2018 CHEVROLET CRUZE seats
[x] Cancel search: seatsPage 43 of 404

Chevrolet Cruze Owner Manual (GMNA-Localizing-U.S./Canada/Mexico-
11348462) - 2018 - crc - 5/15/17
42 Keys, Doors, and Windows
1. Press the button on the side ofthe transmitter near the bottom
and pull the key out.
2. Separate the two halves of thetransmitter using a flat tool
inserted into the area near the
key slot.
3. Remove the battery by pushing
on the battery and sliding it
toward the bottom of the
transmitter.
4. Insert the new battery, positive side facing the back cover.
Push the battery down until it is
held in place. Replace with a
CR2032 or equivalent battery.
5. Snap the battery cover back on to the transmitter.
Remote Vehicle Start
If equipped, this feature allows the
engine to be started from outside
the vehicle. See Engine Exhaust
0 217.
/:This button will be on the RKE
transmitter if the vehicle has remote
start.
If equipped with remote start, the
climate control system will come on
when the vehicle is started remotely,
depending on the outside
temperature.
The rear window defogger and
heated seats, if equipped, may also
come on. See “Remote Start
Climate Control Operation” in
Climate Control Systems (With
Heater Only) 0188 orClimate
Control Systems (With Air
Conditioning) 0186 and Heated
Front Seats 064.
Laws in some local communities
may restrict the use of remote
starters. For example, some laws
require a person using remote start
Page 61 of 404
Chevrolet Cruze Owner Manual (GMNA-Localizing-U.S./Canada/Mexico-
11348462) - 2018 - crc - 5/15/17
60 Seats and Restraints
Seats and
Restraints
Head Restraints
Head Restraints . . . . . . . . . . . . . . . 61
Front Seats
Seat Adjustment . . . . . . . . . . . . . . . 62
Power Seat Adjustment . . . . . . . . 63
Reclining Seatbacks . . . . . . . . . . . 63
Heated Front Seats . . . . . . . . . . . . 64
Rear Seats
Rear Seats . . . . . . . . . . . . . . . . . . . . 66
Heated Rear Seats . . . . . . . . . . . . 68
Seat Belts
Seat Belts . . . . . . . . . . . . . . . . . . . . . 69
How to Wear Seat BeltsProperly . . . . . . . . . . . . . . . . . . . . . . 70
Lap-Shoulder Belt . . . . . . . . . . . . . 71
Seat Belt Use During Pregnancy . . . . . . . . . . . . . . . . . . . . 73
Seat Belt Extender . . . . . . . . . . . . . 74
Safety System Check . . . . . . . . . . 74
Seat Belt Care . . . . . . . . . . . . . . . . . 74
Replacing Seat Belt System Parts after a Crash . . . . . . . . . . . 75
Airbag System
Airbag System . . . . . . . . . . . . . . . . . 75
Where Are the Airbags? . . . . . . . 77
When Should an AirbagInflate? . . . . . . . . . . . . . . . . . . . . . . . 78
What Makes an Airbag
Inflate? . . . . . . . . . . . . . . . . . . . . . . . 79
How Does an Airbag Restrain? . . . . . . . . . . . . . . . . . . . . . 80
What Will You See after an Airbag Inflates? . . . . . . . . . . . . . . 80
Passenger Sensing System . . . 81
Servicing the Airbag-Equipped Vehicle . . . . . . . . . . . . . . . . . . . . . . . 85
Adding Equipment to the Airbag-Equipped Vehicle . . . . . 86
Airbag System Check . . . . . . . . . . 86
Replacing Airbag System Parts after a Crash . . . . . . . . . . . . . . . . . 87
Child Restraints
Older Children . . . . . . . . . . . . . . . . . 87
Infants and Young Children . . . . 89
Child Restraint Systems . . . . . . . 91
Where to Put the Restraint . . . . . 93
Lower Anchors and Tethers forChildren (LATCH System) . . . . 94
Replacing LATCH System Parts After a Crash . . . . . . . . . 101 Securing Child Restraints (With
the Seat Belt in the
Rear Seat) . . . . . . . . . . . . . . . . . . 101
Securing Child Restraints (With the Seat Belt in the
Front Seat) . . . . . . . . . . . . . . . . . . 103
Page 62 of 404
Chevrolet Cruze Owner Manual (GMNA-Localizing-U.S./Canada/Mexico-
11348462) - 2018 - crc - 5/15/17
Seats and Restraints 61
Head Restraints
The vehicle's front and rear seats
have adjustable head restraints in
the outboard seating positions.
{Warning
With head restraints that are not
installed and adjusted properly,
there is a greater chance that
occupants will suffer a neck/
spinal injury in a crash. Do not
drive until the head restraints for
all occupants are installed and
adjusted properly.
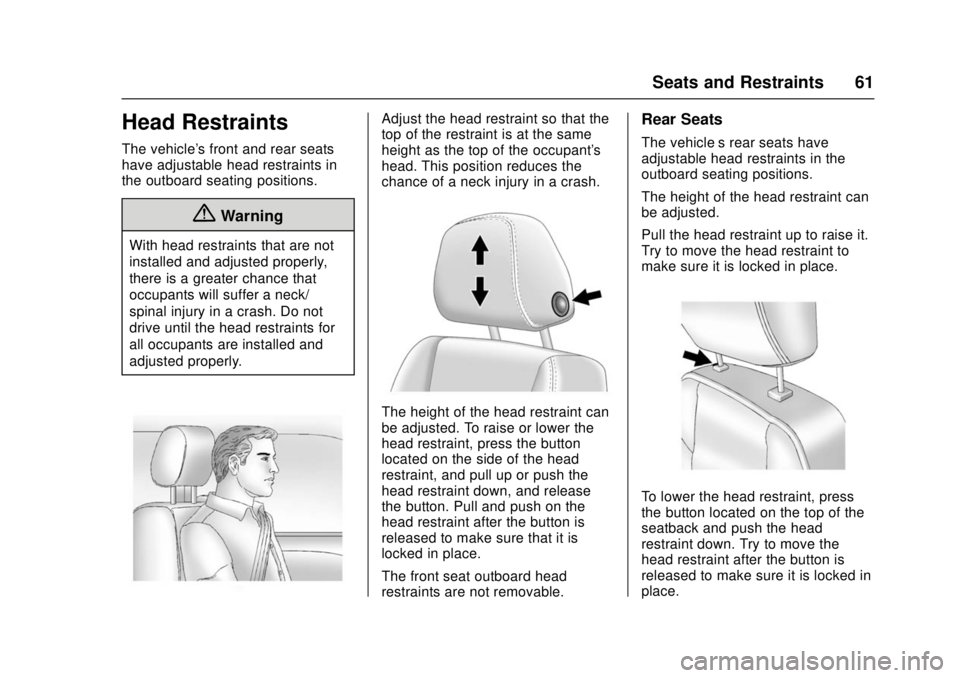
Adjust the head restraint so that the
top of the restraint is at the same
height as the top of the occupant's
head. This position reduces the
chance of a neck injury in a crash.
The height of the head restraint can
be adjusted. To raise or lower the
head restraint, press the button
located on the side of the head
restraint, and pull up or push the
head restraint down, and release
the button. Pull and push on the
head restraint after the button is
released to make sure that it is
locked in place.
The front seat outboard head
restraints are not removable.
Rear Seats
The vehicle’s rear seats have
adjustable head restraints in the
outboard seating positions.
The height of the head restraint can
be adjusted.
Pull the head restraint up to raise it.
Try to move the head restraint to
make sure it is locked in place.
To lower the head restraint, press
the button located on the top of the
seatback and push the head
restraint down. Try to move the
head restraint after the button is
released to make sure it is locked in
place.
Page 63 of 404
Chevrolet Cruze Owner Manual (GMNA-Localizing-U.S./Canada/Mexico-
11348462) - 2018 - crc - 5/15/17
62 Seats and Restraints
The rear outboard head restraints
are designed to be removed. See
“Head Restraint Removal and
Reinstallation”underLower Anchors
and Tethers for Children (LATCH
System) 094.
If you are installing a child restraint
in the rear seat, see “Securing a
Child Restraint Designed for the
LATCH System” underLower
Anchors and Tethers for Children
(LATCH System) 094.Front Seats
Seat Adjustment
{Warning
You can lose control of the
vehicle if you try to adjust a driver
seat while the vehicle is moving.
Adjust the driver seat only when
the vehicle is not moving.
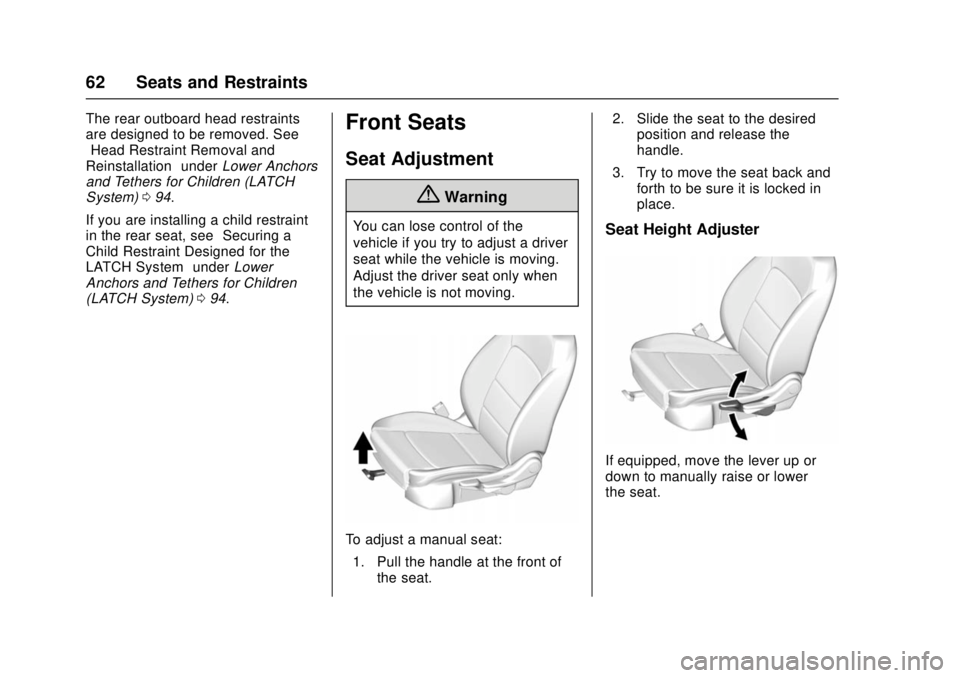
To adjust a manual seat:
1. Pull the handle at the front of the seat. 2. Slide the seat to the desired
position and release the
handle.
3. Try to move the seat back and forth to be sure it is locked in
place.
Seat Height Adjuster
If equipped, move the lever up or
down to manually raise or lower
the seat.
Page 64 of 404
Chevrolet Cruze Owner Manual (GMNA-Localizing-U.S./Canada/Mexico-
11348462) - 2018 - crc - 5/15/17
Seats and Restraints 63
Power Seat Adjustment
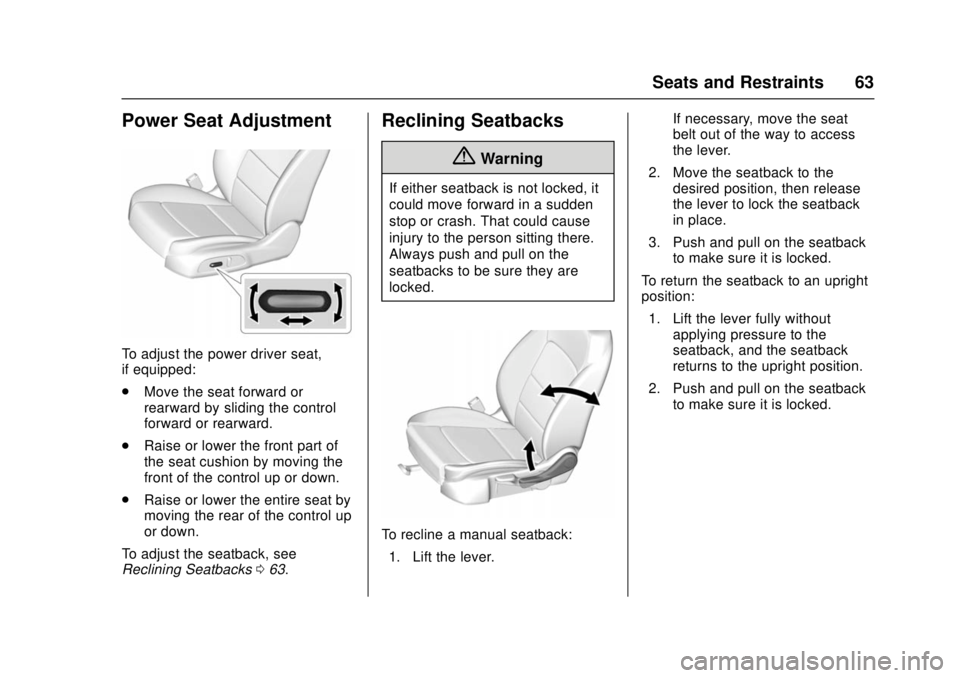
To adjust the power driver seat,
if equipped:
.Move the seat forward or
rearward by sliding the control
forward or rearward.
. Raise or lower the front part of
the seat cushion by moving the
front of the control up or down.
. Raise or lower the entire seat by
moving the rear of the control up
or down.
To adjust the seatback, see
Reclining Seatbacks 063.
Reclining Seatbacks
{Warning
If either seatback is not locked, it
could move forward in a sudden
stop or crash. That could cause
injury to the person sitting there.
Always push and pull on the
seatbacks to be sure they are
locked.
To recline a manual seatback:
1. Lift the lever. If necessary, move the seat
belt out of the way to access
the lever.
2. Move the seatback to the desired position, then release
the lever to lock the seatback
in place.
3. Push and pull on the seatback to make sure it is locked.
To return the seatback to an upright
position: 1. Lift the lever fully without applying pressure to the
seatback, and the seatback
returns to the upright position.
2. Push and pull on the seatback to make sure it is locked.
Page 65 of 404

Chevrolet Cruze Owner Manual (GMNA-Localizing-U.S./Canada/Mexico-
11348462) - 2018 - crc - 5/15/17
64 Seats and Restraints
To recline a power seatback,
if equipped:
.Tilt the top of the control
rearward to recline.
. Tilt the top of the control forward
to raise.
{Warning
Sitting in a reclined position when
the vehicle is in motion can be
dangerous. Even when buckled
up, the seat belts cannot do
their job.
(Continued)
Warning (Continued)
The shoulder belt will not be
against your body. Instead, it will
be in front of you. In a crash, you
could go into it, receiving neck or
other injuries.
The lap belt could go up over
your abdomen. The belt forces
would be there, not at your pelvic
bones. This could cause serious
internal injuries.
For proper protection when the
vehicle is in motion, have the
seatback upright. Then sit well
back in the seat and wear the
seat belt properly.
Do not have a seatback reclined if
the vehicle is moving.
Heated Front Seats
{Warning
If temperature change or pain to
the skin cannot be felt, the seat
heater may cause burns. To
reduce the risk of burns, use care
when using the seat heater,
especially for long periods of
time. Do not place anything on
the seat that insulates against
heat, such as a blanket, cushion,
(Continued)
Page 66 of 404
Chevrolet Cruze Owner Manual (GMNA-Localizing-U.S./Canada/Mexico-
11348462) - 2018 - crc - 5/15/17
Seats and Restraints 65
Warning (Continued)
cover, or similar item. This may
cause the seat heater to
overheat. An overheated seat
heater may cause a burn or may
damage the seat.
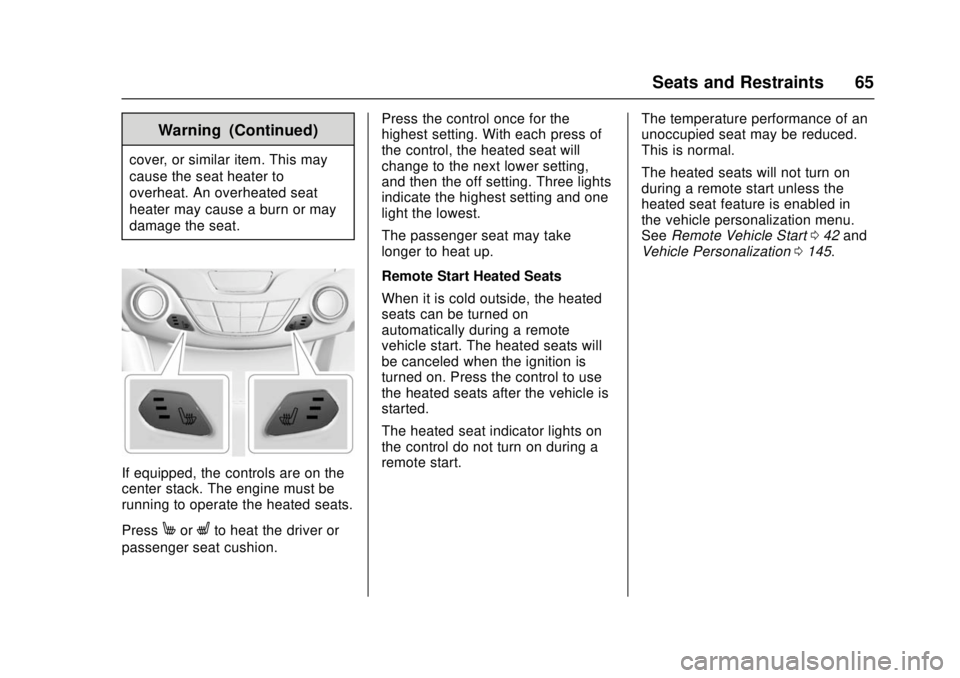
If equipped, the controls are on the
center stack. The engine must be
running to operate the heated seats.
Press
MorLto heat the driver or
passenger seat cushion. Press the control once for the
highest setting. With each press of
the control, the heated seat will
change to the next lower setting,
and then the off setting. Three lights
indicate the highest setting and one
light the lowest.
The passenger seat may take
longer to heat up.
Remote Start Heated Seats
When it is cold outside, the heated
seats can be turned on
automatically during a remote
vehicle start. The heated seats will
be canceled when the ignition is
turned on. Press the control to use
the heated seats after the vehicle is
started.
The heated seat indicator lights on
the control do not turn on during a
remote start.
The temperature performance of an
unoccupied seat may be reduced.
This is normal.
The heated seats will not turn on
during a remote start unless the
heated seat feature is enabled in
the vehicle personalization menu.
See
Remote Vehicle Start 042 and
Vehicle Personalization 0145.
Page 67 of 404
Chevrolet Cruze Owner Manual (GMNA-Localizing-U.S./Canada/Mexico-
11348462) - 2018 - crc - 5/15/17
66 Seats and Restraints
Rear Seats
Rear Seat Reminder
If equipped, the message REAR
SEAT REMINDER LOOK IN REAR
SEAT displays under certain
conditions indicating there may be
an item or passenger in the rear
seat. Check before exiting the
vehicle.
This feature will activate when a
second row door is opened while
the vehicle is on or up to 10 minutes
before the vehicle is turned on.
There will be an alert when the
vehicle is turned off. The alert does
not directly detect objects in the rear
seat; instead, under certain
conditions, it detects when a rear
door is opened and closed,
indicating that there may be
something in the rear seat.
The feature is active only once each
time the vehicle is turned on and off,
and will require reactivation by
opening and closing the second row
doors. There may be an alert even
when there is nothing in the rear
seat; for example, if a child enteredthe vehicle through the rear door
and left the vehicle without the
vehicle being shut off.
The feature can be turned on or off.
See
Vehicle Personalization 0145.
Folding the Seatback
The rear seatbacks can be folded.
To fold the rear seatbacks:
1. Place the front seatbacks in the upright position. See Reclining
Seatbacks 063.
Caution
Folding a rear seat with the seat
belts still fastened may cause
damage to the seat or the seat
belts. Always unbuckle the seat
belts and return them to their
normal stowed position before
folding a rear seat.
2. Unbuckle the rear seat belt and make sure the seat belt is in
the guide on top of the
seatback.
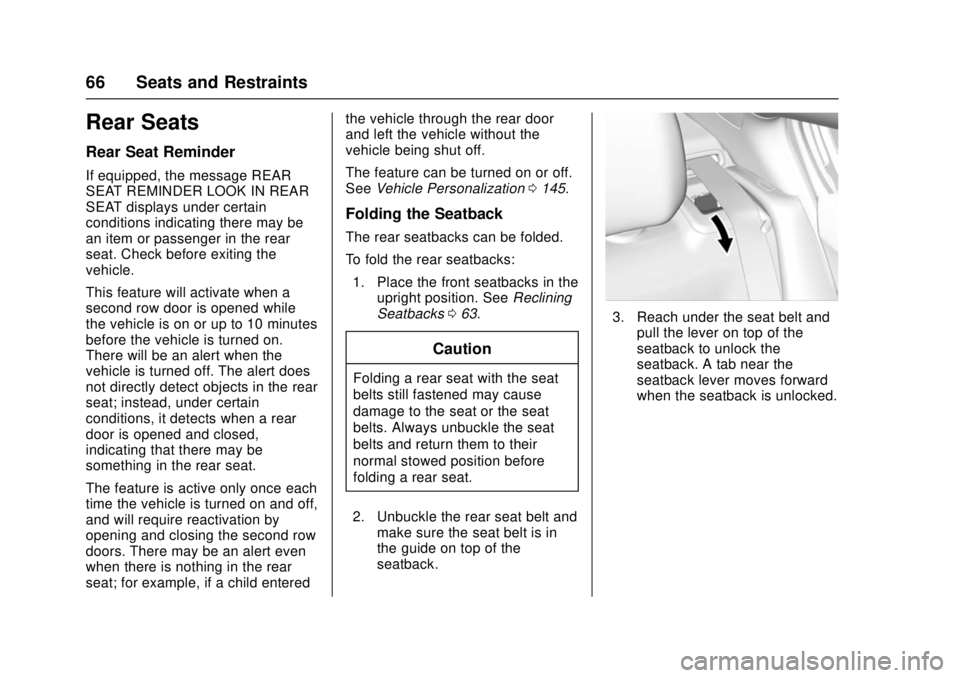
3. Reach under the seat belt andpull the lever on top of the
seatback to unlock the
seatback. A tab near the
seatback lever moves forward
when the seatback is unlocked.