2018 CHEVROLET CRUZE infotainment
[x] Cancel search: infotainmentPage 26 of 404
Chevrolet Cruze Owner Manual (GMNA-Localizing-U.S./Canada/Mexico-
11348462) - 2018 - crc - 5/15/17
In Brief 25
Rear Cross Traffic Alert
(RCTA) System
If equipped, the RCTA system uses
a triangle with an arrow on the
infotainment display to warn of
traffic behind your vehicle that may
cross your vehicle's path while in
R (Reverse). In addition, beeps will
sound.
SeeAssistance Systems for Parking
or Backing 0236.
Parking Assist
If equipped, Rear Parking Assist
(RPA) uses sensors on the rear
bumper to assist with parking and
avoiding objects while in
R (Reverse). It operates at speeds
less than 8 km/h (5 mph). RPA may
show a warning triangle on the
infotainment display and/or a
graphic on the instrument cluster to
provide the object distance. In
addition, multiple beeps may occur
if very close to an object.
See Assistance Systems for Parking
or Backing 0236.
Power Outlets
The 12-volt accessory power outlet
can be used to plug in electrical
equipment, such as a cell phone or
MP3 player.
There is an accessory power outlet
on the center console in front of the
shift lever. This outlet is powered
when the ignition is on or in ACC/
ACCESSORY, or until the driver
door is opened within 10 minutes of
turning off the vehicle. See Retained
Accessory Power (RAP) 0215.
See Power Outlets 0115.
Sunroof
If equipped, the sunroof only
operates with the ignition on or in
ACC/ACCESSORY, or when
Retained Accessory Power (RAP) is
active. See Retained Accessory
Power (RAP) 0215.
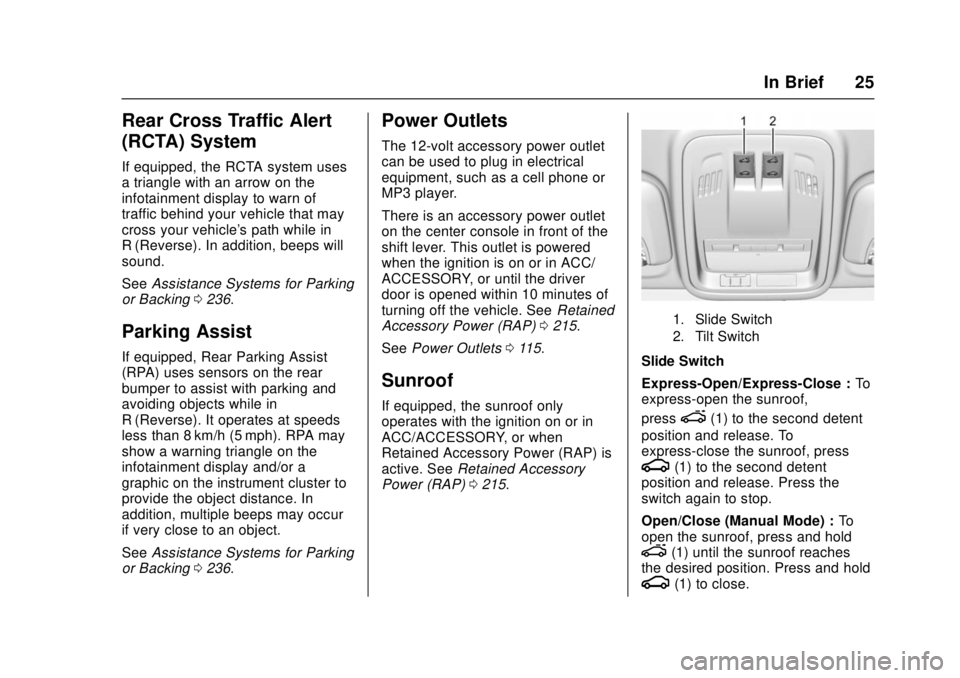
1. Slide Switch
2. Tilt Switch
Slide Switch
Express-Open/Express-Close : To
express-open the sunroof,
press
e(1) to the second detent
position and release. To
express-close the sunroof, press
g(1) to the second detent
position and release. Press the
switch again to stop.
Open/Close (Manual Mode) : To
open the sunroof, press and hold
e(1) until the sunroof reaches
the desired position. Press and hold
g(1) to close.
Page 111 of 404
Chevrolet Cruze Owner Manual (GMNA-Localizing-U.S./Canada/Mexico-
11348462) - 2018 - crc - 5/15/17
110 Instruments and Controls
Controls
Steering Wheel
Adjustment
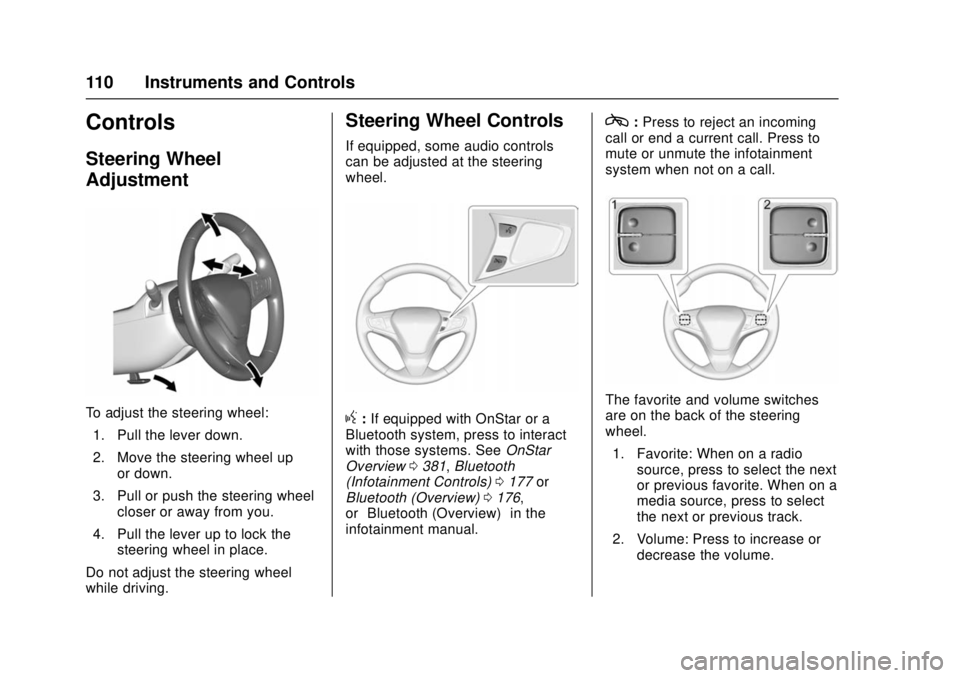
To adjust the steering wheel:1. Pull the lever down.
2. Move the steering wheel up or down.
3. Pull or push the steering wheel closer or away from you.
4. Pull the lever up to lock the steering wheel in place.
Do not adjust the steering wheel
while driving.
Steering Wheel Controls
If equipped, some audio controls
can be adjusted at the steering
wheel.
g: If equipped with OnStar or a
Bluetooth system, press to interact
with those systems. See OnStar
Overview 0381, Bluetooth
(Infotainment Controls) 0177 or
Bluetooth (Overview) 0176,
or “Bluetooth (Overview)” in the
infotainment manual.
c: Press to reject an incoming
call or end a current call. Press to
mute or unmute the infotainment
system when not on a call.
The favorite and volume switches
are on the back of the steering
wheel.
1. Favorite: When on a radio source, press to select the next
or previous favorite. When on a
media source, press to select
the next or previous track.
2. Volume: Press to increase or decrease the volume.
Page 114 of 404

Chevrolet Cruze Owner Manual (GMNA-Localizing-U.S./Canada/Mexico-
11348462) - 2018 - crc - 5/15/17
Instruments and Controls 113
The wiper operations return to
normal when the transmission is no
longer in N (Neutral) or the vehicle
speed has increased.
Reverse Gear Wipes
If the rear wiper control is off, the
rear wiper will automatically operate
continuously when the shift lever is
in R (Reverse), and the front
windshield wiper is performing low
or high speed wipes. If the rear
wiper control is off, the shift lever is
in R (Reverse), and the front
windshield wiper is performing
interval wipes, then the rear wiper
automatically performs interval
wipes.
This feature can be turned on or off.
SeeVehicle Personalization 0145.
The windshield washer reservoir is
used for the windshield and rear
window. Check the fluid level if
either washer is not working. See
Washer Fluid 0276.Compass
The vehicle may have a compass
display in the Driver Information
Center (DIC). The compass receives
its heading and other information
from the Global Positioning
System (GPS) antenna, StabiliTrak,
and vehicle speed information.
Avoid covering the GPS antenna,
located on the roof, for long periods
of time with objects that may
interfere with the antenna's ability to
receive a satellite signal. The
compass system is designed to
operate for a certain number of
miles or degrees of turn before
needing a signal from the GPS
satellites. When the compass
display shows CAL, drive the
vehicle for a short distance in an
open area where it can receive a
GPS signal. The compass system
will automatically determine when
the GPS signal is restored and
provide a heading again.
Clock
Base Radio
The infotainment system controls
are used to access the time and
date settings through the menu
system. See Operation0164 on
how to use the menu system.
Setting the Time and Date
When Auto Set is enabled the time
cannot be manually set.
1. Press
{, then touch
SETTINGS.
2. Touch Time and Date, then Set Time or Set Date.
3. Touch + or −to adjust the
value.
4. Touch
RorQto adjust AM or
PM for 12 hour format.
5. Touch
0.
Using Auto Set
1. Press{, then touch
SETTINGS.
Page 115 of 404

Chevrolet Cruze Owner Manual (GMNA-Localizing-U.S./Canada/Mexico-
11348462) - 2018 - crc - 5/15/17
114 Instruments and Controls
2. Touch Time and Date, thenAuto Set.
3. Select from the available selections.
4. Touch
0.
Setting the 12/24 Hour Format
1. Press{, then touch
SETTINGS.
2. Touch Time and Date, then select 12h or 24h format.
3. Touch
0.
Setting the Month and Day
Format
1. Press{, then touch
SETTINGS.
2. Touch Time and Date, then Set Date Format.
3. Select DD/MM/YYYY (day/ month/year), MM/DD/YYYY
(month/day/year), or YYYY/
MM/DD (year/month/day)
format.
4. Touch
0.
Uplevel Radio Using Center
Stack Controls
The infotainment system controls
are used to access the time and
date settings through the menu
system. See “Using the System”
under “Introduction” in the
infotainment manual.
To set the time or date:
1. Press
{, then select
SETTINGS.
2. Select Time and Date, then the desired function.
3. Turn the MENU knob to increase or decrease the value.
4. Press the MENU knob to go to the next value. After the last
value is selected, the system
will update and return to the
Settings menu. Press
oBACK
to go to the last menu and
save the changes.
Auto Set requires an OnStar
service plan. If auto timing is set, the time
displayed on the clock may not
update immediately when driving
into a new time zone.
To set the clock display:
1. Select SETTINGS from the Home Page, then select Time
and Date.
2. Select Clock Display.
3. Turn the MENU knob to Off or On.
4. Press the MENU knob to select.
Press
oBACK to go to the last
menu and save the changes.
Uplevel Radio Using
Infotainment Display Controls
To set the time:
1. Touch SETTINGS from the Home Page, then touch Time
and Date.
Page 119 of 404
Chevrolet Cruze Owner Manual (GMNA-Localizing-U.S./Canada/Mexico-
11348462) - 2018 - crc - 5/15/17
118 Instruments and Controls
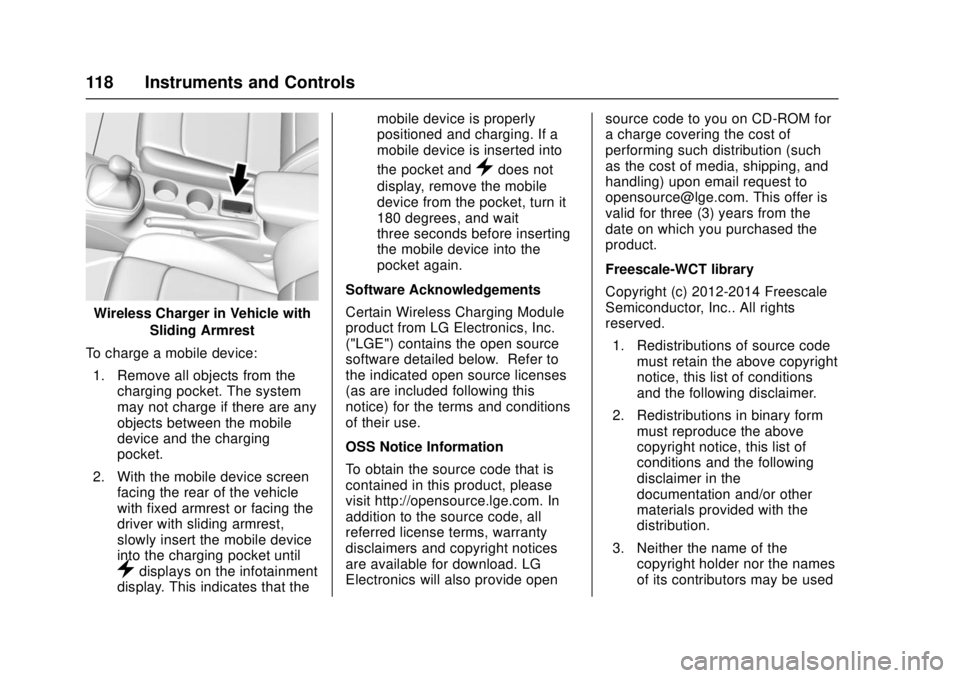
Wireless Charger in Vehicle withSliding Armrest
To charge a mobile device: 1. Remove all objects from the charging pocket. The system
may not charge if there are any
objects between the mobile
device and the charging
pocket.
2. With the mobile device screen facing the rear of the vehicle
with fixed armrest or facing the
driver with sliding armrest,
slowly insert the mobile device
into the charging pocket until
}displays on the infotainment
display. This indicates that the mobile device is properly
positioned and charging. If a
mobile device is inserted into
the pocket and
}does not
display, remove the mobile
device from the pocket, turn it
180 degrees, and wait
three seconds before inserting
the mobile device into the
pocket again.
Software Acknowledgements
Certain Wireless Charging Module
product from LG Electronics, Inc.
("LGE") contains the open source
software detailed below. Refer to
the indicated open source licenses
(as are included following this
notice) for the terms and conditions
of their use.
OSS Notice Information
To obtain the source code that is
contained in this product, please
visit http://opensource.lge.com. In
addition to the source code, all
referred license terms, warranty
disclaimers and copyright notices
are available for download. LG
Electronics will also provide open source code to you on CD-ROM for
a charge covering the cost of
performing such distribution (such
as the cost of media, shipping, and
handling) upon email request to
[email protected]. This offer is
valid for three (3) years from the
date on which you purchased the
product.
Freescale-WCT library
Copyright (c) 2012-2014 Freescale
Semiconductor, Inc.. All rights
reserved.
1. Redistributions of source code must retain the above copyright
notice, this list of conditions
and the following disclaimer.
2. Redistributions in binary form must reproduce the above
copyright notice, this list of
conditions and the following
disclaimer in the
documentation and/or other
materials provided with the
distribution.
3. Neither the name of the copyright holder nor the names
of its contributors may be used
Page 146 of 404

Chevrolet Cruze Owner Manual (GMNA-Localizing-U.S./Canada/Mexico-
11348462) - 2018 - crc - 5/15/17
Instruments and Controls 145
Vehicle
Personalization
Use the audio system controls to
access the personalization menus
for customizing vehicle features.
The following are all possible
personalization features. Depending
on the vehicle, some may not be
available.
Base Radio Audio System
Controls
{:Press to access the Home
Page Menu.
QorR: Touch to scroll through the
menus or setup items.
0: Touch to exit or return to the
previous screen or menu.
Uplevel Radio Audio System
Controls
1. Touch the desired feature to display a list of available
options.
2. Touch to select the desired feature setting. 3. Press BACK on the center
stack or touch
hto return to the
previous menu or exit.
Turn the ignition on to access the
Settings menu, then select
SETTINGS from the Home Page on
the infotainment display.
Personalization Menus
The following list of menu items may
be available:
. Time and Date
. Rear Seat Reminder
. Language
. Teen Driver
. Valet Mode
. Radio
. Vehicle
. Bluetooth
. Apple CarPlay
. Android Auto
. USB Auto Launch
. Voice
. Display .
Rear Camera
. Return to Factory Settings
. Software Information
. Wi-Fi
Detailed information for each menu
follows.
Time and Date
Manually set the time and date. See
Clock 0113.
Rear Seat Reminder
This allows for a chime and a
message when the rear door has
been opened before or during
operation of the vehicle.
Select Off or On.
Language
Select Language, then select from
the available language(s).
The selected language will display
on the system, and voice
recognition will reflect the selected
language.
Page 147 of 404

Chevrolet Cruze Owner Manual (GMNA-Localizing-U.S./Canada/Mexico-
11348462) - 2018 - crc - 5/15/17
146 Instruments and Controls
Teen Driver
See“Teen Driver” under“Settings”
in the infotainment manual.
Valet Mode
This will lock the infotainment
system and steering wheel controls.
It may also limit access to vehicle
storage locations, if equipped.
To enable valet mode:
1. Enter a four-digit code on the keypad.
2. Select Enter to go to the confirmation screen.
3. Re-enter the four-digit code.
Touch Lock or Unlock to lock or
unlock the system. Touch Back to
go back to the previous menu.
Radio
Select and the following may
display:
. Manage Favorites
. Number of Favorites Shown
. Audible Touch Feedback
. Text Scroll .
Tone Settings
. Auto Volume
. Maximum Startup Volume
. Audio Cue Volume
Manage Favorites
This allows favorites to be edited.
See “Storing a Station as a
Favorite” inAM-FM Radio 0166 or
“Manage Favorites” in“Settings”
under “Radio” in the infotainment
manual.
Number of Favorites Shown
Select to set the number of favorites
to display.
Select the desired number or select
Auto and the infotainment system
will automatically adjust the number
of favorites shown.
Audible Touch Feedback
This allows Audible Touch
Feedback to be turned on or off.
Select Off or On. Text Scroll
Select to see text scroll on the
screen.
Select Off or On.
Tone Settings
Select to adjust the radio tone. See
Operation
0164 or“Tone Settings”
under “AM-FM Radio” in the
infotainment manual.
Auto Volume
This feature adjusts the volume
based on vehicle speed and
ambient noise.
Select Off, Low, Medium-Low,
Medium, Medium-High, or High.
Maximum Startup Volume
This feature sets the maximum
startup volume. If the vehicle is
started and the volume is greater
than this level, the volume is
adjusted to this level. To set the
maximum startup volume, turn the
MENU knob or touch + or −to
increase or decrease.
Page 151 of 404
Chevrolet Cruze Owner Manual (GMNA-Localizing-U.S./Canada/Mexico-
11348462) - 2018 - crc - 5/15/17
150 Instruments and Controls
Pair New Device
Select to pair a new device. See
“Pairing”underBluetooth
(Infotainment Controls) 0177 or
Bluetooth (Overview) 0176 or
“Pairing” in“Infotainment Controls”
under “Bluetooth” in the infotainment
manual.
Discoverable
This allows the system to find a
device.
Select Off or On.
Device Information
See information about the device
name, address, and PIN code.
Device Management
Select to connect to a different
phone source, disconnect a phone,
or delete a phone.
Change Pairing PIN
Select to change the PIN of a
device. Ringtones
Select to change the ring tone for
the specific phone. The phone does
not need to be connected to change
the ring tones.
Sort Order
Select to change the order of the
contacts list.
Select First/Last or Last/First.
Voice Mail Numbers
This feature displays the voice mail
number for all connected phones.
To change the voice mail number,
select EDIT. Type a new number,
then select SAVE.
Text Message Alerts
This allows the feature to be turned
on or off.
Select Off or On.
Apple CarPlay
Select and the following may
display:
.
Apple CarPlay
. Manage Apple CarPlay Devices Apple CarPlay
This feature allows Apple devices to
be connected to the infotainment
system through a USB port.
Select Off or On.
Manage Apple CarPlay Devices
Select to manage Apple devices.
Apple CarPlay must be on for this
feature to be accessed.
Android Auto
Select and the following may
display:
.
Android Auto
. Manage Android Auto Devices
Android Auto
This feature allows Android devices
to be connected to the infotainment
system through a USB port.
Select Off or On.
Manage Android Auto Devices
Select to manage Android devices.
Android Auto must be on for this
feature to be accessed.