2018 CHEVROLET CRUZE bulb
[x] Cancel search: bulbPage 145 of 404
Chevrolet Cruze Owner Manual (GMNA-Localizing-U.S./Canada/Mexico-
11348462) - 2018 - crc - 5/15/17
144 Instruments and Controls
Vehicle Messages
Messages displayed on the DIC
indicate the status of the vehicle or
some action that may be needed to
correct a condition. Multiple
messages may appear one after
another.
The messages that do not require
immediate action can be
acknowledged and cleared by
pressing
V. The messages that
require immediate action cannot be
cleared until that action is
performed.
All messages should be taken
seriously; clearing the message
does not correct the problem.
If a SERVICE message appears,
see your dealer.
Follow the instructions given in the
messages. The system displays
messages regarding the following
topics:
. Service Messages
. Fluid Levels
. Vehicle Security .
Brakes
. Ride Control Systems
. Driver Assistance Systems
. Cruise Control
. Lighting and Bulb Replacement
. Wiper/Washer Systems
. Doors and Windows
. Seat Belts
. Airbag Systems
. Engine and Transmission
. Tire Pressure
. Battery
Engine Power Messages
ENGINE POWER IS REDUCED
This message displays when the
vehicle's propulsion power is
reduced. Reduced propulsion power
can affect the vehicle's ability to
accelerate. If this message is on,
but there is no observed reduction
in performance, proceed to your
destination. The performance may
be reduced the next time the vehicle
is driven. The vehicle may be driven while this message is on, but
maximum acceleration and speed
may be reduced. Anytime this
message stays on, or displays
repeatedly, the vehicle should be
taken to your dealer for service as
soon as possible.
Vehicle Speed Messages
SPEED LIMITED TO XXX
KM/H (MPH)
This message shows that the
vehicle speed has been limited to
the speed displayed. The limited
speed is a protection for various
propulsion and vehicle systems,
such as lubrication, thermal,
suspension, Teen Driver if
equipped, or tires.
Page 158 of 404
Chevrolet Cruze Owner Manual (GMNA-Localizing-U.S./Canada/Mexico-
11348462) - 2018 - crc - 5/15/17
Lighting 157
Turn and Lane-Change
Signals
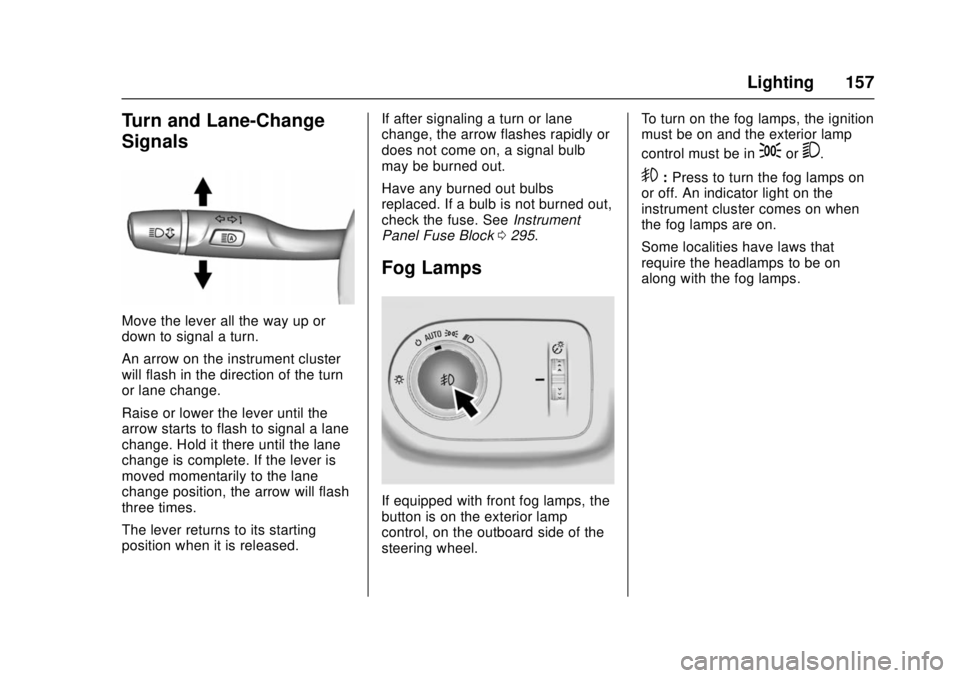
Move the lever all the way up or
down to signal a turn.
An arrow on the instrument cluster
will flash in the direction of the turn
or lane change.
Raise or lower the lever until the
arrow starts to flash to signal a lane
change. Hold it there until the lane
change is complete. If the lever is
moved momentarily to the lane
change position, the arrow will flash
three times.
The lever returns to its starting
position when it is released.If after signaling a turn or lane
change, the arrow flashes rapidly or
does not come on, a signal bulb
may be burned out.
Have any burned out bulbs
replaced. If a bulb is not burned out,
check the fuse. See
Instrument
Panel Fuse Block 0295.
Fog Lamps
If equipped with front fog lamps, the
button is on the exterior lamp
control, on the outboard side of the
steering wheel. To turn on the fog lamps, the ignition
must be on and the exterior lamp
control must be in
;or5.
9:
Press to turn the fog lamps on
or off. An indicator light on the
instrument cluster comes on when
the fog lamps are on.
Some localities have laws that
require the headlamps to be on
along with the fog lamps.
Page 259 of 404
Chevrolet Cruze Owner Manual (GMNA-Localizing-U.S./Canada/Mexico-
11348462) - 2018 - crc - 5/15/17
258 Vehicle Care
Vehicle Care
General Information
General Information . . . . . . . . . . 259
California Proposition65 Warning . . . . . . . . . . . . . . . . . 259
California Perchlorate Materials Requirements . . . . . 260
Accessories and Modifications . . . . . . . . . . . . . . . . 260
Vehicle Checks
Doing Your OwnService Work . . . . . . . . . . . . . . . 260
Hood . . . . . . . . . . . . . . . . . . . . . . . . . 261
Engine Compartment Overview . . . . . . . . . . . . . . . . . . . . 262
Engine Oil . . . . . . . . . . . . . . . . . . . . 265
Engine Oil Life System . . . . . . . 268
Automatic Transmission Fluid . . . . . . . . . . . . . . . . . . . . . . . . 269
Manual Transmission Fluid . . . 270
Hydraulic Clutch . . . . . . . . . . . . . . 270
Engine Air Cleaner/Filter . . . . . . 270
Cooling System . . . . . . . . . . . . . . 272
Engine Overheating . . . . . . . . . . 275
Washer Fluid . . . . . . . . . . . . . . . . . 276
Brakes . . . . . . . . . . . . . . . . . . . . . . . 277
Brake Fluid . . . . . . . . . . . . . . . . . . . 278
Battery - North America . . . . . . 279 Fuel Filter . . . . . . . . . . . . . . . . . . . . 280
Starter Switch Check . . . . . . . . . 280
Automatic Transmission Shift
Lock Control Function
Check . . . . . . . . . . . . . . . . . . . . . . . 281
Ignition Transmission Lock Check . . . . . . . . . . . . . . . . . . . . . . . 281
Park Brake and P (Park) Mechanism Check . . . . . . . . . . 281
Wiper Blade Replacement . . . . 282
Gas Strut(s) . . . . . . . . . . . . . . . . . . 283
Headlamp Aiming
Headlamp Aiming . . . . . . . . . . . . 284
Bulb Replacement
Bulb Replacement . . . . . . . . . . . . 284
Halogen Bulbs . . . . . . . . . . . . . . . . 284
High Intensity Discharge (HID) Lighting . . . . . . . . . . . . . . . . . . . . . 285
Headlamps and Front Turn Signal . . . . . . . . . . . . . . . . . . . . . . . 285
Taillamps and Back-Up Lamps . . . . . . . . . . . . . . . . . . . . . . 286
License Plate Lamp (Liftgate Models) . . . . . . . . . . . . . . . . . . . . . 289
Electrical System
Electrical System Overload . . . 290
Fuses and Circuit Breakers . . . 290
Engine Compartment FuseBlock . . . . . . . . . . . . . . . . . . . . . . . . 291 Instrument Panel Fuse
Block . . . . . . . . . . . . . . . . . . . . . . . . 295
Wheels and Tires
Tires . . . . . . . . . . . . . . . . . . . . . . . . . . 298
All-Season Tires . . . . . . . . . . . . . . 298
Winter Tires . . . . . . . . . . . . . . . . . . 299
Low-Profile Tires . . . . . . . . . . . . . 299
Tire Sidewall Labeling . . . . . . . . 300
Tire Designations . . . . . . . . . . . . . 302
Tire Terminology andDefinitions . . . . . . . . . . . . . . . . . . 302
Tire Pressure . . . . . . . . . . . . . . . . . 305
Tire Pressure for High-Speed Operation . . . . . . . . . . . . . . . . . . . 306
Tire Pressure Monitor System . . . . . . . . . . . . . . . . . . . . . . 307
Tire Pressure Monitor Operation . . . . . . . . . . . . . . . . . . . 308
Tire Inspection . . . . . . . . . . . . . . . . 311
Tire Rotation . . . . . . . . . . . . . . . . . . 311
When It Is Time for New Tires . . . . . . . . . . . . . . . . . . . . . . . . 312
Buying New Tires . . . . . . . . . . . . . 313
Different Size Tires and Wheels . . . . . . . . . . . . . . . . . . . . . . 314
Uniform Tire Quality Grading . . . . . . . . . . . . . . . . . . . . . 315
Wheel Alignment and Tire Balance . . . . . . . . . . . . . . . . . . . . . 316
Wheel Replacement . . . . . . . . . . 316
Page 285 of 404
Chevrolet Cruze Owner Manual (GMNA-Localizing-U.S./Canada/Mexico-
11348462) - 2018 - crc - 5/15/17
284 Vehicle Care
Liftgate
Headlamp Aiming
Headlamp aim has been preset and
should need no further adjustment.
If the vehicle is damaged in a crash,
the headlamp aim may be affected.
If adjustment to the headlamps is
necessary, see your dealer.
Bulb Replacement
For the proper type of replacement
bulbs, or any bulb changing
procedure not listed in this section,
contact your dealer.
Halogen Bulbs
{Warning
Halogen bulbs have pressurized
gas inside and can burst if you
drop or scratch the bulb. You or
others could be injured. Be sure
to read and follow the instructions
on the bulb package.
Page 286 of 404
Chevrolet Cruze Owner Manual (GMNA-Localizing-U.S./Canada/Mexico-
11348462) - 2018 - crc - 5/15/17
Vehicle Care 285
High Intensity Discharge
(HID) Lighting
{Warning
The High Intensity Discharge
(HID) lighting system operates at
a very high voltage. If you try to
service any of the system
components, you could be
seriously injured. Have your
dealer or a qualified technician
service them.
After an HID headlamp bulb has
been replaced, the beam might be a
slightly different shade than it was
originally. This is normal.
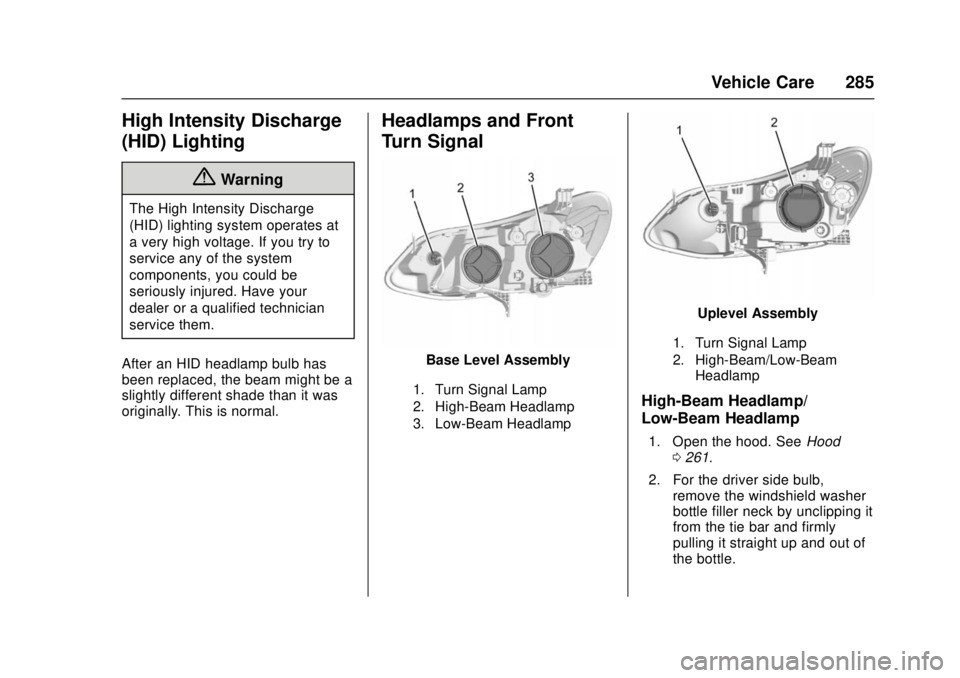
Headlamps and Front
Turn Signal
Base Level Assembly
1. Turn Signal Lamp
2. High-Beam Headlamp
3. Low-Beam Headlamp
Uplevel Assembly
1. Turn Signal Lamp
2. High-Beam/Low-Beam Headlamp
High-Beam Headlamp/
Low-Beam Headlamp
1. Open the hood. See Hood
0 261.
2. For the driver side bulb, remove the windshield washer
bottle filler neck by unclipping it
from the tie bar and firmly
pulling it straight up and out of
the bottle.
Page 287 of 404
Chevrolet Cruze Owner Manual (GMNA-Localizing-U.S./Canada/Mexico-
11348462) - 2018 - crc - 5/15/17
286 Vehicle Care
3. For the passenger side,disengage the air cleaner, and
push it aside to allow easier
access to the bulb cover.
4. Remove the bulb cover by turning counterclockwise.
5. Remove the bulb socket from the headlamp assembly by
turning counterclockwise.
6. Remove the bulb socket from the plug connector.
7. Attach the new bulb socket to the plug connector.
8. Install the bulb socket from the headlamp assembly by turning
clockwise.
9. Install the bulb cover by turning clockwise.
10. For the driver side, reinstall the windshield washer bottle filler
neck by firmly pushing it
straight into the bottle and
reattaching it to the tie bar.
11. For the passenger side, reattach the air cleaner.Turn Signal Lamp
1. Open the hood. See Hood
0 261.
2. For the driver side bulb, remove the windshield washer
bottle filler neck by unclipping it
from the tie bar and firmly
pulling it straight up and out of
the bottle.
3. Remove the bulb socket by turning counterclockwise.
4. Remove the bulb from the socket by pulling it straight out.
5. Install the new bulb by pushing it into the bulb socket.
6. Install the bulb socket to the headlamp assembly by turning
clockwise.
7. For the driver side, reinstall the windshield washer bottle filler
neck by firmly pushing it
straight into the bottle and
reattaching it to the tie bar.
Taillamps and Back-Up
Lamps
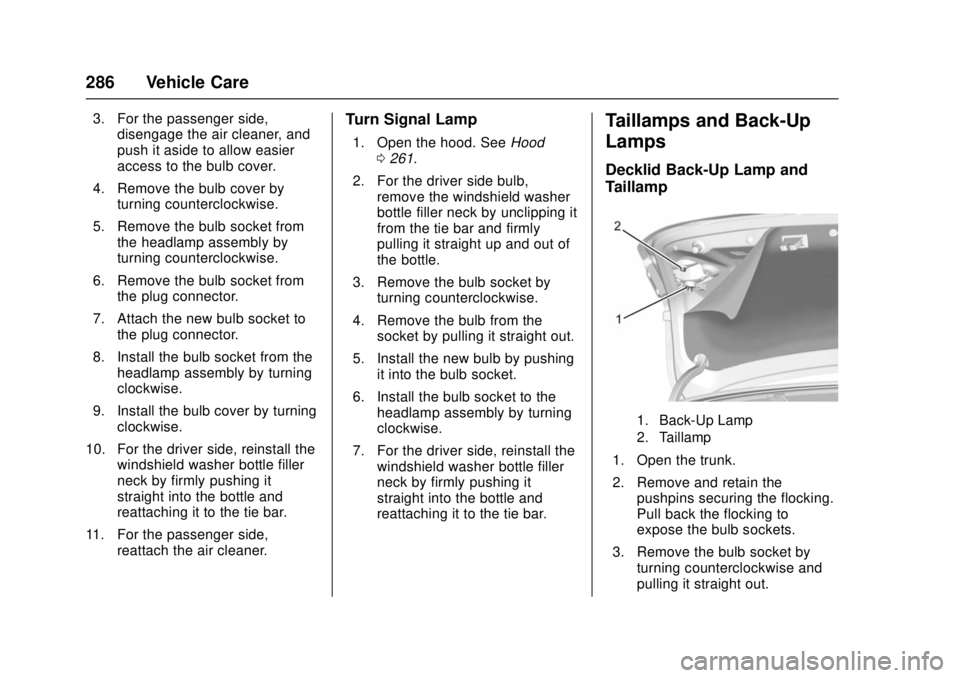
Decklid Back-Up Lamp and
Taillamp
1. Back-Up Lamp
2. Taillamp
1. Open the trunk.
2. Remove and retain thepushpins securing the flocking.
Pull back the flocking to
expose the bulb sockets.
3. Remove the bulb socket by turning counterclockwise and
pulling it straight out.
Page 288 of 404
Chevrolet Cruze Owner Manual (GMNA-Localizing-U.S./Canada/Mexico-
11348462) - 2018 - crc - 5/15/17
Vehicle Care 287
4. Remove the bulb from thesocket by pulling it straight out.
5. Install the new bulb in the bulb socket.
6. Install the bulb socket by turning clockwise.
7. Push the flocking back into place and secure with the
retained pushpins.
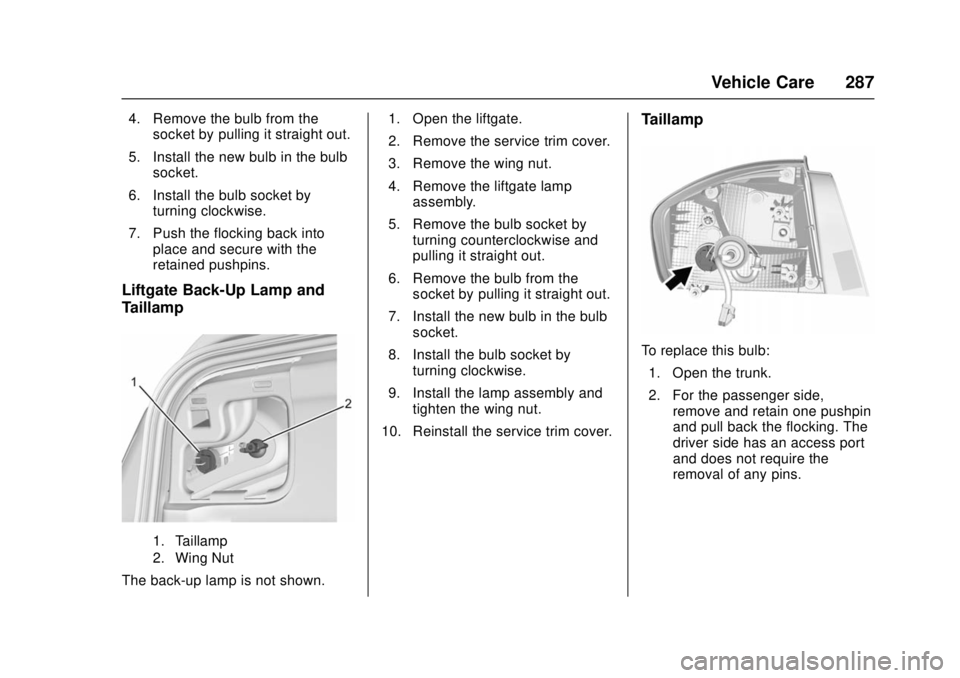
Liftgate Back-Up Lamp and
Taillamp
1. Taillamp
2. Wing Nut
The back-up lamp is not shown. 1. Open the liftgate.
2. Remove the service trim cover.
3. Remove the wing nut.
4. Remove the liftgate lamp
assembly.
5. Remove the bulb socket by turning counterclockwise and
pulling it straight out.
6. Remove the bulb from the socket by pulling it straight out.
7. Install the new bulb in the bulb socket.
8. Install the bulb socket by turning clockwise.
9. Install the lamp assembly and tighten the wing nut.
10. Reinstall the service trim cover.
Taillamp
To replace this bulb: 1. Open the trunk.
2. For the passenger side, remove and retain one pushpin
and pull back the flocking. The
driver side has an access port
and does not require the
removal of any pins.
Page 289 of 404
Chevrolet Cruze Owner Manual (GMNA-Localizing-U.S./Canada/Mexico-
11348462) - 2018 - crc - 5/15/17
288 Vehicle Care
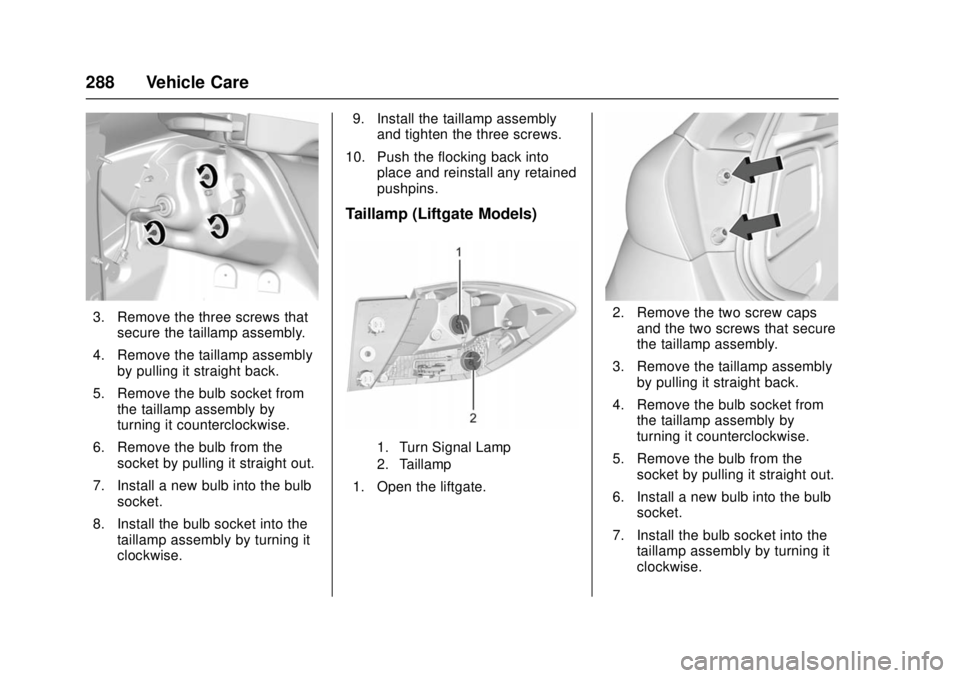
3. Remove the three screws thatsecure the taillamp assembly.
4. Remove the taillamp assembly by pulling it straight back.
5. Remove the bulb socket from the taillamp assembly by
turning it counterclockwise.
6. Remove the bulb from the socket by pulling it straight out.
7. Install a new bulb into the bulb socket.
8. Install the bulb socket into the taillamp assembly by turning it
clockwise. 9. Install the taillamp assembly
and tighten the three screws.
10. Push the flocking back into place and reinstall any retained
pushpins.
Taillamp (Liftgate Models)
1. Turn Signal Lamp
2. Taillamp
1. Open the liftgate.
2. Remove the two screw capsand the two screws that secure
the taillamp assembly.
3. Remove the taillamp assembly by pulling it straight back.
4. Remove the bulb socket from the taillamp assembly by
turning it counterclockwise.
5. Remove the bulb from the socket by pulling it straight out.
6. Install a new bulb into the bulb socket.
7. Install the bulb socket into the taillamp assembly by turning it
clockwise.