Page 5 of 16

5
AUXILIARY RELEASES
OUTSIDE THE VEHICLE
1. Insert the master key from the trans-mitter into the lock cylinder above the license plate and turn it to open the hatch/trunk.
2. Pull the Door Release handle on the driver’s side of the hatch/trunk.
If the vehicle battery is weak or disconnected, the driver’s door can\
be opened manually.
BATTERY CARE TIPS
BATTERY CHARGERF
If the vehicle is not driven weekly or the battery is disconnected or dr\
ained, use the
optional battery maintainer to charge the battery. To operate the batter\
y maintainer, plug it into a standard electrical outlet and into the vehicle’s rear acce\
ssory power outlet.
See Vehicle Care in your Owner’s Manual.
WINDOW INDEXING
To provide a tight seal, window indexing automatically lowers the window\
slightly when the door is opened and then automatically raises the window when the doo\
r is closed.
If battery power is disconnected, reset the indexing feature:
1. Close the doors.
2. Start the vehicle.
3. Hold up the window switch to the fully closed position.
Note: The power windows’ express-up feature and the power convertible topF will not operate until the window indexing feature is reset.
See Keys, Doors and Windows in your Owner’s Manual.
INSIDE THE VEHICLE
Pull the Door Release handle on the floor next to the driver’s or passenger’s seat.
See Keys, Doors and Windows in your Owner’s Manual.
F Optional equipment
Page 7 of 16

7
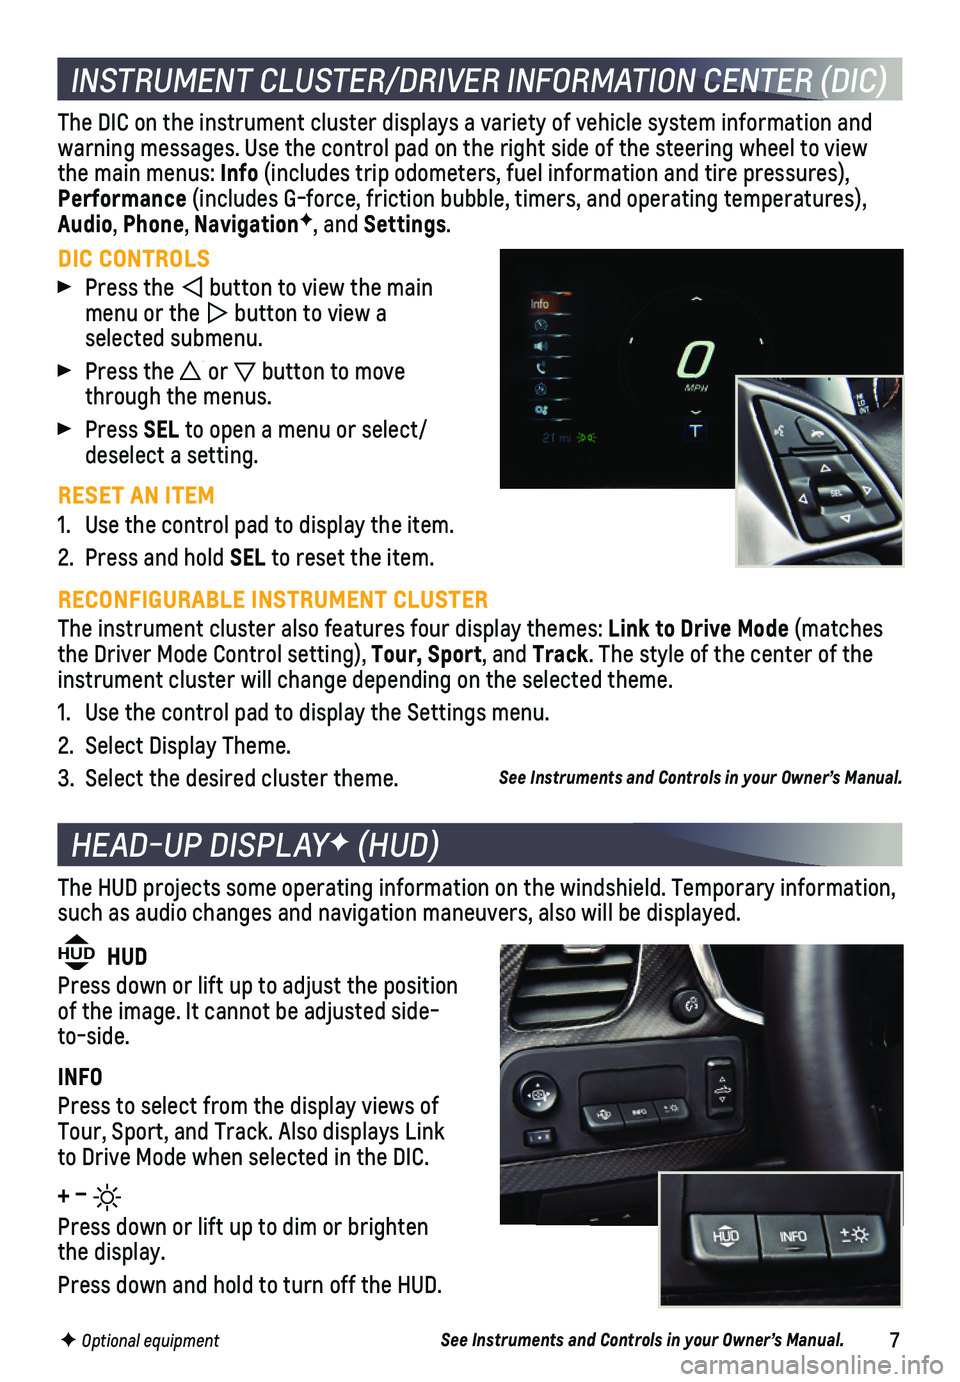
INSTRUMENT CLUSTER/DRIVER INFORMATION CENTER (DIC)
DIC CONTROLS
Press the button to view the main menu or the button to view a selected submenu.
Press the or button to move through the menus.
Press SEL to open a menu or select/deselect a setting.
RESET AN ITEM
1. Use the control pad to display the item.
2. Press and hold SEL to reset the item.
The DIC on the instrument cluster displays a variety of vehicle system information and warning messages. Use the control pad on the right side of the steering \
wheel to view the main menus: Info (includes trip odometers, fuel information and tire pressures), Performance (includes G-force, friction bubble, timers, and operating temperatures\
), Audio, Phone, NavigationF, and Settings.
RECONFIGURABLE INSTRUMENT CLUSTER
The instrument cluster also features four display themes: Link to Drive Mode (matches the Driver Mode Control setting), Tour, Sport, and Track. The style of the center of the instrument cluster will change depending on the selected theme.
1. Use the control pad to display the Settings menu.
2. Select Display Theme.
3. Select the desired cluster theme.
HEAD-UP DISPLAYF (HUD)
HUD HUD
Press down or lift up to adjust the position of the image. It cannot be adjusted side-to-side.
INFO
Press to select from the display views of Tour, Sport, and Track. Also displays Link to Drive Mode when selected in the DIC.
+ –
Press down or lift up to dim or brighten the display.
Press down and hold to turn off the HUD.
The HUD projects some operating information on the windshield. Temporary\
information, such as audio changes and navigation maneuvers, also will be displayed.
See Instruments and Controls in your Owner’s Manual.
See Instruments and Controls in your Owner’s Manual.
F Optional equipment
Page 15 of 16

15
COUPE ROOF PANEL
CONVERTIBLE TOP OPERATIONF
Before operating the convertible top, park the vehicle and check that th\
e trunk partition is in the fastened, upright position, and that the trunk is closed.
OPERATE THE POWER CONVERTIBLE TOP
1. Start the engine, shift to Park or Neutral, and set the parking brake. (If necessary, the top can be operated at vehicle speeds up to 30 mph.)
2. Press and hold the bottom of the Convertible Top button on the left side of the instrument panel to open the top; press and hold the top of the button to close the top.
3. A chime will sound when the top is opened or closed completely.
The top also may be opened using the Remote Keyless Entry transmitter.
Press the Unlock button and then press and hold the Convertible Top button.
Note: After a loss of battery power, reset the window indexing to operate the power top.
See Keys, Doors and Windows in your Owner’s Manual.
The removable roof panel is secured with two front levers and one rear l\
ever. It may be necessary to have two people remove the roof panel. When removed, secure\
the roof panel facing forward in the receivers in the rear storage compartment. D\
uring instal-lation, the rear edge of the panel should be installed first. See your\
Owner’s Manual for instructions. See Keys, Doors and Windows in your Owner’s Manual.
CAR WASH GUIDELINES
LOW GROUND CLEARANCE/FRONT CURBVIEW CAMERAF
Automatic car washes are not recommended. They may cause damage to the v\
ehicle, wheels or convertible topF. To avoid possible damage, use a touchless car wash.
To avoid damaging the clear coat on visible exterior carbon fiber, nev\
er polish any exposed carbon fiber body parts with polish compound.
The low ground clearance of the Corvette aids its aerodynamic efficien\
cy. As a result, the lower part of the front fascia (bumper) may contact a parking block or\
curb if the vehicle is parked too closely. Use care when parking to avoid damage.
At speeds slower than 5 mph, the Front CurbView CameraF displays a front, top-down view and left- and right-front view images of the area in front of the v\
ehicle.
Press the Camera icon on the infotainment screen to activate the front cameras.
See Driving and Operating in your Owner’s Manual.
See Vehicle Care in your Owner’s Manual.F Optional equipment