2018 CHEVROLET CORVETTE C7 hood release
[x] Cancel search: hood releasePage 8 of 353

Chevrolet Corvette Owner Manual (GMNA-Localizing-U.S./Canada/Mexico-
11374030) - 2018 - crc - 3/29/17
In Brief 7
1.Air Vents 0151.
2. Turn Signal Lever. See Turn
and Lane-Change Signals
0 138.
Exterior Lamp Controls 0135.
3. Manual Shift Paddles (If Equipped). See Manual
Mode 0183.
Active Rev Match Paddles
(If Equipped). See Active Rev
Match 0188.
4. Instrument Cluster 099.
5. Windshield Wiper/Washer 095.
6. Instrument Panel Storage Button. See Instrument Panel
Storage 090.
7. Passenger Airbag Status Indicator. See Passenger
Sensing System 075.
8. Light Sensor. See Automatic
Headlamp System 0137.
9. Hazard Warning Flashers
0138.
10. Infotainment 0141. 11. Passenger Temperature
Control. See Dual Automatic
Climate Control System 0147.
Passenger Heated and
Ventilated Seat Controls
(If Equipped). See Heated and
Ventilated Front Seats 062.
12. Driver and Redundant Passenger Heated and
Ventilated Seat Controls
(If Equipped). See Heated and
Ventilated Front Seats 062.
13. Dual Automatic Climate Control
System 0147.
14. Electric Parking Brake 0190.
15. MODE SELECT Knob. See Competitive Driving Mode
0197.
16. Shift Lever (Manual Shown). SeeAutomatic Transmission
0 182 orManual Transmission
0 186.
17. Keyless Ignition. See Ignition
Positions 0175.
18. Bluetooth Controls. See “Steering Wheel Controls” in
the infotainment manual. Voice Recognition Controls.
See
“Steering Wheel Controls”
in the infotainment manual.
Driver Information Center (DIC)
Controls. See Driver
Information Center (DIC) 0116.
19. See “Steering Wheel Controls”
in the infotainment manual.
20. Horn 095.
21. Steering Wheel Adjustment
095 (Out of View).
22. Cruise Control 0201.
23. Hood Release (Out of View). SeeHood 0216.
24. Data Link Connector (DLC) (Out of View). See Malfunction
Indicator Lamp 0109.
25. Hatch/Trunk Release Button. SeeHatch (Trunk) 038.
Intrusion and Inclination
Sensors Disable Switch. See
Vehicle Alarm System 040.
26. Head-Up Display Controls (If Equipped). See Head-Up
Display (HUD) 0118.
27. Power Mirrors 043.
Page 152 of 353

Chevrolet Corvette Owner Manual (GMNA-Localizing-U.S./Canada/Mexico-
11374030) - 2018 - crc - 3/29/17
Climate Controls 151
Air Vents
Use the tab on the air outlets to
change the direction of the airflow.
Operation Tips
.Clear away any ice, snow,
or leaves from the air inlets at
the base of the windshield that
may block the flow of air into the
vehicle.
. Clear snow off the hood to
improve visibility and help
decrease moisture drawn into
the vehicle.
. Use of non-GM approved hood
deflectors may adversely affect
the performance of the system.
. Keep the area around the base
of the instrument panel console
and air path under the seats
clear of objects to help circulate
the air inside of the vehicle more
effectively.
Maintenance
Passenger Compartment
Air Filter
The passenger compartment air
filter reduces dust, pollen, and other
airborne irritants from outside air
that is pulled into the vehicle.
Reductions in airflow, which may
occur more often in dusty areas,
indicate that the filter may need to
be replaced. See Maintenance
Schedule 0299.
Caution
Driving without a passenger
compartment air filter in place can
cause water and small particles,
like paper and leaves, to be
pulled into your climate control
system which may cause damage
to it. Make sure you always
replace the old filter with a
new one. The passenger compartment air
filter is on the passenger side of the
engine compartment near the
coolant surge tank. See
Engine
Compartment Overview 0217.
To check or replace the air filter:
1. Release the retainer clips from the passenger compartment air
filter cover. The PVC hoses
may need to be held out of the
way briefly to access the air
filter cover.
2. Remove the cover.
Page 217 of 353

Chevrolet Corvette Owner Manual (GMNA-Localizing-U.S./Canada/Mexico-
11374030) - 2018 - crc - 3/29/17
216 Vehicle Care
Vehicle Checks
Doing Your Own
Service Work
{Warning
It can be dangerous to work on
your vehicle if you do not have
the proper knowledge, service
manual, tools, or parts. Always
follow owner’s manual procedures
and consult the service manual
for your vehicle before doing any
service work.
If doing some of your own service
work, use the proper service
manual. It tells you much more
about how to service the vehicle
than this manual can. To order the
proper service manual, see Service
Publications Ordering Information
0 325.
This vehicle has an airbag system.
Before attempting to do your own
service work, see Servicing the
Airbag-Equipped Vehicle 079. Keep a record with all parts receipts
and list the mileage and the date of
any service work performed. See
Maintenance Records
0311.
Caution
Even small amounts of
contamination can cause damage
to vehicle systems. Do not allow
contaminants to contact the fluids,
reservoir caps, or dipsticks.
Hood
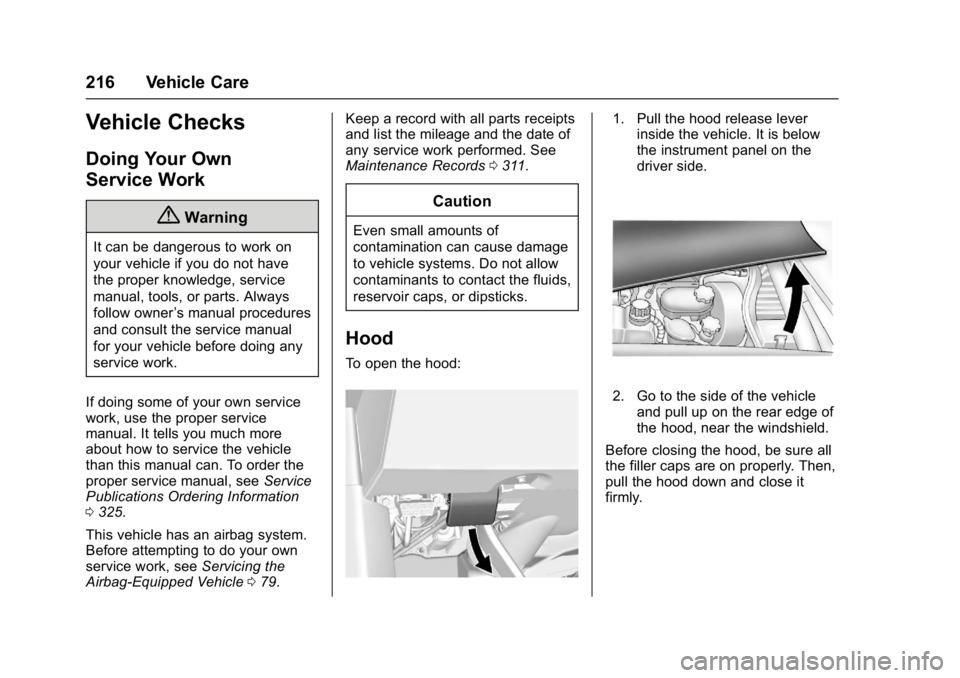
To open the hood:
1. Pull the hood release lever
inside the vehicle. It is below
the instrument panel on the
driver side.
2. Go to the side of the vehicle
and pull up on the rear edge of
the hood, near the windshield.
Before closing the hood, be sure all
the filler caps are on properly. Then,
pull the hood down and close it
firmly.
Page 231 of 353

Chevrolet Corvette Owner Manual (GMNA-Localizing-U.S./Canada/Mexico-
11374030) - 2018 - crc - 3/29/17
230 Vehicle Care
Caution (Continued)
damaged. The repairs would not
be covered by the vehicle
warranty.
When to Inspect the Engine Air
Cleaner/Filter
For intervals on changing and
inspecting the engine air cleaner/
filter, see Maintenance Schedule
0 299.
How to Inspect the Engine Air
Cleaner/Filter
Do not start the engine or have the
engine running with the engine air
cleaner/filter housing open. Before
removing the engine air cleaner/
filter, make sure that the engine air
cleaner/filter housing and nearby
components are free of dirt and
debris. Remove the engine air
cleaner/filter. Lightly tap and shake
the engine air cleaner/filter (away
from the vehicle), to release loose
dust and dirt. Inspect the engine air
cleaner/filter for damage, and
replace if damaged. Do not clean the engine air cleaner/filter or
components with water or
compressed air.
To remove the hood extractor duct
to gain access:
1. Bolts (4)
2. Hood Extractor Duct
1. Open the hood. See
Hood
0 216.
2. Remove the four bolts (1) and the hood extractor duct (2).
3. Reverse Step 2 to replace the hood extractor duct. To inspect or replace the engine air
cleaner/filter:
1. Surge Tank Coolant Hose
2. Screws (2)
3. Hose Retainers (2)
4. Air Duct Clamp
5. Electrical Connector
Caution
If the engine coolant surge tank
hose is not carefully lifted out of
the hose retainers on the air
cleaner/filter cover assembly, it
(Continued)
Page 244 of 353

Chevrolet Corvette Owner Manual (GMNA-Localizing-U.S./Canada/Mexico-
11374030) - 2018 - crc - 3/29/17
Vehicle Care 243
Automatic Transmission
Shift Lock Control
Function Check
{Warning
When you are doing this
inspection, the vehicle could
move suddenly. If the vehicle
moves, you or others could be
injured.
1. Before starting this check, be sure there is enough room
around the vehicle. It should be
parked on a level surface.
2. Apply the parking brake. See Electric Parking Brake 0190.
Be ready to apply the regular
brake immediately if the vehicle
begins to move.
3. With the engine off, turn the ignition on, but do not start the
engine. Without applying the
regular brake, try to move the
shift lever out of P (Park) with normal effort. If the shift lever
moves out of P (Park), contact
your dealer for service.
Park Brake and P (Park)
Mechanism Check
{Warning
When you are doing this check,
the vehicle could begin to move.
You or others could be injured
and property could be damaged.
Make sure there is room in front
of the vehicle in case it begins to
roll. Be ready to apply the regular
brake at once should the vehicle
begin to move.
Park on a fairly steep hill, with the
vehicle facing downhill. Keeping
your foot on the regular brake, set
the parking brake.
. To check the parking brake's
holding ability: With the engine
running and the transmission in
N (Neutral), slowly remove foot pressure from the regular brake
pedal. Do this until the vehicle is
held by the parking brake only.
. To check the P (Park)
mechanism's holding ability:
With the engine running, shift to
P (Park). Then release the
parking brake followed by the
regular brake.
Contact your dealer if service is
required.
Wiper Blade Replacement
Windshield wiper blades should be
inspected for wear and cracking.
Replacement blades come in
different types and are removed in
different ways. For proper type and
length, see Maintenance
Replacement Parts 0309.
To replace the windshield wiper
blade: 1. Open the hood.
2. Pull the windshield wiper assembly away from the
windshield.
Page 245 of 353

Chevrolet Corvette Owner Manual (GMNA-Localizing-U.S./Canada/Mexico-
11374030) - 2018 - crc - 3/29/17
244 Vehicle Care
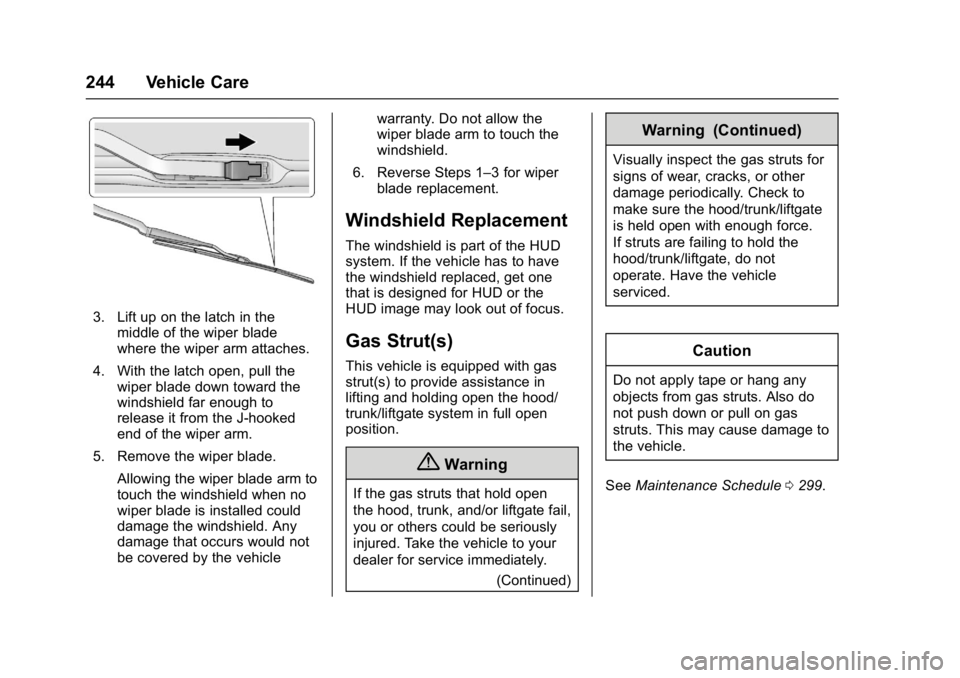
3. Lift up on the latch in themiddle of the wiper blade
where the wiper arm attaches.
4. With the latch open, pull the wiper blade down toward the
windshield far enough to
release it from the J-hooked
end of the wiper arm.
5. Remove the wiper blade. Allowing the wiper blade arm to
touch the windshield when no
wiper blade is installed could
damage the windshield. Any
damage that occurs would not
be covered by the vehicle warranty. Do not allow the
wiper blade arm to touch the
windshield.
6. Reverse Steps 1–3 for wiper blade replacement.
Windshield Replacement
The windshield is part of the HUD
system. If the vehicle has to have
the windshield replaced, get one
that is designed for HUD or the
HUD image may look out of focus.
Gas Strut(s)
This vehicle is equipped with gas
strut(s) to provide assistance in
lifting and holding open the hood/
trunk/liftgate system in full open
position.
{Warning
If the gas struts that hold open
the hood, trunk, and/or liftgate fail,
you or others could be seriously
injured. Take the vehicle to your
dealer for service immediately.
(Continued)
Warning (Continued)
Visually inspect the gas struts for
signs of wear, cracks, or other
damage periodically. Check to
make sure the hood/trunk/liftgate
is held open with enough force.
If struts are failing to hold the
hood/trunk/liftgate, do not
operate. Have the vehicle
serviced.
Caution
Do not apply tape or hang any
objects from gas struts. Also do
not push down or pull on gas
struts. This may cause damage to
the vehicle.
See Maintenance Schedule 0299.
Page 309 of 353

Chevrolet Corvette Owner Manual (GMNA-Localizing-U.S./Canada/Mexico-
11374030) - 2018 - crc - 3/29/17
308 Service and Maintenance
Recommended Fluids, Lubricants, and Parts
Recommended Fluids and Lubricants
Fluids and lubricants identified below by name, part number, or specification can be obtained from your dealer.Usage Fluid/Lubricant
Chassis Lubrication Chassis Lubricant (GM Part No. 12377985, in Canada 88901242) or lubricant meeting requirements of NLGI #2, Category LB or GC-LB.
Electronic Limited-Slip Differential (eLSD) Clutch System Lubricant
(Z51, Grand Sport, and Z06 Only) DEXRON-VI Automatic Transmission Fluid.
Engine Coolant 40/60 coolant/water mixture of clean, drinkable water and use only DEX-COOL Coolant.
SeeCooling System (Engine) 0232 orCooling System (Aero Panel) 0235.
Engine Oil Engine oil meeting the dexos1 specification of the proper SAE viscosity grade. Mobil 1 dexos1 is recommended. See Engine Oil0222.
Hood Latch Assembly, Secondary Latch, Pivots, Spring Anchor, and Release Pawl Lubriplate Lubricant Aerosol (GM Part No. 89021668, in Canada 89021674)
or lubricant meeting requirements of NLGI #2, Category LB or GC-LB.
Hydraulic Brake System DOT 3 Hydraulic Brake Fluid (GM Part No. 19353126, in Canada 19299819).
Hydraulic Clutch System Hydraulic Clutch Fluid. Use only GM Part No. 19299570, in Canada 19299571, Super DOT 4 brake fluid.