2018 CHEVROLET CORVETTE C7 engine
[x] Cancel search: enginePage 244 of 353

Chevrolet Corvette Owner Manual (GMNA-Localizing-U.S./Canada/Mexico-
11374030) - 2018 - crc - 3/29/17
Vehicle Care 243
Automatic Transmission
Shift Lock Control
Function Check
{Warning
When you are doing this
inspection, the vehicle could
move suddenly. If the vehicle
moves, you or others could be
injured.
1. Before starting this check, be sure there is enough room
around the vehicle. It should be
parked on a level surface.
2. Apply the parking brake. See Electric Parking Brake 0190.
Be ready to apply the regular
brake immediately if the vehicle
begins to move.
3. With the engine off, turn the ignition on, but do not start the
engine. Without applying the
regular brake, try to move the
shift lever out of P (Park) with normal effort. If the shift lever
moves out of P (Park), contact
your dealer for service.
Park Brake and P (Park)
Mechanism Check
{Warning
When you are doing this check,
the vehicle could begin to move.
You or others could be injured
and property could be damaged.
Make sure there is room in front
of the vehicle in case it begins to
roll. Be ready to apply the regular
brake at once should the vehicle
begin to move.
Park on a fairly steep hill, with the
vehicle facing downhill. Keeping
your foot on the regular brake, set
the parking brake.
. To check the parking brake's
holding ability: With the engine
running and the transmission in
N (Neutral), slowly remove foot pressure from the regular brake
pedal. Do this until the vehicle is
held by the parking brake only.
. To check the P (Park)
mechanism's holding ability:
With the engine running, shift to
P (Park). Then release the
parking brake followed by the
regular brake.
Contact your dealer if service is
required.
Wiper Blade Replacement
Windshield wiper blades should be
inspected for wear and cracking.
Replacement blades come in
different types and are removed in
different ways. For proper type and
length, see Maintenance
Replacement Parts 0309.
To replace the windshield wiper
blade: 1. Open the hood.
2. Pull the windshield wiper assembly away from the
windshield.
Page 248 of 353

Chevrolet Corvette Owner Manual (GMNA-Localizing-U.S./Canada/Mexico-
11374030) - 2018 - crc - 3/29/17
Vehicle Care 247
Electrical System
Electrical System
Overload
The vehicle has fuses to protect
against an electrical system
overload. Fuses also protect power
devices in the vehicle.
Replace a bad fuse with a new one
of the identical size and rating.
If there is a problem on the road and
a fuse needs to be replaced, there
are some spare fuses and a fuse
puller in the Instrument Panel Fuse
Block. The same amperage fuse
can also be borrowed. Choose
some feature of the vehicle that is
not needed to use and replace it as
soon as possible.
Windshield Wipers
If the wiper motor overheats due to
heavy snow or ice, the windshield
wipers will stop until the motor cools
and will then restart.
Although the circuit is protected
from electrical overload, overload
due to heavy snow or ice maycause wiper linkage damage.
Always clear ice and heavy snow
from the windshield before using the
windshield wipers.
If the overload is caused by an
electrical problem and not snow or
ice, be sure to get it fixed.
Fuses
The wiring circuits in the vehicle are
protected from short circuits by
fuses. This greatly reduces the
chance of fires caused by electrical
problems.
{Danger
Fuses and circuit breakers are
marked with their ampere rating.
Do not exceed the
specified amperage rating when
replacing fuses and circuit
breakers. Use of an oversized
fuse or circuit breaker can result
in a vehicle fire. You and others
could be seriously injured or
killed.
Look at the silver-colored band
inside the fuse. If the band is broken
or melted, replace the fuse. Be sure
you replace a bad fuse with a new
one of the identical size and rating.
Fuses of the same amperage can
be temporarily borrowed from
another fuse location, if a fuse goes
out. Replace the fuse as soon as
you can.
Engine Compartment
Fuse Block
There is one fuse block in the
engine compartment on the
passenger side of the vehicle. See
Engine Compartment Overview
0
217 for more information on
location.
Caution
Spilling liquid on any electrical
component on the vehicle may
damage it. Always keep the
covers on any electrical
component.
Page 250 of 353

Chevrolet Corvette Owner Manual (GMNA-Localizing-U.S./Canada/Mexico-
11374030) - 2018 - crc - 3/29/17
Vehicle Care 249
The vehicle may not be equipped
with all of the fuses, relays, and
features shown.Fuses Usage
1 Front wiper
2 Starter
3 ABS valves
4 Engine control module
5 Electric parking brake
6 Front HVAC
7 ABS pump
8 Logistics
9 Vacuum pump
10 Electronic rear differential module
11 Heated seat 1
12 Column lock module
13 Steering column
14 Glove box
15 Engine inside position Fuses Usage
16 Body control module 6
17 HVAC controls
18 Body control module 5
19 Heated seat 2
20 Body control module 7
21 Electric steering column lock
22 Display
23 Auxiliary outlet
24 Radio
25 Instrument cluster HUD
26 Interior rearview mirror
27 Ignition –odd
28 Ignition –even
29 Data link connector
30 Seat fan Fuses Usage
31 Fuel pump power module
32 Exhaust valve 1
33 Horn
34 Headlamp washer
35 A/C clutch
36 Engine outside position
37 Real time dampening
38 Intercooler
39 Left headlamp
40 Right headlamp
41 Headlamp washer pump
42 Exhaust valve 2
43 Reverse lockout
44 Electric rear differential module
45 Rear transmission cooler fan
Page 251 of 353

Chevrolet Corvette Owner Manual (GMNA-Localizing-U.S./Canada/Mexico-
11374030) - 2018 - crc - 3/29/17
250 Vehicle Care
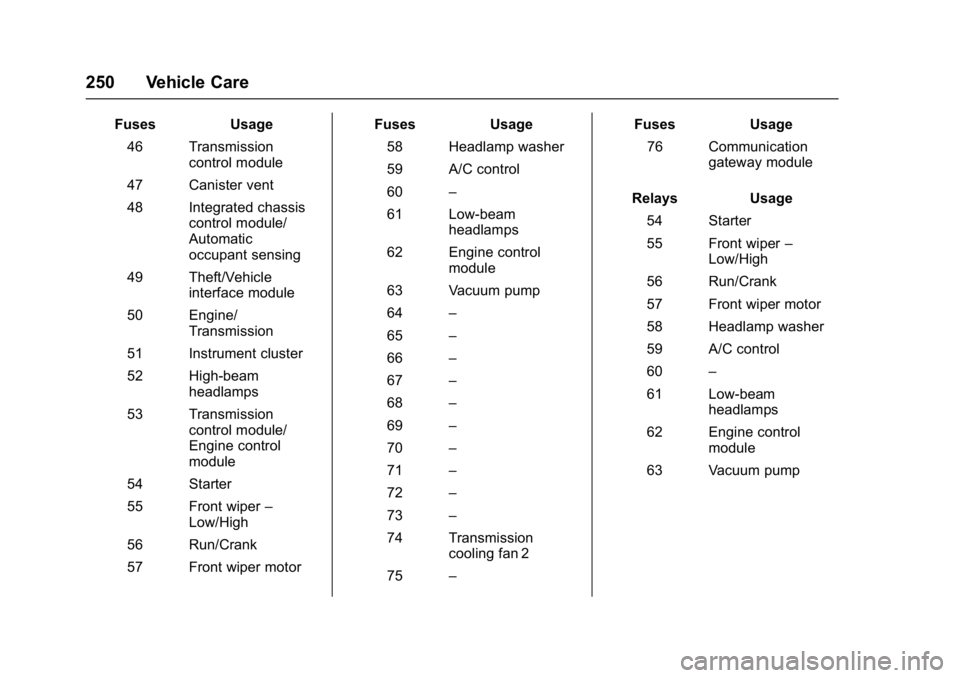
FusesUsage
46 Transmission control module
47 Canister vent
48 Integrated chassis control module/
Automatic
occupant sensing
49 Theft/Vehicle interface module
50 Engine/ Transmission
51 Instrument cluster
52 High-beam headlamps
53 Transmission control module/
Engine control
module
54 Starter
55 Front wiper –
Low/High
56 Run/Crank
57 Front wiper motor Fuses
Usage
58 Headlamp washer
59 A/C control
60 –
61 Low-beam headlamps
62 Engine control module
63 Vacuum pump
64 –
65 –
66 –
67 –
68 –
69 –
70 –
71 –
72 –
73 –
74 Transmission cooling fan 2
75 – Fuses
Usage
76 Communication gateway module
Relays Usage
54 Starter
55 Front wiper –
Low/High
56 Run/Crank
57 Front wiper motor
58 Headlamp washer
59 A/C control
60 –
61 Low-beam headlamps
62 Engine control module
63 Vacuum pump
Page 254 of 353

Chevrolet Corvette Owner Manual (GMNA-Localizing-U.S./Canada/Mexico-
11374030) - 2018 - crc - 3/29/17
Vehicle Care 253
You can remove fuses using the
fuse puller.
The vehicle may not be equipped
with all of the fuses, relays, and
features shown.Fuses Usage
1 Window
2 Driver power seat
3 Passive entry/ Passive start 2
4 Passive entry/ Passive start 1
5 Engine control module
6 Heated mirrors
7 Body control module 4
8 Rear window defogger
9 GBS
10 Body control module 2
11 Steering wheel Fuses Usage
12 Passenger power seat
13 –
14 Exterior rearview mirror
15 Body control module 1
16 Body control module 3
17 Sensing diagnostic module/Automatic
occupant sensing
18 Logistics 2
19 Body control module 8
20 Integrated chassis control module
21 Amplifier
22 Rear accessory power outlet
24 Memory seat module/
Convertible top Fuses Usage
25 Theft deterrent PSM
26 Trunk release module
27 OnStar (if equipped)
28 Camera module
29 –
30 Fuel pump power module
31 Trunk release module latch
32 Battery regulated voltage control
33 –
34 Convertible top solenoid
35 –
36 Passenger window switch
37 Front accessory power outlet
38 –
Page 260 of 353

Chevrolet Corvette Owner Manual (GMNA-Localizing-U.S./Canada/Mexico-
11374030) - 2018 - crc - 3/29/17
Vehicle Care 259
GM's TPC specifications meet or
exceed all federal safety
guidelines.
(3) DOT (Department of
Transportation)
:The
Department of Transportation
(DOT) code indicates that the
tire is in compliance with the
U.S. Department of
Transportation Motor Vehicle
Safety Standards.
DOT Tire Date of
Manufacture
:The last four
digits of the TIN indicate the tire
manufactured date. The first two
digits represent the week
(01-52) and the last two digits,
the year. For example, the third
week of the year 2010 would
have a four-digit DOT date
of 0310.
(4) Tire Identification Number
(TIN)
:The letters and numbers
following the DOT code are the
Tire Identification Number (TIN).
The TIN shows the
manufacturer and plant code, tire size, and date the tire was
manufactured. The TIN is
molded onto both sides of the
tire, although only one side may
have the date of manufacture.
(5) Tire Ply Material
:The type
of cord and number of plies in
the sidewall and under the tread.
(6) Uniform Tire Quality
Grading (UTQG)
:Tire
manufacturers are required to
grade tires based on three
performance factors: treadwear,
traction, and temperature
resistance. For more information
see Uniform Tire Quality
Grading 0271.
(7) Maximum Cold Inflation
Load Limit
:Maximum load that
can be carried and the
maximum pressure needed to
support that load.
Tire Designations
Tire Size
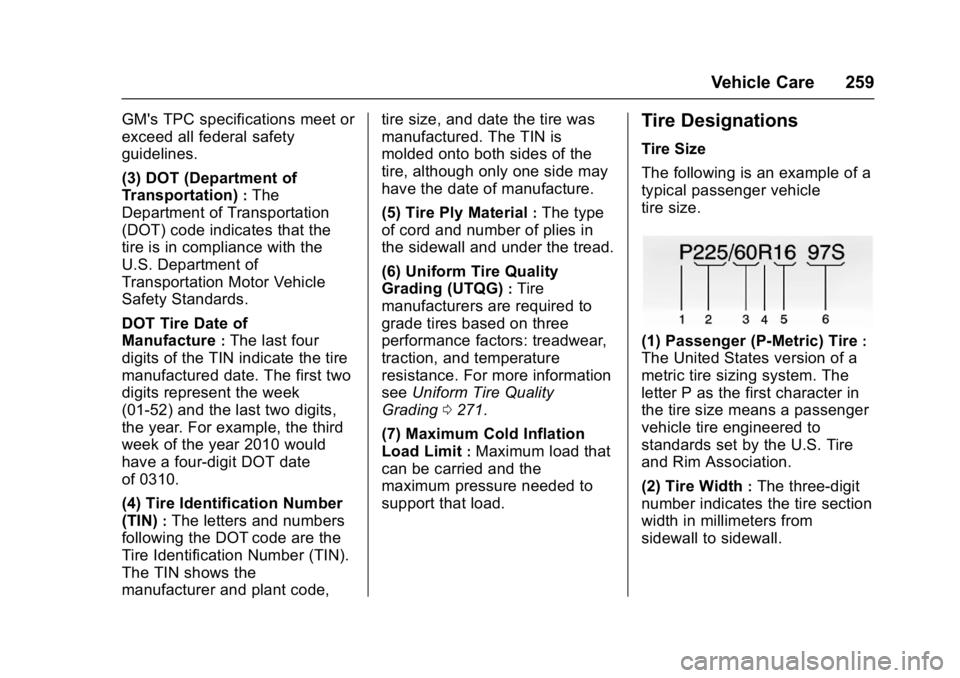
The following is an example of a
typical passenger vehicle
tire size.
(1) Passenger (P-Metric) Tire:
The United States version of a
metric tire sizing system. The
letter P as the first character in
the tire size means a passenger
vehicle tire engineered to
standards set by the U.S. Tire
and Rim Association.
(2) Tire Width
:The three-digit
number indicates the tire section
width in millimeters from
sidewall to sidewall.
Page 277 of 353

Chevrolet Corvette Owner Manual (GMNA-Localizing-U.S./Canada/Mexico-
11374030) - 2018 - crc - 3/29/17
276 Vehicle Care
{Warning
Driving on a flat tire will cause
permanent damage to the tire.
Re-inflating a tire after it has been
driven on while severely
underinflated or flat may cause a
blowout and a serious crash.
Never attempt to re-inflate a tire
that has been driven on while
severely underinflated or flat.
Have your dealer or an authorized
tire service center repair or
replace the flat tire as soon as
possible.
If this vehicle has a tire sealant kit
and the tire has been separated
from the wheel, has damaged
sidewalls, or has a puncture larger
than 6 mm (0.25 in), the tire is too
severely damaged for the tire
sealant and compressor kit to be
effective. If the tire has a puncture
less than 6 mm (0.25 in) in the tread
area of the tire, see Tire Sealant
and Compressor Kit 0276.
Tire Sealant and
Compressor Kit
{Warning
Idling a vehicle in an enclosed
area with poor ventilation is
dangerous. Engine exhaust may
enter the vehicle. Engine exhaust
contains carbon monoxide (CO)
which cannot be seen or smelled.
It can cause unconsciousness
and even death. Never run the
engine in an enclosed area that
has no fresh air ventilation. For
more information, see Engine
Exhaust 0181.
{Warning
Overinflating a tire could cause
the tire to rupture and you or
others could be injured. Be sure
to read and follow the tire sealant
and compressor kit instructions
and inflate the tire to its
(Continued)
Warning (Continued)
recommended pressure. Do not
exceed the recommended
pressure.
{Warning
Storing the tire sealant and
compressor kit or other
equipment in the passenger
compartment of the vehicle could
cause injury. In a sudden stop or
collision, loose equipment could
strike someone. Store the tire
sealant and compressor kit in its
original location.
If this vehicle has a tire sealant and
compressor kit, there may not be a
spare tire or tire changing
equipment, and on some vehicles
there may not be a place to store
a tire.
To obtain a tire sealant and
compressor kit, see your dealer.
Page 287 of 353

Chevrolet Corvette Owner Manual (GMNA-Localizing-U.S./Canada/Mexico-
11374030) - 2018 - crc - 3/29/17
286 Vehicle Care
4. Open the hatch/trunk and liftthe carpet on the passenger
side of the vehicle to gain
access to the battery cover.
5. Remove the left elastic loop forthe cargo cover, then remove
the battery cover and locate
the positive (+) and negative
(−) terminals.
6. Check that the jumper cables do not have loose or missing
insulation. If they do, you could
get a shock. The vehicles
could be damaged too.
7. Open the positive terminal trim cover and connect the red
positive (+) cable to the
positive (+) terminal (1) of the
dead battery.
8. Do not let the other end touch metal. Connect it to the
positive (+) terminal (4) of the
good battery.
9. Now connect the black negative (−) cable to the
negative (−) terminal (3) of the
good battery.
Do not let the other end touch
anything until the next step. 10. Connect the other end of the
negative (−) cable to the
negative (−) terminal (2) on the
dead battery.
11. Now start the vehicle with the good battery and run the
engine for a while.
12. Try to start the vehicle that had the dead battery. If it will not
start after a few tries, it
probably needs service.
Caution
If the jumper cables are
connected or removed in the
wrong order, electrical shorting
may occur and damage the
vehicle. The repairs would not be
covered by the vehicle warranty.
Always connect and remove the
jumper cables in the correct order,
making sure that the cables do
not touch each other or other
metal.