2018 CHEVROLET COLORADO steering
[x] Cancel search: steeringPage 269 of 421

Chevrolet Colorado Owner Manual (GMNA-Localizing-U.S./Canada/Mexico-
11349743) - 2018 - crc - 10/12/17
268 Driving and Operating
Warning (Continued)
increase in stopping distance or
trailer instability which could
result in personal injury or
damage to the vehicle, trailer,
or other property. Use the ITBC
system only with electric or
electric over hydraulic trailer
brakes.
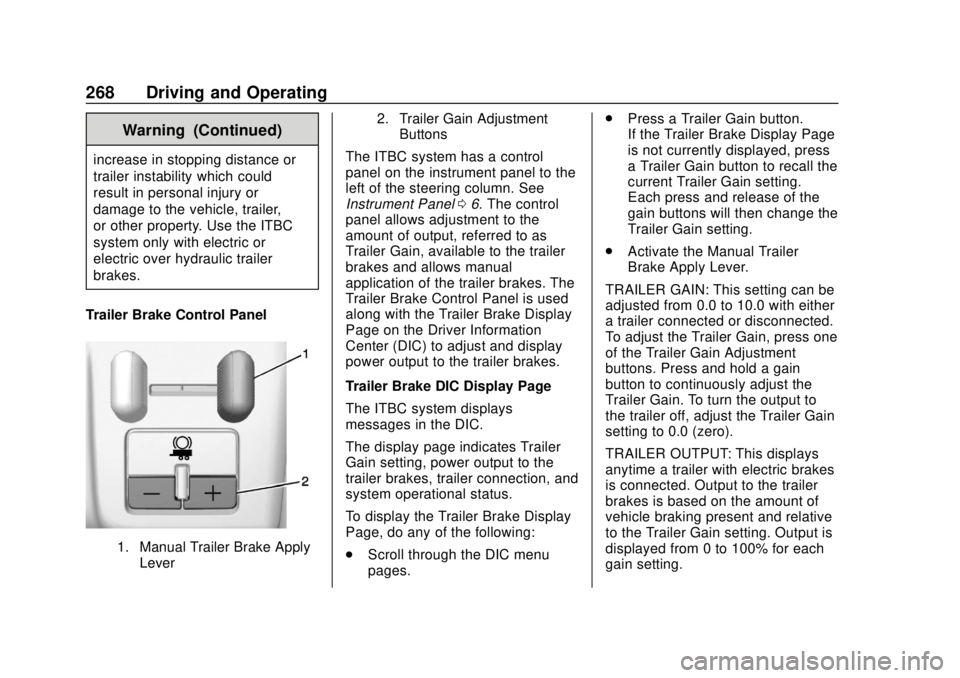
Trailer Brake Control Panel
1. Manual Trailer Brake Apply Lever 2. Trailer Gain Adjustment
Buttons
The ITBC system has a control
panel on the instrument panel to the
left of the steering column. See
Instrument Panel 06. The control
panel allows adjustment to the
amount of output, referred to as
Trailer Gain, available to the trailer
brakes and allows manual
application of the trailer brakes. The
Trailer Brake Control Panel is used
along with the Trailer Brake Display
Page on the Driver Information
Center (DIC) to adjust and display
power output to the trailer brakes.
Trailer Brake DIC Display Page
The ITBC system displays
messages in the DIC.
The display page indicates Trailer
Gain setting, power output to the
trailer brakes, trailer connection, and
system operational status.
To display the Trailer Brake Display
Page, do any of the following:
. Scroll through the DIC menu
pages. .
Press a Trailer Gain button.
If the Trailer Brake Display Page
is not currently displayed, press
a Trailer Gain button to recall the
current Trailer Gain setting.
Each press and release of the
gain buttons will then change the
Trailer Gain setting.
. Activate the Manual Trailer
Brake Apply Lever.
TRAILER GAIN: This setting can be
adjusted from 0.0 to 10.0 with either
a trailer connected or disconnected.
To adjust the Trailer Gain, press one
of the Trailer Gain Adjustment
buttons. Press and hold a gain
button to continuously adjust the
Trailer Gain. To turn the output to
the trailer off, adjust the Trailer Gain
setting to 0.0 (zero).
TRAILER OUTPUT: This displays
anytime a trailer with electric brakes
is connected. Output to the trailer
brakes is based on the amount of
vehicle braking present and relative
to the Trailer Gain setting. Output is
displayed from 0 to 100% for each
gain setting.
Page 278 of 421

Chevrolet Colorado Owner Manual (GMNA-Localizing-U.S./Canada/Mexico-
11349743) - 2018 - crc - 10/12/17
Vehicle Care 277
Keep a record with all parts receipts
and list the mileage and the date of
any service work performed. See
Maintenance Records0377.
Caution
Even small amounts of
contamination can cause damage
to vehicle systems. Do not allow
contaminants to contact the fluids,
reservoir caps, or dipsticks.
Hood
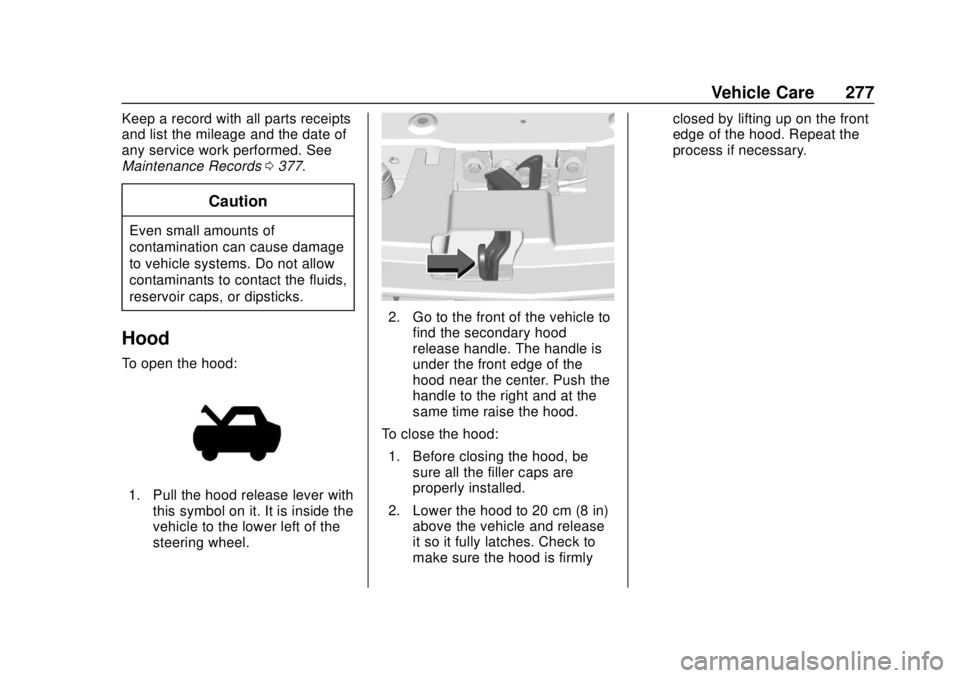
To open the hood:
1. Pull the hood release lever with
this symbol on it. It is inside the
vehicle to the lower left of the
steering wheel.
2. Go to the front of the vehicle tofind the secondary hood
release handle. The handle is
under the front edge of the
hood near the center. Push the
handle to the right and at the
same time raise the hood.
To close the hood: 1. Before closing the hood, be sure all the filler caps are
properly installed.
2. Lower the hood to 20 cm (8 in) above the vehicle and release
it so it fully latches. Check to
make sure the hood is firmly closed by lifting up on the front
edge of the hood. Repeat the
process if necessary.
Page 310 of 421

Chevrolet Colorado Owner Manual (GMNA-Localizing-U.S./Canada/Mexico-
11349743) - 2018 - crc - 10/12/17
Vehicle Care 309
FusesUsage
F38 Left high-beam headlamp
F39 Rear differential lock
actuators (ZR2
only)
F40 Front differential lock
actuators (ZR2
only)
F41 –
F42 –
F43 –
F44 Vacuum pump
F45 –
F46 Engine control module 2
F47 Miscellaneous 2/ Ignition
F48 Fog lamps (if equipped)
F49 – Fuses
Usage
F50 Trailer parking lamps
F51 Horn
F52 –
F53 –
F54 –
F55 –
F56 Washer pump
F57 –
F58 –
F59 –
F60 Mirrors defogger
F61 –
F62 Canister vent solenoid
F63 –
F64 Trailer reverse lamp
F65 Left trailer stoplamp/Turn
signal lamps Fuses
Usage
F66 Right trailer stoplamp/Turn
signal lamps
F67 Electric power steering
F68 –
F69 Battery regulated voltage control
F70 –
F71 –
F72 –
F73 –
F74 Generator
F75 –
Relays Usage
K1 Air conditioning clutch
K2 Starter
K3 –
K4 Wipers speed
K5 Wipers control
Page 312 of 421

Chevrolet Colorado Owner Manual (GMNA-Localizing-U.S./Canada/Mexico-
11349743) - 2018 - crc - 10/12/17
Vehicle Care 311
The vehicle may not be equipped
with all of the fuses, relays, and
features shown.Fuses Usage
F1 Body control module 1
F2 – Fuses Usage
F3 –
F4 Steering wheel controls
F5 Body control module 2
F6 –
F7 –
F8 Mirror window module
F9 Instrument cluster
F10 –
F11 Body control module 8
F12 –
F13 OnStar/HVAC
F14 Radio/HMI
F15 Body control module 6
F16 Communication gateway module
F17 Body control module 4
F18 Airbag
F19 –
F20 Amplifier (if equipped)
Page 313 of 421

Chevrolet Colorado Owner Manual (GMNA-Localizing-U.S./Canada/Mexico-
11349743) - 2018 - crc - 10/12/17
312 Vehicle Care
FusesUsage
F21 –
F22 –
F23 Data link connector/USB
F24 HVAC ignition
F25 Body control module 7
F26 –
F27 –
F28 Instrument panel/ Sensing and
diagnostic module/
Ignition
F29 Miscellaneous/Ignition
F30 –
F31 Front camera
F32 Steering wheel controls backlighting
F33 Heated steering wheel
F34 Front ventilated seats
F35 Park/Reverse/Neutral/ Drive/Low/Wireless
charging module Fuses
Usage
F36 Discrete logic ignition sensor
F37 –
F38 –
F39 Auxiliary power outlet 2
F40 Auxiliary power outlet
F41 Auxiliary power outlet 1/Lighter
F42 Left power window
F43 Driver power seat
F44 –
F45 Right power window
F46 Passenger power seat
Relays Usage
K1 Retained accessory power
K2 Run/CrankWheels and Tires
Tires
Every new GM vehicle has
high-quality tires made by a
leading tire manufacturer. See
the warranty manual for
information regarding the tire
warranty and where to get
service. For additional
information refer to the tire
manufacturer.
{Warning
.Poorly maintained and
improperly used tires are
dangerous.
.Overloading the tires can
cause overheating as a
result of too much
flexing. There could be a
blowout and a serious
crash. See Vehicle Load
Limits 0210.
(Continued)
Page 325 of 421

Chevrolet Colorado Owner Manual (GMNA-Localizing-U.S./Canada/Mexico-
11349743) - 2018 - crc - 10/12/17
324 Vehicle Care
more of the TPMS sensors. Also,
the TPMS sensor matching process
should be performed after replacing
a spare tire with a road tire
containing the TPMS sensor. The
malfunction light and the DIC
message should go off at the next
ignition cycle. The sensors are
matched to the tire/wheel positions,
using a TPMS relearn tool, in the
following order: driver side front tire,
passenger side front tire, passenger
side rear tire, and driver side rear.
See your dealer for service or to
purchase a relearn tool. A TPMS
relearn tool can also be purchased.
See Tire Pressure Monitor Sensor
Activation Tool at
www.gmtoolsandequipment.com or
call 1-800-GM TOOLS
(1-800-468-6657).
There are two minutes to match the
first tire/wheel position, and
five minutes overall to match all four
tire/wheel positions. If it takes
longer, the matching process stops
and must be restarted.The TPMS sensor matching
process is:
1. Set the parking brake.
2. Turn the ignition on without starting the vehicle.
3. If the vehicle has an uplevel DIC, make sure the Tire
Pressure info page option is
turned on. The info pages on
the DIC can be turned on and
off through the Settings menu.
See Driver Information Center
(DIC) (Base Level) 0129 or
Driver Information Center (DIC)
(Uplevel) 0131.
4. If the vehicle has an uplevel DIC, use the DIC controls on
the right side of the steering
wheel to scroll to the Tire
Pressure screen under the DIC
info page.
If the vehicle has a base level
DIC, use the MENU button to
select the Vehicle Information
menu in the DIC. Use the
thumbwheel to scroll to the Tire
Pressure Menu item screen. 5. If the vehicle has an uplevel
DIC, press and hold
Vin the
center of the DIC controls.
If the vehicle has a base level
DIC, press SET/CLR on the
turn signal lever to begin the
sensor matching process.
A message asking if the
process should begin should
appear. Press SET/CLR again
to confirm the selection.
The horn sounds twice to
signal the receiver is in relearn
mode and the TIRE
LEARNING ACTIVE message
displays on the DIC screen.
6. Start with the driver side front tire.
7. Place the relearn tool against the tire sidewall, near the valve
stem. Then press the button to
activate the TPMS sensor.
A horn chirp confirms that the
sensor identification code has
been matched to this tire and
wheel position.
Page 333 of 421

Chevrolet Colorado Owner Manual (GMNA-Localizing-U.S./Canada/Mexico-
11349743) - 2018 - crc - 10/12/17
332 Vehicle Care
Tire Chains
{Warning
If the vehicle has 255/65R17 AT,
265/60R18, 265/65R17 or 265/
70R16 size tires, do not use tire
chains. They can damage the
vehicle because there is not
enough clearance. Tire chains
used on a vehicle without the
proper amount of clearance can
cause damage to the brakes,
suspension, or other vehicle
parts. The area damaged by the
tire chains could cause you to
lose control of the vehicle and
you or others may be injured in a
crash.
Use another type of traction
device only if its manufacturer
recommends it for use on the
vehicle and tire size combination
and road conditions. Follow that
manufacturer's instructions. To
help avoid damage to the vehicle,(Continued)
Warning (Continued)
drive slowly, readjust, or remove
the device if it is contacting the
vehicle, and do not spin the
vehicle's wheels.
If you do find traction devices that
will fit, install them on the rear
tires.
Caution
If the vehicle has a tire size other
than 255/65R17 AT, 265/60R18,
265/65R17 or 265/70R16, use tire
chains only where legal and only
when you must. Use chains that
are the proper size for the tires.
Install them on the tires of the
rear axle. Do not use chains on
the tires of the front axle. Tighten
them as tightly as possible with
the ends securely fastened. Drive
slowly and follow the chain
manufacturer's instructions. If you(Continued)
Caution (Continued)
can hear the chains contacting
the vehicle, stop and retighten
them. If the contact continues,
slow down until it stops. Driving
too fast or spinning the wheels
with chains on will damage the
vehicle.
If a Tire Goes Flat
It is unusual for a tire to blowout
while driving, especially if the tires
are maintained properly. If air goes
out of a tire, it is much more likely to
leak out slowly. But if there ever is a
blowout, here are a few tips about
what to expect and what to do:
If a front tire fails, the flat tire
creates a drag that pulls the vehicle
toward that side. Take your foot off
the accelerator pedal and grip the
steering wheel firmly. Steer to
maintain lane position, and then
gently brake to a stop, well off the
road, if possible.
Page 351 of 421

Chevrolet Colorado Owner Manual (GMNA-Localizing-U.S./Canada/Mexico-
11349743) - 2018 - crc - 10/12/17
350 Vehicle Care
Caution
Failure to disconnect the negative
battery cable or to have it contact
the terminals can cause damage
to the vehicle.
6. Disconnect the negative battery cable at the battery and
secure the nut and bolt. Cover
the negative battery post with a
non-conductive material to
prevent any contact with the
negative battery terminal.
7. Shift the transmission to P (Park).
Caution
If the steering column is locked,
vehicle damage may occur.
8. Move the steering wheel to make sure the steering column
is unlocked. 9. With a foot on the brake pedal,
release the parking brake.
Keep the ignition key in the
towed vehicle in ACC/
ACCESSORY to prevent the
steering column from locking.
Disconnecting the Towed Vehicle
Before disconnecting the towed
vehicle: 1. Park on a level surface.
2. Set the parking brake, then shift the transmission to
P (Park), and move the ignition
key to OFF.
3. Connect the battery.
4. Apply the brake pedal.
5. Shift the transfer case out of N (Neutral) to Two-Wheel Drive
High. See “Shifting out of
N (Neutral)” underFour-Wheel
Drive 0231. See your dealer if
the transfer case cannot be
shifted out of N (Neutral).
6. Check that the vehicle is in Two-Wheel Drive High by
shifting the transmission to R (Reverse) and then to D
(Drive). There should be
movement of the vehicle while
shifting.
7. Shift the transmission to P (Park) and turn off the
ignition.
8. Disconnect the vehicle from the tow vehicle.
9. Release the parking brake.
10. Reset any lost presets. The outside temperature
display will default to 0 °C
(32 °F) but will reset with
normal usage.