2018 CHEVROLET COLORADO ABS
[x] Cancel search: ABSPage 240 of 421
Chevrolet Colorado Owner Manual (GMNA-Localizing-U.S./Canada/Mexico-
11349743) - 2018 - crc - 10/12/17
Driving and Operating 239
Using ABS
Do not pump the brakes. Just hold
the brake pedal down firmly and let
ABS work. You may hear the ABS
pump or motor operating and feel
the brake pedal pulsate. This is
normal.
Braking in Emergencies
ABS allows you to steer and brake
at the same time. In many
emergencies, steering can help
more than even the very best
braking.
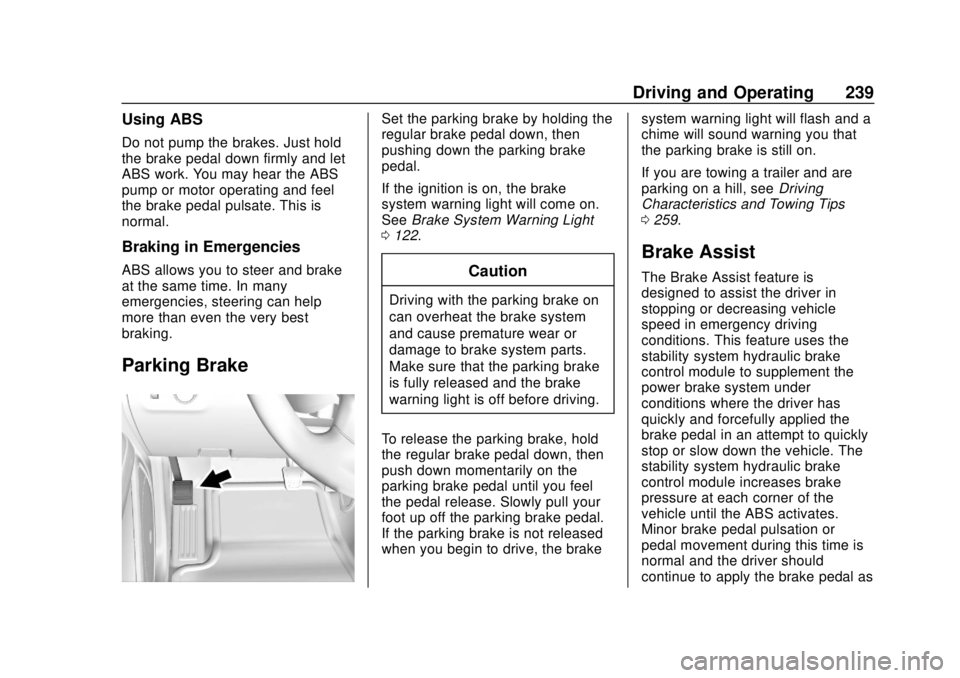
Parking Brake
Set the parking brake by holding the
regular brake pedal down, then
pushing down the parking brake
pedal.
If the ignition is on, the brake
system warning light will come on.
SeeBrake System Warning Light
0 122.
Caution
Driving with the parking brake on
can overheat the brake system
and cause premature wear or
damage to brake system parts.
Make sure that the parking brake
is fully released and the brake
warning light is off before driving.
To release the parking brake, hold
the regular brake pedal down, then
push down momentarily on the
parking brake pedal until you feel
the pedal release. Slowly pull your
foot up off the parking brake pedal.
If the parking brake is not released
when you begin to drive, the brake system warning light will flash and a
chime will sound warning you that
the parking brake is still on.
If you are towing a trailer and are
parking on a hill, see
Driving
Characteristics and Towing Tips
0 259.
Brake Assist
The Brake Assist feature is
designed to assist the driver in
stopping or decreasing vehicle
speed in emergency driving
conditions. This feature uses the
stability system hydraulic brake
control module to supplement the
power brake system under
conditions where the driver has
quickly and forcefully applied the
brake pedal in an attempt to quickly
stop or slow down the vehicle. The
stability system hydraulic brake
control module increases brake
pressure at each corner of the
vehicle until the ABS activates.
Minor brake pedal pulsation or
pedal movement during this time is
normal and the driver should
continue to apply the brake pedal as
Page 246 of 421
Chevrolet Colorado Owner Manual (GMNA-Localizing-U.S./Canada/Mexico-
11349743) - 2018 - crc - 10/12/17
Driving and Operating 245
.Optimizing the performance of
the anti-lock brake (ABS),
Traction Control System (TCS)
and StabiliTrak systems on
slippery surfaces
For more information, on disabling
the TCS and StabiliTrak systems
see Traction Control/Electronic
Stability Control 0240.
Off-Road Mode also interact with
the axle locking system. It allows
the vehicle to travel at higher
speeds with a locked rear axle. See
Locking Rear Axle 0245 for more
information.
Limited-Slip Differential
If equipped, the limited-slip
differential can give more traction on
snow, mud, ice, sand, or gravel.
It works like a standard axle most of
the time, but when traction is low,
this feature allows the drive wheel
with the most traction to move the
vehicle. For vehicles with the
limited-slip differential, driven under severe conditions, the rear axle fluid
should be changed. See
Maintenance Schedule
0365.
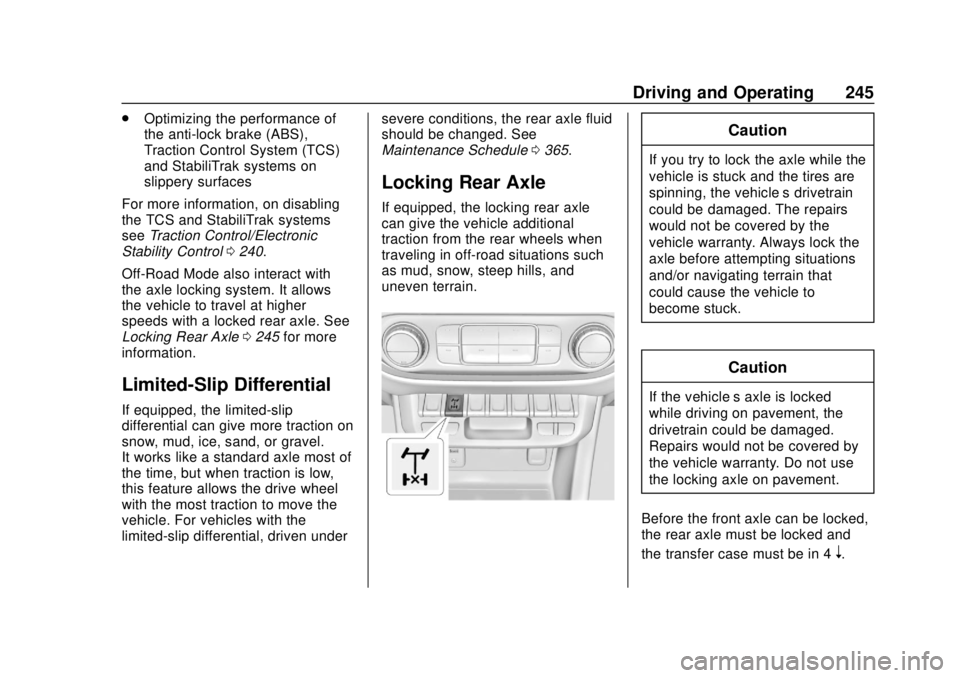
Locking Rear Axle
If equipped, the locking rear axle
can give the vehicle additional
traction from the rear wheels when
traveling in off-road situations such
as mud, snow, steep hills, and
uneven terrain.
Caution
If you try to lock the axle while the
vehicle is stuck and the tires are
spinning, the vehicle’ s drivetrain
could be damaged. The repairs
would not be covered by the
vehicle warranty. Always lock the
axle before attempting situations
and/or navigating terrain that
could cause the vehicle to
become stuck.
Caution
If the vehicle’ s axle is locked
while driving on pavement, the
drivetrain could be damaged.
Repairs would not be covered by
the vehicle warranty. Do not use
the locking axle on pavement.
Before the front axle can be locked,
the rear axle must be locked and
the transfer case must be in 4
n.
Page 248 of 421

Chevrolet Colorado Owner Manual (GMNA-Localizing-U.S./Canada/Mexico-
11349743) - 2018 - crc - 10/12/17
Driving and Operating 247
3. Wait for the light in the switchto stop flashing and remain
illuminated to show that the
rear axle is locked.
4. Press the front axle locking switch with the vehicle stopped
or moving less than 40 km/h
(25 mph).
5. Wait for the light in the switch to stop flashing and remain
illuminated to show that the
front axle is locked.
Engagement of the front axle
lock will disable the Antilock
Brake System (ABS) and
illuminate the ABS warning
light. Hill Decent Control (HDC)
will also be disabled.
The locking front axle will be
disengaged when the vehicle speed
exceeds 40 km/h (25 mph) or the
transfer case is shifted out of 4
n.
ABS will be automatically enabled
and the ABS warning light will turn
off when the locking front axle is
disengaged. If HDC was enabled prior to axle
lock, it will be automatically enabled
when the locking front axle is
disengaged.
After pressing the switch to unlock
the axle, it may remain locked due
to torque in the driveline. The axle is
more easily unlocked by turning the
steering wheel to the right and to
the left while traveling at a low
speed.
Cruise Control
With cruise control a speed of about
40 km/h (25 mph) or more can be
maintained without keeping your
foot on the accelerator. Cruise
control does not work at speeds
below about 40 km/h (25 mph).
{Warning
Cruise control can be dangerous
where you cannot drive safely at
a steady speed. Do not use
cruise control on winding roads or
in heavy traffic.
Cruise control can be dangerous
on slippery roads. On such roads,
fast changes in tire traction can
cause excessive wheel slip, and
you could lose control. Do not use
cruise control on slippery roads.
If equipped with a manual
transmission, the cruise control will
remain active when the gears are
shifted. The cruise is deactivated if
the clutch is pressed for several
seconds. If the cruise control is
Page 262 of 421

Chevrolet Colorado Owner Manual (GMNA-Localizing-U.S./Canada/Mexico-
11349743) - 2018 - crc - 10/12/17
Driving and Operating 261
vehicle may show signs similar to
engine overheating. To avoid this,
let the engine run while parked,
preferably on level ground, with the
transmission in P (Park) for a few
minutes before turning the engine
off. If the overheat warning comes
on, seeEngine Overheating 0291.
Parking on Hills
{Warning
Parking the vehicle on a hill with
the trailer attached can be
dangerous. If something goes
wrong, the rig could start to move.
People can be injured, and both
the vehicle and the trailer can be
damaged. When possible, always
park the rig on a flat surface.
If parking the rig on a hill: 1. Press the brake pedal, but do not shift into P (Park) yet. Turn
the wheels into the curb if
facing downhill or into traffic if
facing uphill. 2. Have someone place chocks
under the trailer wheels.
3. When the wheel chocks are in place, release the regular
brakes until the chocks absorb
the load.
4. Reapply the brake pedal. Then apply the parking brake and
shift into P (Park).
5. Release the brake pedal.Leaving After Parking on a Hill
1. Apply and hold the brake pedal.
2. Start the engine.
3. Shift into a gear.
4. Release the parking brake.
5. Let up on the brake pedal.
6. Drive slowly until the trailer is clear of the chocks.
7. Stop and have someone pick up and store the chocks.
Maintenance when Trailer
Towing
The vehicle needs service more
often when pulling a trailer. See
Maintenance Schedule 0365.
Things that are especially important
in trailer operation are automatic
transmission fluid, engine oil, axle
lubricant, belts, cooling system, and
brake system. It is a good idea to
inspect these before and during
the trip.
Check periodically to see that all
hitch nuts and bolts are tight.
Trailer Towing
Do not tow a trailer during break-in.
See New Vehicle Break-In 0216.
{Warning
The driver can lose control when
pulling a trailer if the correct
equipment is not used or the
vehicle is not driven properly. For
example, if the trailer is too heavy
(Continued)
Page 296 of 421
Chevrolet Colorado Owner Manual (GMNA-Localizing-U.S./Canada/Mexico-
11349743) - 2018 - crc - 10/12/17
Vehicle Care 295
There are only two reasons why the
brake fluid level in the reservoir may
go down:
.Normal brake lining wear. When
new linings are installed, the
fluid level goes back up.
. A fluid leak in the brake/clutch
hydraulic system. Have the
brake/clutch hydraulic system
fixed. With a leak, the brakes will
not work well.
Always clean the brake fluid
reservoir cap and the area around
the cap before removing it.
Do not top off the brake/clutch fluid.
Adding fluid does not correct a leak.
If fluid is added when the linings are
worn, there will be too much fluid
when new brake linings are
installed. Add or remove fluid, as
necessary, only when work is done
on the brake/clutch hydraulic
system.{Warning
If too much brake fluid is added, it
can spill on the engine and burn,
if the engine is hot enough. You
or others could be burned, and
the vehicle could be damaged.
Add brake fluid only when work is
done on the brake/clutch
hydraulic system.
When the brake/clutch fluid falls to a
low level, the brake warning light
comes on. See Brake System
Warning Light 0122.
Brake fluid absorbs water over time
which degrades the effectiveness of
the brake fluid. Replace brake fluid
at the specified intervals to prevent
increased stopping distance. See
Maintenance Schedule 0365.
What to Add
Use only GM approved DOT 3
brake fluid from a clean, sealed
container. See Recommended
Fluids and Lubricants 0374.
{Warning
The wrong or contaminated brake
fluid could result in damage to the
brake system. This could result in
the loss of braking leading to a
possible injury. Always use the
proper GM approved brake fluid.
Caution
If brake fluid is spilled on the
vehicle's painted surfaces, the
paint finish can be damaged.
Immediately wash off any painted
surface.
Battery - North America
For diesel engine vehicles, see
“Battery” in the Duramax diesel
supplement.
The original equipment battery is
maintenance free. Do not remove
the cap and do not add fluid.
Page 339 of 421
Chevrolet Colorado Owner Manual (GMNA-Localizing-U.S./Canada/Mexico-
11349743) - 2018 - crc - 10/12/17
338 Vehicle Care
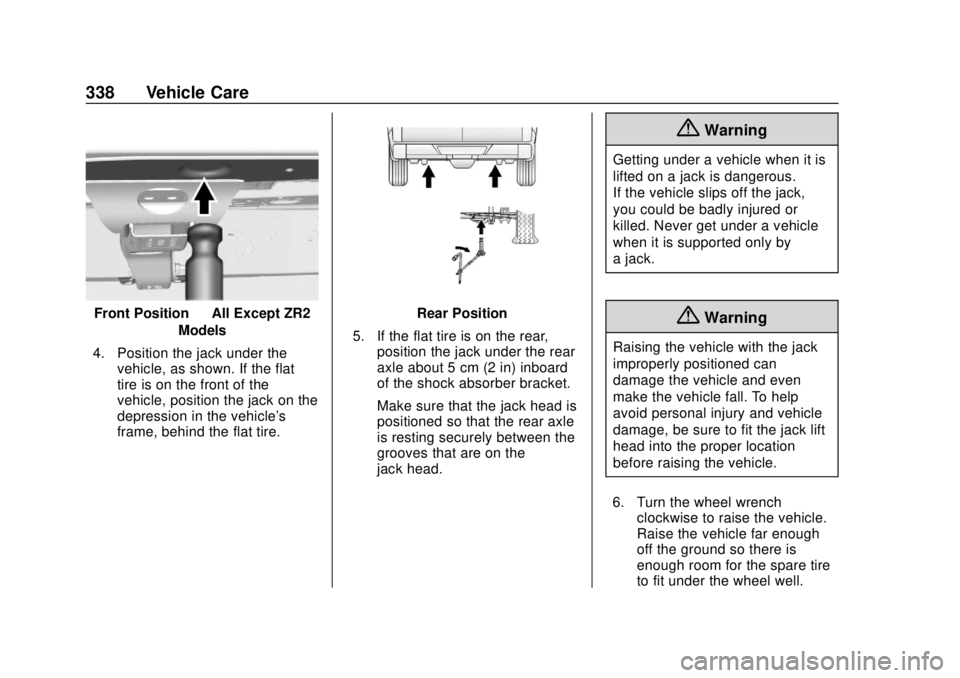
Front Position—All Except ZR2
Models
4. Position the jack under the vehicle, as shown. If the flat
tire is on the front of the
vehicle, position the jack on the
depression in the vehicle's
frame, behind the flat tire.Rear Position
5. If the flat tire is on the rear, position the jack under the rear
axle about 5 cm (2 in) inboard
of the shock absorber bracket.
Make sure that the jack head is
positioned so that the rear axle
is resting securely between the
grooves that are on the
jack head.
{Warning
Getting under a vehicle when it is
lifted on a jack is dangerous.
If the vehicle slips off the jack,
you could be badly injured or
killed. Never get under a vehicle
when it is supported only by
a jack.
{Warning
Raising the vehicle with the jack
improperly positioned can
damage the vehicle and even
make the vehicle fall. To help
avoid personal injury and vehicle
damage, be sure to fit the jack lift
head into the proper location
before raising the vehicle.
6. Turn the wheel wrench clockwise to raise the vehicle.
Raise the vehicle far enough
off the ground so there is
enough room for the spare tire
to fit under the wheel well.
Page 342 of 421
Chevrolet Colorado Owner Manual (GMNA-Localizing-U.S./Canada/Mexico-
11349743) - 2018 - crc - 10/12/17
Vehicle Care 341
The cap may only go on one way.
Be sure to line up any tabs on the
center cap with corresponding
indentations on the wheel.
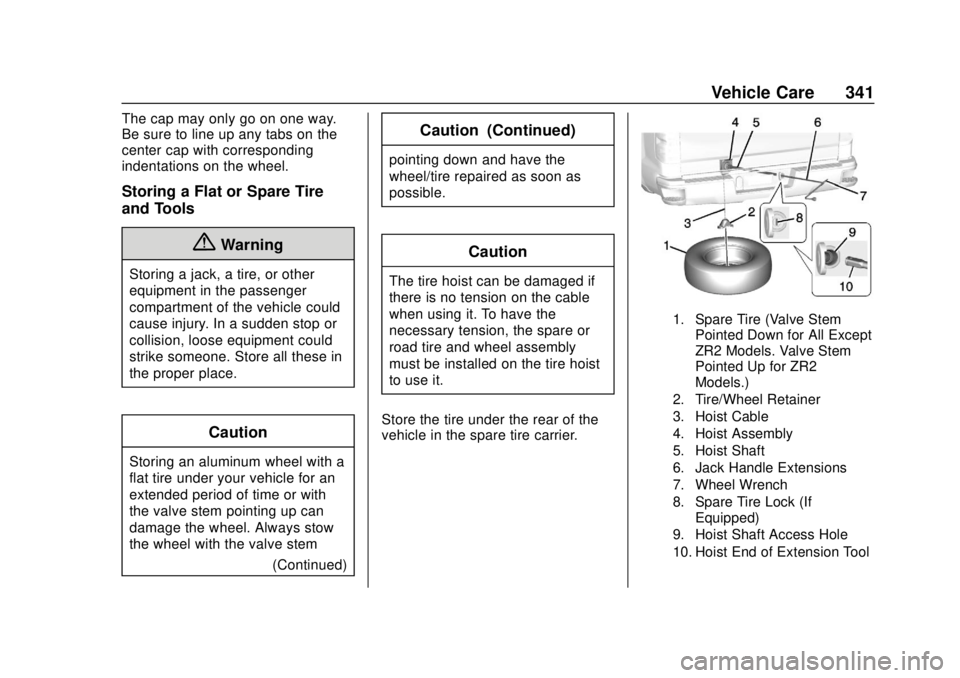
Storing a Flat or Spare Tire
and Tools
{Warning
Storing a jack, a tire, or other
equipment in the passenger
compartment of the vehicle could
cause injury. In a sudden stop or
collision, loose equipment could
strike someone. Store all these in
the proper place.
Caution
Storing an aluminum wheel with a
flat tire under your vehicle for an
extended period of time or with
the valve stem pointing up can
damage the wheel. Always stow
the wheel with the valve stem(Continued)
Caution (Continued)
pointing down and have the
wheel/tire repaired as soon as
possible.
Caution
The tire hoist can be damaged if
there is no tension on the cable
when using it. To have the
necessary tension, the spare or
road tire and wheel assembly
must be installed on the tire hoist
to use it.
Store the tire under the rear of the
vehicle in the spare tire carrier.
1. Spare Tire (Valve Stem Pointed Down for All Except
ZR2 Models. Valve Stem
Pointed Up for ZR2
Models.)
2. Tire/Wheel Retainer
3. Hoist Cable
4. Hoist Assembly
5. Hoist Shaft
6. Jack Handle Extensions
7. Wheel Wrench
8. Spare Tire Lock (If Equipped)
9. Hoist Shaft Access Hole
10. Hoist End of Extension Tool
Page 344 of 421
Chevrolet Colorado Owner Manual (GMNA-Localizing-U.S./Canada/Mexico-
11349743) - 2018 - crc - 10/12/17
Vehicle Care 343
and then try to turn the tire.
If the tire moves, use the wheel
wrench to tighten the cable.
8. Reinstall the spare tire lock, if the vehicle has one.
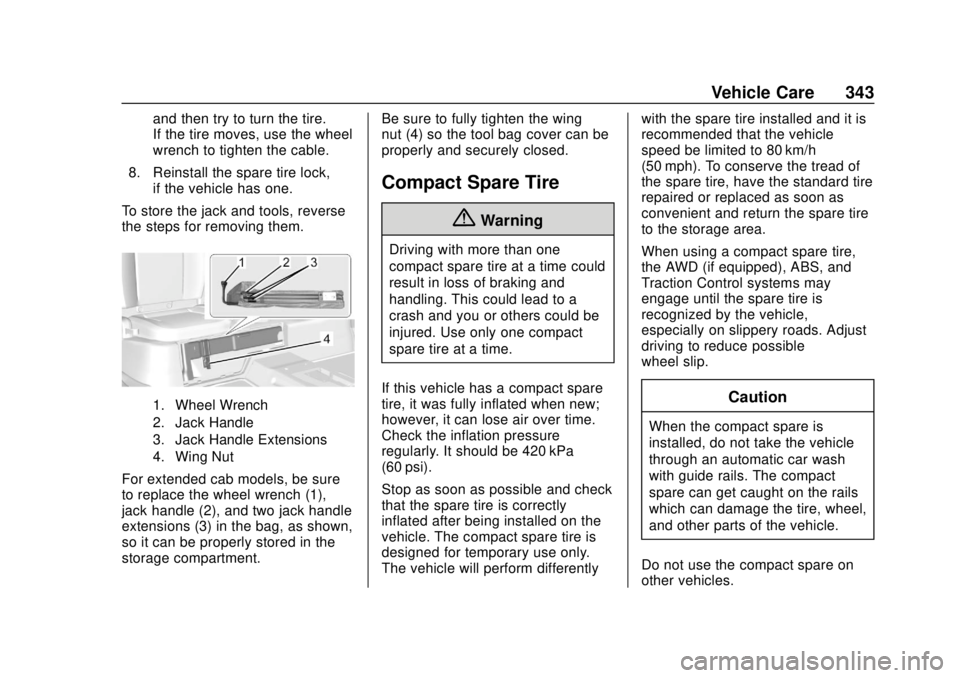
To store the jack and tools, reverse
the steps for removing them.
1. Wheel Wrench
2. Jack Handle
3. Jack Handle Extensions
4. Wing Nut
For extended cab models, be sure
to replace the wheel wrench (1),
jack handle (2), and two jack handle
extensions (3) in the bag, as shown,
so it can be properly stored in the
storage compartment. Be sure to fully tighten the wing
nut (4) so the tool bag cover can be
properly and securely closed.
Compact Spare Tire
{Warning
Driving with more than one
compact spare tire at a time could
result in loss of braking and
handling. This could lead to a
crash and you or others could be
injured. Use only one compact
spare tire at a time.
If this vehicle has a compact spare
tire, it was fully inflated when new;
however, it can lose air over time.
Check the inflation pressure
regularly. It should be 420 kPa
(60 psi).
Stop as soon as possible and check
that the spare tire is correctly
inflated after being installed on the
vehicle. The compact spare tire is
designed for temporary use only.
The vehicle will perform differently with the spare tire installed and it is
recommended that the vehicle
speed be limited to 80 km/h
(50 mph). To conserve the tread of
the spare tire, have the standard tire
repaired or replaced as soon as
convenient and return the spare tire
to the storage area.
When using a compact spare tire,
the AWD (if equipped), ABS, and
Traction Control systems may
engage until the spare tire is
recognized by the vehicle,
especially on slippery roads. Adjust
driving to reduce possible
wheel slip.
Caution
When the compact spare is
installed, do not take the vehicle
through an automatic car wash
with guide rails. The compact
spare can get caught on the rails
which can damage the tire, wheel,
and other parts of the vehicle.
Do not use the compact spare on
other vehicles.