2018 CHEVROLET COLORADO light
[x] Cancel search: lightPage 287 of 421

Chevrolet Colorado Owner Manual (GMNA-Localizing-U.S./Canada/Mexico-
11349743) - 2018 - crc - 10/12/17
286 Vehicle Care
Do not remove the cap to check the
fluid level or to top-off the fluid level.
Remove the cap only when
necessary to add the proper fluid
until the level reaches the MIN line.
Engine Air Cleaner/Filter
The engine air cleaner/filter is in the
engine compartment on the
passenger side of the vehicle. See
Engine Compartment Overview
0278.
When to Inspect the Engine Air
Cleaner/Filter
For intervals on changing and
inspecting the engine air cleaner/
filter, see Maintenance Schedule
0 365.
How to Inspect the Engine Air
Cleaner/Filter
Do not start the engine or have the
engine running with the engine air
cleaner/filter housing open. Before
removing the engine air cleaner/
filter, make sure that the engine air
cleaner/filter housing and nearby
components are free of dirt and debris. Remove the engine air
cleaner/filter. Lightly tap and shake
the engine air cleaner/filter (away
from the vehicle), to release loose
dust and dirt. Inspect the engine air
cleaner/filter for damage, and
replace if damaged. Do not clean
the engine air cleaner/filter or
components with water or
compressed air.
To inspect or replace the air cleaner/
filter:
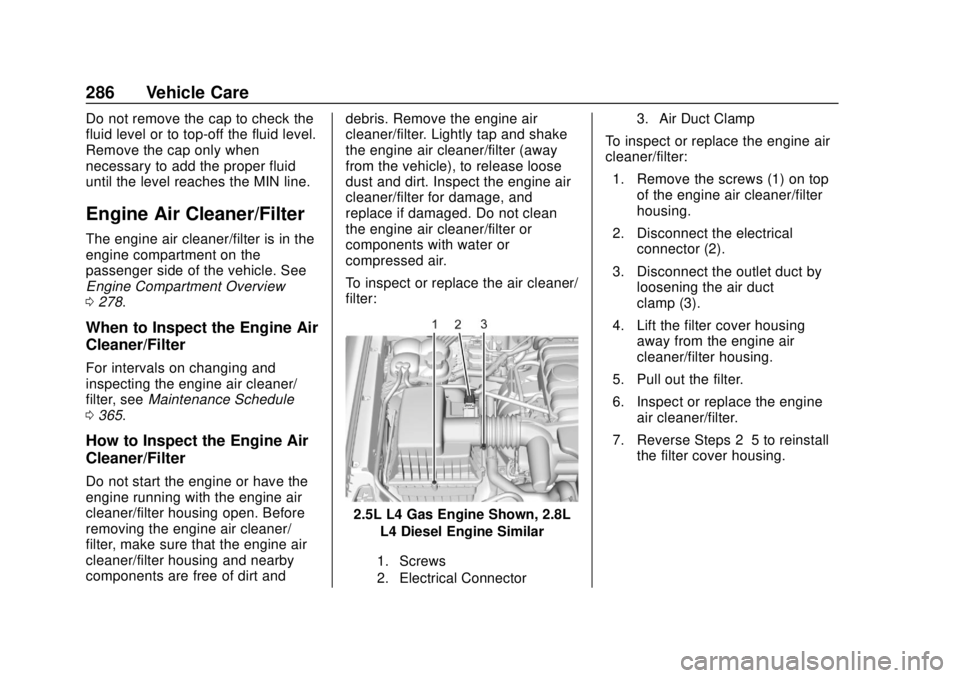
2.5L L4 Gas Engine Shown, 2.8L
L4 Diesel Engine Similar
1. Screws
2. Electrical Connector 3. Air Duct Clamp
To inspect or replace the engine air
cleaner/filter:
1. Remove the screws (1) on top of the engine air cleaner/filter
housing.
2. Disconnect the electrical connector (2).
3. Disconnect the outlet duct by loosening the air duct
clamp (3).
4. Lift the filter cover housing away from the engine air
cleaner/filter housing.
5. Pull out the filter.
6. Inspect or replace the engine air cleaner/filter.
7. Reverse Steps 2–5 to reinstall the filter cover housing.
Page 295 of 421

Chevrolet Colorado Owner Manual (GMNA-Localizing-U.S./Canada/Mexico-
11349743) - 2018 - crc - 10/12/17
294 Vehicle Care
heard all the time the vehicle is
moving, except when applying the
brake pedal firmly.
{Warning
The brake wear warning sound
means that soon the brakes will
not work well. That could lead to
a crash. When the brake wear
warning sound is heard, have the
vehicle serviced.
Caution
Continuing to drive with worn-out
brake pads could result in costly
brake repair.
Some driving conditions or climates
can cause a brake squeal when the
brakes are first applied or lightly
applied. This does not mean
something is wrong with the brakes.
Properly torqued wheel nuts are
necessary to help prevent brake
pulsation. When tires are rotated, inspect brake pads for wear and
evenly tighten wheel nuts in the
proper sequence to torque
specifications in
Capacities and
Specifications 0379.
Brake linings should always be
replaced as complete axle sets.
Brake Pedal Travel
See your dealer if the brake pedal
does not return to normal height,
or if there is a rapid increase in
pedal travel. This could be a sign
that brake service may be required.
Replacing Brake System Parts
Always replace brake system parts
with new, approved replacement
parts. If this is not done, the brakes
may not work properly. The braking
performance expected can change
in many other ways if the wrong
replacement brake parts are
installed or parts are improperly
installed.
Brake Fluid
The brake/clutch master cylinder
reservoir is filled with GM approved
DOT 3 brake fluid as indicated on
the reservoir cap. See Engine
Compartment Overview 0278 for
the location of the reservoir.
Checking Brake Fluid
Place the vehicle in P (Park) or
Neutral with the parking brake
applied if equipped with a manual
transmission. On a level surface,
the brake fluid level should be
between the minimum and
maximum marks on the brake fluid
reservoir.
Page 296 of 421

Chevrolet Colorado Owner Manual (GMNA-Localizing-U.S./Canada/Mexico-
11349743) - 2018 - crc - 10/12/17
Vehicle Care 295
There are only two reasons why the
brake fluid level in the reservoir may
go down:
.Normal brake lining wear. When
new linings are installed, the
fluid level goes back up.
. A fluid leak in the brake/clutch
hydraulic system. Have the
brake/clutch hydraulic system
fixed. With a leak, the brakes will
not work well.
Always clean the brake fluid
reservoir cap and the area around
the cap before removing it.
Do not top off the brake/clutch fluid.
Adding fluid does not correct a leak.
If fluid is added when the linings are
worn, there will be too much fluid
when new brake linings are
installed. Add or remove fluid, as
necessary, only when work is done
on the brake/clutch hydraulic
system.{Warning
If too much brake fluid is added, it
can spill on the engine and burn,
if the engine is hot enough. You
or others could be burned, and
the vehicle could be damaged.
Add brake fluid only when work is
done on the brake/clutch
hydraulic system.
When the brake/clutch fluid falls to a
low level, the brake warning light
comes on. See Brake System
Warning Light 0122.
Brake fluid absorbs water over time
which degrades the effectiveness of
the brake fluid. Replace brake fluid
at the specified intervals to prevent
increased stopping distance. See
Maintenance Schedule 0365.
What to Add
Use only GM approved DOT 3
brake fluid from a clean, sealed
container. See Recommended
Fluids and Lubricants 0374.
{Warning
The wrong or contaminated brake
fluid could result in damage to the
brake system. This could result in
the loss of braking leading to a
possible injury. Always use the
proper GM approved brake fluid.
Caution
If brake fluid is spilled on the
vehicle's painted surfaces, the
paint finish can be damaged.
Immediately wash off any painted
surface.
Battery - North America
For diesel engine vehicles, see
“Battery” in the Duramax diesel
supplement.
The original equipment battery is
maintenance free. Do not remove
the cap and do not add fluid.
Page 309 of 421

Chevrolet Colorado Owner Manual (GMNA-Localizing-U.S./Canada/Mexico-
11349743) - 2018 - crc - 10/12/17
308 Vehicle Care
The vehicle may not be equipped
with all of the fuses, relays, and
features shown.Fuses Usage
F1 Traction control module power
F2 Engine control module power
F3 Air conditioning clutch
F4 –
F5 Engine control module/Integrated
chassis control
module/Fuel pump
power module
F6 Wipers
F7 Cargo lamp/Bed lighting (if
equipped)
F8 Fuel injectors–even
F9 Fuel injectors–odd
F10 Engine control module 1 Fuses Usage
F11 Miscellaneous 1/ Ignition
F12 Starter
F13 Traction control module
F14 –
F15 –
F16 –
F17 Front axle actuator
F18 –
F19 –
F20 –
F21 Front blower
F22 Antilock brake system valves
F23 –
F24 Trailer
F25 Transfer case electronic control
F26 Antilock brake system pump Fuses Usage
F27 Trailer brake control module (if
equipped)/Trailer
wiring
F28 Rear window defogger
F29 –
F30 Driver heated seat
F31 –
F32 Passenger heated seat
F33 Body control module 3
F34 Fuel pump power module
F35 Integrated chassis control module (if
equipped)
F36 Center high-mounted
stoplamp
F37 Right high-beam headlamp
Page 311 of 421

Chevrolet Colorado Owner Manual (GMNA-Localizing-U.S./Canada/Mexico-
11349743) - 2018 - crc - 10/12/17
310 Vehicle Care
RelaysUsage
K6 Cargo lamp/Bed lighting (if
equipped)
K7 Powertrain
K8 –
K9 Front differential lock
actuators (ZR2
only)
K10 Rear differential lock
actuators (ZR2
only)
K11 Center high-mounted
stoplamp
K12 Vacuum pump
K13 –
K14 Trailer parking lamps
K15 Run/Crank
K16 – Relays
Usage
K17 Rear window/Mirror defogger
Instrument Panel Fuse
Block
The instrument panel fuse block is
behind the passenger side cowl side
trim panel. Remove the plastic nut
at the front of the cover, then pull
the cover away from the trim panel
to access the fuse block.
Page 313 of 421

Chevrolet Colorado Owner Manual (GMNA-Localizing-U.S./Canada/Mexico-
11349743) - 2018 - crc - 10/12/17
312 Vehicle Care
FusesUsage
F21 –
F22 –
F23 Data link connector/USB
F24 HVAC ignition
F25 Body control module 7
F26 –
F27 –
F28 Instrument panel/ Sensing and
diagnostic module/
Ignition
F29 Miscellaneous/Ignition
F30 –
F31 Front camera
F32 Steering wheel controls backlighting
F33 Heated steering wheel
F34 Front ventilated seats
F35 Park/Reverse/Neutral/ Drive/Low/Wireless
charging module Fuses
Usage
F36 Discrete logic ignition sensor
F37 –
F38 –
F39 Auxiliary power outlet 2
F40 Auxiliary power outlet
F41 Auxiliary power outlet 1/Lighter
F42 Left power window
F43 Driver power seat
F44 –
F45 Right power window
F46 Passenger power seat
Relays Usage
K1 Retained accessory power
K2 Run/CrankWheels and Tires
Tires
Every new GM vehicle has
high-quality tires made by a
leading tire manufacturer. See
the warranty manual for
information regarding the tire
warranty and where to get
service. For additional
information refer to the tire
manufacturer.
{Warning
.Poorly maintained and
improperly used tires are
dangerous.
.Overloading the tires can
cause overheating as a
result of too much
flexing. There could be a
blowout and a serious
crash. See Vehicle Load
Limits 0210.
(Continued)
Page 319 of 421

Chevrolet Colorado Owner Manual (GMNA-Localizing-U.S./Canada/Mexico-
11349743) - 2018 - crc - 10/12/17
318 Vehicle Care
maximum capacity of fuel, oil,
and coolant, but without
passengers and cargo.
DOT Markings
:A code molded
into the sidewall of a tire
signifying that the tire is in
compliance with the U.S.
Department of Transportation
(DOT) Motor Vehicle Safety
Standards. The DOT code
includes the Tire Identification
Number (TIN), an alphanumeric
designator which can also
identify the tire manufacturer,
production plant, brand, and
date of production.
GVWR
:Gross Vehicle Weight
Rating. See Vehicle Load Limits
0 210.
GAWR FRT
:Gross Axle Weight
Rating for the front axle. See
Vehicle Load Limits 0210.
GAWR RR
:Gross Axle Weight
Rating for the rear axle. See
Vehicle Load Limits 0210. Intended Outboard Sidewall
:
The side of an asymmetrical tire
that must always face outward
when mounted on a vehicle.
Kilopascal (kPa)
:The metric
unit for air pressure.
Light Truck (LT-Metric) Tire
:A
tire used on light duty trucks and
some multipurpose passenger
vehicles.
Load Index
:An assigned
number ranging from 1 to 279
that corresponds to the load
carrying capacity of a tire.
Maximum Inflation Pressure
:
The maximum air pressure to
which a cold tire can be inflated.
The maximum air pressure is
molded onto the sidewall.
Maximum Load Rating
:The
load rating for a tire at the
maximum permissible inflation
pressure for that tire. Maximum Loaded Vehicle
Weight
:The sum of curb
weight, accessory weight,
vehicle capacity weight, and
production options weight.
Normal Occupant Weight
:The
number of occupants a vehicle
is designed to seat multiplied by
68 kg (150 lb). See Vehicle Load
Limits 0210.
Occupant Distribution
:
Designated seating positions.
Outward Facing Sidewall
:The
side of an asymmetrical tire that
has a particular side that faces
outward when mounted on a
vehicle. The side of the tire that
contains a whitewall, bears
white lettering, or bears
manufacturer, brand, and/or
model name molding that is
higher or deeper than the same
moldings on the other sidewall
of the tire.
Page 320 of 421

Chevrolet Colorado Owner Manual (GMNA-Localizing-U.S./Canada/Mexico-
11349743) - 2018 - crc - 10/12/17
Vehicle Care 319
Passenger (P-Metric) Tire:A
tire used on passenger cars and
some light duty trucks and
multipurpose vehicles.
Recommended Inflation
Pressure
:Vehicle
manufacturer's recommended
tire inflation pressure as shown
on the tire placard.
See Tire Pressure 0320 and
Vehicle Load Limits 0210.
Radial Ply Tire
:A pneumatic
tire in which the ply cords that
extend to the beads are laid at
90 degrees to the centerline of
the tread.
Rim
:A metal support for a tire
and upon which the tire beads
are seated.
Sidewall
:The portion of a tire
between the tread and the bead. Speed Rating
:An
alphanumeric code assigned to
a tire indicating the maximum
speed at which a tire can
operate.
Traction
:The friction between
the tire and the road surface.
The amount of grip provided.
Tread
:The portion of a tire that
comes into contact with
the road.
Treadwear Indicators
:Narrow
bands, sometimes called wear
bars, that show across the tread
of a tire when only 1.6 mm
(1/16 in) of tread remains. See
When It Is Time for New Tires
0 326.
UTQGS (Uniform Tire Quality
Grading Standards)
:A tire
information system that provides
consumers with ratings for a
tire's traction, temperature, and
treadwear. Ratings are
determined by tire
manufacturers using government testing procedures.
The ratings are molded into the
sidewall of the tire. See
Uniform
Tire Quality Grading 0329.
Vehicle Capacity Weight
:The
number of designated seating
positions multiplied by
68 kg (150 lb) plus the rated
cargo load. See Vehicle Load
Limits 0210.
Vehicle Maximum Load on the
Tire
:Load on an individual tire
due to curb weight, accessory
weight, occupant weight, and
cargo weight.
Vehicle Placard
:A label
permanently attached to a
vehicle showing the vehicle
capacity weight and the original
equipment tire size and
recommended inflation pressure.
See “Tire and Loading
Information Label” underVehicle
Load Limits 0210.