2018 CHEVROLET COLORADO lock
[x] Cancel search: lockPage 246 of 421

Chevrolet Colorado Owner Manual (GMNA-Localizing-U.S./Canada/Mexico-
11349743) - 2018 - crc - 10/12/17
Driving and Operating 245
.Optimizing the performance of
the anti-lock brake (ABS),
Traction Control System (TCS)
and StabiliTrak systems on
slippery surfaces
For more information, on disabling
the TCS and StabiliTrak systems
see Traction Control/Electronic
Stability Control 0240.
Off-Road Mode also interact with
the axle locking system. It allows
the vehicle to travel at higher
speeds with a locked rear axle. See
Locking Rear Axle 0245 for more
information.
Limited-Slip Differential
If equipped, the limited-slip
differential can give more traction on
snow, mud, ice, sand, or gravel.
It works like a standard axle most of
the time, but when traction is low,
this feature allows the drive wheel
with the most traction to move the
vehicle. For vehicles with the
limited-slip differential, driven under severe conditions, the rear axle fluid
should be changed. See
Maintenance Schedule
0365.
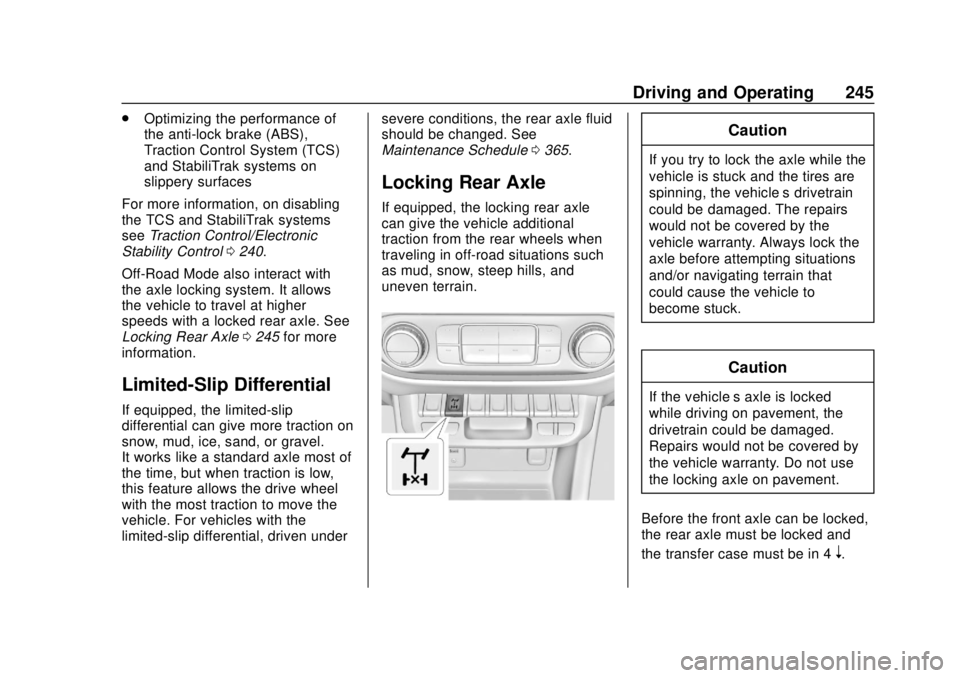
Locking Rear Axle
If equipped, the locking rear axle
can give the vehicle additional
traction from the rear wheels when
traveling in off-road situations such
as mud, snow, steep hills, and
uneven terrain.
Caution
If you try to lock the axle while the
vehicle is stuck and the tires are
spinning, the vehicle’ s drivetrain
could be damaged. The repairs
would not be covered by the
vehicle warranty. Always lock the
axle before attempting situations
and/or navigating terrain that
could cause the vehicle to
become stuck.
Caution
If the vehicle’ s axle is locked
while driving on pavement, the
drivetrain could be damaged.
Repairs would not be covered by
the vehicle warranty. Do not use
the locking axle on pavement.
Before the front axle can be locked,
the rear axle must be locked and
the transfer case must be in 4
n.
Page 247 of 421

Chevrolet Colorado Owner Manual (GMNA-Localizing-U.S./Canada/Mexico-
11349743) - 2018 - crc - 10/12/17
246 Driving and Operating
To lock the rear axle:1. Press the rear axle locking switch with the vehicle moving
less than 40 km/h (25 mph).
2. Wait for the light in the switch to stop flashing and remain
illuminated to show that the
rear axle is locked.
The locking rear axle will be
disengaged when the vehicle speed
exceeds 40 km/h (25 mph). The
Off-Road Mode allows the axle lock
to remain engaged at higher vehicle
speeds.
After pressing the switch to unlock
the axle, it may remain locked due
to torque in the driveline. The axle is
more easily unlocked by turning the
steering wheel to the right and to
the left while traveling at a low
speed.
Locking Front Axle
If equipped, the locking front axle
can give the vehicle additional
traction when traveling in off-road
situations such as mud, snow, steep
hills, and uneven terrain.
Caution
If you try to lock the axle while the
vehicle is stuck and the tires are
spinning, the vehicle’ s drivetrain
could be damaged. The repairs
would not be covered by the
vehicle warranty. Always lock the
axle before attempting situations
and/or navigating terrain that
could cause the vehicle to
become stuck.
Caution
If the vehicle’ s axle is locked
while driving on pavement, the
drivetrain could be damaged.
Repairs would not be covered by
the vehicle warranty. Do not use
the locking axle on pavement.
Before the front axle can be locked,
the rear axle must be locked and
the transfer case must be in 4
n.
To lock the front and rear axles:
1. Place the transfer case in 4
n.
This is the only mode that
allows the front axle to lock.
See Four-Wheel Drive 0231
for more information regarding
the transfer case and
four-wheel drive low operation.
2. Press the rear axle locking switch with the vehicle stopped
or moving less than 40 km/h
(25 mph).
Page 248 of 421

Chevrolet Colorado Owner Manual (GMNA-Localizing-U.S./Canada/Mexico-
11349743) - 2018 - crc - 10/12/17
Driving and Operating 247
3. Wait for the light in the switchto stop flashing and remain
illuminated to show that the
rear axle is locked.
4. Press the front axle locking switch with the vehicle stopped
or moving less than 40 km/h
(25 mph).
5. Wait for the light in the switch to stop flashing and remain
illuminated to show that the
front axle is locked.
Engagement of the front axle
lock will disable the Antilock
Brake System (ABS) and
illuminate the ABS warning
light. Hill Decent Control (HDC)
will also be disabled.
The locking front axle will be
disengaged when the vehicle speed
exceeds 40 km/h (25 mph) or the
transfer case is shifted out of 4
n.
ABS will be automatically enabled
and the ABS warning light will turn
off when the locking front axle is
disengaged. If HDC was enabled prior to axle
lock, it will be automatically enabled
when the locking front axle is
disengaged.
After pressing the switch to unlock
the axle, it may remain locked due
to torque in the driveline. The axle is
more easily unlocked by turning the
steering wheel to the right and to
the left while traveling at a low
speed.
Cruise Control
With cruise control a speed of about
40 km/h (25 mph) or more can be
maintained without keeping your
foot on the accelerator. Cruise
control does not work at speeds
below about 40 km/h (25 mph).
{Warning
Cruise control can be dangerous
where you cannot drive safely at
a steady speed. Do not use
cruise control on winding roads or
in heavy traffic.
Cruise control can be dangerous
on slippery roads. On such roads,
fast changes in tire traction can
cause excessive wheel slip, and
you could lose control. Do not use
cruise control on slippery roads.
If equipped with a manual
transmission, the cruise control will
remain active when the gears are
shifted. The cruise is deactivated if
the clutch is pressed for several
seconds. If the cruise control is
Page 253 of 421

Chevrolet Colorado Owner Manual (GMNA-Localizing-U.S./Canada/Mexico-
11349743) - 2018 - crc - 10/12/17
252 Driving and Operating
approaching a vehicle ahead too
quickly, FCA provides a red flashing
alert on the windshield, and rapidly
beeps. FCA also lights an amber
visual alert if following another
vehicle much too closely.
FCA detects vehicles within a
distance of approximately 60 m
(197 ft) and operates at speeds
above 40 km/h (25 mph).
{Warning
FCA is a warning system and
does not apply the brakes. When
approaching a slower-moving or
stopped vehicle ahead too rapidly,
or when following a vehicle too
closely, FCA may not provide a
warning with enough time to help
avoid a crash. It also may not
provide any warning at all. FCA
does not warn of pedestrians,
animals, signs, guardrails,
bridges, construction barrels,
or other objects. Be ready to take
action and apply the brakes. See
Defensive Driving0199. FCA can be disabled with either the
FCA steering wheel control or,
if equipped, through vehicle
personalization. See
“Collision/
Detection Systems” underVehicle
Personalization 0136.
Detecting the Vehicle Ahead
FCA warnings will not occur unless
the FCA system detects a vehicle
ahead. When a vehicle is detected,
the vehicle ahead indicator will
display green. Vehicles may not be
detected on curves, highway exit
ramps, or hills, due to poor visibility;
or if a vehicle ahead is partially
blocked by pedestrians or other
objects. FCA will not detect another
vehicle ahead until it is completely
in the driving lane.
{Warning
FCA does not provide a warning
to help avoid a crash, unless it
detects a vehicle. FCA may not
detect a vehicle ahead if the FCA
sensor is blocked by dirt, snow,
or ice, or if the windshield is
damaged. It may also not detect a
vehicle on winding or hilly roads,
or in conditions that can limit
visibility such as fog, rain,
or snow, or if the headlamps or
windshield are not cleaned or in
proper condition. Keep the
windshield, headlamps, and FCA
sensors clean and in good repair.
Collision Alert
Page 255 of 421

Chevrolet Colorado Owner Manual (GMNA-Localizing-U.S./Canada/Mexico-
11349743) - 2018 - crc - 10/12/17
254 Driving and Operating
{Warning
The LDW system does not steer
the vehicle. The LDW system
may not:. Provide enough time to
avoid a crash.
. Detect lane markings under
poor weather or visibility
conditions. This can occur if
the windshield or
headlamps are blocked by
dirt, snow, or ice; if they are
not in proper condition; or if
the sun shines directly into
the camera.
. Detect road edges.
. Detect lanes on winding or
hilly roads.
If LDW only detects lane
markings on one side of the road,
it will only warn you when
departing the lane on the side
where it has detected a lane
marking. Always keep your (Continued)
Warning (Continued)
attention on the road and
maintain proper vehicle position
within the lane, or vehicle
damage, injury, or death could
occur. Always keep the
windshield, headlamps, and
camera sensors clean and in
good repair. Do not use LDW in
bad weather conditions.
How the System Works
The LDW camera sensor is on the
windshield ahead of the rearview
mirror.
To turn LDW on and off, press
@on
the center stack. The control
indicator will light when LDW is on.
When LDW is on,@is green if
LDW is available to warn of a lane
departure. If the vehicle crosses a
detected lane marking without using
the turn signal in that direction,
@
changes to amber and flashes.
Additionally, there will be three
beeps on the right or left, depending
on the lane departure direction.
When the System Does Not
Seem to Work Properly
The system may not detect lanes as
well when there are:
. Close vehicles ahead.
. Sudden lighting changes, such
as when driving through tunnels.
. Banked roads.
If the LDW system is not functioning
properly when lane markings are
clearly visible, cleaning the
windshield may help.
LDW alerts may occur due to tar
marks, shadows, cracks in the road,
temporary or construction lane
markings, or other road
imperfections. This is normal system
Page 268 of 421

Chevrolet Colorado Owner Manual (GMNA-Localizing-U.S./Canada/Mexico-
11349743) - 2018 - crc - 10/12/17
Driving and Operating 267
.When pulling a heavy trailer or a
large or heavy load in busy
parking lots where improved low
speed control of the vehicle is
desired.
Operating the vehicle in Tow/Haul
when lightly loaded or with no trailer
at all will not cause damage.
However, there is no benefit to the
selection of Tow/Haul when the
vehicle is unloaded. Such a
selection when unloaded may result
in unpleasant engine and
transmission driving characteristics
and reduced fuel economy. Tow/
Haul is recommended only when
pulling a heavy trailer or a large or
heavy load.
If the vehicle has a diesel engine,
the Tow/Haul button activates the
exhaust brake system
simultaneously. See “Exhaust
Brake” in the Duramax diesel
supplement.Integrated Trailer Brake
Control System
The vehicle may have an Integrated
Trailer Brake Control (ITBC) system
for use with electric trailer brakes or
most electric over hydraulic trailer
brakes.
This symbol is on the Trailer Brake
Control Panel on vehicles with an
ITBC system. The power output to
the trailer brakes is based on the
amount of brake pressure being
applied by the vehicle’s brake
system, and on the type of trailer
brakes detected. This available
power output to the trailer brakes
can be adjusted to a wide range of
trailering situations.
The ITBC system is integrated with
the vehicle’ s brake, antilock brake,
and StabiliTrak systems. In trailering
conditions that cause the vehicle’s antilock brake or StabiliTrak
systems to activate, power sent to
the trailer's brakes will be
automatically adjusted to minimize
trailer wheel lock-up. This does not
imply that the trailer has StabiliTrak.
If the vehicle’s brake, antilock brake,
or StabiliTrak systems are not
functioning properly, the ITBC
system may not be fully functional
or may not function at all. Make sure
all of these systems are fully
operational to ensure full
functionality of the ITBC system.
The ITBC system is powered
through the vehicle's electrical
system. Turning the ignition off will
also turn off the ITBC system. The
ITBC system is fully functional only
when the ignition is in ON/RUN.
{Warning
Connecting a trailer that has an
air brake system may result in
reduced or complete loss of trailer
braking. There may be an
(Continued)
Page 270 of 421

Chevrolet Colorado Owner Manual (GMNA-Localizing-U.S./Canada/Mexico-
11349743) - 2018 - crc - 10/12/17
Driving and Operating 269
The Trailer Output will indicate“- - -
- - -” on the Trailer Brake Display
Page whenever the following occur:
. No trailer is connected.
. A trailer without electric brakes
is connected (no DIC message
will display).
. A trailer with electric brakes has
become disconnected (a
CHECK TRAILER WIRING
message will also display on
the DIC).
. There is a fault present in the
wiring to the trailer brakes (a
CHECK TRAILER WIRING
message will also display on
the DIC).
. The ITBC system is not working
due to a fault (a SERVICE
TRAILER BRAKE SYSTEM
message will also display in
the DIC).
Manual Trailer Brake Apply
The Manual Trailer Brake Apply
Lever is used to apply the trailer ’s
electric brakes independent of the
vehicle’s brakes. Sliding the lever to the left will apply only the trailer
brakes. Use this lever to adjust
Trailer Gain to properly adjust the
power output to the trailer brakes.
The trailer's and the vehicle's brake
lamps will come on when either
vehicle brakes or manual trailer
brakes are applied.
Trailer Gain Adjustment Procedure
Trailer Gain should be set for a
specific trailering condition and must
be adjusted anytime vehicle loading,
trailer loading, or road surface
conditions change.
{Warning
Trailer brakes that are
over-gained or under-gained may
not stop the vehicle and the trailer
as intended and can result in a
crash. Always follow the
instructions to set the Trailer Gain
for the proper trailer stopping
performance.
Use the following to adjust Trailer
Gain for each towing condition:
1. Drive the vehicle with the trailer attached on a level road
surface representative of the
towing condition and free of
traffic at about 32 to 40 km/h
(20 to 25 mph) and fully apply
the Manual Trailer Brake Apply
Lever.
Adjusting Trailer Gain at
speeds lower than 32 to
40 km/h (20 to 25 mph) may
result in an incorrect gain
setting.
2. Adjust the Trailer Gain, using the Trailer Gain Adjustment
Buttons, to just below the point
of trailer wheel lock-up,
indicated by trailer wheel
squeal or tire smoke when a
trailer wheel locks.
Trailer wheel lock-up may not
occur if towing a heavily loaded
trailer. In this case, adjust the
Trailer Gain to the highest
allowable setting for the towing
condition.
Page 271 of 421

Chevrolet Colorado Owner Manual (GMNA-Localizing-U.S./Canada/Mexico-
11349743) - 2018 - crc - 10/12/17
270 Driving and Operating
3. Readjust Trailer Gain anytimevehicle loading, trailer loading,
or road surface conditions
change or if trailer wheel
lock-up is noticed at any time
while towing.
Other ITBC-Related DIC Messages
In addition to displaying TRAILER
GAIN and OUTPUT through the
DIC, trailer connection and ITBC
system status are displayed on
the DIC.
TRAILER CONNECTED: This
message will briefly display when a
trailer with electric brakes is first
connected to the vehicle. This
message will automatically turn off
in about 10 seconds. This message
can be acknowledged before it
automatically turns off.
CHECK TRAILER WIRING: This
message will display if:
. The ITBC system first
determines connection to a
trailer with electric brakes and
then the trailer harness becomes
disconnected from the vehicle. If the disconnect occurs while
the vehicle is stationary, this
message will automatically turn
off in about 30 seconds. This
message will also turn off if it is
acknowledged or if the trailer
harness is reconnected.
If the disconnect occurs while
the vehicle is moving, this
message will continue until the
ignition is turned off. This
message will also turn off if it is
acknowledged or if the trailer
harness is reconnected.
. There is an electrical fault in the
wiring to the trailer brakes. This
message will continue as long
as there is an electrical fault in
the trailer wiring. This message
will also turn off if it is
acknowledged.
To determine if the electrical fault is
on the vehicle side or trailer side of
the trailer wiring harness
connection: 1. Disconnect the trailer wiring harness from the vehicle.
2. Turn the ignition off. 3. Wait 10 seconds, then turn the
ignition back to RUN.
4. If the CHECK TRAILER WIRING message reappears,
the electrical fault is on the
vehicle side.
If the CHECK TRAILER
WIRING message only
reappears when connecting the
trailer wiring harness to the
vehicle, the electrical fault is on
the trailer side.
SERVICE TRAILER BRAKE
SYSTEM: This message will display
when there is a problem with the
ITBC system. If this message
continues over multiple ignition
cycles, there is a problem with the
ITBC system. Have the vehicle
serviced.
If either the CHECK TRAILER
WIRING or SERVICE TRAILER
BRAKE SYSTEM message displays
while driving, the ITBC system may
not be fully functional or may not
function at all. When traffic
conditions allow, carefully pull the
vehicle over to the side of the road