2018 CHEVROLET BOLT EV display
[x] Cancel search: displayPage 249 of 370

Chevrolet BOLT EV Owner Manual (GMNA-Localizing-U.S./Canada/Mexico-
11434431) - 2018 - crc - 2/14/18
248 Driving and Operating
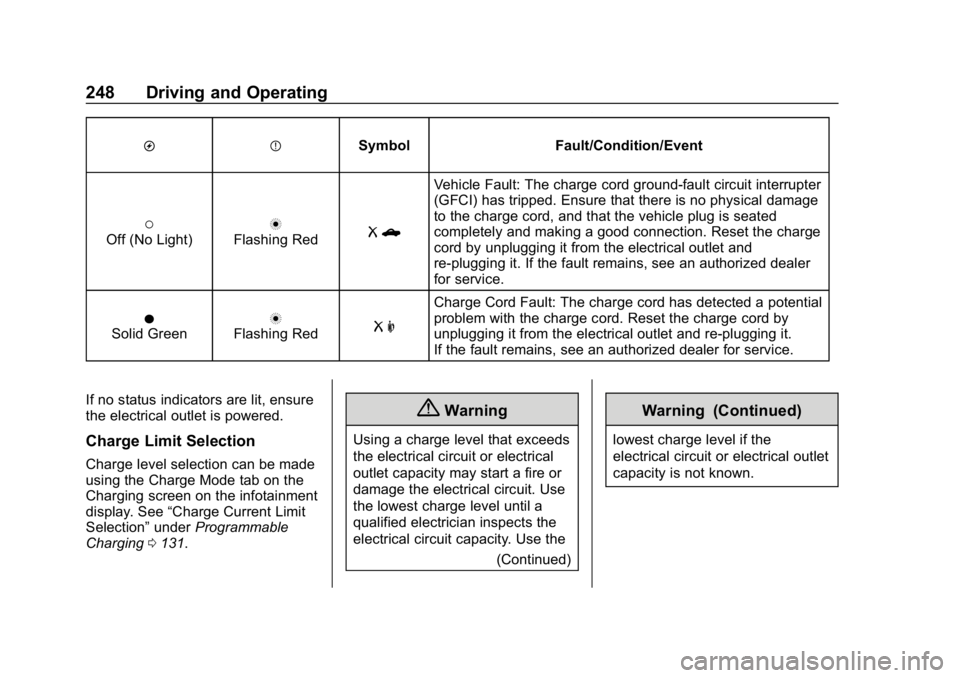
OPSymbol Fault/Condition/Event
(Off (No Light)nFlashing RedRb
Vehicle Fault: The charge cord ground-fault circuit interrupter
(GFCI) has tripped. Ensure that there is no physical damage
to the charge cord, and that the vehicle plug is seated
completely and making a good connection. Reset the charge
cord by unplugging it from the electrical outlet and
re-plugging it. If the fault remains, see an authorized dealer
for service.
OSolid GreennFlashing RedR m
Charge Cord Fault: The charge cord has detected a potential
problem with the charge cord. Reset the charge cord by
unplugging it from the electrical outlet and re-plugging it.
If the fault remains, see an authorized dealer for service.
If no status indicators are lit, ensure
the electrical outlet is powered.
Charge Limit Selection
Charge level selection can be made
using the Charge Mode tab on the
Charging screen on the infotainment
display. See “Charge Current Limit
Selection” underProgrammable
Charging 0131.
{Warning
Using a charge level that exceeds
the electrical circuit or electrical
outlet capacity may start a fire or
damage the electrical circuit. Use
the lowest charge level until a
qualified electrician inspects the
electrical circuit capacity. Use the
(Continued)
Warning (Continued)
lowest charge level if the
electrical circuit or electrical outlet
capacity is not known.
Page 251 of 370

Chevrolet BOLT EV Owner Manual (GMNA-Localizing-U.S./Canada/Mexico-
11434431) - 2018 - crc - 2/14/18
250 Driving and Operating
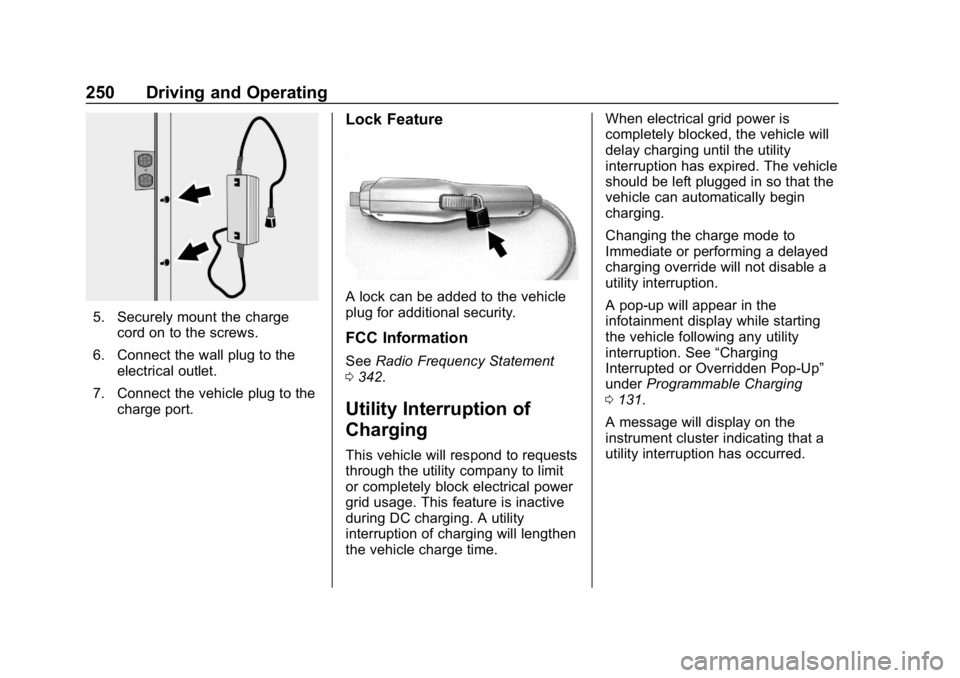
5. Securely mount the chargecord on to the screws.
6. Connect the wall plug to the electrical outlet.
7. Connect the vehicle plug to the charge port.
Lock Feature
A lock can be added to the vehicle
plug for additional security.
FCC Information
See Radio Frequency Statement
0 342.
Utility Interruption of
Charging
This vehicle will respond to requests
through the utility company to limit
or completely block electrical power
grid usage. This feature is inactive
during DC charging. A utility
interruption of charging will lengthen
the vehicle charge time. When electrical grid power is
completely blocked, the vehicle will
delay charging until the utility
interruption has expired. The vehicle
should be left plugged in so that the
vehicle can automatically begin
charging.
Changing the charge mode to
Immediate or performing a delayed
charging override will not disable a
utility interruption.
A pop-up will appear in the
infotainment display while starting
the vehicle following any utility
interruption. See
“Charging
Interrupted or Overridden Pop-Up”
under Programmable Charging
0 131.
A message will display on the
instrument cluster indicating that a
utility interruption has occurred.
Page 265 of 370

Chevrolet BOLT EV Owner Manual (GMNA-Localizing-U.S./Canada/Mexico-
11434431) - 2018 - crc - 2/14/18
264 Vehicle Care
Caution
If brake fluid is spilled on the
vehicle's painted surfaces, the
paint finish can be damaged.
Immediately wash off any painted
surface.
Battery - North America
The original equipment battery is
maintenance free. Do not remove
the cap and do not add fluid.
This vehicle has a high voltage
battery and a standard 12-volt
battery.
{Warning
Damage to the high voltage
battery or high voltage system
can create a risk of electric shock,
overheating, or fire.
If the vehicle is damaged from a
moderate to severe crash, flood,
fire, or other event, the vehicle(Continued)
Warning (Continued)
should be inspected as soon as
possible. Until the vehicle has
been inspected, store it outside at
least 15 m (50 ft) from any
structure or anything that can
burn. Ventilate the vehicle by
opening a window or a door.
Contact Customer Assistance as
soon as possible to determine
whether an inspection is needed.
SeeCustomer Assistance Offices
0 334.
If the vehicle is in a crash, the
sensing system may shut down the
high voltage system. When this
occurs, the high voltage battery is
disconnected and the vehicle will
not start. The SERVICE VEHICLE
SOON message in the Driver
Information Center (DIC) will be
displayed. Before the vehicle can be
operated again, it must be serviced
at your dealer. See
“If a Crash Occurs” under
Collision Damage Repair 0339 for
additional information. If an airbag
has inflated, see What Will You See
after an Airbag Inflates? 075.
Only a trained service technician
with the proper knowledge and tools
should inspect, test, or replace the
high voltage battery. See your
dealer if either the 12-volt or high
voltage battery needs service. The
dealer has information on how to
recycle the high voltage battery.
There is also information available
at http://www.recyclemybattery.com.
Keep the vehicle plugged in, even
when fully charged, to keep the high
voltage battery temperature ready
for the next drive. This is important
when outside temperatures are
extremely hot or cold.
Propulsion power may be reduced
in extremely cold temperatures, or if
the high voltage battery is too cold.
BATTERY TOO COLD, PLUG IN
TO WARM will display.
Page 268 of 370

Chevrolet BOLT EV Owner Manual (GMNA-Localizing-U.S./Canada/Mexico-
11434431) - 2018 - crc - 2/14/18
Vehicle Care 267
To remove the cover:
1. Slide a plastic tool under thecover and push upward to
unsnap.
2. Slide the cover toward the wiper blade tip to unhook it
from the blade assembly.
3. Remove the cover.
4. After wiper blade replacement, ensure that the cover hook
slides into the slot in the blade
assembly.
5. Snap the cover down to secure.
To replace the wiper blade:
1. Lift the wiper arm away from the windshield.2. Push the release lever (2) todisengage the hook and push
the wiper arm (1) out of the
blade assembly (3).
3. Push the new blade assembly securely on the wiper arm until
the release lever clicks into
place.
4. Replace the wiper cover.
Windshield Replacement
Driver Assistance Systems
If the windshield needs to be
replaced and the vehicle is
equipped with a front camera sensor
for the Driver Assistance Systems, a
GM replacement windshield is
recommended. The replacement
windshield must be installed according to GM specifications for
proper alignment. If it is not, these
systems may not work properly, they
may display messages, or they may
not work at all. See your dealer for
proper windshield replacement.
Gas Strut(s)
This vehicle is equipped with gas
strut(s) to provide assistance in
lifting and holding open the hood/
trunk/liftgate system in full open
position.
{Warning
If the gas struts that hold open
the hood, trunk, and/or liftgate fail,
you or others could be seriously
injured. Take the vehicle to your
dealer for service immediately.
Visually inspect the gas struts for
signs of wear, cracks, or other
damage periodically. Check to
make sure the hood/trunk/liftgate
is held open with enough force.
If struts are failing to hold the
(Continued)
Page 277 of 370

Chevrolet BOLT EV Owner Manual (GMNA-Localizing-U.S./Canada/Mexico-
11434431) - 2018 - crc - 2/14/18
276 Vehicle Care
Instrument Panel Fuse
BlockThe instrument panel fuse block is
on the left side of the instrument
panel. To access the fuses, open
the fuse panel door by pulling out.
To reinstall the door, insert the top
tab first, then push the door back
into its original location.Fuses Usage
F01 Video processing
module
F02 Indicator light solar
sensor
F03 Side blind zone alert
F04 Passive entry, passive
start
F05 CGM
F06 Body control module 4
F07 Body control module 3
F08 Body control module 2
F09 Body control module 1
F10 Trailer interface
module 1
F11 Amplifier
F12 Body control module 8 Fuses Usage
F13 Data link connector 1
F14 Automatic parking
assist
F15 -
F16 Single power inverter
module 1
F17 Body control module 6
F18 Body control module 5
F19 –
F20 –
F21 –
F22 –
F23 USB
F24 Wireless charging
module
F25 Reflected LED alert
display
F26 Heated steering wheel
F27 –
F28 Instrument cluster 2
Page 288 of 370

Chevrolet BOLT EV Owner Manual (GMNA-Localizing-U.S./Canada/Mexico-
11434431) - 2018 - crc - 2/14/18
Vehicle Care 287
sensors monitor the air pressure in
the tires and transmits the tire
pressure readings to a receiver
located in the vehicle.
When a low tire pressure condition
is detected, the TPMS illuminates
the low tire pressure warning light
located on the instrument cluster.
If the warning light comes on, stop
as soon as possible and inflate the
tires to the recommended pressure
shown on the Tire and Loading
Information label. SeeVehicle Load
Limits 0200.
A message to check the pressure in
a specific tire displays in the Driver
Information Center (DIC). The low
tire pressure warning light and the
DIC warning message come on at
each ignition cycle using POWER
O
until the tires are inflated to the
correct inflation pressure. Using the DIC, tire pressure levels can be
viewed. For additional information
and details about the DIC operation
and displays see
Driver Information
Center (DIC) 0141.
The low tire pressure warning light
may come on in cool weather when
the vehicle is first started, and then
turn off as the vehicle is driven. This
could be an early indicator that the
air pressure is getting low and
needs to be inflated to the proper
pressure.
A Tire and Loading Information
label, attached to your vehicle,
shows the size of the original
equipment tires and the correct
inflation pressure for the tires when
they are cold. See Vehicle Load
Limits 0200, for an example of the
Tire and Loading Information label
and its location. Also see Tire
Pressure 0284.
The TPMS can warn about a low
tire pressure condition but it does
not replace normal tire
maintenance. See Tire Inspection
0 289, Tire Rotation 0290 andTires
0 278.
Caution
Tire sealant materials are not all
the same. A non-approved tire
sealant could damage the TPMS
sensors. TPMS sensor damage
caused by using an incorrect tire
sealant is not covered by the
vehicle warranty. Always use only
the GM approved tire sealant
available through your dealer or
included in the vehicle.
Factory-installed Tire Inflator Kits
use a GM-approved liquid tire
sealant. Using non-approved tire
sealants could damage the TPMS
sensors. See Tire Sealant and
Compressor Kit 0297 for
information regarding the inflator kit
materials and instructions.
TPMS Malfunction Light and
Message
The TPMS will not function properly
if one or more of the TPMS sensors
are missing or inoperable. When the
system detects a malfunction, the
Page 289 of 370

Chevrolet BOLT EV Owner Manual (GMNA-Localizing-U.S./Canada/Mexico-
11434431) - 2018 - crc - 2/14/18
288 Vehicle Care
low tire warning light flashes for
about one minute and then stays on
for the remainder of the ignition
cycle using POWER
O. A DIC
warning message also displays. The
malfunction light and DIC warning
message come on at each ignition
cycle using POWER
Ountil the
problem is corrected. Some of the
conditions that can cause these to
come on are:
. One of the road tires has been
replaced with the spare tire. The
spare tire does not have a
TPMS sensor. The malfunction
light and DIC message should
go off after the road tire is
replaced and the sensor
matching process is performed
successfully. See “TPMS Sensor
Matching Process” later in this
section.
. The TPMS sensor matching
process was not done or not
completed successfully after
rotating the tires. The
malfunction light and the DIC
message should go off after
successfully completing the sensor matching process. See
"TPMS Sensor Matching
Process" later in this section.
. One or more TPMS sensors are
missing or damaged. The
malfunction light and the DIC
message should go off when the
TPMS sensors are installed and
the sensor matching process is
performed successfully. See
your dealer for service.
. Replacement tires or wheels do
not match the original equipment
tires or wheels. Tires and wheels
other than those recommended
could prevent the TPMS from
functioning properly. See Buying
New Tires 0291.
. Operating electronic devices or
being near facilities using radio
wave frequencies similar to the
TPMS could cause the TPMS
sensors to malfunction.
If the TPMS is not functioning
properly it cannot detect or signal a
low tire condition. See your dealer for service if the TPMS malfunction
light and DIC message comes on
and stays on.
TPMS Sensor Matching
Process
Each TPMS sensor has a unique
identification code. The identification
code needs to be matched to a new
tire/wheel position after rotating the
vehicle’s tires or replacing one or
more of the TPMS sensors. The
TPMS sensor matching process
should also be performed after
replacing a spare tire with a road
tire containing the TPMS sensor.
The malfunction light and the DIC
message should go off at the next
ignition cycle using POWER
O. The
sensors are matched to the tire/
wheel positions, using a TPMS
relearn tool, in the following order:
driver side front tire, passenger side
front tire, passenger side rear tire,
and driver side rear. See your
dealer for service or to purchase a
relearn tool. A TPMS relearn tool
can also be purchased. See Tire
Pressure Monitor Sensor Activation
Page 290 of 370

Chevrolet BOLT EV Owner Manual (GMNA-Localizing-U.S./Canada/Mexico-
11434431) - 2018 - crc - 2/14/18
Vehicle Care 289
Tool at
www.gmtoolsandequipment.com or
call 1-800-GM TOOLS
(1-800-468-6657).
There are two minutes to match the
first tire/wheel position, and
five minutes overall to match all four
tire/wheel positions. If it takes
longer, the matching process stops
and must be restarted.
The TPMS sensor matching
process is:1. Set the parking brake.
2. Press POWER
Oto start the
vehicle. See Power Button
0 204.
3. Make sure the Tire Pressure info page option is turned on.
The info pages on the DIC can
be turned on and off through
the Settings menu. See Driver
Information Center (DIC) 0141.
4. Use the DIC controls on the right side of the steering wheel
to scroll to the Tire Pressure
screen under the DIC
info page. 5. Press and hold
Vin the center
of the DIC controls.
The horn sounds twice to
signal the receiver is in relearn
mode and the TIRE
LEARNING ACTIVE message
displays on the DIC screen.
6. Start with the driver side front tire.
7. Place the relearn tool against the tire sidewall, near the valve
stem. Then press the button to
activate the TPMS sensor.
A horn chirp confirms that the
sensor identification code has
been matched to this tire and
wheel position.
8. Proceed to the passenger side front tire, and repeat the
procedure in Step 7.
9. Proceed to the passenger side rear tire, and repeat the
procedure in Step 7.
10. Proceed to the driver side rear tire, and repeat the procedure
in Step 7. The horn sounds two
times to indicate the sensor identification code has been
matched to the driver side rear
tire, and the TPMS sensor
matching process is no longer
active. The TIRE LEARNING
ACTIVE message on the DIC
display screen goes off.
11. Turn the vehicle off.
12. Set all four tires to the recommended air pressure
level as indicated on the Tire
and Loading Information label.
Tire Inspection
We recommend that the tires,
including the spare tire, if the
vehicle has one, be inspected
for signs of wear or damage at
least once a month.
Replace the tire if:
.The indicators at three or
more places around the tire
can be seen.
.There is cord or fabric
showing through the tire's
rubber.