2018 CADILLAC ESCALADE spare tire
[x] Cancel search: spare tirePage 324 of 399

Cadillac Escalade Owner Manual (GMNA-Localizing-U.S./Canada/Mexico-
11349344) - 2018 - crc - 11/7/17
VEHICLE CARE 323
Removing the Flat Tire and
Installing the Spare Tire
1. Do a safety check beforeproceeding. See If a Tire Goes Flat
0 318 for more information.
2. If the vehicle has a center cap
that covers the wheel fasteners,
place the chisel end of the wheel
wrench in the slot on the wheel
and gently pry the cap out.
3. Use the wheel wrench to loosenall the wheel nuts. Turn the
wheel wrench counterclockwise
to loosen the wheel nuts. Do not
remove the wheel nuts yet.
Jacking Locations (Overall View)
4. Position the jack under the vehicle, as shown.
Left Front Shown, Right Front Similar
Front Tire Flat: If the flat tire is
on a front tire of the vehicle, use
the jack handle and only one
jack handle extension. Attach the
wheel wrench to the jack handle
extension. Attach the jack handle
to the jack. Position the jack on
the frame behind the flat tire
where the frame sections overlap.
Turn the wheel wrench clockwise
to raise the vehicle. Raise the
vehicle far enough off the ground
so there is enough room for the
spare tire to clear the ground.
Page 325 of 399

Cadillac Escalade Owner Manual (GMNA-Localizing-U.S./Canada/Mexico-
11349344) - 2018 - crc - 11/7/17
324 VEHICLE CARE
Rear Position
Rear Tire Flat: If the flat tire is
on a rear tire of the vehicle, use
the jack handle (2) and both jack
handle extensions (3). Attach the
wheel wrench (4) to the jack
handle extensions (3). Attach the
jack handle (2) to the jack (1).
Use the jacking pad (5) provided
on the rear axle. Turn the wheel
wrench (4) clockwise to raise the
vehicle. Raise the vehicle far
enough off the ground so there is
enough room for the spare tire to
clear the ground.
{Warning
Getting under a vehicle when it is
lifted on a jack is dangerous. If the
vehicle slips off the jack, you could
be badly injured or killed. Never get
under a vehicle when it is
supported only by a jack.
{Warning
Raising the vehicle with the jack
improperly positioned can damage
the vehicle and even make the
vehicle fall. To help avoid personal
injury and vehicle damage, be sure
to fit the jack lift head into the
proper location before raising the
vehicle.5. Remove all of the wheel nuts.
6. Take off the flat tire.
Page 326 of 399

Cadillac Escalade Owner Manual (GMNA-Localizing-U.S./Canada/Mexico-
11349344) - 2018 - crc - 11/7/17
VEHICLE CARE 325
7. Remove any rust or dirt from thewheel bolts, mounting surfaces,
and spare wheel.
{Warning
Rust or dirt on a wheel, or on the
parts to which it is fastened, can
make wheel nuts become loose
after time. The wheel could come
off and cause an accident. When
changing a wheel, remove any rust
or dirt from places where the wheel
attaches to the vehicle. In an
emergency, a cloth or a paper towel
can be used; however, use a scraper
or wire brush later to remove all
rust or dirt.
8. Put the wheel nuts back on with the rounded end of the nuts
toward the wheel after mounting
the spare tire.
{Warning
Never use oil or grease on bolts or
nuts because the nuts might come
loose. The vehicle's wheel could fall
off, causing a crash.
9. Tighten each wheel nut by hand. Then use the wheel wrench to
tighten the nuts until the wheel
is held against the hub.
10. Turn the wheel wrench counterclockwise to lower the
vehicle. Lower the jack
completely.
11. Tighten the nuts firmly in acrisscross sequence as shown by
turning the wheel wrench
clockwise.
{Warning
Wheel nuts that are improperly or
incorrectly tightened can cause the
wheels to become loose or come off.
The wheel nuts should be tightened
with a torque wrench to the proper
torque specification after replacing.
Follow the torque specification
supplied by the aftermarket
manufacturer when using accessory
locking wheel nuts. See Capacities
and Specifications 0359 for original
equipment wheel nut torque
specifications.
Caution
Improperly tightened wheel nuts
can lead to brake pulsation and
rotor damage. To avoid expensive
(Continued)
Page 327 of 399
Cadillac Escalade Owner Manual (GMNA-Localizing-U.S./Canada/Mexico-
11349344) - 2018 - crc - 11/7/17
326 VEHICLE CARE
Caution (Continued)
brake repairs, evenly tighten the
wheel nuts in the proper sequence
and to the proper torque
specification. SeeCapacities and
Specifications 0359 for the wheel
nut torque specification.
When reinstalling the regular wheel
and tire, also reinstall the center cap,
if equipped. Line up the tab on the
center cap with the slot in the wheel.
The cap only goes in one way. Place
the cap on the wheel and press until it
snaps into place.
Storing a Flat or Spare Tire and
Tools
{Warning
Storing a jack, a tire, or other
equipment in the passenger
compartment of the vehicle could
cause injury. In a sudden stop or (Continued)
Warning (Continued)
collision, loose equipment could
strike someone. Store all these in
the proper place.
Caution
Storing an aluminum wheel with a
flat tire under your vehicle for an
extended period of time or with the
valve stem pointing up can damage
the wheel. Always stow the wheel
with the valve stem pointing down
and have the wheel/tire repaired as
soon as possible.
Caution
The tire hoist can be damaged if
there is no tension on the cable
when using it. To have the
necessary tension, the spare or road
tire and wheel assembly must be
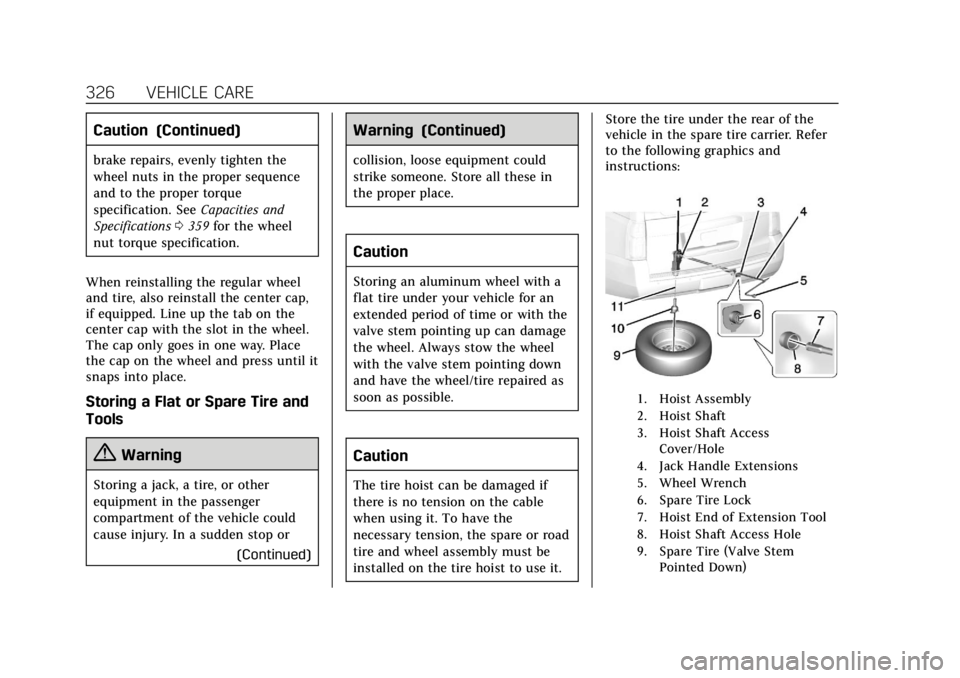
installed on the tire hoist to use it. Store the tire under the rear of the
vehicle in the spare tire carrier. Refer
to the following graphics and
instructions:
1. Hoist Assembly
2. Hoist Shaft
3. Hoist Shaft Access
Cover/Hole
4. Jack Handle Extensions
5. Wheel Wrench
6. Spare Tire Lock
7. Hoist End of Extension Tool
8. Hoist Shaft Access Hole
9. Spare Tire (Valve Stem Pointed Down)
Page 328 of 399

Cadillac Escalade Owner Manual (GMNA-Localizing-U.S./Canada/Mexico-
11349344) - 2018 - crc - 11/7/17
VEHICLE CARE 327
10. Tire/Wheel Retainer
11. Hoist Cable
1. Put the tire (9) on the ground atthe rear of the vehicle with the
valve stem pointed down, and to
the rear.
2. Tilt the tire toward the vehicle. Separate the tire/wheel retainer
from the guide pin. Pull the pin
through the center of the wheel.
Tilt the retainer down through
the center wheel opening.
Make sure the retainer is fully
seated across the underside of
the wheel.
3. Assemble the two jack handleextensions (4) and wheel
wrench (5).
4. Insert the open end of the
extension (7) through the hole in
the rear bumper (8) (hoist shaft
access hole).
5. Raise the tire part way upward. Make sure the retainer is seated
in the wheel opening.
6. Raise the tire fully against the underside of the vehicle by
turning the wheel wrench
clockwise until you hear two
clicks or feel it skip twice. The
cable cannot be overtightened.
7. Make sure the tire is stored
securely. Push, pull, and then try
to turn the tire. If the tire moves,
use the wheel wrench to tighten
the cable.
8. Reinstall the spare tire lock.
9. Reinstall the hoist shaft access cover.
If equipped, reinstall the hitch
cover and turn the retainers
clockwise.
To store the tools: 1. Return the tools (wheel wrench, jack handle, and jack handle
extensions) to the tool bag.
Page 329 of 399

Cadillac Escalade Owner Manual (GMNA-Localizing-U.S./Canada/Mexico-
11349344) - 2018 - crc - 11/7/17
328 VEHICLE CARE
2. Assemble the wheel blocks andjack together with the wing nut.
3. Position the jack and wheel blocks in the driver side trim
panel over the wheelhouse.
4. Turn the jack knob clockwise until the jack is secured tight in
the mounting bracket. Be sure to
position the holes in the base of
the jack onto the pin in the
mounting bracket.
5. Use the retaining bracket to fasten the tool bag on the stud
and turn the wing nut clockwise
to secure.
6. Close the trim panel door.
Full-Size Spare Tire
If this vehicle came with a full-size
spare tire, it was fully inflated when
new, however, it can lose air over
time. Check the inflation pressure
regularly.
See Tire Pressure 0305 and Vehicle
Load Limits 0193. For instructions on
how to remove, install, or store a
spare tire, see Tire Changing0320. If equipped with a temporary use
full-size spare tire, it is indicated on
the tire sidewall. See
Tire Sidewall
Labeling 0301. This spare tire should
not be driven on over 112 km/h
(70 mph), or 88 km/h (55 mph) when
pulling a trailer, at the proper
inflation pressure. Repair and replace
the road tire as soon as it is
convenient, and stow the spare tire for
future use.
Caution
If the vehicle has four-wheel drive
and a different size spare tire is
installed, do not drive in four-wheel
drive until the flat tire is repaired
and/or replaced. The vehicle could
be damaged and the repairs would
not be covered by the warranty.
Never use four-wheel drive when a
different size spare tire is installed
on the vehicle.
The vehicle may have a different size
spare tire than the road tires originally
installed on the vehicle. This spare tire
was developed for use on this vehicle, so it is all right to drive on it. If the
vehicle has four-wheel drive and a
different size spare tire is installed,
drive only in two-wheel drive.
After installing the spare tire on the
vehicle, stop as soon as possible and
check that the spare tire is correctly
inflated.
Have the damaged or flat road tire
repaired or replaced and installed
back onto the vehicle as soon as
possible so the spare tire will be
available in case it is needed again.
Do not mix tires and wheels of
different sizes, because they will not
fit. Keep your spare tire and its wheel
together. If the vehicle has a spare tire
that does not match the original road
tires and wheels in size and type, do
not include the spare in the tire
rotation.
Page 349 of 399
Cadillac Escalade Owner Manual (GMNA-Localizing-U.S./Canada/Mexico-
11349344) - 2018 - crc - 11/7/17
348 SERVICE AND MAINTENANCE
.Check windshield washer fluid
level. See Washer Fluid 0278.
. Visually inspect windshield wiper
blades for wear, cracking,
or contamination. See Exterior
Care 0337. Replace worn or
damaged wiper blades. See Wiper
Blade Replacement 0284.
. Check tire inflation pressures. See
Tire Pressure 0305.
. Inspect tire wear. See Tire
Inspection 0312.
. Visually check for fluid leaks.
. Inspect engine air cleaner filter.
See Engine Air Cleaner/Filter 0272.
. Inspect brake system. See Exterior
Care 0337.
. Visually inspect steering,
suspension, and chassis
components for damaged, loose,
or missing parts or signs of wear.
See Exterior Care 0337.
. Lubricate the suspension and
steering components at least every
other oil change (if equipped with
grease fittings). .
Check restraint system
components. See Safety System
Check 083.
. Visually inspect fuel system for
damage or leaks.
. Visually inspect exhaust system
and nearby heat shields for loose
or damaged parts.
. Lubricate body components. See
Exterior Care 0337.
. Check starter switch. See Starter
Switch Check 0283.
. Check automatic transmission
shift lock control function. See
Automatic Transmission Shift Lock
Control Function Check 0283.
. Check parking brake and
automatic transmission park
mechanism. See Park Brake and
P (Park) Mechanism Check 0284.
. Check accelerator pedal for
damage, high effort, or binding.
Replace if needed. .
Visually inspect gas strut for signs
of wear, cracks, or other damage.
Check the hold open ability of the
strut. If the hold open is low,
service the gas strut. See Gas
Strut(s) 0285.
. Inspect sunroof track and seal,
if equipped. See Sunroof056.
. Verify spare tire key lock operation
and lubricate as needed. See Tire
Changing 0320.
Page 368 of 399

Cadillac Escalade Owner Manual (GMNA-Localizing-U.S./Canada/Mexico-
11349344) - 2018 - crc - 11/7/17
CUSTOMER INFORMATION 367
driven. Assistance is not given
when the vehicle is stuck in the
sand, mud, or snow.
. Flat Tire Change: Service to
change a flat tire with a spare tire.
The spare tire, if equipped, must
be in good condition and properly
inflated. It is your responsibility
for the repair or replacement of
the tire if it is not covered by the
warranty.
. Battery Jump Start: Service to
jump start a dead battery.
. Trip Interruption Benefits and
Service: If your trip is interrupted
due to a warranty failure,
incidental expenses may be
reimbursed during the Powertrain
warranty period. Items considered
are hotel, meals, and rental car or
a vehicle being delivered back to
the customer, up to 500 miles.
Cadillac Technician Roadside
Service (U.S. Only)
Cadillac's exceptional Roadside Service
is more than an auto club or towing
service. It provides every Cadillac
owner in the United States with the advantage of contacting a Cadillac
advisor and, where available, a
Cadillac trained dealer technician who
can provide on-site service.
A dealer technician will travel to your
location within a 30-mile radius of a
participating Cadillac dealership.
If beyond this radius, we will arrange
to have your car towed to the nearest
Cadillac dealership. Each technician
travels with a specially equipped
service vehicle complete with the
necessary Cadillac parts and tools
required to handle most roadside
repairs.
Services Not Included in
Roadside Service
.
Impound towing caused by
violation of any laws
. Legal fines
. Mounting, dismounting,
or changing of snow tires, chains,
or other traction devices
Service is not provided if a vehicle is
in an area that is not accessible to the
service vehicle or is not a regularly traveled or maintained public road,
which includes ice and winter roads.
Off-road use is not covered.
Services Specific to
Canadian-Purchased Vehicles
.
Fuel delivery: Reimbursement is
up to 7 liters. Diesel fuel delivery
may be restricted. Propane and
other fuels are not provided
through this service.
. Lock-Out Service: Vehicle
registration is required.
. Trip Interruption Benefits and
Service: Pre-authorization, original
detailed receipts, and a copy of the
repair orders are required. Once
authorization has been received,
the Roadside Service advisor will
help you make arrangements and
explain how to receive payment.
Items considered are hotel, meals,
and rental car or a vehicle being
delivered back to the customer, up
to 800 km.
. Alternative Service: If assistance
cannot be provided right away, the
Roadside Service advisor may give
you permission to get local