Page 8 of 445

Cadillac CT6 Owner Manual (GMNA-Localizing-U.S./Canada-11292458) -
2018 - crc - 2/14/17
IN BRIEF 7
1.Air Vents 0203.
2. Exterior Lamp Controls 0183.
Turn Signal Lever. See Turn and
Lane-Change Signals 0186.
3. Tap Shift Paddles (If Equipped). See Manual Mode (Gasoline Only)
0 233.
Regen On Demand (If Equipped).
See Regenerative Braking
(PLUG-IN Only) 0237.
4. Instrument Cluster (Base Level)
0127 orInstrument Cluster
(Uplevel) 0130.
Driver Information Center (DIC)
Display. See Driver Information
Center (DIC) 0162.
5. Windshield Wiper/Washer 0120.
6. ENGINE START/STOP Button. See Ignition Positions 0217.
7. Parking Assist Button. See Assistance Systems for Parking or
Backing 0254.
Automatic Parking Assist (APA)
Button (If Equipped). See
Assistance Systems for Parking or
Backing 0254. Automatic Engine Stop/Start
Disable Switch (If Equipped).
See
Starting the Engine (PLUG-IN
Only) 0218 orStarting the Engine
(Gasoline Only) 0221.
8. Light Sensor. See Automatic
Headlamp System 0185.
9. Hazard Warning Flashers 0186.
Glove Box Button. See Glove Box
0 115.
10. Infotainment 0190.
11. Heated and Ventilated Front Seats
072 (If Equipped).
12. Infotainment Touch Pad. See the infotainment manual.
13. Automatic Climate Control System
(Quad Zone - Gasoline Only) 0197
or Automatic Climate Control
System (Dual Zone - Gasoline and
PLUG-IN) 0191.
14. Automatic Vehicle Hold (AVH)
0237 (If Equipped).
MODE Button. See Driver Mode
Control (Gasoline Only) 0241.
Traction Control/Electronic
Stability Control 0239. 15. Shift Lever. See
Automatic
Transmission 0231.
16. Driver Information Center (DIC) Controls. See Driver Information
Center (DIC) 0162.
17. Steering Wheel Controls. See the infotainment manual.
18. Horn 0120.
19. Steering Wheel Adjustment 0119
(Out of View).
20. Forward Collision Alert (FCA)
System 0260 (If Equipped).
Lane Keep Assist (LKA) 0271 (If
Equipped).
Heated Steering Wheel 0119 (If
Equipped).
21. Cruise Control 0242.
Adaptive Cruise Control 0245 (If
Equipped).
Phone Button. See “Steering
Wheel Controls ”in the
infotainment manual.
22. Data Link Connector (DLC) (Out of View). See Malfunction
Indicator Lamp (Check Engine
Light) 0143.
Page 11 of 445
Cadillac CT6 Owner Manual (GMNA-Localizing-U.S./Canada-11292458) -
2018 - crc - 2/14/17
10 IN BRIEF
From inside, pressQorK. SeePower
Door Locks 045.
Trunk
To open the trunk:
.
Press
|.
. Press
Xtwice quickly on the
Remote Keyless Entry (RKE)
transmitter.
. Press the touch pad on the rear of
the trunk above the license plate
after unlocking all doors.
If equipped, these will also open the
power trunk. See Trunk047.
Windows
The power windows work when the
ignition is on, in ACC/ACCESSORY,
or when Retained Accessory Power
(RAP) is active. See Retained Accessory
Power (RAP) 0224.
Using the window switch, press to
open or pull to close the window.
The windows may be temporarily
disabled if they are used repeatedly
within a short time.
Page 12 of 445

Cadillac CT6 Owner Manual (GMNA-Localizing-U.S./Canada-11292458) -
2018 - crc - 2/14/17
IN BRIEF 11
Seat Adjustment
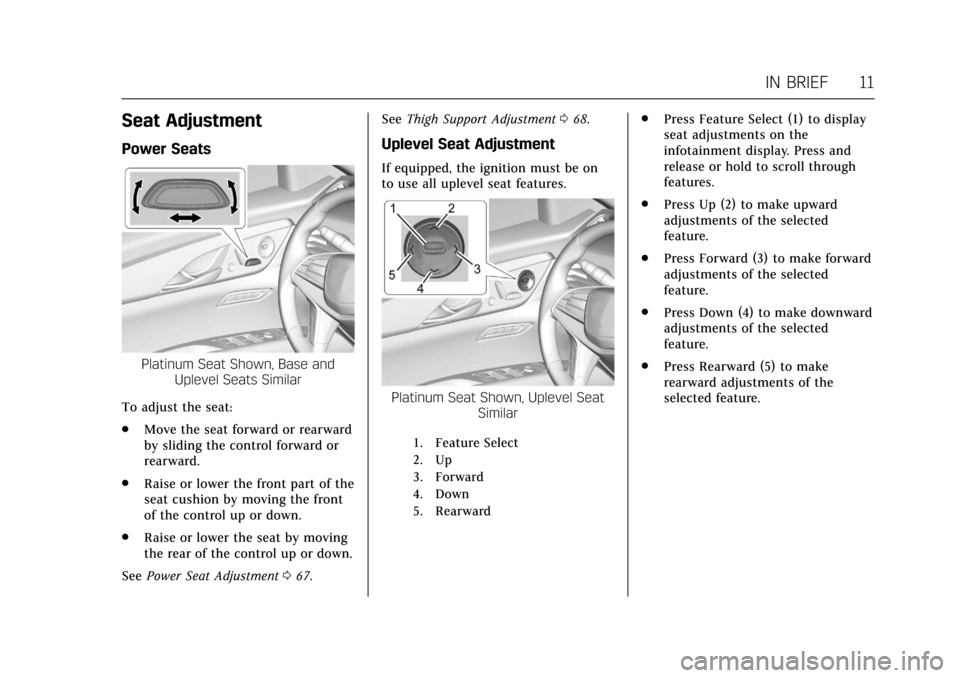
Power Seats
Platinum Seat Shown, Base andUplevel Seats Similar
To adjust the seat:
. Move the seat forward or rearward
by sliding the control forward or
rearward.
. Raise or lower the front part of the
seat cushion by moving the front
of the control up or down.
. Raise or lower the seat by moving
the rear of the control up or down.
See Power Seat Adjustment 067. See
Thigh Support Adjustment 068.
Uplevel Seat Adjustment
If equipped, the ignition must be on
to use all uplevel seat features.
Platinum Seat Shown, Uplevel Seat
Similar
1. Feature Select
2. Up
3. Forward
4. Down
5. Rearward
.Press Feature Select (1) to display
seat adjustments on the
infotainment display. Press and
release or hold to scroll through
features.
. Press Up (2) to make upward
adjustments of the selected
feature.
. Press Forward (3) to make forward
adjustments of the selected
feature.
. Press Down (4) to make downward
adjustments of the selected
feature.
. Press Rearward (5) to make
rearward adjustments of the
selected feature.
Page 13 of 445
Cadillac CT6 Owner Manual (GMNA-Localizing-U.S./Canada-11292458) -
2018 - crc - 2/14/17
12 IN BRIEF
Reclining Seatbacks
Platinum Seat Shown, Base andUplevel Seats Similar
To adjust the seatback:
. Tilt the top of the control
rearward to recline.
. Tilt the top of the control forward
to raise.
See Reclining Seatbacks 069.
Base Lumbar Adjustment
Base Seat
To adjust lumbar support, if equipped:
. Press Forward (2) to move lumbar
support forward.
. Press Rearward (1) to move
lumbar support rearward.
Massage
Platinum Driver Seat Shown,
Passenger Seat Similar
If equipped, the ignition must be on
to use the massage feature.
To activate and adjust the massage
feature: 1. Toggle the center selection control (2) to view available
massage adjustment options on
the infotainment display.
2. Select massage feature.
3. Press the control up (3) or down (5) to select the
massage type.
Page 14 of 445

Cadillac CT6 Owner Manual (GMNA-Localizing-U.S./Canada-11292458) -
2018 - crc - 2/14/17
IN BRIEF 13
4. Press the control forward (4) orrearward (6) to change the
intensity.
5. Press the massage control button (1) to recall the last
massage type and intensity.
See Massage 074.
Memory Features
Platinum Driver Seat Shown,
Passenger Seat Similar
If equipped, memory seats allow two
drivers to store and recall their unique
seat positions for driving the vehicle,
and a shared exit position for getting
out of the vehicle. Other feature positions may also be set, such as
power mirrors and power steering
wheel. Memory positions are linked to
RKE transmitter 1 or 2 for automatic
memory recalls.
Before storing, adjust all available
memory feature positions. Turn the
ignition on and then press and release
SET; a beep will sound. Then
immediately press and hold 1, 2,
or
B(Exit) on the driver door until
two beeps sound. To manually recall
these positions, press and hold 1, 2,
or
Buntil the saved position is
reached.
When Auto Memory Recall is enabled
in the personalization menu, positions
previously stored to memory buttons
1 and 2 are recalled when the ignition
is changed from OFF to ON/RUN or
ACC/ACCESSORY.
When Easy Exit Options is enabled in
the personalization menu, the feature
automatically recalls the current
driver’s previously stored exit position
when exiting the vehicle. See Memory
Seats 069.
Second Row Seats
If equipped, the armrest may have
seat adjustment controls.
1. Seatback Display and Lumbar
Adjustment Control
2. Power Seat Adjustment
3. Power Seat Adjustment
4. Massage
See Rear Seats 074.
Page 15 of 445

Cadillac CT6 Owner Manual (GMNA-Localizing-U.S./Canada-11292458) -
2018 - crc - 2/14/17
14 IN BRIEF
Easy Exit
If equipped, pressSto tilt the front of
the seat fully downward and to move
the entire seat fully rearward. The seat
will also move to this position when
the rear door is opened.
Heated and Ventilated
Seats
If equipped, the buttons are near the
climate controls on the center stack.
To operate, the ignition must be on.
Press
Jorzto heat the driver or
passenger seat cushion and seatback.
Press
Ior+to heat the driver or
passenger seatback only.
Press
Cor{to ventilate the driver
or passenger seat.
Press the button once for the highest
setting. With each press of the button,
the seat will change to the next lower setting, and then to the off setting.
The indicator lights above the buttons
indicate three for the highest setting
and one for the lowest. If the front
heated seats are on high, the level
may automatically be lowered after
approximately 30 minutes.
See
Heated and Ventilated Front Seats
0 72.
Heated and Ventilated Rear
Seats
If equipped, the buttons are on the
rear passenger doors.
Page 16 of 445

Cadillac CT6 Owner Manual (GMNA-Localizing-U.S./Canada-11292458) -
2018 - crc - 2/14/17
IN BRIEF 15
With the ignition on, pressMorLto
heat the left or right outboard seat
cushion.
With the ignition on, press
Cor{to
ventilate the left or right
outboard seat.
See Heated and Ventilated Rear Seats
0 77.
Head Restraint Adjustment
Do not drive until the head restraints
for all occupants are installed and
adjusted properly.
To achieve a comfortable seating
position, change the seatback recline
angle as little as necessary while
keeping the seat and the head
restraint height in the proper position.
See Head Restraints 065 and Power
Seat Adjustment 067.
Seat Belts
Refer to the following sections for
important information on how to use
seat belts properly:
.
Seat Belts 078.
. How to Wear Seat Belts Properly
079.
. Lap-Shoulder Belt 080.
. Lower Anchors and Tethers for
Children (LATCH System) 0103.
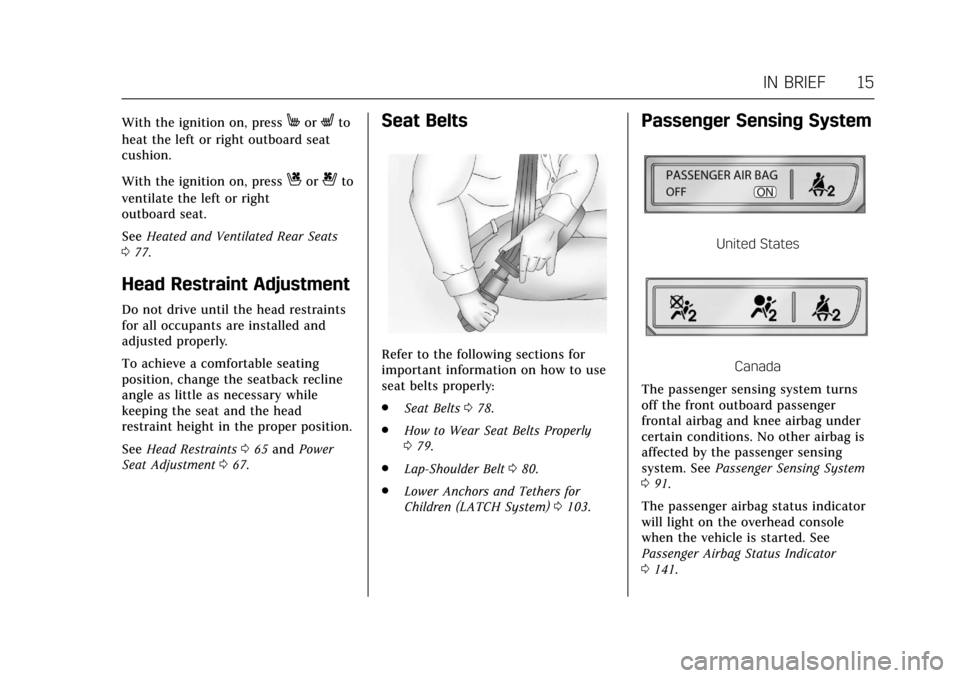
Passenger Sensing System
United States
Canada
The passenger sensing system turns
off the front outboard passenger
frontal airbag and knee airbag under
certain conditions. No other airbag is
affected by the passenger sensing
system. See Passenger Sensing System
0 91.
The passenger airbag status indicator
will light on the overhead console
when the vehicle is started. See
Passenger Airbag Status Indicator
0 141.
Page 19 of 445

Cadillac CT6 Owner Manual (GMNA-Localizing-U.S./Canada-11292458) -
2018 - crc - 2/14/17
18 IN BRIEF
Turn the control to the following
positions:
O:Turns off the exterior lamps. The
knob returns to the AUTO position
after it is released. Turn to
Oagain to
reactivate the AUTO mode.
AUTO : Automatically turns the
exterior lamps on and off, depending
on outside lighting.
;: Turns on the parking lamps
including all lamps, except the
headlamps.
5: Turns on the headlamps together
with the parking lamps and
instrument panel lights.
See:
. Exterior Lamp Controls 0183.
. Turn and Lane-Change Signals
0186.
Windshield Wiper/Washer
With the ignition on or in ACC/
ACCESSORY, move the lever up or
down to select the wiper speed.
HI : Use for fast wipes.
LO : Use for slow wipes.
AUTO : Use this setting for
intermittent wipes when Rainsense is
disabled, or for Rainsense wipes when
it is enabled. For intermittent wipes,
move the lever up to AUTO, then turn
the band on the wiper lever up for
more frequent wipes or down for less
frequent wipes.
If Rainsense is enabled in vehicle
personalization, move the lever up to
AUTO, then turn the band on the
wiper lever to adjust the sensitivity to
moisture.
. Turn the band up for more
sensitivity to moisture.
. Turn the band down for less
sensitivity to moisture.
. Move the windshield wiper lever
out of the AUTO position to
deactivate Rainsense.