2018 BUICK REGAL TOURX mirror
[x] Cancel search: mirrorPage 2 of 20

2
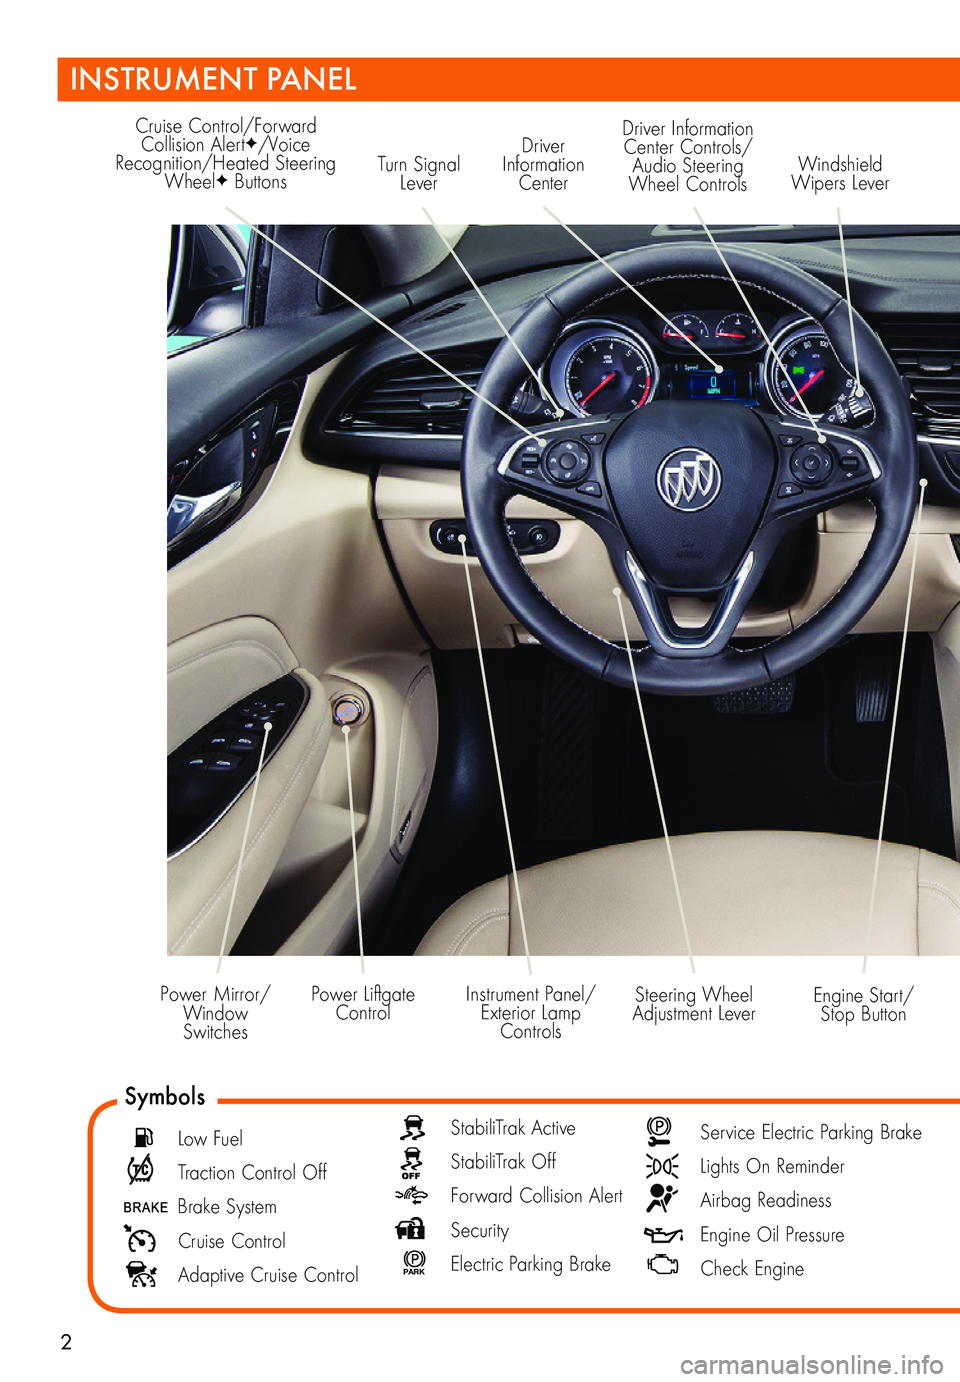
Turn Signal Lever
Driver Information Center
Cruise Control/Forward Collision AlertF/Voice Recognition/Heated Steering WheelF Buttons
Driver Information Center Controls/ Audio Steering Wheel Controls
Engine Start/Stop Button
Windshield Wipers Lever
Steering Wheel Adjustment LeverInstrument Panel/Exterior Lamp Controls
Power Liftgate ControlPower Mirror/ Window Switches
INSTRUMENT PANEL
Symbols
Low Fuel
Traction Control Off
Brake System
Cruise Control
Adaptive Cruise Control
StabiliTrak Active
StabiliTrak Off
Forward Collision Alert
Security
P ARK Electric Parking Brake
Service Electric Parking Brake
Lights On Reminder
Airbag Readiness
Engine Oil Pressure
Check Engine
Page 6 of 20

6
Power Seat Adjustments
A. Seat Adjustment
Move the horizontal control to move the seat forward or rearward and to tilt, raise or lower the seat.
B. Seatback Recline Adjustment
Move the vertical control to recline or raise the seatback.
C. Lumbar Support Adjustment
Press and hold the round control to adjust the lumbar support.
Memory Seats
1. Adjust the seat and power outside mirrors.
2. Press and hold the MEM (Memory) but-ton and button 1 (D) until 2 beeps sound.
3. Repeat these steps using button 2 for a second driver.
Recall Memory Positions Press and hold button 1 or 2 until the saved position is reached.
The memory/exit positions can be programmed to be recalled automatically.
To set the Auto Memory Recall or Easy Exit options, go to Settings > Vehicle > Comfort and Convenience.
See Seats and Restraints in your Owner’s Manual.
F Optional equipment
POWER FRONT SEATSF
REAR SEATS
Fold the Rear Seatbacks
1. Pull the lever (A) on top of the outboard seatback and fold the seatback forward. A red tab near the lever is visible when the seatback is unlatched.
2. If equipped with a center seatback, pull the strap (B) on top of the seatback and fold the seatback forward.
3. Each outboard seatback also can be folded by pulling the switch (C) on either side of the cargo area.
4. To raise each seatback, lift it up until it locks in place.
See Seats and Restraints in your Owner’s Manual.
AB
D
C
B
A
C
Page 10 of 20

10F Optional equipment
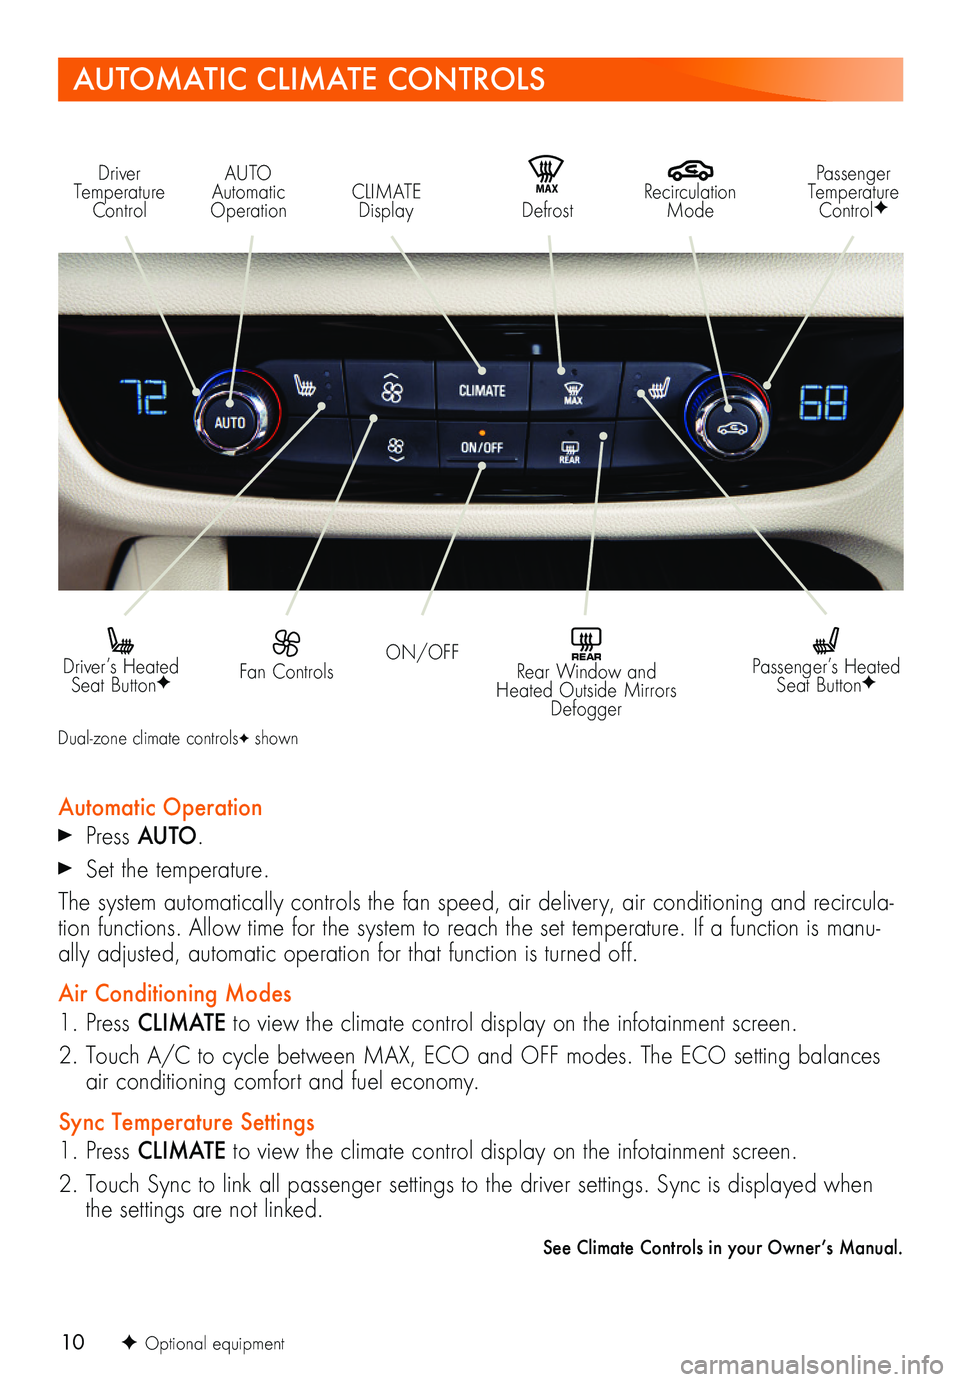
AUTOMATIC CLIMATE CONTROLS
Driver Temperature Control
Recirculation Mode
AUTO Automatic OperationCLIMATE Display
Passenger Temperature ControlFMAX Defrost
ON/OFF Fan Controls Driver’s Heated Seat ButtonF
REAR Rear Window and Heated Outside Mirrors Defogger
Passenger’s Heated Seat ButtonF
Automatic Operation Press AUTO.
Set the temperature.
The system automatically controls the fan speed, air delivery, air conditioning and recircula-tion functions. Allow time for the system to reach the set temperature. If a function is manu-ally adjusted, automatic operation for that function is turned off.
Air Conditioning Modes
1. Press CLIMATE to view the climate control display on the infotainment screen.
2. Touch A/C to cycle between MAX, ECO and OFF modes. The ECO setting balances air conditioning comfort and fuel economy.
Sync Temperature Settings
1. Press CLIMATE to view the climate control display on the infotainment screen.
2. Touch Sync to link all passenger settings to the driver settings. Sync is displayed when the settings are not linked.
See Climate Controls in your Owner’s Manual.
Dual-zone climate controlsF shown
Page 14 of 20

14
Refer to your Owner’s Manual for important information about using the Bluetooth system while driving.
Before using a Bluetooth-enabled device in the vehicle, it must be paired with the in-vehicle Bluetooth system. The pairing process is disabled when the vehicle is moving. Not all devic-es will support all functions. Visit my.buick.com/learn for more information.
Pair a Phone
1. To use voice recognition, press the Push to Talk button; after the beep, say “Pair phone.”
To use the infotainment screen buttons, touch the Phone icon and then select Pair or Search Device.
2. Start the pairing process on the phone. From your phone’s Bluetooth settings, select the name shown on the infotainment screen.
3. Confirm the codes that appear on the infotainment screen and the phone.
4. When pairing is complete, the phone screen is displayed. Depending on the phone, your phone book may be downloaded automatically.
Stream Audio To stream audio from a paired device connected via Bluetooth, select the Audio icon on the infotainment screen and then touch Media until Bluetooth is displayed. Control audio operation using the device controls or infotainment controls.
See your Infotainment System Manual.
Portable Audio Devices
An iPod®, iPhone®, MP3 Player, a USB flash drive or a portable USB hard drive can be connected to a USB data port located inside the center console storage compartment.
Touch the Audio icon to select a portable device as the audio source.
The USB ports on the rear of the center console are for charging only.
See your Infotainment System Manual.
With the vehicle’s built-in Wi-Fi hotspot, up to 7 devices (smartphones, tablets and laptops) can be connected to high-speed internet using OnStar’s 4G LTE signal.
To retrieve the SSID and password for the hotspot, go to Settings > Wi-Fi; or press the OnStar Voice Command button on the overhead console or rearview mirror, wait for the prompt, and then say “Wi-Fi settings.” The information will be displayed on the infotain-ment screen.
For assistance, press the blue OnStar button or call 1-888-4-ONSTAR (1-888-466-7827).
Note: See onstar.com for a detailed instruction guide, vehicle availability, details, and system limitations.
See your Infotainment System Manual.
ONSTAR® 4G LTE WI-FI® HOTSPOT
BLUETOOTH® SYSTEM
INFOTAINMENT SYSTEM
Page 18 of 20

18F Optional equipment
Lane Change Alert with Side Blind Zone AlertF — While driving, the system displays a
warning symbol on the left or right side mirror when a vehicle is detected in that side blind zone area or rapidly approaching that area. The warning symbol flashes if a turn
signal is activated when a vehicle has been detected on the same side.
To turn the system on or off, go to Settings > Vehicle > Collision/Detection Systems > Lane Change Alert.
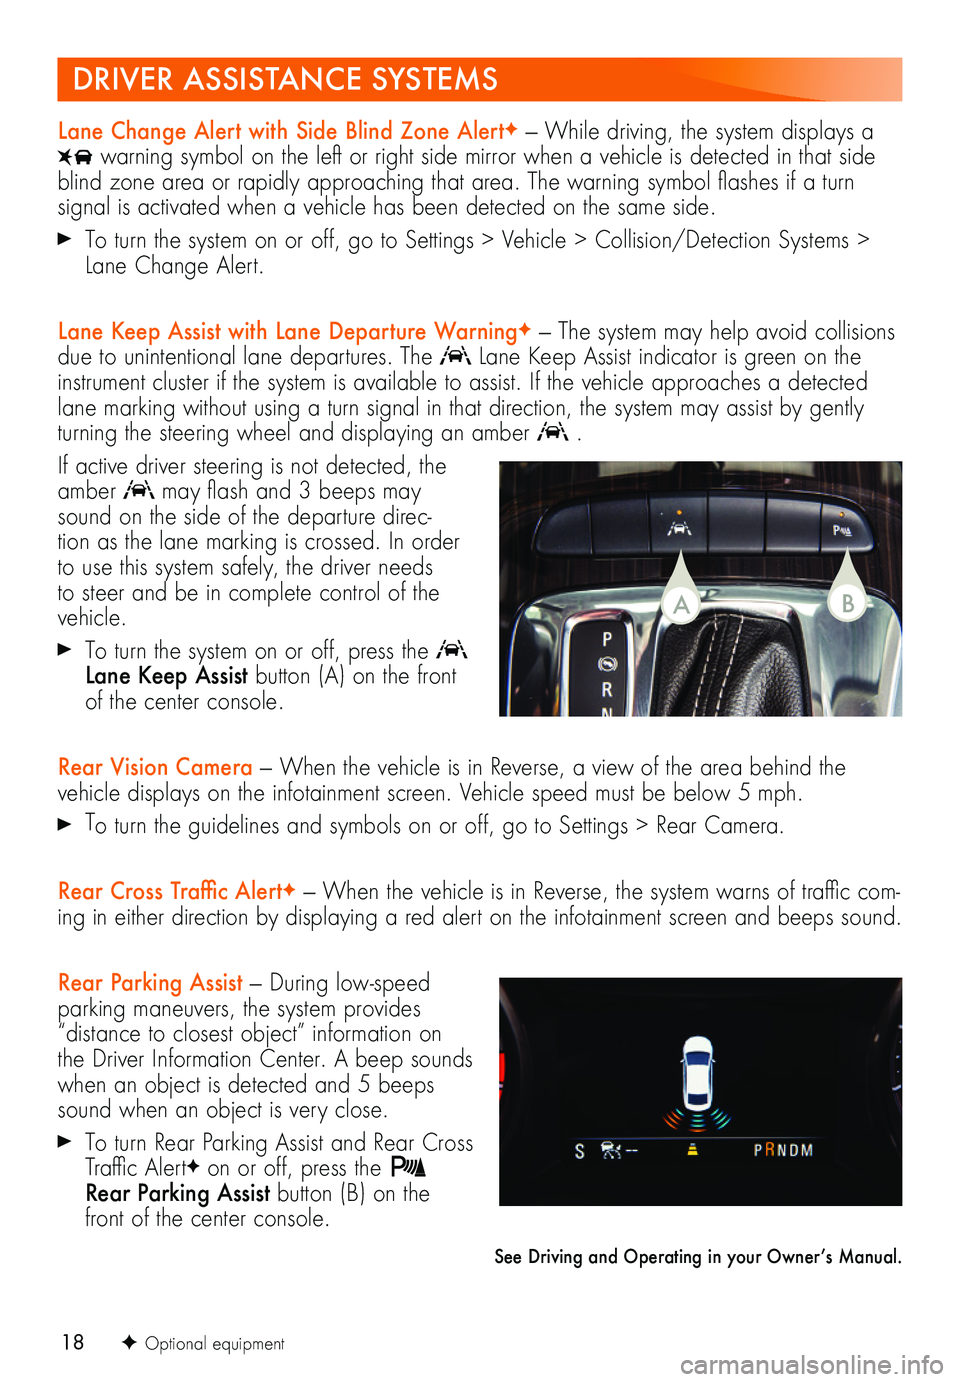
Lane Keep Assist with Lane Departure WarningF — The system may help avoid collisions due to unintentional lane departures. The Lane Keep Assist indicator is green on the instrument cluster if the system is available to assist. If the vehicle approaches a detected lane marking without using a turn signal in that direction, the system may assist by gently turning the steering wheel and displaying an amber .
If active driver steering is not detected, the amber may flash and 3 beeps may sound on the side of the departure direc-tion as the lane marking is crossed. In order to use this system safely, the driver needs to steer and be in complete control of the vehicle.
To turn the system on or off, press the Lane Keep Assist button (A) on the front of the center console.
Rear Vision Camera — When the vehicle is in Reverse, a view of the area behind the vehicle displays on the infotainment screen. Vehicle speed must be below 5 mph.
To turn the guidelines and symbols on or off, go to Settings > Rear Camera.
Rear Cross Traffic AlertF — When the vehicle is in Reverse, the system warns of traffic com-ing in either direction by displaying a red alert on the infotainment screen and beeps sound.
Rear Parking Assist — During low-speed parking maneuvers, the system provides “distance to closest object” information on the Driver Information Center. A beep sounds when an object is detected and 5 beeps sound when an object is very close.
To turn Rear Parking Assist and Rear Cross Traffic AlertF on or off, press the Rear Parking Assist button (B) on the front of the center console.
See Driving and Operating in your Owner’s Manual.
DRIVER ASSISTANCE SYSTEMS
BA