2018 AUDI Q3 Start
[x] Cancel search: StartPage 24 of 230

Opening and closing
Opening and closing
Central locking
Description
You can lock and unlock the vehicle centrally . You
have the following options:
- Remote control key <=>
page 24,
-Sensors in the door handles" <=> page 24,
-Inner central locking switch <=>page 25, or
- Lock cylinder on the driver's door<=>
page 26.
Turn signals
The turn s ignals flash twice when you unlock the
veh icle and flash once when you lock the vehicle.
If they do not flash, then the ignition may still be
sw itched on, or one of the doors or the luggage
compa rtment lid may be open, fo r example.
Automatic locking (Auto Lock)
The Auto Lock function locks all doors and the
luggage compartment lid once the speed has ex
ceeded approx imately 9 mph (15 km/h).
The vehicle will unlock again if the ignition key* is
removed, the opening function from the central
locking switch is activated, or one of the door
handles is operated .
In the event of a crash with airbag deployment,
the doors will also automatically unlock to allow
access to the vehicle.
Selective door unlocking
The doors and luggage compartment lid wi ll lock
when they close. You can set in the Infotainment
system if
only the driver's door or the entire vehi
cle should unlock when unlocking<=>
page 26,
Setting the central locking system .
Unintentionally locking yourself out
Only lock your vehicle when all of the doors and
the luggage compartment lid are closed and the
remote control key is not in the vehicle. This
helps to prevent you from locking yourself out
accidentally .
The fo llow ing conditions prevent you from lock
ing your remote control key in the vehicle :
22
-If the driver's door is open, the vehicle cannot
be locked by pressing the
!'.II button on the re
mote contro l key or by touching the locking
sensor* on a door .
- If the most recently used convenience key* is in
the luggage compartment, the luggage com
partment lid automatically unlocks again after
closing it<=>
page 2 7. The emergency flashers
blink four t imes.
- If the convenience key* that was last used is de
tected inside the veh icle, then the vehicle will
not be able to lock from the outside .
A WARNING
-Always take the key with you when leaving
your vehicle, even if for a short pe riod of
time. This applies particularly when children
remain in the vehicle. Otherwise, children
could start the engine or operate electrical
equipment (such as power windows), which increases the risk of an accident.
- No one, especially children, should stay in
the vehicle when it is locked from the out
side, because the windows can no longer be
opened from the inside <=>
page 2 7. Locked
doors make it more difficult for emergency
workers to get into the vehicle, which puts
lives at r isk .
A WARNING
Appl ies to: ve hicles with ignition loc k
Do not remove the key from the ignition lock
until the vehicle has come to a complete stop.
Otherwise, the steering lock could engage
suddenly and increase the risk of an accident.
(D Tips
-Do not leave va luables unattended in the ve
hicle. A loc ked vehicle is not a safe!
- The LED in the dr iver's door rail b links when
you lock the vehicle. If the LED lights up for
approximate ly 30 seconds after locking,
there is a malfunction in the centra l locking
system . Have the problem corrected by an
authorized Audi dealer or authorized Aud i
Service Facility.
Page 26 of 230
Opening and clo sin g
@ Tips
The replacement battery must meet the same
specifications as the orig inal battery in the re
mote control key.
Remote control key synchronization
If the veh icle cannot be unlocked/locked by the
remote control, you can synchron ize the remote
control key .
• Press the remote control key button
III-
• Insert the key in the driver's door lock within 30
seconds.
• Press the
III button or cf'.I butto n.
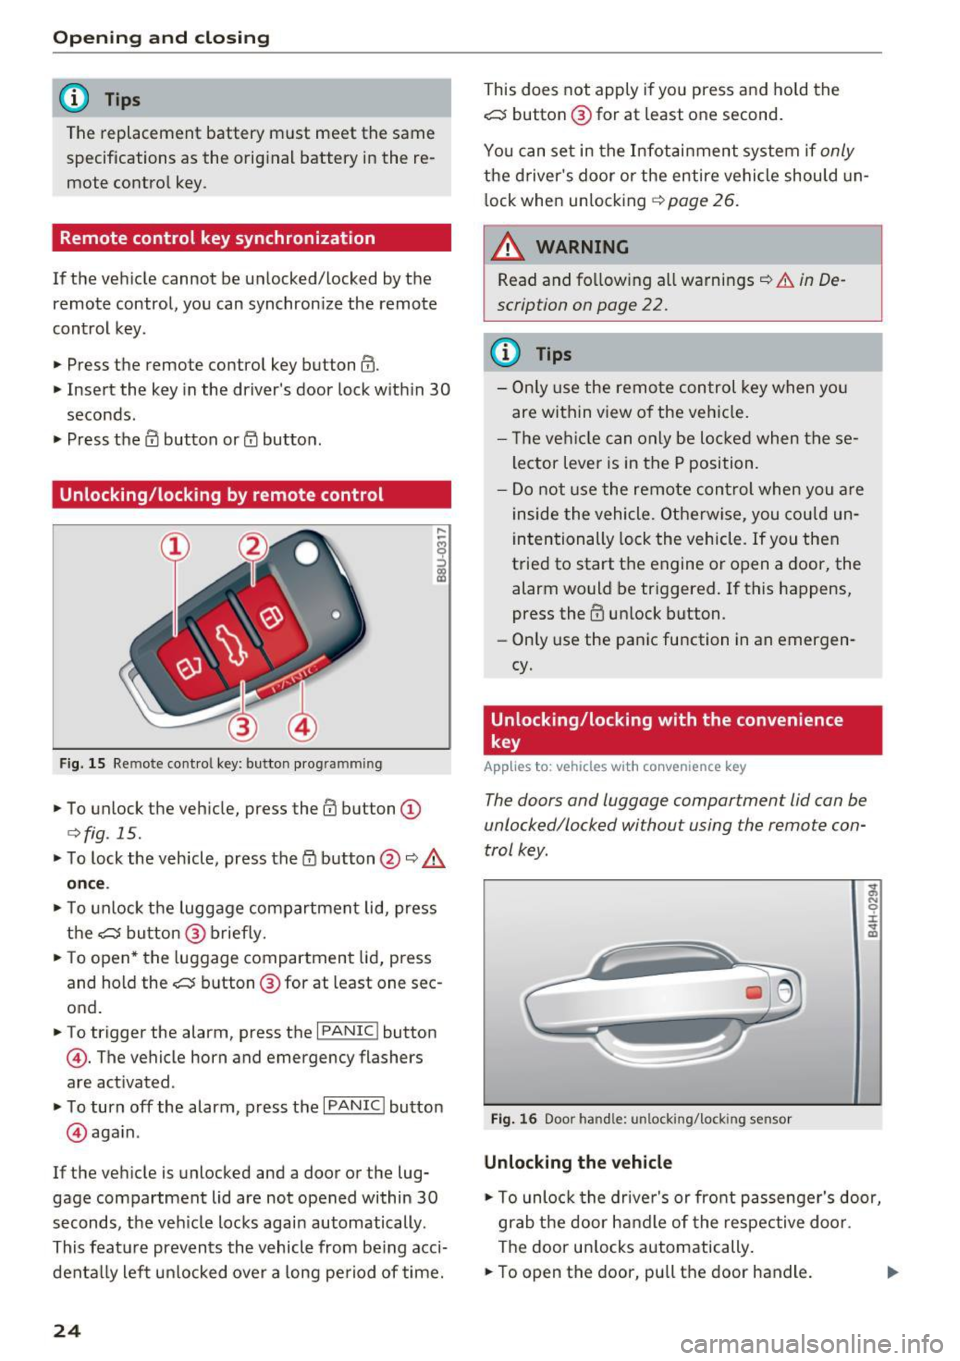
Unlocking /locking by remote control
F ig. 15 Remote control key: button programming
• To unlock the vehicle, press the III button (D
c>fig. 15.
• To lock the vehicle, press the /fl button @¢&.
on ce .
• To unlock the luggage compartment lid, press
the~ button@ brief ly.
• To open* the luggage compartment lid, press
and hold the~ button @ for at least one sec
ond.
• To trigger the alarm, press the
I PANIC I button
©-The vehicle horn and emergency flashers
are activated .
• To turn off the alarm, press the
I PANIC I button
@ aga in .
If the veh icle is unlocked and a door or the lug
gage compartment lid are not opened within
30
seconds, the ve hicle locks again automatically .
This feat ure prevents the vehicle from be ing acci
denta lly lef t un locked over a long pe riod of time.
24
This does not apply i f you press and hold the
~ button @for at least one second.
You can set in the Infot ain ment system if
only
the d river's door o r the entire vehicle should un
l ock whe n unlocking ¢
page 26.
~ WARNING
Read and fo llow ing all warnings¢ &. in De
scription on page
22.
(D Tips
- Only use the remo te control key when yo u
are within view of the veh icle.
- T he ve hicle can only be loc ke d when these
lector Lever is in the P position.
- Do not use the remote con trol when you a re
inside the vehicle. O therwise, you cou ld un
intentionally lock the vehicle . If you then
t ried to start the engine or open a door, the
alarm would be triggered. If this happens,
press the
III unlock button.
- Only use the panic function in an emergen
cy.
Unlocking/locking with the convenience
key
Applies to: vehicles with convenience key
The doors and luggage comportment lid con be
unlocked/locked without using the remote con
trol key .
Fig. 16 Door handle: unlocking/lock ing sensor
Unlocking the vehicle
-
;;, N 0 :i: ... m
• To unlock the drive r's or front passenge r's door,
grab the door ha ndle of the respective door .
The door u nlocks automatically.
• To open the door, pu ll the door handle. .,.
Page 27 of 230

a
co
...... N r-,. N
"" 0 0 ::, co
.. To open the luggage compartment lid, press
the grip p iece in the luggage compartment lid
¢page 27.
Locking the vehicle
.. Place the selector lever in the P position, or else
the vehicle will not be able to lock .
.. To lock the vehicle, close the door and touch
the sensor on the door handle
once¢ fig. 16,
¢ ,&.. Do not hold the door handle while doing
this.
Unlocking and locking the vehicle can only be
done at the front doors. The remote control key
cannot be more than approximately 4 ft (1.5 m)
away from the door handle . It makes no differ
ence whether the remote control key is in your
jacket pocket, purse or briefcase .
The door cannot be opened for a brief period di rectly after locking it. Th is way you have the op
portunity to check if the doors locked correctly .
You can set in the Infotainment system if
only
the driver's door or the entire vehicle should un lock when unlocking ¢
page 26.
A WARNING
Read and following all warnings¢.& in De
scription on page 22.
(D} Tips
If your vehicle is left standing for a long peri
od of time, note the following:
- The proximity sensor switches off after a
few days to save energy. You then have to
pull once on the door handle to unlock the
vehicle and a second time to open it .
- The energy management system gradually
turns off unnecessary convenience functions
to prevent the vehicle battery from draining
and to maintain the vehicle's ability to start
for as long as possible. You then may no
longer be able to unlock your vehicle with
this convenience function.
Opening and closing
Central locking switch
Fig. 17 Driver 's doo r: centr al locking switc h
Fig. 18 Rear center co nsole: ce ntra l locking sw itch
• To lock the vehicle, press the ff! button ¢ ,A.
• To unlock the vehicle, press the al button .
You can
lock and unlock your vehicle using the
central locking switch in the driver's or front pas
senger's door¢
fig. 17 . You can only lock your
vehicle using the central locking switch on the
center console
¢ fig . 18 .
When locking the vehicle with the central locking
switch, the following applies:
- Opening the door and the luggage compart
ment lid from the
outside is not possible (for
security reasons, such as when stopped at a light) .
- The L ED in the central locking switch turns on
when all doors are closed and locked.
- Front doors : you can open the doors individual
ly from the inside by pulling the door handle .
- Rear doors: to unlock the doors, pull on the door handle
one time. To open the doors, pull
on the door handle
again.
- In the event of a crash with airbag deployment, the doors unlock automatically to allow access
to the vehicle .
IJII>
25
Page 32 of 230

Opening and clo sin g
Child safety lock
The child safety lock prevents the rear doors
from being opened from the inside and the rear
power windows from be operated .
Fig. 26 Sect ion of driver's doo r: co ntrols
F ig. 27 Rear door: c hild safety lock
Vehicles with button [TI
~ N M 9 ::J
co
(D
., To activate/deactivate the inne r door handle
and the power w indow switch for the respective
rea r door, p ress the left/right
[II b utton in the
driver's door(!)'=~
fig. 26. The indicator light in
the button turns on/blinks.
., To activate/deactivate the child safety lock on
both sides, you must press the
Ii] buttons one
after the other.
V eh icl es with button [@
., To deactivate/activate the power window
switch in the rear doors, press the~ button in
the driver's door@¢
fig. 26. The indicator light
in the button turns on/blinks.
., To also deactivate/activate the inner door han
dle, open the respective rear door and turn the key sw itch w ith the vehicle key in the direction
of the arrow or the opposite direction of the ar row
~ fig. 2 7.
30
A WARNING
A lways take the key with you when leaving
your vehicle, eve n if for a short period of time .
This applies particularly w hen ch ildren remain
in the vehicle . Otherwise ch ildren cou ld start
the engine or ope rate electr ical equ ipment
(such as power w indows), which increa ses the
risk of an acciden t.
Power windows
Controls
The driver con control oil power windows.
Fig. 28 Section of driver's door: controls
All powe r window switches are equipped with a
two-stage function:
Openin g and clos in g the w ind ows
(I) ~
9 ::J (I)
(D
., To open or close the window completely, press
the switch down or pull the switch up briefly to
the second level. The operat ion will stop if the
sw itch is p ressed/pulled again .
., To select a position in between opened and
closed, p ress/pu ll the switch to the first level
until the des ired window posit ion is reached.
Power window switches
CD Left front door
@ Right front door
® left
rear door
© Right rear door
A WARNING
- Always take the key with yo u when leaving
your veh icle, even if for a sho rt period of
.
time . This applies parti cularly when children ..,
Page 33 of 230

a
co
...... N r--. N .... 0 0 ::, co
remain in the vehicle. Otherwise, children
could start the engine or operate electrical
equipment (such as power windows), which
increases the risk of an accident .
- Pay careful attention when closing the win
dows. Pinching could cause serious injuries.
- When locking the vehicle from outside, the vehicle must be unoccupied since the windows can no longer be opened in an emer
gency .
(D Tips
After switching the ignition off, you can still
open and close the windows for approximate
ly 10 minutes. The power windows do not
sw itch off until the driver's door or front pas
senger's door has been opened .
Convenience opening/closing
All of the windows and the panorama glass roof
can be opened/closed at the same time .
Convenience opening feature
"'Hold the key in the open position in the driver's
door lock until all of the windows are in the de
sired position and the panorama glass roof is
tilted open .
Convenience closing feature
"'Hold the key in the lock position in the driver's
door lock until all the windows and the panora
ma glass roof are closed .
When the panorama glass roof is opened/closed,
the electric sunshade also opens/closes.
A WARNING
Never close the windows or panorama glass
roof carelessly or in an uncontrolled manner,
because this increases the risk of injury.
Correcting power window malfunctions
You can reactivate the one-touch up/down func
tion if it malfunctions.
"'Pull the power window switch up until the win
dow is completely raised.
-
Open ing and closing
"'Release the switch and pull it up again for at
least one second .
"' Press the power window switch until the w in
dow is completely lowered.
"' Release the switch and press it again for at
least one second . Now you can close the win
dow as usual.
Panorama glass roof
Description
Applies to : veh icles with pano rama glass roof
Fig. 29 F ront headline r: pa norama glass roof buttons
@ Tilting the roof
"'To tilt the sunroof complete ly open, press the
~ button up briefly to the second level.
"' To close the sunroof completely, pull the~
button down briefly to the second level
¢ ,&. .
"'To set a position between opened and closed ,
press/pull the~ button up to the first level
until the roof reaches the desired position.
@ Sliding the roof
"'To open the sunroof completely, push the~
button back briefly to the second level.
"' To close the sunroof completely, push the~
button forward briefly to the second level
¢ ,&. .
M ~., 0
0
:, (X) m
"'To select a partially open position, push the~
button forward/back to the first level until the
desired posit ion is reached .
© Opening and closing the sunshade
"'To completely open the sunshade, briefly press
the right button.
"' To completely close the sunshade, briefly press
the left button . ..,
31
Page 55 of 230

0 co ......
"' ,....
"' ...... 0 0 :::,
00
I n the@ setting, the windshield and side win
dows are defrosted or cleared of condensation as
qu ickly as possible. The rec irculat ion mode
switches off, but can be act ivated again manually
by pressing the~ button.
You can open or close the center and rear vents in
the cockpit and the vents in the rear center con
sole us ing the r idged thumbwhee ls. The levers
adjust the direction of the airflow from the vents.
To keep the front side windows from fogging up
in damp weather, we recommend opening the
side air vents and tilting them to the side.
~ R ecirc ulation mo de
In recircu lation mode, the a ir inside the vehicle is
circu lated and fi ltered. This prevents the unfil
tered air outside the vehicle from entering the
vehicle interior . Switching recircu lation mode on
when dr iving through a tunnel or when sitting in
traffic is recommended
¢ .&, . If recirculation
mode is sw itched on before the eng ine starts, it
will be switched off automatically after approx i
mate ly 20 minutes.
Recirculation mode is switched off in the defrost
setting®.
QW R ea r win dow defogger
The rear window defogger only operates when
the eng ine is running. It switches off automati-
Warm and c old
ca lly after approximately 10 to 20 minutes, de
pending on the outside temperature .
J Seat heating*
You can adjust the left and right heated seat
temperature using the left/right thumbwheel.
T he seat heating is switched off when the leve l is
set to 0.
A WARNING .-==-
- You sho uld not use the recircu lation mode
for an extended period since no fresh air is
drawn in. When the A/C system* is sw itched
off, the windows can fog up, which increas
es the risk of an acc ident.
- Individuals w ith reduced sensit ivity to pa in
or temperature could develop burns when
using the seat heat ing* function . To reduce
the r isk of inju ry, these individua ls sho uld
not use seat heating*.
Q) Note
To avoid damaging the seat heat ing* ele
ments, do not kneel on the seats o r place
heavy pressure on one area of the seat .
53
Page 59 of 230

0 co ......
"' ,....
"' ...... 0 0 :::,
00
Driving
General information
Breaking in
A new vehicle must be broken in for the first
1,000 mi les (1,500 km). For the first 600 miles
(1,000 km), do not drive at speeds that are more
than 2/3 of the maximum permitted RPM, avoid
full acce leration, and do not tow a trailer . You
may gradually start increasing the RPM and the
speed between 600 miles (1,000 km) and 1,000
miles (1,500 km) .
During the first hours of use, the engine has a
higher internal friction than later on when all
moving parts have settled into p lace with each
other.
How the vehicle is driven during the first 1,000
miles (1,500 km) also affects the engine quality.
Drive at moderate engine speeds after the initia l
break-in period, particularly when running a cold
engine . This will reduce eng ine wear and improve
the m ileage .
Do not drive at too
low of an engine speed (RPM).
Shift down if the engine stops running "smooth ly". Extremely high eng ine speeds are automati
cally reduced.
Reducing the risk of vehicle damage
([) Note
When driving on poor roads, by curbs and on
steep ramps , make su re that low-hang ing
components such as the spoiler and exhaust
system do not come into contact with these
or they could be damaged. This especially ap
plies to vehicles with low ground clearance
and vehicles that are heavily loaded.
Driving through water on roads
Note the following to reduce the risk of vehicle
damage when driv ing through water, for example
on flooded roads :
- The water must not be any higher than the bot
tom of the vehicle body.
D riving
- Do not drive faster than walking speed.
A WARNING
After driv ing through water or mud, the effec
tiveness of the brakes may be reduced due to moisture on the brake rotors and brake pads.
A few careful brake applications should dry
off the brakes and restore the full braking ef
fect .
(D Note
Vehicle components such as the engine,
transmission, suspension or electrical system
can be severely damaged by driving through
water.
(D Tips
-Determine the depth before driving through
water.
- Do not stop the vehicle, drive in reverse or
switch the engine off when driving through
water.
- Keep in mind that oncom ing vehicles may
create waves that raise the water level and
make it too deep for your vehicle to drive
through safely.
- Avoid dr iving through salt water, because
this can cause corrosion .
Economical and environmentally-friendly
driving
T he amount o f fuel consumption, the environ
mental impact and the wear to the engine,
brakes and tires depends mostly on your driving
style. With an anticipatory and economic driving
style, fuel consumption can be reduced by ap proximately 10-15% . The following tips will help
you conserve the environment and your money at
the same time .
Anticipatory driving
A vehicle uses the most fuel when accelerating.
When you drive with anticipation, you do not
need to brake as often and so you accelerate less.
When possible, let your vehicle coast with a
gear
engaged,
for examp le when you notice that the
next t raffic light is red. This produces an engine
llll-
57
Page 60 of 230

Driving
braking effec t, which he lps to protect the brakes
and tires and reduces the emissions and fuel con
sumpt ion to zero (fuel shut-off during dece lera
tion) .
Shift effici en tly
Upshift ing earlier is an effective way to save fuel.
Staying in a gear too long uses fue l unnecessari
ly.
P ress down o n the acce le ra tor peda l slowly and
avoid " kick -down ".
Avoid full acceleration
You should rare ly trave l at the maximum vehicle
speed. High speeds cause a d isproportionately
h igh inc rease in fuel consump tion, emissions and
tr affic no ise. Slower driving saves fuel.
Reduce idling time
There are benefits to stopp ing the engine, for ex
ample when at railroad crossings or traffic lights
with longer red lights. Stopping the engi ne for
30 -40 seconds already saves mo re fuel than the
amount of extra fuel needed to restart the en
gine.
It takes a very long time in idle to wa rm the en
g ine up to ope ra ting tempe ra tu re. Wea r and
emissions are especially high in the wa rm -up
phase . Therefore, yo u should begi n driving im
mediately after starting the engine. Avoid high
RP Ms while doing t his .
Have maintenance performed r egularly
By having m ainten ance perfo rmed regu larly on
your ve hicle, yo u can he lp to reduce f uel con
sumpt ion befo re yo u even start to dr ive. The
maintenance condition of your vehicle not only
affects traffic safety and long-te rm value but a l
so impacts
fuel consumpt ion . A poorly main
tained engine can lead to fuel consumption that
is 10% higher than normal.
Also check th e
oil level when refueling . T he oil
consumption
depends large ly on the engine load
and speed. It is normal for the oil consumpt ion
of a new eng ine to reach its lowest point only af
ter a certain amount of use. Therefo re, the oil
consumpt ion can o nly be properly judged after
58
approximately 3,0 00 miles (S,000 km) have been
driven .
Avoid short trips
The eng ine and exhaust clean ing system mus t
r each their optima l
operating temperature to ef
fe ct ively reduce consump tion and emissions.
A cold engine uses a d isp roportionately high
amount of fue l. The engine reac hes operat ing
temperat ure and cons umption no rmal izes on ly
a fter approximate ly 2.5 m iles (4 km) .
Check the tire pressure
To save fuel, make sure the t ires are always in
flated to the correct pressure ~
page 175. The
fuel consumpt ion can increase by 5% if the p res
s ur e is on ly 0.5 bar too low. Due to the i ncreased
rol ling resis tance, low tire p ressures w ill also
l ead to greater tire
wear and will affect driving
behavior .
Do no t drive on
winter tir es ye ar-r ound, as this
will consume up to 10% more f uel.
Eliminate unnecessary weight
S ince every po und of ext ra weight increases fuel
consump tion , a quick inspect io n of the luggage
compartmen t may be wo rth it to avoid unneces
s ar y we ight.
When not be ing used, a roof rack shou ld be re
moved to decrease the w ind resistance of the ve
hi cle. This will save yo u ap prox imately 1 2% fue l
at speeds from 62 -75 mph (100 -12 0 km/h).
Save energy
The eng ine drives the generator, which generates
e lectric ity; the fuel consumpt io n also increases
with t he demand for e lectricity . T he refore, sw itch
electrica l eq uipm ent off whe n you no longe r
need i t. Exa mples of eq uipme nt tha t uses a lo t of
energy a re air blowe rs at a high setting, the rea r
window defogger and seat heating* .
([) Note
-Do not leave engine idling un attended afte r
sta rting. If warn ing li ghts should come on
to ind icate improper ope ration, they wou ld
go unheeded . Extended idling also pro duces .,.