2018 Acura NSX lock
[x] Cancel search: lockPage 64 of 489

Continued63
uuChild Safety uSafety of Infants and Small Children
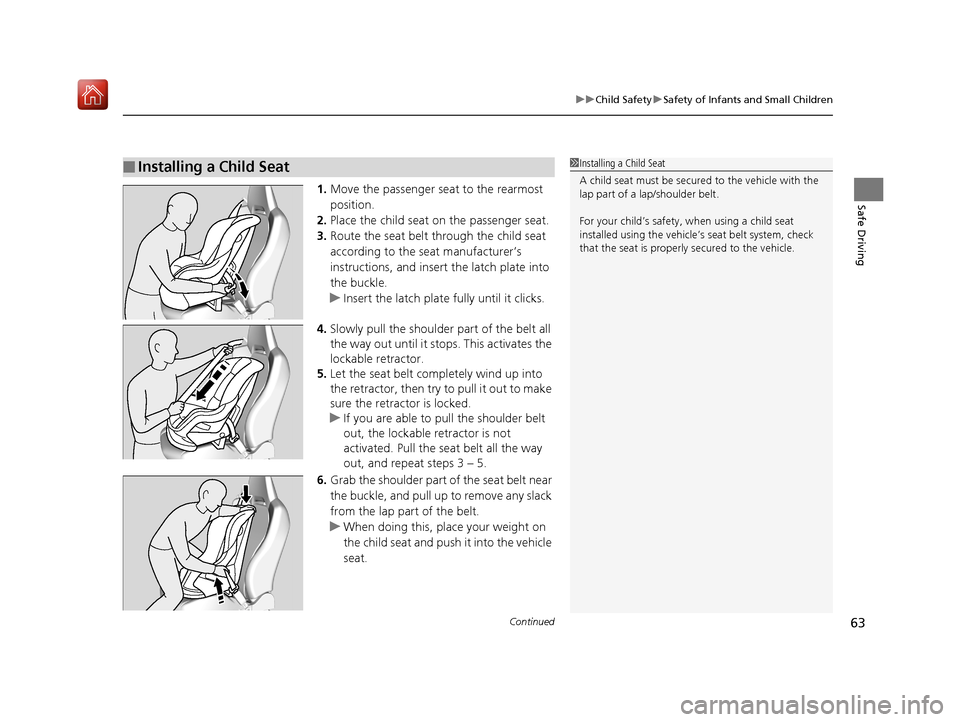
Safe Driving1. Move the passenger seat to the rearmost
position.
2. Place the child seat on the passenger seat.
3. Route the seat belt through the child seat
according to the seat manufacturer’s
instructions, and insert the latch plate into
the buckle.
u Insert the latch plate fully until it clicks.
4. Slowly pull the shoulder part of the belt all
the way out until it stops. This activates the
lockable retractor.
5. Let the seat belt completely wind up into
the retractor, then try to pull it out to make
sure the retractor is locked.
u If you are able to pull the shoulder belt
out, the lockable retractor is not
activated. Pull the seat belt all the way
out, and repeat steps 3 – 5.
6. Grab the shoulder part of the seat belt near
the buckle, and pull up to remove any slack
from the lap part of the belt.
u When doing this, place your weight on
the child seat and push it into the vehicle
seat.
■Installing a Child Seat1Installing a Child Seat
A child seat must be secure d to the vehicle with the
lap part of a la p/shoulder belt.
For your child’s safety, when using a child seat
installed using the vehicle’ s seat belt system, check
that the seat is properly secured to the vehicle.
18 NSX-31T6N6100.book 63 ページ 2017年10月27日 金曜日 午後1時39分
Page 65 of 489

uuChild Safety uSafety of Infants and Small Children
64
Safe Driving
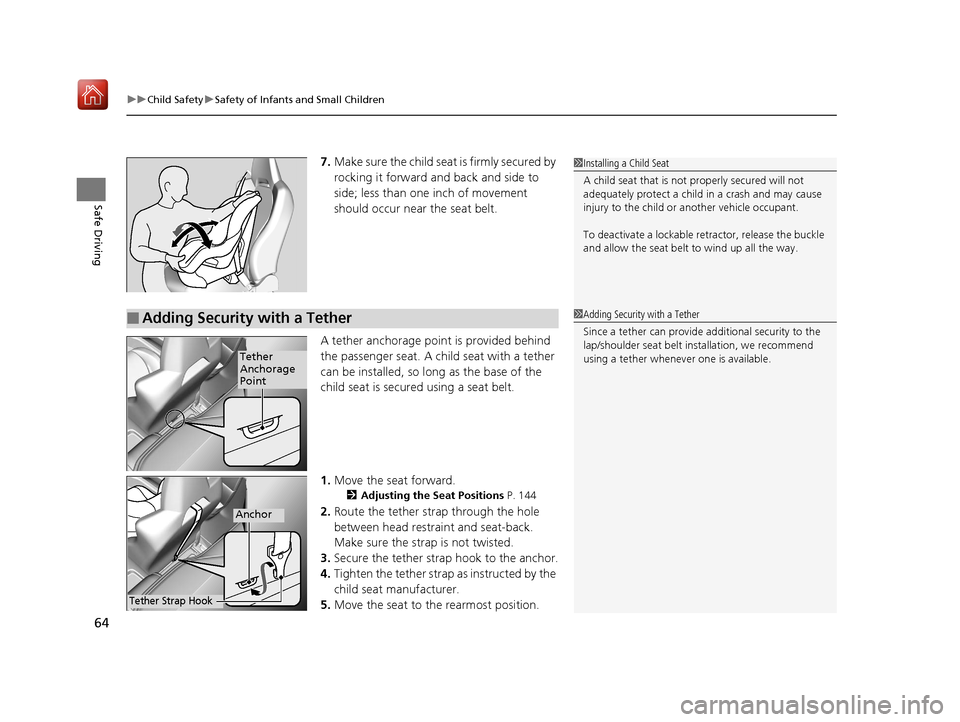
7. Make sure the child seat is firmly secured by
rocking it forward and back and side to
side; less than one inch of movement
should occur near the seat belt.
A tether anchorage point is provided behind
the passenger seat. A child seat with a tether
can be installed, so long as the base of the
child seat is secured using a seat belt.
1. Move the seat forward.
2 Adjusting the Seat Positions P. 144
2.Route the tether strap through the hole
between head restraint and seat-back.
Make sure the strap is not twisted.
3. Secure the tether strap hook to the anchor.
4. Tighten the tether strap as instructed by the
child seat manufacturer.
5. Move the seat to the rearmost position.
1Installing a Child Seat
A child seat that is not properly secured will not
adequately protect a child in a crash and may cause
injury to the child or another vehicle occupant.
To deactivate a lockable retractor, release the buckle
and allow the seat belt to wind up all the way.
■Adding Security with a Tether1 Adding Security with a Tether
Since a tether can provide additional security to the
lap/shoulder seat belt in stallation, we recommend
using a tether whenever one is available.
Tether
Anchorage
Point
Tether Strap Hook
Anchor
18 NSX-31T6N6100.book 64 ページ 2017年10月27日 金曜日 午後1時39分
Page 79 of 489

78
uuIndicators u
Instrument Panel
IndicatorNameOn/BlinkingExplanationMessage
Anti-lock Brake
System (ABS )
Indicator
●Comes on for a few seconds when
you set the power mode to ON,
then goes off.
●If it comes on at any other time,
there is a problem with the ABS.
●Stays on constantly - Have your vehicle
checked by an auth orized Acura NSX
dealer. With this indi cator on, your vehicle
still has normal braking ability but no
anti-lock function.
2 Anti-lock Brake System (ABS) P. 361
Supplemental
Restraint System
Indicator
●Comes on for a few seconds when
you set the power mode to ON,
then goes off.
●Comes on if a problem with any of
the following is detected:
-Supplemental restraint system
- Side airbag system
- Side curtain airbag system
- Knee airbag system
- Seat belt tensioner
●Stays on constantly or does not come
on at all - Have your vehicle checked by
an authorized Acura NSX dealer.
Electric Power
Steering (EPS)
System Indicator
●Comes on when you set the power
mode to ON, and go es off when the
power system is on.
●Comes on if there is a problem with
the EPS system.
●Stays on constantly or does not come
on at all - Have your vehicle checked by
an authorized Acura NSX dealer.
2 If the Electric Power Steering (EPS)
System Indicator Comes On P. 453
18 NSX-31T6N6100.book 78 ページ 2017年10月27日 金曜日 午後1時39分
Page 104 of 489

103
Controls
This chapter explains how to operate the various controls necessary for driving.
Clock.................................................. 104
Locking and Unlocking the Doors Key Type and Functions ................... 105
Low Keyless Access Remote Signal Strength ......................................... 106
Locking/Unlocking the Doors from the
Outside .......................................... 107
Locking/Unlocking the Doors from the Inside ............................................. 115
Auto Door Locking/Unlocking .......... 118
Opening and Closing the Hatch....... 119
Security System ................................ 122
Immobilizer System .......................... 122 Security System Alarm...................... 122Opening and Closing the Windows.... 125Operating the Switches Around the
Steering Wheel ENGINE START/STOP Button............. 127
Turn Signals ..................................... 130
Light Switches.................................. 131
Daytime Running Lights ................... 134
Wipers and Washers ........................ 135
Brightness Control ........................... 136
Rear Defogger/Heated Door Mirror Button.....137Driving Position Memory System*.... 138
Adjusting the Steering Wheel........... 140 Adjusting the Mirrors
....................... 141
Interior Rearview Mirror ................... 141
Power Door Mirrors ......................... 142
Adjusting the Seats .......................... 144
Interior Lights/Interior Convenience Items ................................................ 149
Interior Lights .................................. 149
Interior Convenience Items .............. 151
Climate Control System ................... 156
Using Automatic Climate Control .... 156Automatic Climate Control Sensors......160
* Not available on all models
18 NSX-31T6N6100.book 103 ページ 2017年10月27日 金曜日 午後1時39分
Page 105 of 489

104
Controls
Clock
Adjusting the Clock
You can adjust the time in the clock display with the power mode in ON.
■Using the Settings menu on the audio/
information screen
1. Select Settings .
2. Select Clock/Info .
3. Select Clock Adjustment .
4. Select or to change hour.
5. Select or to change minute, then
select OK.
■Adjusting the Time
1Adjusting the Clock
The clock is automatically updated through the audio
system, so the time does not need to be adjusted.
You cannot adjust the time while the vehicle is
moving.
Models with navigation system
Models with Display Audio
Models without navigation system
1Using the Settings menu on the audio/information screen
You can customize the clock display to show the 12
hour clock or 24 hour clock.
2 Customized Features P. 244
The clock display is set to on by factory default.
You can turn the clock display on and off. 2 Customized Features P. 244
The clock is automatica lly updated when your
smartphone is connected to the audio system.
You can also adjust the clock by touching the clock
displayed on the upper right corner of the display.
1. Touch the clock on the display for a few seconds.
2. Select Clock Adjustment.
3. Select or to change hour.
4. Select or to change minute, then select OK.
Models with Display Audio
34
34
34
34
18 NSX-31T6N6100.book 104 ページ 2017年10月27日 金曜日 午後1時39分
Page 106 of 489

105Continued
Controls
Locking and Unlocking the Doors
Key Type and Functions
This vehicle comes with the following key:Use the keyless access remote to turn on and
off the power system, to lock and unlock the
doors and to open the hatch. You can also use
the keyless access system to lock and unlock
the doors and hatch.
The built-in key can be used to lock or unlock
the doors when the keyless access remote
battery becomes weak and the power door
lock/unlock operation is disabled.
To remove the built-in key, slide the release
knob and then pull out the key. To reinstall
the built-in key, push the built-in key into the
keyless access remote until it clicks.1 Key Type and Functions
All the keys have an immobilizer system. The
immobilizer system helps to protect against vehicle
theft. 2 Immobilizer System P. 122
Follow the advice below to prevent damage to the
keys:
•Do not leave the keys in direct sunlight, or in
locations with high temperature or high humidity.
•Do not drop the keys or set heavy objects on them.•Keep the keys away from liquids, dust and sand.
•Do not take the keys apart except for replacing the
battery.
If the circuits in the keys are damaged, the power
system may not activate, and the keyless access
system may not work.
If the keys do not work properly, have them
inspected by an authorized Acura NSX dealer.■Built-in Key
Built-in Key Release Knob
18 NSX-31T6N6100.book 105 ページ 2017年10月27日 金曜日 午後1時39分
Page 107 of 489

uuLocking and Unlocking the Doors uLow Keyless Access Remote Signal Strength
106
Controls
Contains a number that you will need if you
purchase a replacement key.
Low Keyless Access Remo te Signal Strength
The vehicle transmits radio waves to loca te the keyless access remote when locking/
unlocking the doors, opening the hatch, or to activate the power system.
In the following cases, locking/unlocking the doors, opening the hatch, or activating
the power system may be inhibited or operation may be unstable:
• Strong radio waves are being tra nsmitted by nearby equipment.
• You are carrying the keyless access remote together with telecommunications
equipment, laptop computers, ce ll phones, or wireless devices.
• A metallic object is touching or co vering the keyless access remote.
■Key Number Tag1Key Number Tag
Keep the key number tag separate from the key in a
safe place outside of your vehicle.
If you wish to purchase an additional key, contact an
authorized Acura NSX dealer.
If you lose your key an d you cannot activate the
power system, contact an authorized Acura NSX
dealer.
1 Low Keyless Access Remote Signal Strength
Communication between the keyless access remote
and the vehicle consumes the keyless access remote’s
battery.
Battery life is about two years, but this varies
depending on regularity of use.
The battery is consumed whenever the keyless access
remote is receivi ng strong radio wave s. Avoid placing
it near electrical appliances such as televisions and
personal computers.
18 NSX-31T6N6100.book 106 ページ 2017年10月27日 金曜日 午後1時39分
Page 108 of 489

107
uuLocking and Unlocking the Doors uLocking/Unlocking the Doors from the Outside
Continued
Controls
Locking/Unlocking the Doors from the Outside
When you carry the keyless access remote, the
outer door handles automatically pop in/out
and you can lock/unlock the doors and open
the hatch.
Outer door handles automatically pop in/out
within about 6 feet (2 m) radius of the outside
door handle.
You can lock/unlock the doors within a radius
of about 32 inches (80 cm) of the outside door
handle. You can open the hatch within about
32 inches (80 cm) radius from the hatch
release button.
■Locking the vehicle
Press the door lock button on either door.u Some exterior lights flash; the beeper
sounds; both doors lock; both outer door
handles pop in if they are popped out;
and the security system sets.
■Using the Keyless Access System1Using the Keyless Access System
If you do not open a door within 30 seconds of
unlocking the vehicle, th e doors will automatically
relock and the outer ha ndles of the doors will
automatically pop back in.
You can lock or unlock doors using the remote
transmitter or keyless access system only when the
power mode is in VEHICLE OFF.
•Do not leave the keyless access remote in the
vehicle when you get out . Carry it with you.
•Even if you are not carrying the keyless access
remote, you can lock/unlock the doors while
someone else with the remote is within range.
•The door may be unlocked if the door handle is
covered with water in heavy rain or in a car wash if
the keyless access remote is within range.
•If you grip either door handle wearing gloves, the
door sensor may be slow to respond or may not
respond by unlocking the doors.
•The door may not open if you pull it immediately
after gripping the door handle. Grip the handle
again and confirm that th e door is unlocked before
pulling the handle.
•Even within the 32 inches (80 cm) radius, you may
not be able to lock/unl ock the doors with the
keyless access remote if it is above or below the
outside handle.
•The keyless access remote may not operate if it is
too close to the door and door glass.
18 NSX-31T6N6100.book 107 ページ 2017年10月27日 金曜日 午後1時39分