Page 219 of 697

uuInterior Lights/Interior Convenience Items uInterior Convenience Items
218
Controls
The power mode must be in ON to use the
seat heaters.
Press the seat heater button:
Once - The HI setting (three indicators on)
Twice - The MID setting (two indicators on)
Three times - The LO setting (one indicator on)
Four times - The OFF se tting (no indicators on)
Pull the tab and roll up the sunshade all the
way. Use the hooks to hang it.
■Second Row Outer Seat Heaters*1 Second Row Outer Seat Heaters*
Do not use the seat heaters even in LO when the
engine is off. Under such conditions, the battery may
be weakened, making the engine difficult to start.
3WARNING
Heat induced burns are possible when
using seat heaters.
Persons with a diminished ability to sense
temperature (e.g., persons with diabetes,
lower-limb nerve damage, or paralysis) or
with sensitive skin should not use seat
heaters.
■Integrated Sunshades*1Integrated Sunshades*
Use the sunshades only when the windows are fully
closed. Using the shade while a window is open can
unhook and blow off the sh ade, hitting and hurting
anyone sitting near the window.
Tab
Hook
* Not available on all models
18 ACURA MDX-31TZ56400.book 218 ページ 2017年8月23日 水曜日 午後4時1分
Page 224 of 697

Continued223
uuClimate Control System uUsing Automatic Climate Control
Controls
■SYNC on and off
1.Select SYNC.
2. Select On for synchronization mode.
u When in synchronization mode, the front
passenger’s side temperature and the
rear passenger compartment become
the same as the driv er’s side settings.
3. Adjust the temperature or change the
mode from the driver’s side.
■Changing the fan speed
1.Select .
u When the left or right side of the
is selected, the fan speed level goes up or
down one level at a time.
2. Change the fan speed with one of the
following:
The fan speed level indicators: Select your
desired speed level. The smaller indicator is
for a slower speed, and the larger for a
faster speed.
(+/(-: To go up or down one level at a
time.
Front Fan AUTO : The system automatically
selects the fan speed most suitable to the
ambient environment.
1 SYNC on and off
When you press the button or select the Front
icon, the system synchronizes the driver’s and
front passenger’s temp erature settings.
When the system is not in SYNC mode, the driver's
side temperature, the front passenger’s side
temperature and the rear passenger compartment (if
it is on) can be set separately.
You can also turn off SYNC mode by changing the
front passenger’s side temperature or rear
passenger’s temperature.
1 Changing the fan speed
While the climate control system is in auto, Front
Fan AUTO is highlighted.
Fan Speed Level Indicators
18 ACURA MDX-31TZ56400.book 223 ページ 2017年8月23日 水曜日 午後4時1分
Page 234 of 697

233
uuAudio System uUSB Ports
Continued
Features
USB Ports
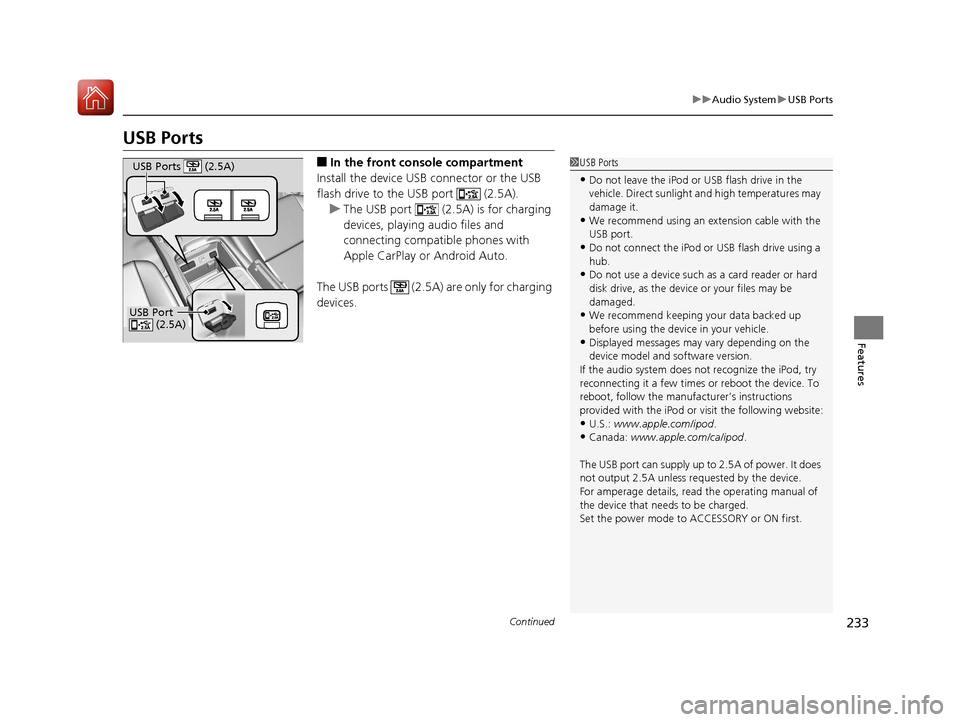
■In the front console compartment
Install the device USB connector or the USB
flash drive to the USB port (2.5A). u The USB port (2.5A) is for charging
devices, playing audio files and
connecting compatib le phones with
Apple CarPlay or Android Auto.
The USB ports (2.5A) are only for charging
devices.1 USB Ports
•Do not leave the iPod or USB flash drive in the
vehicle. Direct sunlight and high temperatures may
damage it.
•We recommend using an extension cable with the
USB port.
•Do not connect the iPod or USB flash drive using a
hub.
•Do not use a device such as a card reader or hard
disk drive, as the device or your files may be
damaged.
•We recommend keeping y our data backed up
before using the device in your vehicle.
•Displayed messages may vary depending on the
device model and software version.
If the audio system does not recognize the iPod, try
reconnecting it a few times or reboot the device. To
reboot, follow the manufac turer’s instructions
provided with the iPod or visit the following website:
•U.S.: www.apple.com/ipod .•Canada: www.apple.com/ca/ipod.
The USB port can supply up to 2.5A of power. It does
not output 2.5A unless requested by the device.
For amperage details, read the operating manual of
the device that ne eds to be charged.
Set the power mode to ACCESSORY or ON first.
USB Port (2.5A)
USB Ports (2.5A)
18 ACURA MDX-31TZ56400.book 233 ページ 2017年8月23日 水曜日 午後4時1分
Page 237 of 697

236
uuAudio System uAuxiliary Input Jack
Features
Auxiliary Input Jack
Use the jack to connect standard audio
devices.
1. Open the AUX cover.
2. Connect a standard audio device to the
input jack using a 1/8 inch (3.5 mm) stereo
miniplug.
u The audio system automatically switches
to the AUX mode.
Audio System Theft Protection
The audio system is disabled when it is di sconnected from the power source, such as
when the battery is disconnected or goes dead. In certain conditions, the system
may display a code entry screen. If this occurs, reactivate the audio system.
■Reactivating the audio system
1. Set the power mode to ON.
2. Turn on the audio system.
3. Press and hold the audio system power button for more than two seconds.
u The audio system is reac tivated when the audio co ntrol unit establishes a
connection with the vehicle control unit. If the control unit fails to recognize
the audio unit, you must go to a dealer and have the audio unit checked.
1 Auxiliary Input Jack
You can return to the AUX mode by selecting Source
on the On Demand Multi-Use Display
TM.
18 ACURA MDX-31TZ56400.book 236 ページ 2017年8月23日 水曜日 午後4時1分
Page 240 of 697

239
Features
Audio System Basic Operation
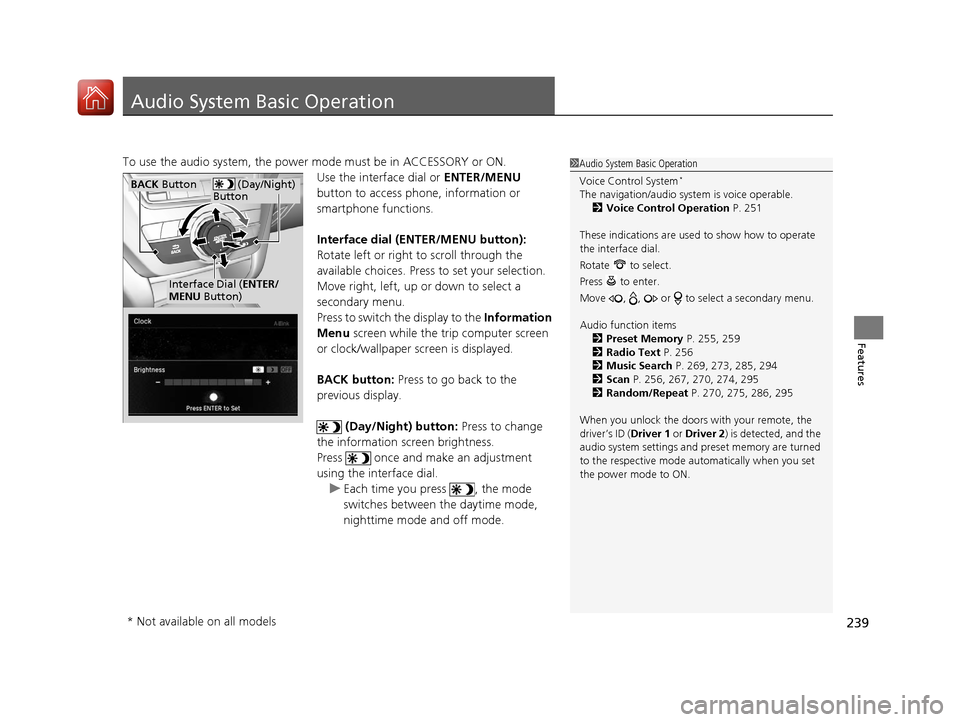
To use the audio system, the power mode must be in ACCESSORY or ON.Use the interface dial or ENTER/MENU
button to access phone, information or
smartphone functions.
Interface dial (E NTER/MENU button):
Rotate left or right to scroll through the
available choices. Press to set your selection.
Move right, left, up or down to select a
secondary menu.
Press to switch the display to the Information
Menu screen while the trip computer screen
or clock/wallpaper screen is displayed.
BACK button: Press to go back to the
previous display.
(Day/Night) button: Press to change
the information screen brightness.
Press once and make an adjustment
using the interface dial. u Each time you press , the mode
switches between the daytime mode,
nighttime mode and off mode.1Audio System Basic Operation
Voice Control System
*
The navigation/audio system is voice operable.
2 Voice Control Operation P. 251
These indications are used to show how to operate
the interface dial.
Rotate to select.
Press to enter.
Move , , or to se lect a secondary menu.
Audio function items 2 Preset Memory P. 255, 259
2 Radio Text P. 256
2 Music Search P. 269, 273, 285, 294
2 Scan P. 256, 267, 270, 274, 295
2 Random/Repeat P. 270, 275, 286, 295
When you unlock the doors with your remote, the
driver’s ID ( Driver 1 or Driver 2) is detected, and the
audio system settings and pr eset memory are turned
to the respective mode automatically when you set
the power mode to ON. (Day/Night)
ButtonBACK Button
Interface Dial ( ENTER/
MENU Button)
* Not available on all models
18 ACURA MDX-31TZ56400.book 239 ページ 2017年8月23日 水曜日 午後4時1分
Page 241 of 697

240
uuAudio System Basic Operation uOn Demand Multi-Use DisplayTM
Features
On Demand Multi-Use DisplayTM
Use the On Demand Multi-Use DisplayTM to operate the audio system.
Select Source , then select an item on the sour ce list to switch the audio source.
Select Front/Rear to changes between the front side audio source selection and
rear side audio source selection.
2 Selecting the Audio Source using Front Control Panel P. 352
■Selecting an Audio Source
1On Demand Multi-Use DisplayTM
Icons that appear on the sc reen vary by the source
selected.
Select or to go back to the previous screen.
Use the / icons to turn the page.
X
1 Selecting an Audio Source
You can change the order of source list displayed.
1. Select Audio Menu, then Edit Source Order .
2. Select or .
You can also change the source order by pressing
and holding the source on the source list for two
seconds.
Select Source .
Source List
Front
/Rear
*
Models with rear entertainment system
* Not available on all models
18 ACURA MDX-31TZ56400.book 240 ページ 2017年8月23日 水曜日 午後4時1分
Page 246 of 697

245
uuAudio System Basic Operation uInformation Screen
Continued
Features
■Navigation*
Shows the navigation screen.
2 Refer to the Navigation System Manual
■Phone
Shows the HFL information.
2 Bluetooth ® HandsFreeLink ® P. 393
■Info
Shows the AcuraLink Messages*, Trip Computer , Clock/Wallpaper , Traffic
Incidents* or Voice Recognition Guide*. Press or INFO button to display the
Information Menu screen.
AcuraLink Messages
*:
Shows a AcuraLink ® message menu list.
2 AcuraLink Message P. 439
Trip computer:
Current Drive
Shows the range and instant and average fu el economy of the current trip, as well
as the average fuel economy from your last trip.
History of Trip A
Shows the range, average fuel economy and distances traveled for the current trip,
as well as the average fuel economy and distances traveled during the last three
driving cycles.
Each time you reset the trip meter A, th e information on the display updates. The
history of the previous three driving cycles is kept.
* Not available on all models
18 ACURA MDX-31TZ56400.book 245 ページ 2017年8月23日 水曜日 午後4時1分
Page 247 of 697
246
uuAudio System Basic Operation uInformation Screen
Features
Deleting the history manually
1. Press on the History of Trip A screen to select Delete History.
2. A confirmation message appears on the screen. Rotate to select Yes, then
press .
Clock /Wallpaper :
Shows a clock screen or an image you import.
Traffic Incidents
*:
Shows a traffic incidents list.
2 Refer to the Navigation System Manual
Voice Recognition Guide*:
Shows a voice recognition guide screen.
■Smartphone
Displays the Apple CarPlay or Android Auto.
2 Apple CarPlay P. 299
2 Android Auto P. 303
* Not available on all models
18 ACURA MDX-31TZ56400.book 246 ページ 2017年8月23日 水曜日 午後4時1分