Page 16 of 96

Instrument and control functions
3-2
3From the “LOCK” position, push the
key and turn it to “OFF”.
EAU49399
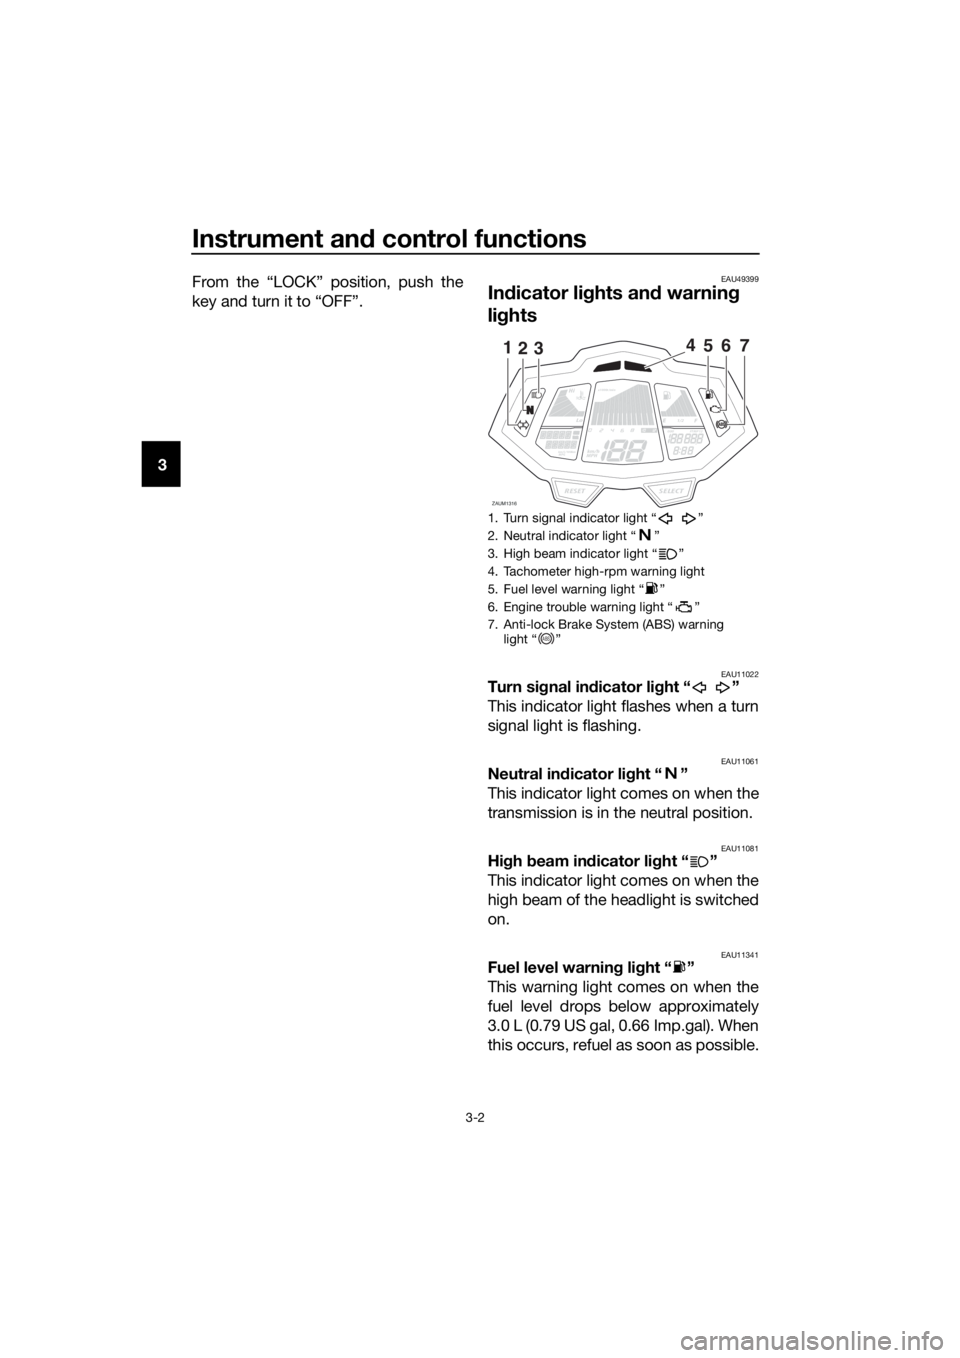
Indicator lights and warning
lights
EAU11022Turn signal indicator light “ ”
This indicator light flashes when a turn
signal light is flashing.
EAU11061Neutral indicator light “ ”
This indicator light comes on when the
transmission is in the neutral position.
EAU11081High beam indicator light “ ”
This indicator light comes on when the
high beam of the headlight is switched
on.
EAU11341Fuel level warning light “ ”
This warning light comes on when the
fuel level drops below approximately
3.0 L (0.79 US gal, 0.66 Imp.gal). When
this occurs, refuel as soon as possible.
1. Turn signal indicator light “ ”
2. Neutral indicator light “ ”
3. High beam indicator light “ ”
4. Tachometer high-rpm warning light
5. Fuel level warning light “ ”
6. Engine trouble warning light “ ”
7. Anti-lock Brake System (ABS) warning
light “ ”
Lo
Hi
1/2
x1000r/min
ZAUM1316SELECTRESET
km/L/100kmMPGkm/h
MPH
ODOFTRIP12OILOIL
1235467
ABS
UBR6E0E0.book Page 2 Wednesday, August 17, 2016 1:26 PM
Page 18 of 96
Instrument and control functions
3-4
3come on to indicate that the function is
activated or the light will go off to indi-
cate that the function is deactivated.
EAUM3423
Multi-function meter unit
TIP
When the key is turned to “ON”, all
display segments of the multi-
function meter unit will momen-
tarily appear in order to test the
electrical circuit. The speedome-
ter, tachometer, fuel meter and
coolant temperature meter will
then perform a display check and
a welcome message will scroll
across the multi-function display.
1. “INFO” switch
2. “RESET” button
3. “SELECT” button
1. Coolant temperature meter
2. Tachometer
3. Fuel meter
4. Odometer/tripmeter/fuel reserve tripmeter
5. Clock
6. Speedometer
7. Multi-function display
Lo1/2ODO
ZAUM1299
SELECTRESET
INFO
km/L/100kmMPGkm/h
MPH
ODOFTRIPx1000r/minOILOIL
23
1
Lo
Hi
1/2
x1000r/min
ZAUM1464
km/h
ODOOIL
123
4567
UBR6E0E0.book Page 4 Wednesday, August 17, 2016 1:26 PM
Page 24 of 96

Instrument and control functions
3-10
3Trip time meter “TRIP TIME”
This function records the elapsed time
of your current trip, or since it was last
reset. Trip time is displayed in “_h
_min” (hours and minutes).
TIP
The trip time meter will automati-
cally reset 4 hours after the key
was last turned to “OFF”.
To manually reset the trip time me-
ter, push the “RESET” button for
two seconds. However, the
odometer and tripmeter display
must be set to “ODO”, otherwise
the tripmeter will be reset instead.
Oil change trip meter “DIST SERV”
This function shows the distance trav-
eled since your last oil service. It will re-
set when the oil change indicator is
reset.Oil change indicator “OIL”
This indicator flashes (“OIL SERV”
message will also appear) to indicate
that the engine oil should be changed.
It will come on at the initial 1000 km
(600 mi) service interval, 2000 km
(1200 mi) after that, and every 3000 km
(1800 mi) thereafter. After changing the
engine oil, be sure to reset the oil
change indicator.
To reset the oil change indicator, make
sure the odometer and tripmeter dis-
play is set to “ODO”, then push the
“RESET” button for two seconds until
“OIL SERV” message flashes, and then
push and hold the “RESET” button for
15 seconds.
TIP
If the engine oil is changed before the
oil change indicator comes on (i.e. be-
fore the set oil service interval has been
reached), the indicator must be reset
for the next oil change to be indicated
at the correct time. In this case, make
sure the odometer and tripmeter is set
the multi-function display, then push
Lo
Hi
ZAUM1311
ZAUM1449
Lo
Hi
ZAUM1450
Lo
Hi
OIL
UBR6E0E0.book Page 10 Wednesday, August 17, 2016 1:26 PM
Page 55 of 96
![YAMAHA YZF-R125 2017 Owners Manual Periodic maintenance and adjustment
6-13
6 NOTICE: Before installing the
engine oil drain bolt, do not for-
get to install the O-ring, com-
pression spring, and oil strainer
in position.
[ECA10422]
1 YAMAHA YZF-R125 2017 Owners Manual Periodic maintenance and adjustment
6-13
6 NOTICE: Before installing the
engine oil drain bolt, do not for-
get to install the O-ring, com-
pression spring, and oil strainer
in position.
[ECA10422]
1](/manual-img/51/54250/w960_54250-54.png)
Periodic maintenance and adjustment
6-13
6 NOTICE: Before installing the
engine oil drain bolt, do not for-
get to install the O-ring, com-
pression spring, and oil strainer
in position.
[ECA10422]
11. Refill with the specified amount of
the recommended engine oil, and
then install and tighten the oil filler
cap.
NOTICE
ECA11621
In order to prevent clutch slip-
page (since the engine oil also
lubricates the clutch), do not
mix any chemical additives. Do
not use oils with a diesel speci-
fication of “CD” or oils of a high-
er quality than specified. In
addition, do not use oils labeled
“ENERGY CONSERVING II” or
higher.
Make sure that no foreign mate-
rial enters the crankcase.
12. Start the engine, and then let it idle
for several minutes while checking
it for oil leakage. If oil is leaking,
immediately turn the engine off
and check for the cause.13. Turn the engine off, and then
check the oil level and correct it if
necessary.
14. Reset the oil change indicator.
(See page 3-10.)
Tightening torques:
Engine oil drain bolt:
32 Nm (3.2 m·kgf, 23 ft·lbf)
Recommended engine oil:
See page 8-1.
Oil quantity:
Without oil filter element replace-
ment:
0.95 L (1.00 US qt, 0.84 Imp.qt)
With oil filter element replacement:
1.00 L (1.06 US qt, 0.88 Imp.qt)
UBR6E0E0.book Page 13 Wednesday, August 17, 2016 1:26 PM