Page 51 of 132

5-3
5
EBU19542FuelMake sure that there is sufficient fuel in the tank.
(See page 4-8.)EBU19561Engine oilMake sure that the engine oil is at the specified
level. Add oil as necessary. (See page 8-11.)EBU34490Transmission oilMake sure that the transmission oil is at the spec-
ified level. Add oil as necessary. (See page 8-14.)EBU19653Front and rear brakesBrake levers
Check for correct free play in the brake levers. If
the free play is incorrect, adjust it. (See pages
8-23 and 8-25.)
Check operation of the levers. They should
move smoothly and there should be a firm feel-
ing when the brake is applied. If not, have the
ATV checked by a Yamaha dealer. Brake operation
Test the brakes at slow speed after starting out to
make sure they are working properly. If the brakes
do not provide proper braking performance,
check the brake shoes for wear. (See page 8-22.)
EBU19762Throttle leverCheck the operation of the throttle lever. It must
open smoothly and spring back to the idle position
when released. Have a Yamaha dealer correct if
necessary.EBU19771Drive chainCheck the condition of the drive chain and check
the drive chain slack. Lubricate and adjust the
drive chain as necessary. (See page 8-26.)EBU19795TiresCheck tire pressure regularly to make sure it is at
the recommended specifications. Also check for
wear and damage.
UBW460E0.book Page 3 Monday, May 23, 2016 11:12 AM
Page 55 of 132

6-1
6
EBU19882
OPERATION
EBU19902Read the Owner’s Manual carefully before riding
the ATV. If there is a control or function you do not
understand, ask your Yamaha dealer.
WARNING
EWB00632Read the Owner’s Manual carefully to become
familiar with all controls in order to help pre-
vent any loss of control, which could cause an
accident or injury. EBU36360Starting a cold engineNOTICEECB00151See the “Engine break-in” section on page 6-3
prior to operating the engine for the first time. 1. Set the parking brake. (The engine can bestarted only when the rear brake lever is ap-
plied.)
2. Turn the fuel cock to “ON”. 3. Turn the key to “ON” and set the engine stop
switch to “ ”.
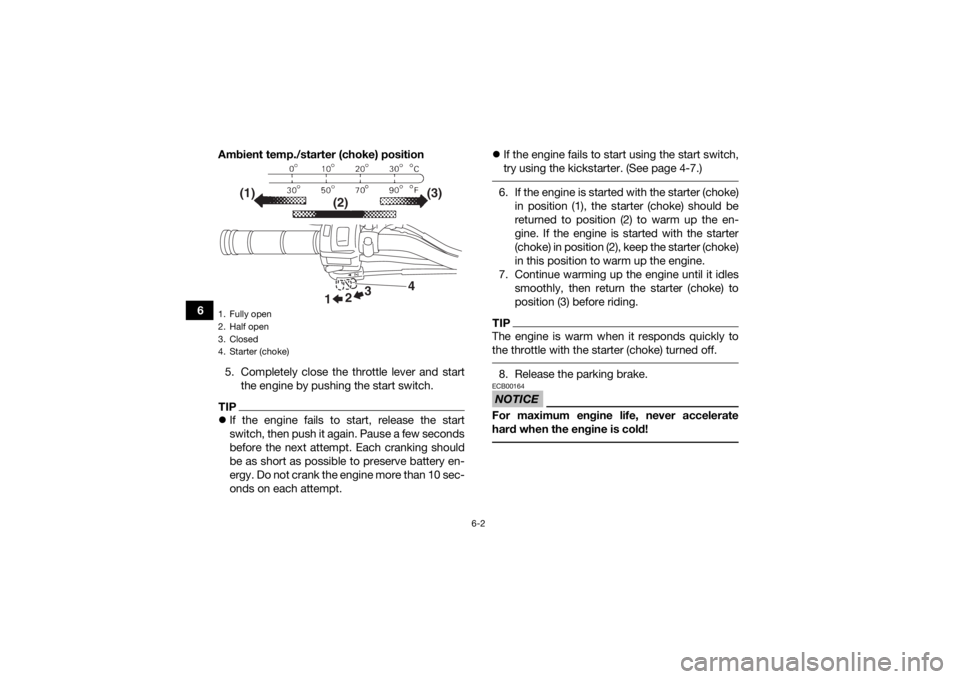
4. Use the starter (choke) in reference to the fi- gure:
Position (1):
Cold engine start with ambient temperature
below 5 °C (40 °F).
Position (2):
Cold engine start with ambient temperature
between 0 °C (30 °F) and 30 °C (90 °F).
Position (3):
Cold engine start with ambient temperature
above 25 °C (80 °F).
UBW460E0.book Page 1 Monday, May 23, 2016 11:12 AM
Page 56 of 132

6-2
6Ambient temp./starter (choke) position
5. Completely close the throttle lever and start the engine by pushing the start switch.
TIPIf the engine fails to start, release the start
switch, then push it again. Pause a few seconds
before the next attempt. Each cranking should
be as short as possible to preserve battery en-
ergy. Do not crank the engine more than 10 sec-
onds on each attempt.
If the engine fails to start using the start switch,
try using the kickstarter. (See page 4-7.)
6. If the engine is started with the starter (choke)
in position (1), the starter (choke) should be
returned to position (2) to warm up the en-
gine. If the engine is started with the starter
(choke) in position (2), keep the starter (choke)
in this position to warm up the engine.
7. Continue warming up the engine until it idles smoothly, then return the starter (choke) to
position (3) before riding.TIPThe engine is warm when it responds quickly to
the throttle with the starter (choke) turned off. 8. Release the parking brake.NOTICEECB00164For maximum engine life, never accelerate
hard when the engine is cold!
1. Fully open
2. Half open
3. Closed
4. Starter (choke)
4
3
2
1
(1) (3)
(2)
UBW460E0.book Page 2 Monday, May 23, 2016 11:12 AM
Page 57 of 132

6-3
6
EBU20292Starting a warm engineFollow the same procedure as for starting a cold
engine, with the exception that the starter (choke)
is not required when the engine is warm. Instead,
start the engine with the throttle slightly open.EBU36860Engine break-inTIPFor ATVs equipped with an odometer or an hour
meter, follow the figures given in km (mi) or the
figures given in hours.
For ATVs not equipped with an odometer or
hour meter, follow the figures given in hours. There is never a more important period in the life
of your engine than the first 240 km (150 mi) or 20
hours of riding. For this reason, you should read
the following material carefully.
Since the engine is brand new, do not put an ex-
cessive load on it for the first 240 km (150 mi) or
20 hours. The various parts in the engine wear and
polish themselves to the correct operating clear-
ances. During this period, prolonged full-throttle
operation or any condition that might result in en-
gine overheating must be avoided. 0–120 km (0–75 mi) or 0–10 hours
Avoid prolonged operation above 1/2 throttle.
Vary the speed of the ATV regularly. Do not oper-
ate it at one set throttle position.
120–240 km (75–150 mi) or 10–20 hours
Avoid prolonged operation above 3/4 throttle. Rev
the engine freely, but do not use full throttle at any
time.
240 km (150 mi) or 20 hours and beyond
The ATV can now be operated normally.
NOTICEECB00221If any engine trouble should occur during the
engine break-in period, immediately have a
Yamaha dealer check the ATV. EBU36370ParkingWhen parking the ATV, apply the rear brake lever,
stop the engine, apply the parking brake, and then
turn the fuel cock to “OFF”.
UBW460E0.book Page 3 Tues day, June 7, 2016 4:17 PM
Page 58 of 132
6-4
6
EBU36380Parking on a slope
WARNING
EWB04130Avoid parking on hills or other inclines. Parking
on a hill or other incline could cause the ATV to
roll out of control, increasing the chance of an
accident. If you must park on an incline, place
the ATV transversely across the incline, stop
the engine, apply the parking brake, and then
block the front and rear wheels with rocks or
other objects.Never park the ATV on hills that are too steep
to walk up easily.
1. Bring the ATV to a stop by applying the
brakes.
2. Stop the engine.
3. With the rear brake lever applied, apply the parking brake, and then slowly release the
rear brake lever.
4. Turn the fuel cock to “OFF”.
1. Parking brake lock plate
1
UBW460E0.book Page 4 Monday, May 23, 2016 11:12 AM
Page 63 of 132
7-3
7
teristics. Take the time to learn the basic techni-
ques well before attempting more difficult
maneuvers.
Not recommended for children under 6 years
of age.
WARNING
EWB01751A child under 6 should never operate an ATV
with engine size greater than 50 cc. Use by
children of ATVs that are not recommended for
their age can lead to severe injury or death of
the child.
This ATV is designed to carry the operator only
– passengers prohibited.
The long seat is to allow the operator to shift posi-
tion as needed during operation. It is not for carry-
ing passengers.
WARNING! Never carry a
passenger. Carrying a passenger on this ATV
greatly reduces your ability to balance and
control this ATV. You could have an accident,
resulting in severe injury or death to you and/or
your passenger.
[EWB01402]
UBW460E0.book Page 3 Monday, May 23, 2016 11:12 AM
Page 65 of 132

7-5
7
Pre-operation checks
Always inspect your ATV each time you use it to
make sure the ATV is in safe operating condition.
Perform the pre-operation checks listed on page
5-1. Always follow the inspection and mainte-
nance procedures and schedules described in the
Owner’s Manual.
WARNING! Failure to inspect
the ATV before riding it or failure to maintain it
properly increases the possibility of an acci-
dent and equipment damage.
[EWB01433]
Speed limiter
For beginning riders, riders less experienced with
this model, or whenever limited speed is desir-
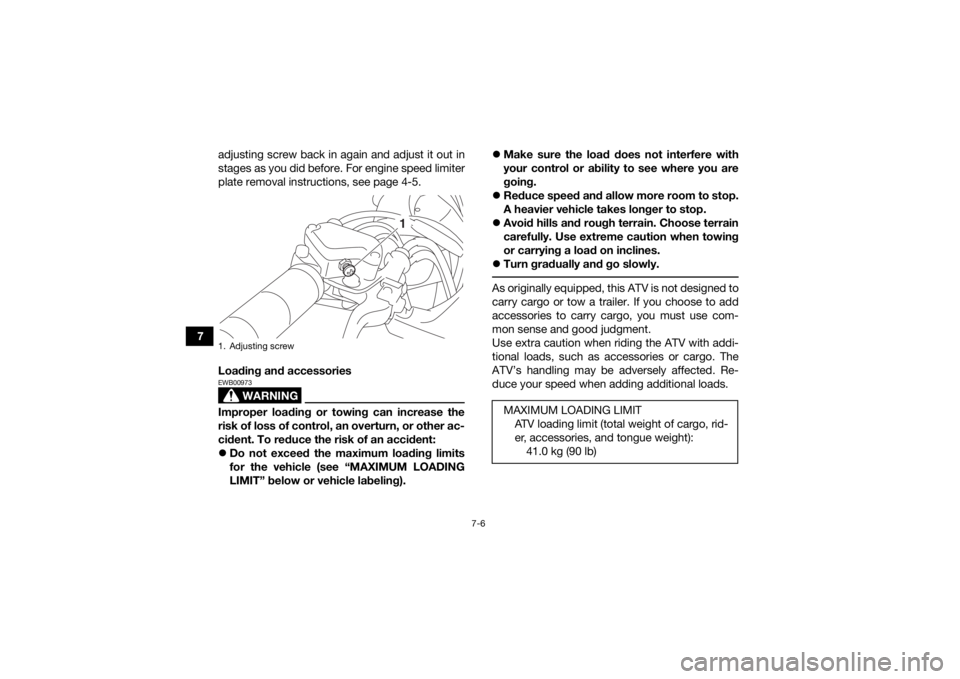
able, the throttle lever housing is equipped with a vehicle speed limiter. The speed limiter keeps the
throttle from fully opening, even when the throttle
lever is pushed to the maximum. Turning in the
adjusting screw limits th
e maximum engine power
available and decreases the maximum speed of
the ATV. Turning in the adjusting screw decreases
top speed, and turning it out increases top speed.
(See page 4-3.)
This model also has an engine speed limiter plate
to limit the amount of engine power available.
Yamaha recommends that all beginning riders start off with the engine speed limiter plate in-
stalled and the vehicle speed limiter adjusting
screw turned in to limit the amount of speed avail-
able while they learn. The vehicle speed limiter
may be gradually adjusted to increase maximum
speed as the beginner becomes more familiar with
operating the ATV. Parents should decide when to
adjust the ATV for more power as their young-
ster’s riding skills improve. Once the ATV rider can
operate with skill at the top speed permitted by
adjusting the vehicle speed limiter alone, the en-
gine speed limiter plate can be removed. Since re-
moval of this plate will result in a significant
increase in power, turn the vehicle speed limiterUBW460E0.book Page 5 Monday, May 23, 2016 11:12 AM
Page 66 of 132

7-6
7adjusting screw back in again and adjust it out in
stages as you did before. For engine speed limiter
plate removal instructions, see page 4-5.
Loading and accessories
WARNING
EWB00973Improper loading or towing can increase the
risk of loss of control, an overturn, or other ac-
cident. To reduce the risk of an accident:
Do not exceed the maximum loading limits
for the vehicle (see “MAXIMUM LOADING
LIMIT” below or vehicle labeling).
Make sure the load does not interfere with
your control or ability to see where you are
going.
Reduce speed and allow more room to stop.
A heavier vehicle takes longer to stop.
Avoid hills and rough terrain. Choose terrain
carefully. Use extreme caution when towing
or carrying a load on inclines.
Turn gradually and go slowly.
As originally equipped, this ATV is not designed to
carry cargo or tow a trailer. If you choose to add
accessories to carry cargo, you must use com-
mon sense and good judgment.
Use extra caution when riding the ATV with addi-
tional loads, such as accessories or cargo. The
ATV’s handling may be adversely affected. Re-
duce your speed when adding additional loads.
1. Adjusting screw
1
MAXIMUM LOADING LIMIT
ATV loading limit (total weight of cargo, rid-
er, accessories, and tongue weight):41.0 kg (90 lb)
UBW460E0.book Page 6 Monday, May 23, 2016 11:12 AM