2017 YAMAHA YFZ50 check oil
[x] Cancel search: check oilPage 94 of 132

8-12
8To check the engine oil level
1. Place the ATV on a level surface.
2. Check the engine oil level on a cold engine.
TIPIf the engine was started before checking the oil
level, be sure to warm up the engine sufficiently,
and then wait at least ten minutes until the oil set-
tles for an accurate reading. 3. Remove the engine oil filler cap, and then wipe the engine oil dipstick off with a clean
rag. 4. Insert the dipstick into the filler hole, screw it
in, and then remove it again to check the oil
level.
TIPThe engine oil should be between the minimum
and maximum level marks. 5. If the engine oil is at or below the minimumlevel mark, add sufficient oil of the recom-
mended type to raise it to the correct level.
1. Engine oil filler cap
1
1. Engine oil filler cap
2. O-ring
3. Engine oil dipstick
4. Maximum level mark
5. Minimum level mark
14523
UBW460E0.book Page 12 Monday, May 23, 2016 11:12 AM
Page 95 of 132
![YAMAHA YFZ50 2017 Owners Manual 8-13
8
NOTICE:
Be sure the engine oil is at the
correct level, otherwise engine damage
may result.
[ECB00852]
6. Check the O-ring for damage, and replace it if necessary.
7. Insert the dipstick into YAMAHA YFZ50 2017 Owners Manual 8-13
8
NOTICE:
Be sure the engine oil is at the
correct level, otherwise engine damage
may result.
[ECB00852]
6. Check the O-ring for damage, and replace it if necessary.
7. Insert the dipstick into](/manual-img/51/53871/w960_53871-94.png)
8-13
8
NOTICE:
Be sure the engine oil is at the
correct level, otherwise engine damage
may result.
[ECB00852]
6. Check the O-ring for damage, and replace it if necessary.
7. Insert the dipstick into the oil filler hole, and then tighten the engine oil filler cap.
To change the engine oil 1. Place the ATV on a level surface.
2. Start the engine, warm it up for several minu- tes, and then turn it off.
3. Place an oil pan under the engine to collect the used oil.
4. Remove the engine oil filler cap, and then re- move the engine oil drain bolt to drain the oil
from the crankcase. NOTICE: When remov-
ing the engine oil drain bolt, the compres-
sion spring, oil strainer and O-ring will fall
out. Take care not to lose these parts.
[ECB00312]
5. Clean the oil strainer with solvent.
6. Apply a thin coat of clean engine oil to a new O-ring.
7. Install the oil strainer, the compression spring, the new O-ring and the engine oil
drain bolt. Tighten the engine oil drain bolt to
the specified torque. NOTICE: Before in-
stalling the engine oil drain bolt, be sure to
install the O-ring, compression spring and
oil strainer.
[ECB00322]
1. Oil strainer
2. Compression spring
3. O-ring
4. Engine oil drain bolt
1234
UBW460E0.book Page 13 Monday, May 23, 2016 11:12 AM
Page 96 of 132

8-14
88. Refill with the specified amount of the recom-
mended engine oil.
TIPBe sure to wipe off spilled oil on any parts after the
engine and exhaust system have cooled down. NOTICEECB00331Do not use oils with a diesel specification of
“CD” or oils of a higher quality than speci-
fied. In addition, do not use oils labeled “EN-
ERGY CONSERVING II” or higher.
Make sure that no foreign material enters the
crankcase.
9. Check the engine oil filler cap O-ring for dam-
age, and replace it if necessary.
10. Install and tighten the engine oil filler cap.
11. Start the engine, and then let it idle for several minutes while checking it for oil leakage. If oil
is leaking, immediately turn the engine off and
check for the cause.
12. Turn the engine off, wait at least ten minutes, and then check the oil level and correct it if
necessary.EBU34472Transmission oilThe transmission case must be checked for oil
leakage before each ride. If any leakage is found,
have a Yamaha dealer check and repair the ATV.
In addition, the transmission oil must be changed
at the intervals specified in the periodic mainte-
nance and lubrication chart.
To change the transmission oil1. Place the ATV on a level surface.
2. Place an oil pan under the transmission case to collect the used oil.
3. Remove the transmission oil filler cap and its O-ring from the transmission case.
Tightening torque:
Engine oil drain bolt:25 N·m (2.5 kgf·m, 18 lb·ft)
Recommended oil: See page 10-1.
Oil quantity: 0.90 L (0.95 US qt, 0.79 Imp.qt)
UBW460E0.book Page 14 Monday, May 23, 2016 11:12 AM
Page 98 of 132

8-16
87. Check the oil filler cap O-ring for damage,
and replace it if necessary.
8. Install and tighten the oil filler cap.
9. Check the transmission case for oil leakage. If oil is leaking, check for the cause.
EBU34110Cleaning the air filter elementThe air filter element should be serviced at the in-
tervals specified in the periodic maintenance and
lubrication chart. Clean or, if necessary, replace
the air filter element more frequently if you are rid-
ing in unusually wet or dusty areas.TIPThere is a check hose at the bottom of the air filter
case. If dust or water collects in this hose, empty
the hose and clean the air filter element and air fil-
ter case.
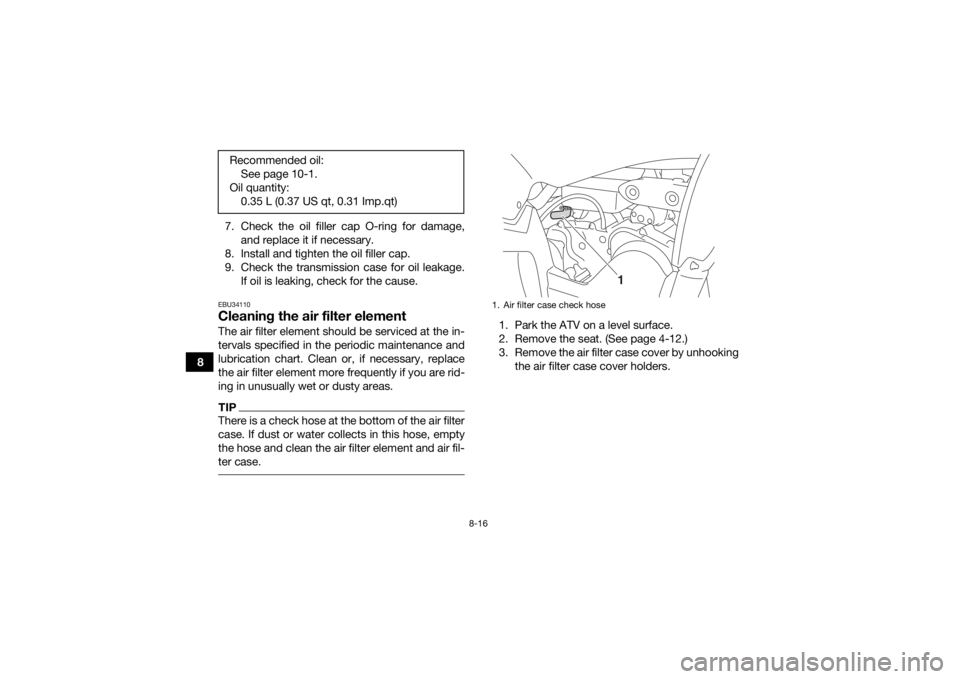
1. Park the ATV on a level surface.
2. Remove the seat. (See page 4-12.)
3. Remove the air filter case cover by unhookingthe air filter case cover holders.
Recommended oil:
See page 10-1.
Oil quantity: 0.35 L (0.37 US qt, 0.31 Imp.qt)1. Air filter case check hose
1
UBW460E0.book Page 16 Monday, May 23, 2016 11:12 AM
Page 100 of 132

8-18
86. Check the air filter element and replace it if
damaged.
7. Apply Yamaha foam air filter oil or other qual- ity foam air filter oil to the element.
TIPThe air filter element should be wet but not drip-
ping. 8. Insert the air filter element into the air filtercase.
9. Install the air filter case cover by hooking the holders onto the air filter case. NOTICE:
Make sure that the air filter element is
properly seated in the air filter case. Never
operate the engine with the air filter ele- ment removed. This will allow unfiltered air
to enter the engine, causing rapid engine
wear and possible engine damage. Addi-
tionally, operation without the air filter ele-
ment will affect carburetor jetting with
subsequent poor performance and possi-
ble engine overheating.
[ECB00462]
10. Install the seat.TIPThe air filter element should be cleaned every 20–
40 hours. It should be cleaned and lubricated
more often if the ATV is operated in extremely
UBW460E0.book Page 18 Monday, May 23, 2016 11:12 AM
Page 111 of 132

8-29
8
TIPFor a thorough cleaning, have a Yamaha dealer re-
move the drive chain and soak it in solvent. 2. Spray Yamaha chain lubricant or other suit-able chain lubricant on the entire chain, mak-
ing sure that all side plates and rollers have
been sufficiently oiled.EBU24905Checking and lubricating the cablesThe operation and the condition of all control ca-
bles should be checked before each ride, and the
cables and cable ends should be lubricated if nec-
essary. If a cable is damaged or does not move
smoothly, have a Yamaha dealer check or replace
it.
WARNING
EWB02582Inspect cables frequently and replace if
damaged. Corrosion can result when the ca-
ble sheaths become damaged, and cables can also become frayed or kinked, which
could restrict the operation of controls and
lead to an accident or injury.
Always make sure all control cables work
smoothly before you begin riding in cold
weather. If the control cables are frozen or
do not work smoothly, you could be unable
to control the ATV, which could lead to an
accident or collision.
EBU28703Checking and lubricating the front and
rear brake leversThe operation of the front and rear brake levers
should be checked before each ride, and the lever
pivots should be lubricated if necessary.
Recommended lubricant: Yamaha cable lubricant or other suitable cable lubricantRecommended lubricant: Lithium-soap-based grease
UBW460E0.book Page 29 Monday, May 23, 2016 11:12 AM
Page 114 of 132

8-32
8
TIPFor parts equipped with a grease nipple, use a
grease gun. EBU36400BatteryThe battery is located under panel A. (See page
8-9.)This model is equipped with a VRLA (Valve Regu-
lated Lead Acid) battery. There is no need to
check the electrolyte or to add distilled water.
However, the battery lead connections need to be
checked and, if necessary, tightened.
WARNING
EWB02161Battery electrolyte is poisonous and danger-
ous, as it contains sulfuric acid, which can cau-
se severe burns. Avoid contact with skin, eyes
or clothing. Always shield your eyes when
working near batteries.
Antidote:
EXTERNAL: Flush with water.
INTERNAL: Drink large quantities of water or
milk. Follow with milk of magnesia, beaten egg
or vegetable oil. Call a physician immediately.
EYES: Flush with water for 15 minutes and get
prompt medical attention.
Batteries produce explosive gases. Keep
sparks, flame, cigarettes or other sources of
ignition away. Ventilate when charging or using
in an enclosed space.
KEEP OUT OF REACH OF CHILDREN.
Recommended lubricant:
Lithium-soap-based grease
UBW460E0.book Page 32 Monday, May 23, 2016 11:12 AM
Page 130 of 132

12-1
12
INDEX
AAccessories and loading ................................................ 6-5
Air filter element, cleaning ............................................ 8-16BBattery .......................................................................... 8-32
Brake lever free play, adjusting the front ..................... 8-23
Brake lever free play (rear), adjusting ........................... 8-25
Brake lever, front ............................................................ 4-5
Brake lever, rear ............................................................. 4-6
Brake levers, checking and lubricating ........................ 8-29
Brakes .......................................................................... 8-22
Brakes, front and rear .................................................... 5-3CCables, checking and lubricating ................................. 8-29
Carburetor, adjusting ...................................................8-20
Chassis fasteners ........................................................... 5-6
Cleaning ......................................................................... 9-1DDrive chain ..................................................................... 5-3
Drive chain, cleaning and lubricating ........................... 8-28
Drive chain slack .......................................................... 8-26EEngine break-in .............................................................. 6-3
Engine, cold start ........................................................... 6-1
Engine idling speed ...................................................... 8-20
Engine oil .............................................................. 5-3, 8-11
Engine, starting a warm ................................................. 6-3
Engine stop switch ......................................................... 4-1
Engine stop switch with lanyard .................................... 4-2
FFront and rear brake shoes, checking ......................... 8-22
Front arm pivots, lubricating ........................................ 8-30
Front knuckle pivots, lubricating .................................. 8-31
Fuel ........................................................................ 4-8, 5-3
Fuel cock ...................................................................... 4-10
Fuel tank cap ................................................................. 4-8
Fuse, replacing ............................................................. 8-35HHandlebar switches ....................................................... 4-1IIdentification numbers ................................................. 11-1
Instruments and switches .............................................. 5-6KKickstarter ...................................................................... 4-7LLabel locations ............................................................... 1-1MMain switch .................................................................... 4-1
Maintenance and lubrication chart ................................ 8-5
Maintenance chart, emission control system ................ 8-3
Model label .................................................................. 11-1OOwner’s manual and tool kit .......................................... 8-2PPanel, removing and installing ....................................... 8-9
Parking ........................................................................... 6-3
Parking brake ................................................................. 4-6
Parking on a slope ......................................................... 6-4
UBW460E0.book Page 1 Monday, May 23, 2016 11:12 AM