2017 YAMAHA XMAX 300 brake
[x] Cancel search: brakePage 5 of 116

Table of contents
Safety information ............................1-1
Further safe-riding points ................1-5
Description ........................................2-1
Left view ..........................................2-1
Right view........................................2-2
Controls and instruments ................2-3
Smart key system ............................3-1
Smart key system............................3-1
Operating range of the smart key system .........................................3-2
Handling of the smart key and mechanical keys ..........................3-3
Smart key ........................................3-5
Replacing the smart key battery .....3-6
Main switch .....................................3-8
Instrument an d control functions ....4-1
Indicator lights and warning
lights ............................................4-1
Speedometer...................................4-2
Tachometer .....................................4-3
Multi-function display......................4-3
Handlebar switches.......................4-12
Front brake lever ...........................4-13
Rear brake lever ............................4-14
ABS ...............................................4-14
Traction control system.................4-15
Fuel tank cap.................................4-17
Fuel................................................4-18
Fuel tank overflow hose ................4-19
Catalytic converters .....................4-20
Storage compartments .................4-20
Windshield.....................................4-22
Handlebar position .......................4-25
Adjusting the shock absorber assemblies .................................4-25
Sidestand ......................................4-26
Ignition circuit cut-off system........4-27
Auxiliary DC jack ..........................4-29 For your safety – pre-operation
checks
............................................... 5-1
Operation an d important ri din g
points ................................................. 6-1
Starting the engine.......................... 6-2
Starting off ...................................... 6-3
Acceleration and deceleration ........ 6-3
Braking............................................ 6-4
Tips for reducing fuel consumption................................ 6-4
Engine break-in ............................... 6-5
Parking ............................................ 6-5
Perio dic maintenance an d
a d justment ........................................ 7-1
Owner’s tool kit ............................... 7-2
Periodic maintenance chart for the
emission control system.............. 7-3
General maintenance and
lubrication chart........................... 7-4
Removing and installing the panel ............................................ 7-7
Checking the spark plug ................. 7-8
Canister........................................... 7-9
Engine oil and oil filter element ....... 7-9
Final transmission oil .................... 7-12
Coolant ......................................... 7-13
Air filter and V-belt case air filter elements .................................... 7-14
Checking the throttle grip free play ............................................ 7-18
Valve clearance ............................. 7-19
Tires .............................................. 7-19
Cast wheels .................................. 7-21
Checking the front and rear brake lever free play ............................ 7-22
Checking the front and rear brake
pads........................................... 7-23
Checking the brake fluid level....... 7-23
Changing the brake fluid............... 7-24
Checking the V-belt ...................... 7-25
Checking and lubricating the cables ........................................ 7-25
Checking and lubricating the
throttle grip and cable ............... 7-26
UB74E0E0.book Page 1 Tuesday, May 2, 2017 1:04 PM
Page 6 of 116

Table of contents
Lubricating the front and rear
brake levers ............................... 7-26
Checking and lubricating the centerstand and sidestand ....... 7-27
Checking the front fork................. 7-27
Checking the steering................... 7-28
Checking the wheel bearings ....... 7-28
Battery .......................................... 7-29
Replacing the fuses ...................... 7-30
Headlights .................................... 7-32
Auxiliary lights............................... 7-32
Brake/tail light............................... 7-33
Front turn signal light.................... 7-33
Rear turn signal light bulb............. 7-34
Replacing the license plate light
bulb ........................................... 7-34
Troubleshooting............................ 7-35
Troubleshooting charts................. 7-36
Emergency mode ........................ 7-38
Scooter care an d stora ge ............... 8-1
Matte color caution ........................ 8-1
Care ................................................ 8-1
Storage ........................................... 8-4
Specifications ................................... 9-1
Consumer information ................... 10-1
Identification numbers .................. 10-1
Diagnostic connector ................... 10-2
Vehicle data recording.................. 10-2
In dex ................................................ 11-1
UB74E0E0.book Page 2 Tuesday, May 2, 2017 1:04 PM
Page 11 of 116

Safety information
1-5
1
Aftermarket Tires an
d Rims
The tires and rims that came with your
scooter were designed to match the
performance capabilities and to pro-
vide the best combination of handling,
braking, and comfort. Other tires, rims,
sizes, and combinations may not be
appropriate. Refer to page 7-19 for tire
specifications and more information on
replacing your tires.
Transportin g the Scooter
Be sure to observe following instruc-
tions before transporting the scooter in
another vehicle. �z Remove all loose items from the
scooter.
�z Point the front wheel straight
ahead on the trailer or in the truck
bed, and choke it in a rail to pre-
vent movement.
�z Secure the scooter with tie-downs
or suitable straps that are at-
tached to solid parts of the scoot-
er, such as the frame or upper
front fork triple clamp (and not, for
example, to rubber-mounted han-
dlebars or turn signals, or parts
that could break). Choose the lo-
cation for the straps carefully so
the straps will not rub against
painted surfaces during transport.
�z The suspension should be com-
pressed somewhat by the tie-
downs, if possible, so that the
scooter will not bounce exces-
sively during transport.
EAU57600
Further safe-ri din g points
�z Be sure to signal clearly when
making turns.
�z Braking can be extremely difficult
on a wet road. Avoid hard braking,
because the scooter could slide.
Apply the brakes slowly when
stopping on a wet surface.
�z Slow down as you approach a
corner or turn. Once you have
completed a turn, accelerate
slowly.
�z Be careful when passing parked
cars. A driver might not see you
and open a door in your path.
�z Railroad crossings, streetcar rails,
iron plates on road construction
sites, and manhole covers be-
come extremely slippery when
wet. Slow down and cross them
with caution. Keep the scooter up-
right, otherwise it could slide out
from under you.
�z The brake pads or linings could
get wet when you wash the scoot-
er. After washing the scooter,
check the brakes before riding.
�z Always wear a helmet, gloves,
trousers (tapered around the cuff
and ankle so they do not flap), and
a brightly colored jacket.
�z Do not carry too much luggage on
the scooter. An overloaded scoot-
er is unstable. Use a strong cord
to secure any luggage to the carri-
er (if equipped). A loose load will
affect the stability of the scooter
and could divert your attention
from the road. (See page 1-3.)
UB74E0E0.book Page 5 Tuesday, May 2, 2017 1:04 PM
Page 14 of 116

Description
2-3
2
EAU63401
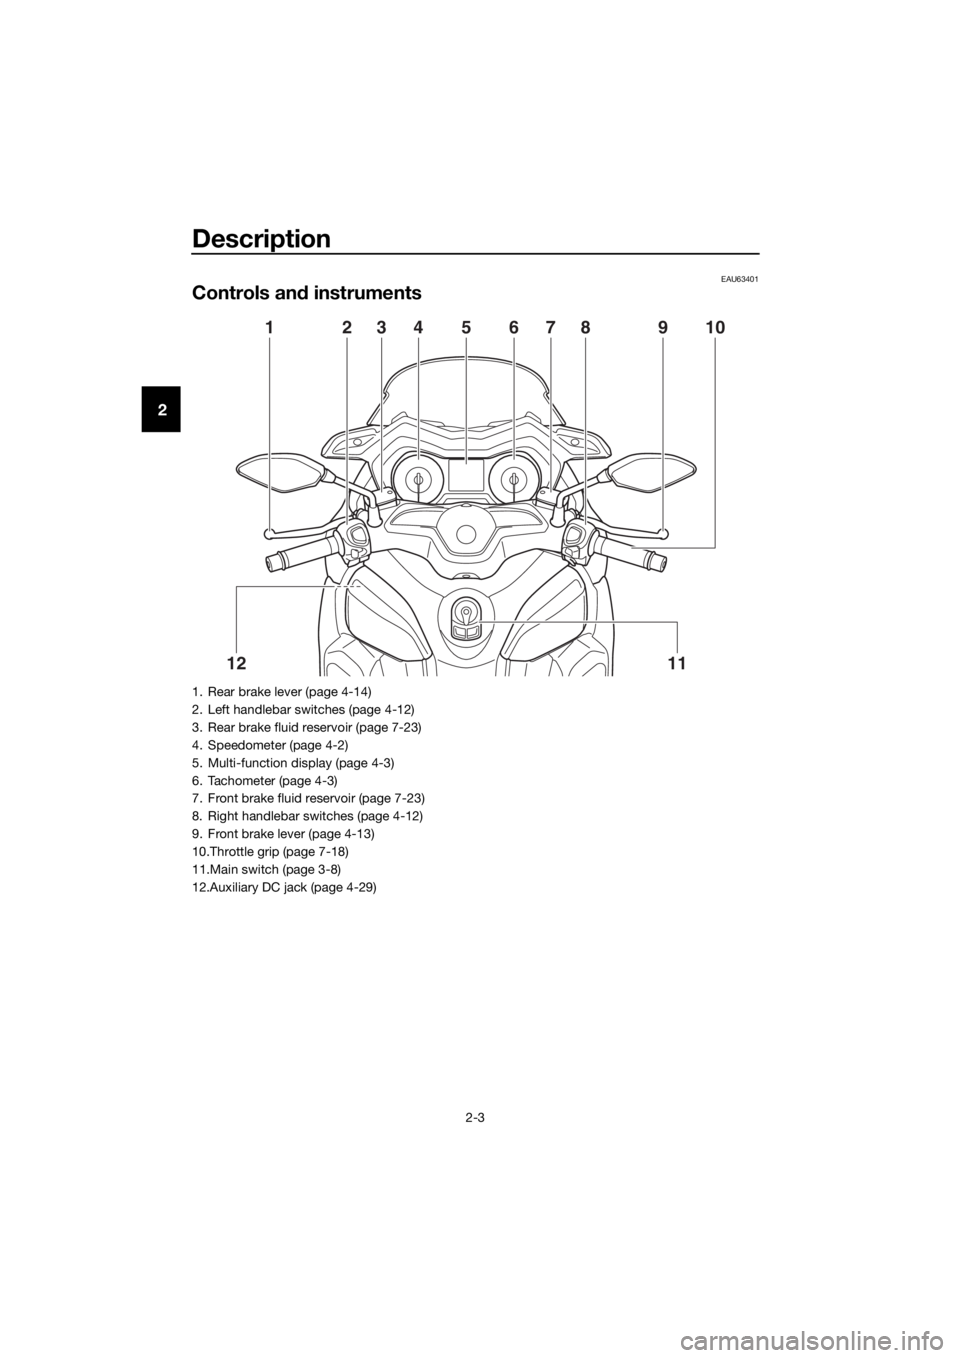
Controls and instruments
10
1112
123987564
1. Rear brake lever (page 4-14)
2. Left handlebar switches (page 4-12)
3. Rear brake fluid reservoir (page 7-23)
4. Speedometer (page 4-2)
5. Multi-function display (page 4-3)
6. Tachometer (page 4-3)
7. Front brake fluid reservoir (page 7-23)
8. Right handlebar switches (page 4-12)
9. Front brake lever (page 4-13)
10.Throttle grip (page 7-18)
11.Main switch (page 3-8)
12.Auxiliary DC jack (page 4-29)
UB74E0E0.book Page 3 Tuesday, May 2, 2017 1:04 PM
Page 27 of 116

Instrument and control functions
4-1
4
EAU4939C
In dicator li ghts an d warnin g
li g hts
EAU11032Turn si gnal in dicator li ghts “ ”
an d“”
Each indicator light will flash when its
corresponding turn signal lights are
flashing.
EAU11081Hi gh beam in dicator li ght “ ”
This indicator light comes on when the
high beam of the headlight is switched
on.
EAU78180En gine trou ble warnin g lig ht “ ”
This warning light comes on if a prob-
lem is detected in the engine or other
vehicle control system. If this occurs,
have a Yamaha dealer check the on-
board diagnostic system. The electrical circuit of the warning
light can be checked by turning the
main switch to “ON”. The warning light
should come on for a few seconds, and
then go off.
If the warning light does not come on
initially when the main switch is turned
to “ON”, or if the warning light remains
on, have a Yamaha dealer check the
vehicle.
EAU78171ABS warnin
g lig ht “ ”
In normal operation, the ABS warning
light comes on when the main switch is
turned to “ON”, and goes off after trav-
eling at a speed of 10 km/h (6 mi/h) or
higher.
If the ABS warning light: �z does not come on when the main
switch is turned to “ON”
�z comes on or flashes while riding
�z does not go off after traveling at a
speed of 10 km/h (6 mi/h) or high-
er
The ABS may not work correctly. If any
of the above occurs, have a Yamaha
dealer check the system as soon as
possible. (See page 4-14 for an expla-
nation of the ABS.)
WARNING
EWA16041
If the ABS warnin g li ght does not go
off after travelin g at a speed of 10
km/h (6 mi/h) or hi gher, or if the
warnin g lig ht comes on or flashes
while ri din g, the b rake system re-
verts to conventional brakin g. If ei-
ther of the a bove occurs, or if the
warnin g lig ht does not come on at
all, use extra caution to avoi d possi-
b le wheel lock durin g emer gency
1. Left turn signal indicator light “ ”
2. Right turn signal indicator light “ ”
3. High beam indicator light “ ”
4. Anti-lock Brake System (ABS) warning
light “ ”
5. Engine trouble warning light “ ”
6. Traction control system indicator light “ ”
7. Smart key system indicator light “ ”
12
36745
ABS
ABS
UB74E0E0.book Page 1 Tuesday, May 2, 2017 1:04 PM
Page 28 of 116

Instrument and control functions
4-2
4 b
rakin g. Have a Yamaha dealer
check the brake system an d electri-
cal circuits as soon as possi ble.
TIP
The ABS warning light may come on
while accelerating the engine with the
vehicle on its centerstand, but this
does not indicate a malfunction.
If this happens, turn the main switch off
and then back on again to reset the in-
dicator light.
EAU78591Traction control system in dicator
li g ht “TCS”
This indicator light will flash when trac-
tion control has engaged.
If the traction control system is turned
off, this indicator light will come on.
(See page 4-15.)
TIP
When the vehicle is turned on, the light
should come on for a few seconds and
then go off. If the light does not come
on, or if the light remains on, have a
Yamaha dealer check vehicle.
EAU78600Smart key system in dicator
li g ht “ ”
This indicator light communicates the
status of the smart key system. When
the smart key system is operating nor-
mally, this indicator light will be off. If
there is an error in the smart key sys-
tem, the indicator light will flash. The
indicator light will also flash when com-
munication between the vehicle and
smart key takes place and when cer-
tain smart key system operations are
carried out.
EAU63542
Spee dometer
The speedometer shows the vehicle's
traveling speed.
When the vehicle power is turned on,
the speedometer needle will sweep
once across the speed range and then
return to zero in order to test the elec-
trical circuit.
1. Speedometer
1
UB74E0E0.book Page 2 Tuesday, May 2, 2017 1:04 PM
Page 39 of 116

Instrument and control functions
4-13
4
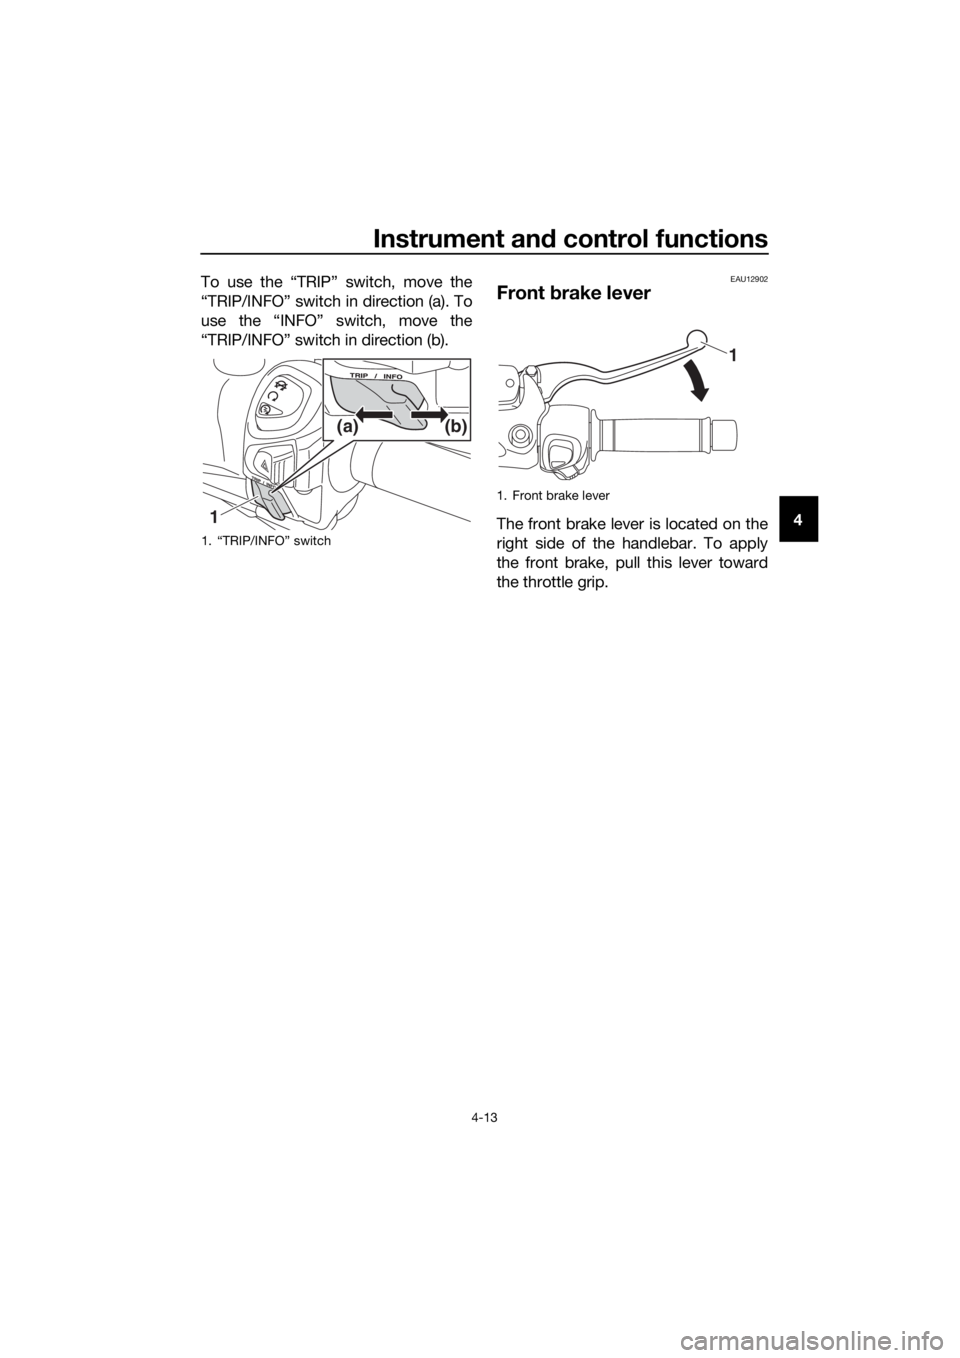
To use the “TRIP” switch, move the
“TRIP/INFO” switch in direction (a). To
use the “INFO” switch, move the
“TRIP/INFO” switch in direction (b).
EAU12902
Front
brake lever
The front brake lever is located on the
right side of the handlebar. To apply
the front brake, pull this lever toward
the throttle grip.1. “TRIP/INFO” switch
1 (b)
(a)
1. Front brake lever
1
UB74E0E0.book Page 13 Tuesday, May 2, 2017 1:04 PM
Page 40 of 116

Instrument and control functions
4-14
4
EAU12952
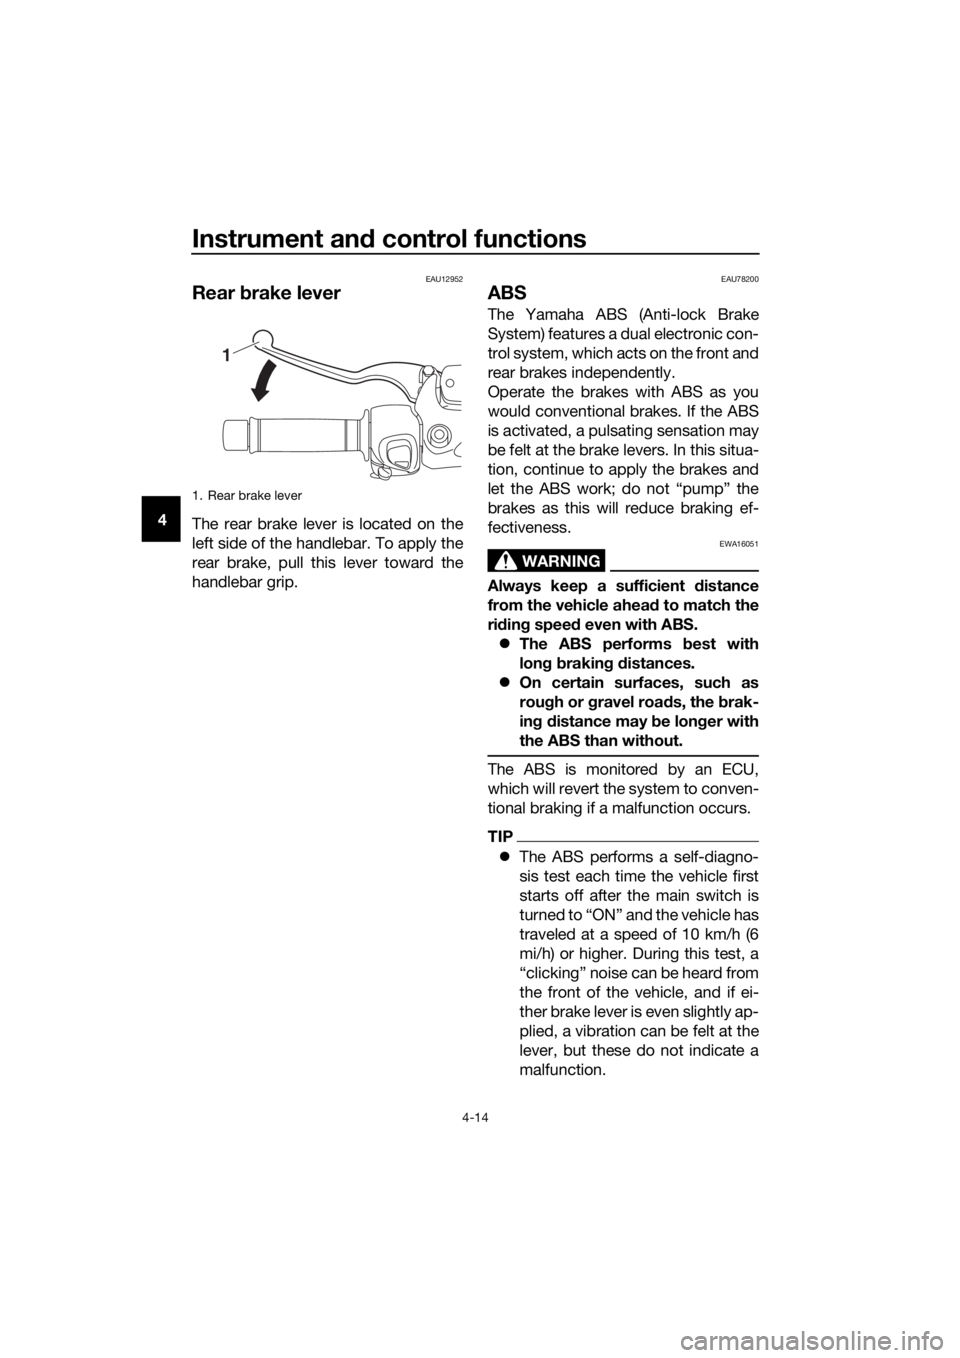
Rear brake lever
The rear brake lever is located on the
left side of the handlebar. To apply the
rear brake, pull this lever toward the
handlebar grip.
EAU78200
ABS
The Yamaha ABS (Anti-lock Brake
System) features a dual electronic con-
trol system, which acts on the front and
rear brakes independently.
Operate the brakes with ABS as you
would conventional brakes. If the ABS
is activated, a pulsating sensation may
be felt at the brake levers. In this situa-
tion, continue to apply the brakes and
let the ABS work; do not “pump” the
brakes as this will reduce braking ef-
fectiveness.
WARNING
EWA16051
Always keep a sufficient d istance
from the vehicle ahead to match the
ri din g speed even with ABS.
�z The ABS performs b est with
lon g b rakin g d istances.
�z On certain surfaces, such as
rou gh or g ravel roa ds, the b rak-
in g d istance may be lon ger with
the ABS than without.
The ABS is monitored by an ECU,
which will revert the system to conven-
tional braking if a malfunction occurs.
TIP
�z The ABS performs a self-diagno-
sis test each time the vehicle first
starts off after the main switch is
turned to “ON” and the vehicle has
traveled at a speed of 10 km/h (6
mi/h) or higher. During this test, a
“clicking” noise can be heard from
the front of the vehicle, and if ei-
ther brake lever is even slightly ap-
plied, a vibration can be felt at the
lever, but these do not indicate a
malfunction.
1. Rear brake lever
1
UB74E0E0.book Page 14 Tuesday, May 2, 2017 1:04 PM