Page 67 of 116

Periodic maintenance an d a djustment
7-4
7
EAU71372
General maintenance an d lu brication chart
NO. ITEM
1 *Dia
gnostic system
check • Perform dynamic inspection
using Yamaha diagnostic tool.
• Check the error codes. √√√√√√
2 *Air filter element • Replace. √√
3 *Pre air filter ele-
ment • Clean.
√√
4 *Su
b air filter ele-
ment • Replace.
√√
5 Air filter case
check hose
• Clean.
√√√√√
6 *V-
belt case air fil-
ter element • Clean.
• Replace if necessary.
√√√√√
7 *Front brake • Check operation, fluid level,
and for fluid leakage.
• Replace brake pads if neces- sary. √√√√√√
8 *Rear brake • Check operation, fluid level,
and for fluid leakage.
• Replace brake pads if neces- sary. √√√√√√
9 *Brake hoses • Check for cracks or damage.
√√√√√
• Replace. Every 4 years
10 *Brake flui d • Change. Every 2 years
11 *Wheels • Check runout and for damage.
• Replace if necessary.
√√√√
12 *Tires • Check tread depth and for
damage.
• Replace if necessary.
• Check air pressure.
• Correct if necessary. √√√√√
13 *Wheel bearin gs • Check bearing for looseness or
damage. √√√√X 1000 km
CHECK OR
MAINTENANCE JOB
X 1000 mi
ODOMETER READINGS
ANNUAL CHECK
110203040
0.66121824
UB74E0E0.book Page 4 Tuesday, May 2, 2017 1:04 PM
Page 75 of 116

Periodic maintenance an d a djustment
7-12
7
EAU20067
Final transmission oil
The final transmission case must be
checked for oil leakage before each
ride. If any leakage is found, have a
Yamaha dealer check and repair the scooter. In addition, the final transmis-
sion oil must be changed as follows at
the intervals specified in the periodic
maintenance and lubrication chart. 1. Start the engine, warm up the final transmission oil by riding the
scooter for several minutes, and
then stop the engine.
2. Place the scooter on the center- stand.
3. Place an oil pan under the final transmission case to collect the
used oil.
4. Remove the final transmission oil filler cap and its O-ring from the fi-
nal transmission case.
5. Remove the final transmission oil drain bolt and its gasket to drain
the oil from the final transmission
case. 6. Install the final transmission oil
drain bolt and its new gasket, and
then tighten the bolt to the speci-
fied torque.
7. Refill with the specified amount of the recommended final transmis-
sion oil. WARNING! Make sure
that no forei gn material enters
the final transmission case.
Make sure that no oil gets on
the tire or wheel.
[EWA11312]
8. Install the final transmission oil fill- er cap and its new O-ring, and
then tighten the oil filler cap.
9. Check the final transmission case for oil leakage. If oil is leaking,
check for the cause.
1. Final transmission oil filler cap
2. O-ring
1
2
1. Final transmission oil drain bolt
2. Gasket
Tightenin g torque:
Final transmission oil drain bolt: 20 N·m (2.0 kgf·m, 14 lb·ft)
Recommen ded final transmission
oil: See page 9-1.
Oil quantity: 0.20 L (0.21 US qt, 0.18 Imp.qt)
12
UB74E0E0.book Page 12 Tuesday, May 2, 2017 1:04 PM
Page 80 of 116
Periodic maintenance an d a djustment
7-17
7 5. Lift up the air filter case slightly, re-
move the rear wheel sensor lead
from the holder, and then remove
the V-belt case cover.
6. Remove the V-belt case air filter cover by removing the bolts. 7. Remove the air filter element, and
then blow out the dirt with com-
pressed air from the clean side as
shown.
8. Check the V-belt case air filter ele- ment for damage and replace it if
necessary.
9. Insert the element into the V-belt case.
10. Install the V-belt case air filter cov- er by installing the bolts.
11. Install the rear wheel sensor lead into the holder at the white tape on
the lead as shown.
1. Bolt
1. Rear wheel sensor lead
2. Lead holder
1. V-belt case air filter cover
2. Bolt
1
1
22
1
2
2
1. V-belt case air filter element
1. Clean side
1
1
UB74E0E0.book Page 17 Tuesday, May 2, 2017 1:04 PM
Page 81 of 116
Periodic maintenance an d a djustment
7-18
7
12. Install the air filter case bolts, and
then tighten the bolts to the spec-
ified torque.
13. Install the V-belt case cover by in- stalling the screws.
14. Install the air filter case cover by installing the screws.
EAU21386
Checkin g the throttle grip free
play
Measure the throttle grip free play as
shown.
Periodically check the throttle grip free
play and, if necessary, have a Yamaha
dealer adjust it.
1. Rear wheel sensor lead
2. White tape
3. Lead holder
Ti ghtening torque:
Bolt:
10 N·m (1.0 kgf·m, 7.2 lb·ft)
1
33
22
3
2
2
3
1. Throttle grip free play
Throttle grip free play:
3.0–5.0 mm (0.12–0.20 in)
1
UB74E0E0.book Page 18 Tuesday, May 2, 2017 1:04 PM
Page 83 of 116

Periodic maintenance an d a djustment
7-20
7
WARNING
EWA10512
Never overloa d your vehicle. Opera-
tion of an overloa ded vehicle coul d
cause an acci dent.
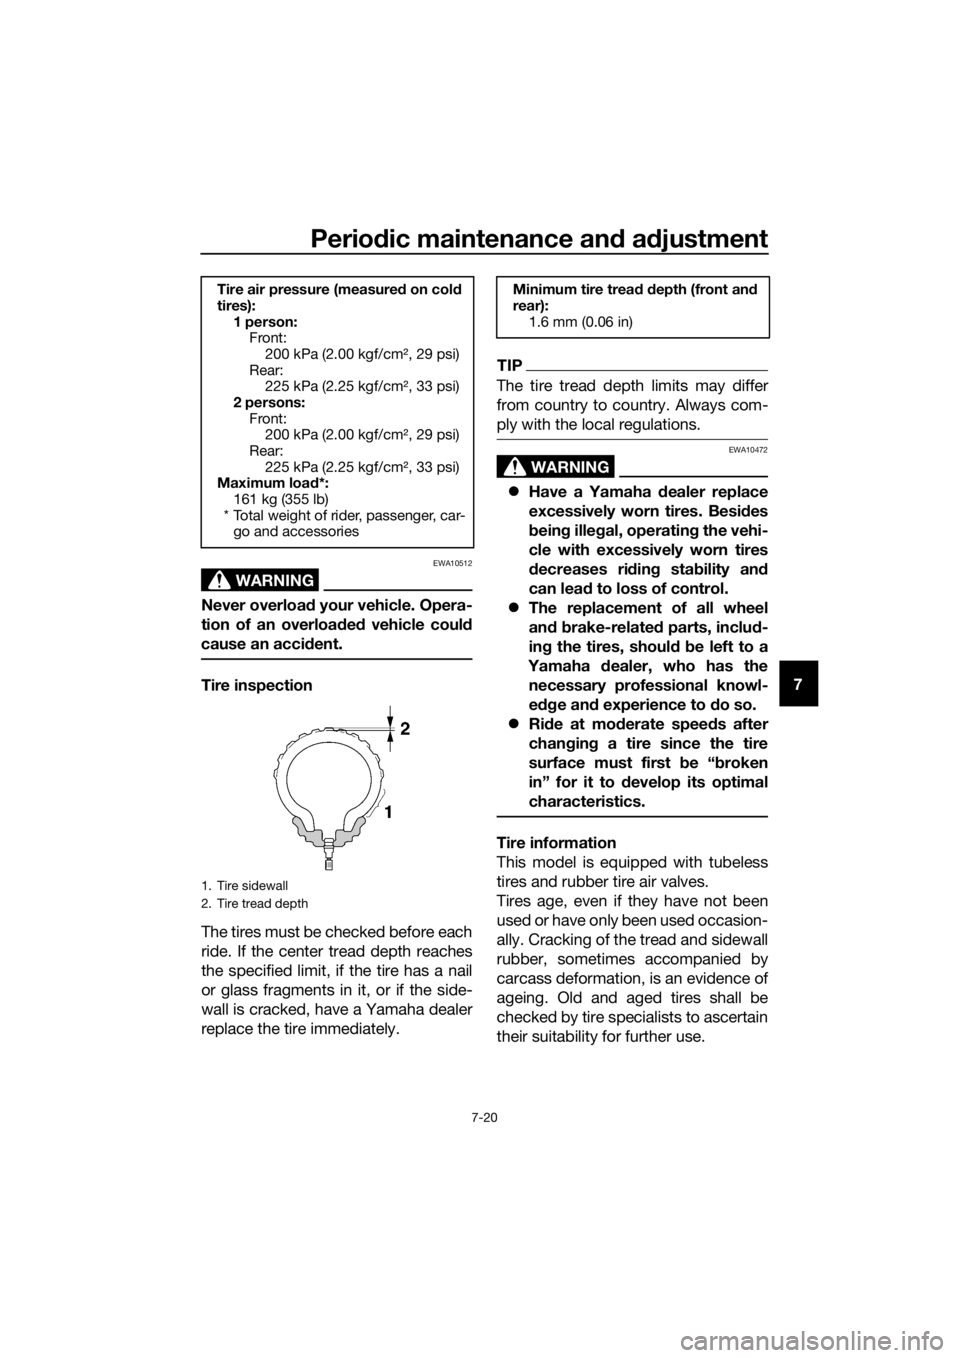
Tire inspection
The tires must be checked before each
ride. If the center tread depth reaches
the specified limit, if the tire has a nail
or glass fragments in it, or if the side-
wall is cracked, have a Yamaha dealer
replace the tire immediately.
TIP
The tire tread depth limits may differ
from country to country. Always com-
ply with the local regulations.
WARNING
EWA10472
�z Have a Yamaha dealer replace
excessively worn tires. Besi des
b ein g ille gal, operatin g the vehi-
cle with excessively worn tires
d ecreases ri din g sta bility an d
can lead to loss of control.
�z The replacement of all wheel
and b rake-relate d parts, inclu d-
in g the tires, shoul d b e left to a
Yamaha dealer, who has the
necessary professional knowl-
e dg e an d experience to d o so.
�z Ride at mo derate spee ds after
chan gin g a tire since the tire
surface must first b e “broken
in” for it to develop its optimal
characteristics.
Tire information
This model is equipped with tubeless
tires and rubber tire air valves.
Tires age, even if they have not been
used or have only been used occasion-
ally. Cracking of the tread and sidewall
rubber, sometimes accompanied by
carcass deformation, is an evidence of
ageing. Old and aged tires shall be
checked by tire specialists to ascertain
their suitability for further use.
Tire air pressure (measure d on col d
tires): 1 person:Front:
200 kPa (2.00 kgf/cm², 29 psi)
Rear: 225 kPa (2.25 kgf/cm², 33 psi)
2 persons: Front:200 kPa (2.00 kgf/cm², 29 psi)
Rear: 225 kPa (2.25 kgf/cm², 33 psi)
Maximum load *:
161 kg (355 lb)
* Total weight of rider, passenger, car- go and accessories
1. Tire sidewall
2. Tire tread depth
Minimum tire trea d d epth (front an d
rear): 1.6 mm (0.06 in)
UB74E0E0.book Page 20 Tuesday, May 2, 2017 1:04 PM
Page 84 of 116

Periodic maintenance an d a djustment
7-21
7
WARNING
EWA10462
The front an d rear tires shoul d b e of
the same make an d d esi gn, other-
wise the han dlin g characteristics of
the vehicle may b e different, which
coul d lea d to an acci dent.
After extensive tests, only the tires list-
ed below have been approved for this
model by Yamaha.
EAU21963
Cast wheels
To maximize the performance, durabil-
ity, and safe operation of your vehicle,
note the following points regarding the
specified wheels.
�z The wheel rims should be
checked for cracks, bends, warp-
age or other damage before each
ride. If any damage is found, have
a Yamaha dealer replace the
wheel. Do not attempt even the
smallest repair to the wheel. A de-
formed or cracked wheel must be
replaced.
�z The wheel should be balanced
whenever either the tire or wheel
has been changed or replaced. An
unbalanced wheel can result in
poor performance, adverse han-
dling characteristics, and a short-
ened tire life.
Front tire:
Size:
120/70-15 M/C 56P
Manufacturer/model: DUNLOP/SCOOTSMART
Rear tire: Size:140/70-14 M/C 62P
Manufacturer/model: DUNLOP/SCOOTSMART
UB74E0E0.book Page 21 Tuesday, May 2, 2017 1:04 PM
Page 91 of 116
Periodic maintenance an d a djustment
7-28
7
EAU45512
Checkin g the steerin g
Worn or loose steering bearings may
cause danger. Therefore, the operation
of the steering must be checked as fol-
lows at the intervals specified in the
periodic maintenance and lubrication
chart.
1. Place the vehicle on the center- stand. WARNING! To avoi d inju-
ry, securely support the vehicle
so there is no dan ger of it fallin g
over.
[EWA10752]
2. Hold the lower ends of the front fork legs and try to move them for-
ward and backward. If any free
play can be felt, have a Yamaha
dealer check or repair the steer-
ing.
EAU23292
Checkin g the wheel bearin gs
The front and rear wheel bearings must
be checked at the intervals specified in
the periodic maintenance and lubrica-
tion chart. If there is play in the wheel
hub or if the wheel does not turn
smoothly, have a Yamaha dealer
check the wheel bearings.
UB74E0E0.book Page 28 Tuesday, May 2, 2017 1:04 PM
Page 103 of 116

Scooter care and stora ge
8-1
8
EAU37834
Matte color caution
NOTICE
ECA15193
Some mo dels are equipped with
matte colored finished parts. Be
sure to consult a Yamaha dealer for
a d vice on what pro ducts to use be-
fore cleanin g the vehicle. Usin g a
b rush, harsh chemical prod ucts or
cleanin g compoun ds when cleanin g
these parts will scratch or damag e
their surface. Wax also shoul d not
b e applie d to any matte colored fin-
ishe d parts.
EAUN1000
Care
While the open design of a scooter re-
veals the attractiveness of the technol-
ogy, it also makes it more vulnerable.
Rust and corrosion can develop even if
high-quality components are used. A
rusty exhaust pipe may go unnoticed
on a car, however, it detracts from the
overall appearance of a scooter. Fre-
quent and proper care does not only
comply with the terms of the warranty,
but it will also keep your scooter look-
ing good, extend its life and optimize
its performance.
Before cleanin g
1. Cover the muffler outlet with a plastic bag after the engine has
cooled down.
2. Make sure that all caps and cov- ers as well as all electrical cou-
plers and connectors, including
the spark plug cap, are tightly in-
stalled.
3. Remove extremely stubborn dirt, like oil burnt onto the crankcase,
with a degreasing agent and a
brush, but never apply such prod-
ucts onto seals, gaskets and
wheel axles. Always rinse the dirt
and degreaser off with water.
Cleanin g
NOTICE
ECA10784
�zAvoi d using strong aci dic wheel
cleaners, especially on spoked
wheels. If such pro ducts are
use d on har d-to-remove dirt, do
not leave the cleaner on the af-
fected area any lon ger than in-
UB74E0E0.book Page 1 Tuesday, May 2, 2017 1:04 PM