Page 137 of 432

CHASSIS
3-37
TIP
• Do not give a half turn (180 °) or more for one
tightening.
• Make sure that tightening after a break-in is
done until the initial looseness in nipples dis-
appears.
• Make sure that tightening is done in stages,
not at a time.
EAS2GBB121CHECKING THE WHEELS
1. Check:
• Wheel(s)
Damage/out-of-round Replace.
EWA
WARNING
Never attempt to make any repairs to the
wheel.
TIP
After replacing a tire or a wheel, always bal-
ance the wheel.
EAS2GBB122CHECKING THE WHEEL BEARINGS
1. Check:
• Wheel bearings
Refer to “CHECKING THE FRONT WHEEL”
on page 5-5 and “CHECKING THE REAR
WHEEL” on page 5-10.
EAS2GBB123CHECKING AND ADJUSTING THE STEER-
ING HEAD
1. Use a suitable stand to raise the front wheel
off the ground.
EWA
WARNING
Securely support the vehicle so that there is
no danger of it falling over.
2. Check:
• Steering head
Grasp the bottom of the front fork legs and
gently rock the front fork.
Blinding/looseness Adjust the steering
head.
3. Remove:
• Handlebar
Refer to “HANDLEBAR” on page 5-33.
• Upper bracket
Refer to “STEERING HEAD” on page 5-53.
4. Adjust:
• Steering head
▼▼▼▼▼▼▼▼▼▼▼▼▼▼▼▼▼▼▼▼▼▼▼▼▼▼▼▼▼▼▼▼
a. Remove the washer “1”.
b. After loosening the ring nut “2” with a steer-
ing nut wrench “3”, tighten it to the specified
torque.
TIP
• Set the torque wrench at a right angle to the
steering nut wrench.
• Move the steering to the left and right a couple
of times to check that it moves smoothly. Spoke nipple wrench (6–7)
90890-01521
Spoke nipple wrench (6–7)
YM-01521
Spokes
2.5 Nm (0.25 m·kgf, 1.8 ft·lbf)
1
T R..
Steering nut wrench
90890-01403
Exhaust flange nut wrench
YU-A9472
1
3
2
Page 154 of 432
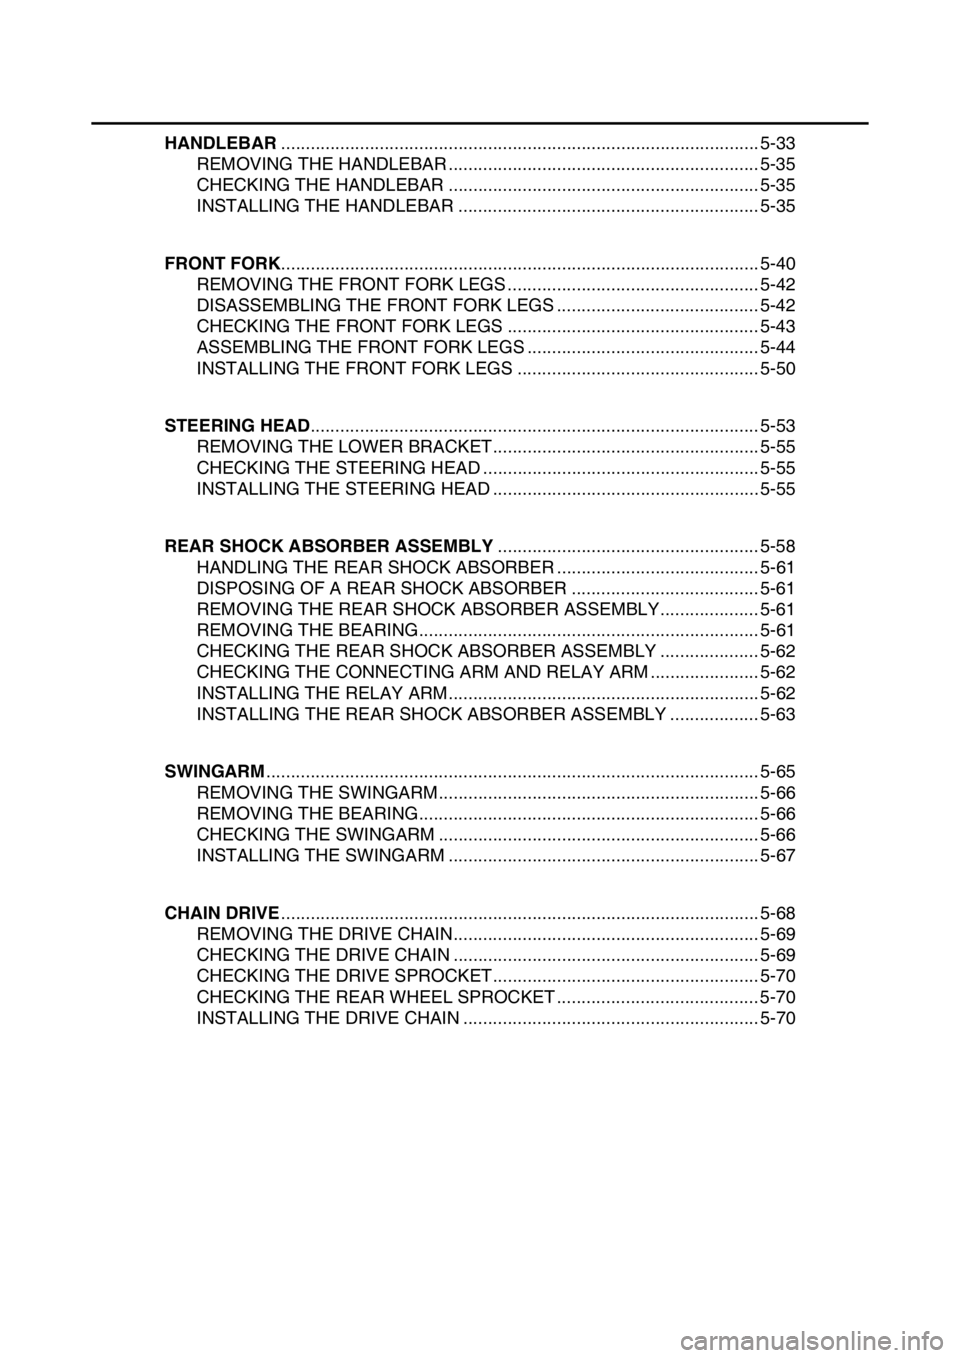
HANDLEBAR................................................................................................. 5-33
REMOVING THE HANDLEBAR............................................................... 5-35
CHECKING THE HANDLEBAR ............................................................... 5-35
INSTALLING THE HANDLEBAR ............................................................. 5-35
FRONT FORK................................................................................................. 5-40
REMOVING THE FRONT FORK LEGS ................................................... 5-42
DISASSEMBLING THE FRONT FORK LEGS ......................................... 5-42
CHECKING THE FRONT FORK LEGS ................................................... 5-43
ASSEMBLING THE FRONT FORK LEGS ............................................... 5-44
INSTALLING THE FRONT FORK LEGS ................................................. 5-50
STEERING HEAD........................................................................................... 5-53
REMOVING THE LOWER BRACKET...................................................... 5-55
CHECKING THE STEERING HEAD ........................................................ 5-55
INSTALLING THE STEERING HEAD ...................................................... 5-55
REAR SHOCK ABSORBER ASSEMBLY..................................................... 5-58
HANDLING THE REAR SHOCK ABSORBER ......................................... 5-61
DISPOSING OF A REAR SHOCK ABSORBER ...................................... 5-61
REMOVING THE REAR SHOCK ABSORBER ASSEMBLY.................... 5-61
REMOVING THE BEARING..................................................................... 5-61
CHECKING THE REAR SHOCK ABSORBER ASSEMBLY .................... 5-62
CHECKING THE CONNECTING ARM AND RELAY ARM ...................... 5-62
INSTALLING THE RELAY ARM............................................................... 5-62
INSTALLING THE REAR SHOCK ABSORBER ASSEMBLY .................. 5-63
SWINGARM.................................................................................................... 5-65
REMOVING THE SWINGARM................................................................. 5-66
REMOVING THE BEARING..................................................................... 5-66
CHECKING THE SWINGARM ................................................................. 5-66
INSTALLING THE SWINGARM ............................................................... 5-67
CHAIN DRIVE................................................................................................. 5-68
REMOVING THE DRIVE CHAIN.............................................................. 5-69
CHECKING THE DRIVE CHAIN .............................................................. 5-69
CHECKING THE DRIVE SPROCKET...................................................... 5-70
CHECKING THE REAR WHEEL SPROCKET ......................................... 5-70
INSTALLING THE DRIVE CHAIN ............................................................ 5-70
Page 207 of 432

STEERING HEAD
5-53
EAS2GBB203
STEERING HEAD
Removing the lower bracket
Order Part name Q’ty Remarks
Refer to “CHECKING AND ADJUSTING
THE STEERING HEAD” on page 3-37.
Use a suitable stand to raise the front wheel
off the ground.
Headlight assembly/multi-function meter/front
fenderRefer to “GENERAL CHASSIS” on page 5-1.
Handlebar Refer to “HANDLEBAR” on page 5-33.
1 Front fender 1
2 Steering stem nut 1
3 Front fork leg (s) 2 Refer to “FRONT FORK” on page 5-40.
4 Upper bracket 1
5 Steering ring nut 1
6 Lower bracket 1
7 Bearing race cover 1
8 Upper bearing 1
9 Bearing (lower side) 1
10 Bearing races 2
2
4
5
7
3
(2)(2)
(2)
(2) (2)
1
6
8
9
10
LS
LS
T
.R.21 Nm (2.1 mlbf) kgf, 15 ft
T
.R.21 Nm (2.1 mlbf) kgf, 15 ft
T
.R.21 Nm (2.1 mlbf) kgf, 15 ft
T
.R.21 Nm (2.1 mlbf) kgf, 15 ft
T
.R.3.8 Nm (0.38 mlbf) kgf, 2.8 ft
T
.R.3.8 Nm (0.38 mlbf) kgf, 2.8 ft
T
.R.9 Nm (0.9 mlbf) kgf, 6.5 ft
T
.R.7 Nm (0.7 mlbf) kgf, 5.1 ftT
.R.7 Nm (0.7 mlbf) kgf, 5.1 ft
T
.R.10 Nm (1.0 mlbf) kgf, 7.2 ft
T
.R.145 Nm (14.5 mlbf) kgf, 105 ft
T
.R.38 Nm (3.8 mlbf) kgf, 27 ft
7 Nm (0.7 m
lbf) kgf, 5.1 ft
*
*
Page 209 of 432

STEERING HEAD
5-55
EAS2GBB204REMOVING THE LOWER BRACKET
1. Use a suitable stand to raise the front wheel
off the ground.
EWA
WARNING
Securely support the vehicle so that there is
no danger of it falling over.
2. Remove:
• Ring nut “1”
TIP
Remove the ring nut with the steering nut
wrench “2”.
EWA
WARNING
Securely support the lower bracket so that
there is no danger of it falling.
EAS2GBB205CHECKING THE STEERING HEAD
1. Wash with kerosene:
• Bearing
• Bearing races
2. Check:
• Bearing
• Bearing races
Damage/pitting Replace.
3. Replace:
• Bearing
• Bearing races
▼▼▼▼▼▼▼▼▼▼▼▼▼▼▼▼▼▼▼▼▼▼▼▼▼▼▼▼▼▼▼▼
a. Remove the bearing race from the steering
head pipe with a long rod “1” and a hammer.
b. Remove the bearing race from the lower
bracket with a chisel “2” and a hammer.
c. Install a new bearing race.
ECA
NOTICE
If the bearing race is not installed properly,
the steering head pipe could be damaged.
TIP
Always replace the bearing and the bearing
race as a set.
▲▲▲▲▲▲▲▲▲▲▲▲▲▲▲▲▲▲▲▲▲▲▲▲▲▲▲▲▲▲▲▲
4. Check:
• Upper bracket
• Lower bracket
(along with the steering stem)
Bends/cracks/damage Replace.
EAS2GBB206INSTALLING THE STEERING HEAD
1. Install:
• Lower bearing “1”
TIP
Apply the lithium-soap-based grease on the
dust seal lip and bearing inner circumference.
2. Install:
• Bearing races
• Upper bearing “1”
• Bearing race cover “2” Steering nut wrench
90890-01403
Exhaust flange nut wrench
YU-A9472
Page 423 of 432
TROUBLESHOOTING
10-4
7. Wheel (s)
• Incorrect wheel balance
• Broken or loose spoke
• Damaged wheel bearing
• Bent or loose wheel axle
• Excessive wheel runout
8. Frame
• Bent frame
• Damaged steering head pipe
• Improperly installed bearing race
EAS2GBB421HEADLIGHT DOES NOT COME ON
Electrical system
1. Headlight
• Fuse open circuit
• Wrong headlight bulb
• Too many electrical accessories
• Hard charging
• Incorrect connection
• Improperly grounded circuit
• Poor contacts (start switch)
• Burnt-out headlight bulb
EAS2GBB422HEADLIGHT BULB BURNT OUT
Electrical system
1. Headlight
• Wrong headlight bulb
• Faulty battery
• Faulty rectifier/regulator
• Improperly grounded circuit
• Faulty start switch
• Headlight bulb life expired
EAS2GBB423TAILLIGHT DOES NOT COME ON
Electrical system
1. Taillight
• Wrong taillight LED
• Too many electrical accessories
• Incorrect connection
• Faulty battery
