Page 47 of 172
4-13
4
EBU34750Parking brake leverThe parking brake lever is located at the right
side of the steering wheel. Setting the parking
brake lever will help keep the vehicle from
moving while parked.
To set the parking brake, pull the lever rear-
ward completely.
To release the parking brake, pull rearward on
the lever, press the release button, and then
push the lever all the way forward.
TIPSpring tension helps return the lever to the
released position.
If you drive the vehicle with the parking
brake engaged, a buzzer will sound.
1. Brake pedal
1
1. Parking brake lever
2. Release button
12
UB427BE0.book Page 13 Friday, February 5, 2016 2:14 PM
Page 60 of 172

5-1
5
EBU31573
FOR YOUR SAFETY – PRE-OPERATION CHECKS
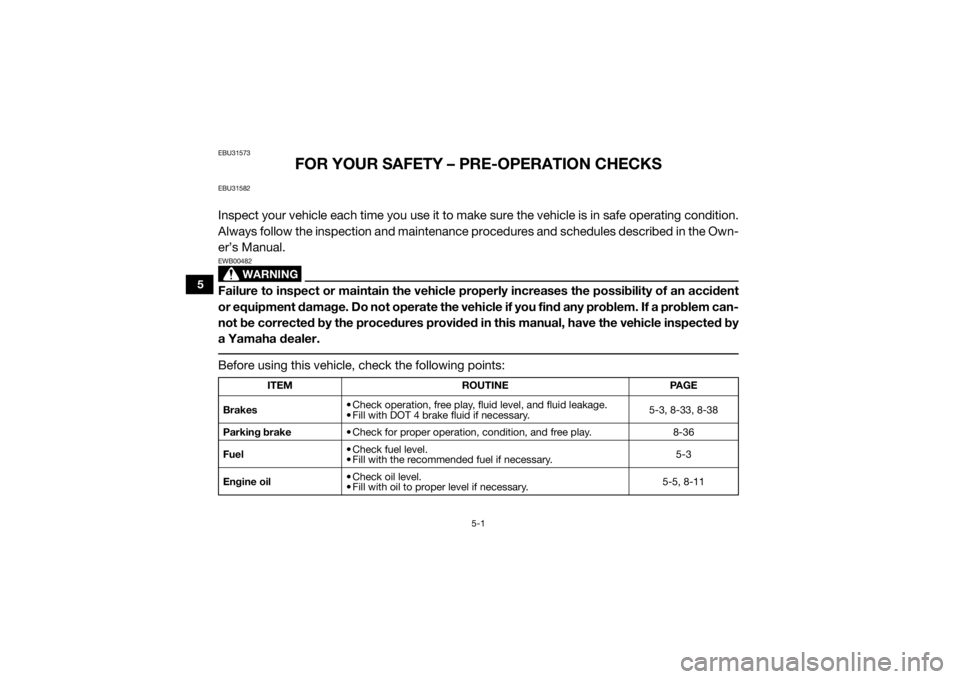
EBU31582Inspect your vehicle each time you use it to make sure the vehicle is in safe operating condition.
Always follow the inspection and maintenance procedures and schedules described in the Own-
er’s Manual.
WARNING
EWB00482Failure to inspect or maintain the vehicle properly increases the possibility of an accident
or equipment damage. Do not operate the vehicle if you find any problem. If a problem can-
not be corrected by the procedures provided in this manual, have the vehicle inspected by
a Yamaha dealer. Before using this vehicle, check the following points:
ITEM ROUTINE PAGE
Brakes • Check operation, free play, fluid level, and fluid leakage.
• Fill with DOT 4 brake fluid if necessary. 5-3, 8-33, 8-38
Parking brake • Check for proper operation, condition, and free play. 8-36
Fuel • Check fuel level.
• Fill with the recommended fuel if necessary. 5-3
Engine oil • Check oil level.
• Fill with oil to proper level if necessary. 5-5, 8-11
UB427BE0.book Page 1 Friday, February 5, 2016 2:14 PM
Page 62 of 172

5-3
5
EBU31730Front and rear brakesBrake pedal
Check that there is no free play in the brake
pedal. If there is free play, have a Yamaha
dealer check the brake system. (See page
8-36.)
Check the operation of the brake pedal. It
should move smoothly and there should be
a firm feeling when the brakes are applied.
If not, have the vehicle inspected by a
Yamaha dealer.
Brake fluid level
Check the brake fluid level. Add fluid if neces-
sary. (See page 8-34.) Brake fluid leakage
Check to see if any brake fluid is leaking out
of the pipe joints or the brake fluid reservoir.
Apply the brakes firmly for one minute. If there
is any leakage, have the vehicle inspected by
a Yamaha dealer.
Brake operation
Check the operation of the brakes at the start
of every ride. Test the brakes at slow speed
after starting out to make sure they are work-
ing properly. If the brakes do not provide
proper braking performance, inspect the
brake system. (See page 8-33.)
EBU33200FuelMake sure there is sufficient fuel in the tank.
Specified brake fluid: DOT 4
UB427BE0.book Page 3 Friday, February 5, 2016 2:14 PM
Page 71 of 172

6-2
6
10–20 hours:
Avoid prolonged operation above three-quar-
ter throttle.
After break-in:
The vehicle may now be operated normally.EBU33081Starting the engine1. Turn the key to “ ” (on).NOTICEECB02291The coolant temperature warning light and
engine trouble warning light should come
on, then go off.
The EPS warning light should come on,
then go off when the engine is started.
To avoid possible damage, do not operate
the vehicle if a warning light does not work
as described above. 2. Apply the brake pedal.
3. Shift the drive select lever into the neutralposition.
When the drive select lever is in the
neutral position, the neutral indicator
light should come on. If the neutral indi-
cator light does not come on, ask a
Yamaha dealer to inspect the electric
circuit.
The engine can be started in any gear if
the brake pedal is applied. However, it
is recommended to shift into neutral
before starting the engine.
4. With your foot off the accelerator pedal,
start the engine by turning the key to “ ”
(start).
If the engine fails to start, release the key, and
then try starting it again. Wait a few seconds
before the next attempt. Each attempt should
be as short as possible, to preserve battery
energy. NOTICE: Do not crank the engine
more than 5 seconds on each attempt, or
starter damage could occur. Wait at least
5 seconds between each operation of the
electric starter to let it cool.
[ECB02140]
UB427BE0.book Page 2 Friday, February 5, 2016 2:14 PM
Page 72 of 172
6-3
6
Do not turn the key to the “ ” (start) position
with the engine running; otherwise, damage
to the electric starter may result.TIPFor maximum engine life, never accelerate
hard when the engine is cold! EBU31911Drive select lever operation and re-
verse drivingNOTICEECB02150Do not shift without coming to a complete
stop and waiting for the engine to return to
normal idle speed. Damage to the engine
or drive train may occur. Shifting: neutral to high and high to low1. Stop the vehicle, and take your foot off the accelerator pedal. 2. Apply the brake pedal, then shift by mov-
ing the drive select lever along the shift
guide. Make sure that the drive select le-
ver is completely shifted into position.
3. Release the parking brake, if applied.
4. Release the brake pedal and press the accelerator pedal gradually.
1. Drive select lever
2. L (Low-range)
3. H (High-range)
4. N (Neutral)
5. R (Reverse)
1
2
5 4
3
UB427BE0.book Page 3 Friday, February 5, 2016 2:14 PM
Page 73 of 172

6-4
6
Shifting: neutral to reverse
WARNING
EWB03300Before you shift into reverse, make sure
there are no obstacles or people behind
you. When it is safe to proceed, go slowly.
Hitting an obstacle or person could result
in serious injury or death. 1. Stop the vehicle, take your foot off the ac-celerator pedal, and check behind you.
2. Apply the brake pedal.
3. Shift from neutral to reverse or vice versa by moving the drive select lever along the
shift guide.
When in reverse, the reverse indicator
light should be on. If the light does not
come on, ask a Yamaha dealer to in-
spect the reverse indicator light electri-
cal circuit.
Due to the synchronizing mechanism in
the engine, the light may not come on
until the vehicle starts moving. 4. Release the parking brake, if applied.
5. Check behind the vehicle for people or
obstacles, and then release the brake
pedal.
6. Press the accelerator pedal gradually and
continue to watch to the rear while back-
ing.
1. Drive select lever
2. L (Low-range)
3. H (High-range)
4. N (Neutral)
5. R (Reverse)
1
2
5 4
3
UB427BE0.book Page 4 Friday, February 5, 2016 2:14 PM
Page 76 of 172

6-7
6
EBU31930ParkingWhen parking, stop the engine and shift the
drive select lever into the neutral position. Ap-
ply the parking brake to help prevent the ve-
hicle from rolling. See page 7-16 for more
information on parking and parking on a
slope.EBU31940LoadingTake extra precautions when driving with a
load or trailer. Follow these instructions and
always use common sense and good judg-
ment when carrying cargo or towing a trailer.
Prepare your load or trailer
WARNING
EWB03310Improper loading or towing can increase
the risk of loss of control, an overturn, or
other accident:
Do not exceed the Maximum Loading
Limits for the vehicle (see “MAXIMUM
LOADING LIMIT” in this section and ve-
hicle labeling).
Keep weight in the cargo bed centered
side to side, and as low and as far for-
ward as possible. Top-heavy loads in-
crease the risk of overturn. Be sure
cargo is secured – a loose load could
change handling unexpectedly or strike
occupants.
Do not exceed the maximum tongue
weight.
Make sure the load does not interfere
with your control or ability to see where
you are going.
Tie down cargo in the trailer securely.
Make sure cargo in the trailer cannot
move around. A shifting load can cause
an accident.
Use the hooks equipped on the cargo bed to
tie down loads.
UB427BE0.book Page 7 Friday, February 5, 2016 2:14 PM
Page 91 of 172

7-13
7
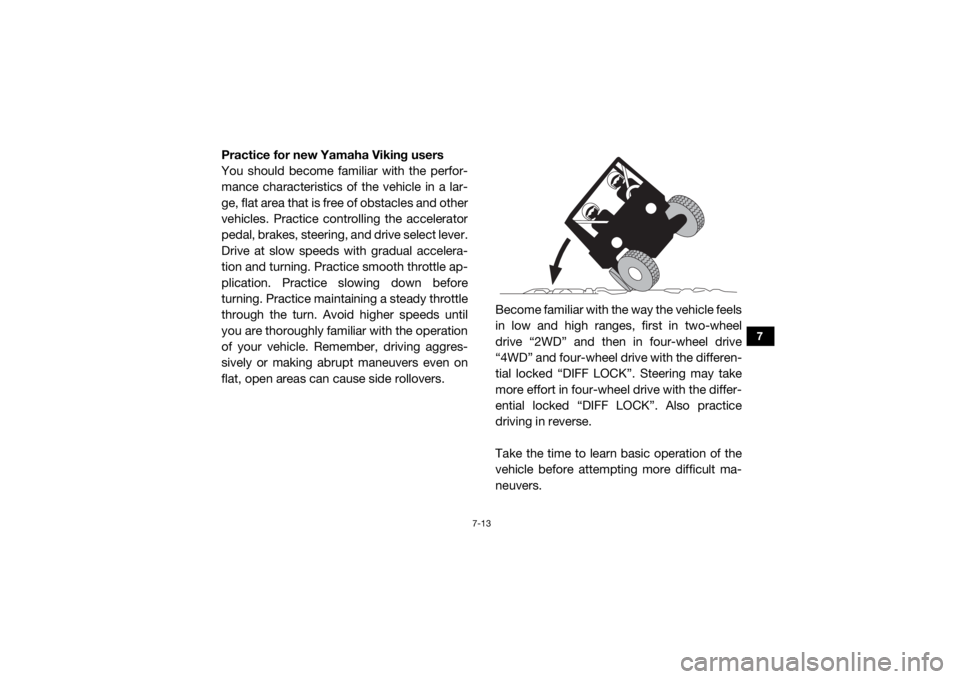
Practice for new Yamaha Viking users
You should become familiar with the perfor-
mance characteristics of the vehicle in a lar-
ge, flat area that is free of obstacles and other
vehicles. Practice controlling the accelerator
pedal, brakes, steering, and drive select lever.
Drive at slow speeds with gradual accelera-
tion and turning. Practice smooth throttle ap-
plication. Practice slowing down before
turning. Practice maintaining a steady throttle
through the turn. Avoid higher speeds until
you are thoroughly familiar with the operation
of your vehicle. Remember, driving aggres-
sively or making abrupt maneuvers even on
flat, open areas can cause side rollovers. Become familiar with the way the vehicle feels
in low and high ranges, first in two-wheel
drive “2WD” and then in four-wheel drive
“4WD” and four-wheel drive with the differen-
tial locked “DIFF LOCK”. Steering may take
more effort in four-wheel drive with the differ-
ential locked “DIFF LOCK”. Also practice
driving in reverse.
Take the time to learn basic operation of the
vehicle before attempting more difficult ma-
neuvers.UB427BE0.book Page 13 Friday, February 5, 2016 2:14 PM