Page 49 of 124
Instrument and control functions
5-16
1
2
3
4
5
6
7
8
9
10
11
12
13
14
2. Push the “MENU” switch.
3. Use the select switch to select the
desired brightness level.
4. Push the “MENU” switch to return to the setting mode menu.
Setting the clock
TIP
The clock uses a 12-hour time system. 1. Use the select switch to highlight “Clock”.
2. Push the “MENU” switch.
3. When the hour digits start flashing, use the select switch to set the
hours.
4. Push the “MENU” switch, and the minute digits start flashing.
5. Use the select switch to set the minutes.
6. Push the “MENU” switch to return to the setting mode menu.
Resetting all of the display items
1. Use the select switch to highlight “All Reset”.
2. Push the “MENU” switch.
3. Use the select switch to highlight
BV1-28199-E0.book 16 ページ 2016年12月19日 月曜日 午前11時25分
Page 50 of 124

Instrument and control functions
5-17
1
2
3
4
5
6
7
8
9
10
11
12
13
14 “YES”, and then push the “MENU”
switch. All items are reset to facto-
ry preset or default settings.
TIP
The odometer, clock, maintenance
counter item “Oil” and mainenance
counter item “V-Belt” will not be reset.
To exit the setting mode
1. Use the select switch to highlight
“Return”.
2. Push the “MENU” switch to exit the setting mode and return to the
standard display mode.
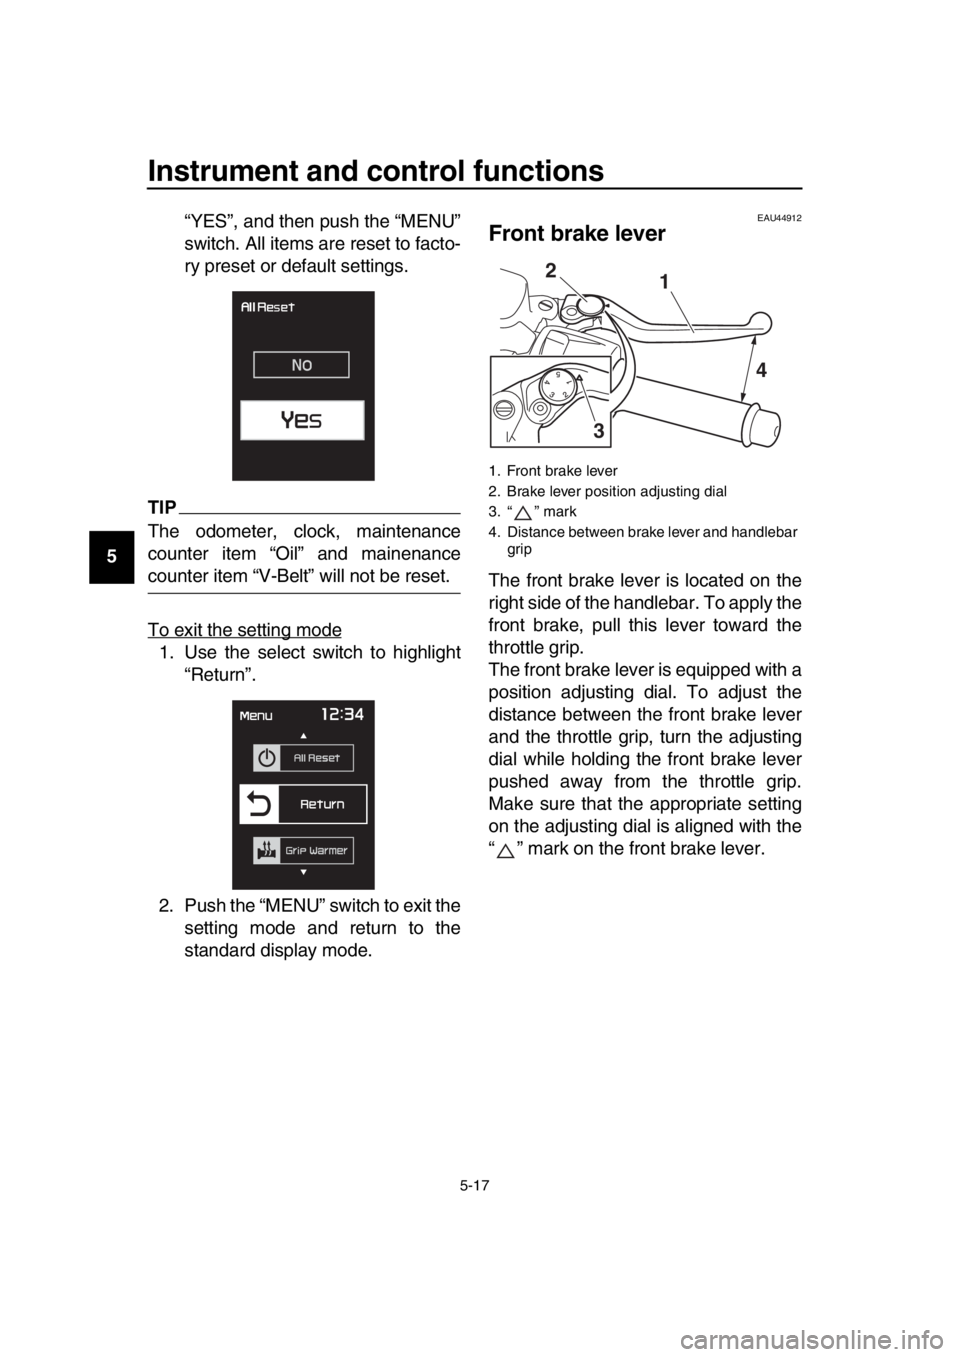
EAU44912
Front brake lever
The front brake lever is located on the
right side of the handlebar. To apply the
front brake, pull this lever toward the
throttle grip.
The front brake lever is equipped with a
position adjusting dial. To adjust the
distance between the front brake lever
and the throttle grip, turn the adjusting
dial while holding the front brake lever
pushed away from the throttle grip.
Make sure that the appropriate setting
on the adjusting dial is aligned with the
“ ” mark on the front brake lever.
1. Front brake lever
2. Brake lever position adjusting dial
3. “ ” mark
4. Distance between brake lever and handlebar grip
1
2
3 4
BV1-28199-E0.book 17 ページ 2016年12月19日 月曜日 午前11時25分
Page 85 of 124

Periodic maintenance and adjustment
8-13
1
2
3
4
5
6
7
8
9
10
11
12
13
14
TIP
Be sure to wipe off spilled oil on any
parts after the engine and exhaust sys-
tem have cooled down.
NOTICE
ECA11621
In order to prevent clutch slip-
page (since the engine oil also
lubricates the clutch), do not
mix any chemical additives. Do
not use oils with a diesel speci-
fication of “CD” or oils of a high-
er quality than specified. In
addition, do not use oils labeled
“ENERGY CONSERVING II” or
higher.
Make sure that no foreign mate-
rial enters the crankcase.
12. Start the engine, and then let it idle for several minutes while checking
it for oil leakage. If oil is leaking, im-
mediately turn the engine off and
check for the cause.
13. Turn the engine off, and then check the oil level and correct it if
necessary.
14. Reset the oil change indicator. (See page 5-11.)
TIP
If the engine oil is changed before the
oil change indicator comes on (i.e. be-
fore the periodic oil change interval has
been reached), the indicator must be reset after the oil change for the next
periodic oil change to be indicated at
the correct time.
Recommended engine oil:
See page 10-1.
Oil quantity: Oil change:2.60 L (2.75 US qt, 2.29 Imp.qt)
With oil filter removal: 2.90 L (3.07 US qt, 2.55 Imp.qt)
BV1-28199-E0.book 13 ページ 2016年12月19日 月曜日 午前11時25分