2017 YAMAHA KODIAK 700 brake
[x] Cancel search: brakePage 61 of 178
5-3
5
EBU19542FuelMake sure that there is sufficient fuel in the tank.
(See page 4-19.)EBU19561Engine oilMake sure that the engine oil is at the specified
level. Add oil as necessary. (See page 8-20.)EBU19591Final gear oilMake sure that the final gear oil is at the specified
level. Add oil as necessary. (See page 8-24.)EBU19601Differential gear oilMake sure that the differential gear oil is at the
specified level. Add oil as necessary. (See page
8-27.)EBU19632CoolantMake sure that the coolant is at the specified level.
Add coolant as necessary. (See page 8-29.)
TIPThe coolant level must be checked on a cold en-
gine since the level varies with engine tempera-
ture. EBU28533Front and rear brakesBrake levers and brake pedal
Check that there is no free play in the front
brake lever. If there is free play, have a Yamaha
dealer check the brake system.
Check for correct free play in the rear brake le-
ver and brake pedal. If the free play is incorrect,
adjust it. (See page 8-45.)
Check operation of the levers and pedal. They
should move smoothly and there should be a
firm feeling when the brake is applied. If not,
have a Yamaha dealer check them.
Brake fluid level (front brake)
Check the brake fluid level. Add fluid if necessary.
(See page 8-44.)
Specified brake fluid:DOT 4
UB1661E0.book Page 3 Thursday, May 12, 2016 2:47 PM
Page 62 of 178
5-4
5Brake fluid leakage (front brake)
Check to see if any brake fluid is leaking out of the
hose, joint or brake fluid reservoir of the front
brake. Apply the brake firmly for one minute. If the
lever moves slowly inward, there may be a leak in
the brake system. If there is any leakage, the brake
system should be checked by a Yamaha dealer.
Brake operation
Test the brakes at slow speed after starting out to
make sure they are working properly. If the brakes
do not provide proper braking performance,
check the brake pads and friction plates for wear.
(See page 8-42.)
EBU19762Throttle leverCheck the operation of the throttle lever. It must
open smoothly and spring back to the idle position
when released. Have a Yamaha dealer correct if
necessary.EBU19815TiresCheck tire pressure regularly to make sure it is at
the recommended specifications. Also check for
wear and damage. Tire pressure
Use the low-pressure tire gauge to check and ad-
just tire pressures when the tires are cold. Tire
pressures must be equal on both sides.
WARNING! Operation of this vehicle with im- proper tire pressure may cause severe injury or
death from loss of control or rollover. Tire
pressure below the minimum specified could
also cause the tire to dislodge from the rim un-
der severe riding conditions.
[EWB02542]
Set tire
pressures to the following specifications:
UB1661E0.book Page 4 Thursday, May 12, 2016 2:47 PM
Page 66 of 178

6-1
6
EBU19882
OPERATION
EBU19902Read the Owner’s Manual carefully before riding
the ATV. If there is a control or function you do not
understand, ask your Yamaha dealer.
WARNING
EWB00632Read the Owner’s Manual carefully to become
familiar with all controls in order to help pre-
vent any loss of control, which could cause an
accident or injury. EBU34161Starting the engineNOTICEECB00151See the “Engine break-in” section on page 6-4
prior to operating the engine for the first time. 1. Turn the key to “ ” (on) and the engine stopswitch to “ ”.
The EPS warning light (for equipped models)
should come on and stay on until the engine
is started. The following warning lights should come on
for a few seconds, then go off.
Coolant temperature warning light
Engine trouble warning light
Fuel level warning light (for equipped mod-
els)
NOTICEECB00826To avoid possible damage, do not operate the
ATV if a warning light does not work as de-
scribed above. 2. Apply the brake pedal, and then shift the drive
select lever into the neutral or park position.
The corresponding indicator light should
come on. If the indicator light does not come
on, have a Yamaha dealer check the electrical
circuit.TIPThis model is equipped with an ignition circuit cut-
off system. The engine can be started under the
following conditions:
The drive select lever is in the neutral or park po-
sition.
UB1661E0.book Page 1 Thursday, May 12, 2016 2:47 PM
Page 67 of 178

6-2
6
The rear brake lever or brake pedal is applied
with the drive select lever in any position. How-
ever, it is recommended to shift into the neutral
or park position before starting the engine.
3. Apply the rear brake lever or brake pedal.
4. Completely close the throttle lever and start
the engine by pushing the start switch.TIPIf the engine fails to start, release the start switch,
then push it again. Pause a few seconds before
the next attempt. Each cranking should be as
short as possible to preserve battery energy. Do
not crank the engine more than 10 seconds on
each attempt. NOTICEECB00164For maximum engine life, never accelerate
hard when the engine is cold!
EBU36230Operating the drive select lever and
driving in reverseNOTICEECB03330Do not shift without coming to a complete stop
and waiting for the engine to return to normal
idle speed. Damage to the engine or drivetrain
may occur. Shifting: Neutral to High-range and High-range
to Low-range1. Bring the ATV to a complete stop.
2. Apply the brake pedal, and then shift by mov- ing the drive select lever along the shift guide.TIPMake sure that the drive select lever is completely
shifted into position.
UB1661E0.book Page 2 Thursday, May 12, 2016 2:47 PM
Page 68 of 178
6-3
63. Release the brake pedal, and then open thethrottle lever gradually.
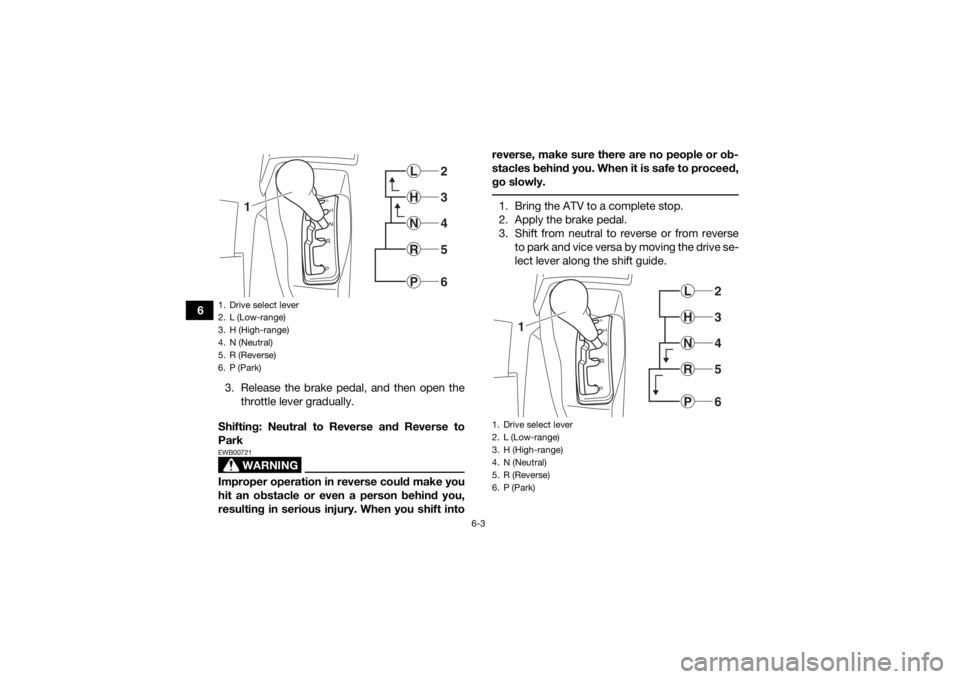
Shifting: Neutral to Reverse and Reverse to
Park
WARNING
EWB00721Improper operation in reverse could make you
hit an obstacle or even a person behind you,
resulting in serious injury. When you shift into reverse, make sure there are no people or ob-
stacles behind you. When it is safe to proceed,
go slowly.
1. Bring the ATV to a complete stop.
2. Apply the brake pedal.
3. Shift from neutral to reverse or from reverse
to park and vice versa by moving the drive se-
lect lever along the shift guide.
1. Drive select lever
2. L (Low-range)
3. H (High-range)
4. N (Neutral)
5. R (Reverse)
6. P (Park)
1
23456
LHNRP
1. Drive select lever
2. L (Low-range)
3. H (High-range)
4. N (Neutral)
5. R (Reverse)
6. P (Park)
1
23456
LHNRP
UB1661E0.book Page 3 Thursday, May 12, 2016 2:47 PM
Page 69 of 178

6-4
6
TIPWhen in reverse, the reverse indicator light
should come on. If the indicator light does not
come on, have a Yamaha dealer check the elec-
trical circuit.
Due to the synchronizing mechanism in the en-
gine, the indicator light may not come on until
the ATV starts moving. 4. Check behind for people or obstacles, and
then release the brake pedal.
5. Open the throttle lever gradually and continue to watch to the rear while backing.EBU20683Engine break-inTIPFor ATVs equipped with an odometer or an hour
meter, follow the figures given in km (mi) or the
figures given in hours.
For ATVs not equipped with an odometer or
hour meter, follow the figures given in hours.
There is never a more important period in the life
of your engine than the first 320 km (200 mi) or 20
hours of riding. For this reason, you should read
the following material carefully.
Since the engine is brand new, do not put an ex-
cessive load on it for the first 320 km (200 mi) or
20 hours. The various parts in the engine wear and
polish themselves to the correct operating clear-
ances. During this period, prolonged full-throttle
operation or any condition that might result in en-
gine overheating must be avoided.
0–160 km (0–100 mi) or 0–10 hours
Avoid prolonged operation above 1/2 throttle.
Vary the speed of the ATV regularly. Do not oper-
ate it at one set throttle position.
160–320 km (100–200 mi) or 10–20 hours
Avoid prolonged operation above 3/4 throttle. Rev
the engine freely, but do not use full throttle at any
time.
320 km (200 mi) or 20 hours and beyond
The ATV can now be operated normally.
UB1661E0.book Page 4 Thursday, May 12, 2016 2:47 PM
Page 70 of 178

6-5
6
NOTICEECB00221If any engine trouble should occur during the
engine break-in period, immediately have a
Yamaha dealer check the ATV. EBU27322ParkingWhen parking the ATV, stop the engine, and shift
the drive select lever into the park position.EBU29901Parking on a slope
WARNING
EWB00861Avoid parking on hills or other inclines. Parking
on a hill or other incline could cause the ATV to
roll out of control, increasing the chance of an
accident. If you must park on an incline, place
the ATV transversely across the incline, stop
the engine, shift the drive select lever to the
park position, and then block the front and rear
wheels with rocks or other objects.
Do not park the ATV at all on hills that are so
steep you could not walk up them easily.
1. Bring the ATV to a stop by applying the brakes.
2. Stop the engine.
3. With the brake pedal applied, shift the drive select lever to the park position.EBU20911Accessories and loadingEBU20922Genuine Yamaha Accessories
Choosing accessories for your ATV is an impor-
tant decision. Genuine Yamaha Accessories,
which are available only from a Yamaha dealer,
have been designed, tested, and approved by
Yamaha for use on your ATV. Many companies with no connection to Yamaha manufacture parts
UB1661E0.book Page 5 Thursday, May 12, 2016 2:47 PM
Page 85 of 178

7-12
7
Select a large, flat, unpaved area to become famil-
iar with your ATV. Make sure that this area is free
of obstacles and other riders. You should practice
control of the throttle, brakes, shifting procedures,
and turning techniques in this area before trying
more difficult terrain.
Shift to the park position and follow the instruction
on page 6-1 to start the engine. Once it has
warmed up you are ready to begin riding your
ATV. With the engine idling, shift the drive select
lever into the low-range position or the high-range
position. Apply the throttle slowly and smoothly.
The centrifugal clutch will engage and you will
start to accelerate. If the throttle is applied too
abruptly, the front wheels may lift off the ground,
resulting in a loss of directional control. Avoid
higher speeds until you are thoroughly familiar
with the operation of your ATV.
When slowing down or stopping, release the
throttle and apply the brakes smoothly and evenly.
Improper use of the brakes can cause the tires to
lose traction, reducing control and increasing the
possibility of an accident.
NOTICEECB00252Do not shift from low-range to high-range or
vice versa without coming to a complete stop.
Damage to the engine or drive train may occur. TURNING YOUR ATV
WARNING
EWB01772Always follow proper procedures for turning as
described in this Owner’s Manual. Practice
turning at low speeds before attempting to turn
at faster speeds. Do not turn at speeds too fast
for your skills or the conditions. ATV could go
out of control, causing a collision or overturn. To achieve maximum traction on unpaved surfac-
es, the two rear wheels turn together at the same
speed. Therefore, unless the wheel on the inside
of the turn is allowed to slip or lose some traction,
the ATV will resist turning. A special turning tech-
nique must be used to allow the ATV to make
turns quickly and easily. It is essential that this skill
be learned first at low speed.
UB1661E0.book Page 12 Thursday, May 12, 2016 2:47 PM