2017 VOLVO XC90 lock
[x] Cancel search: lockPage 84 of 560

||
SAFETY
82
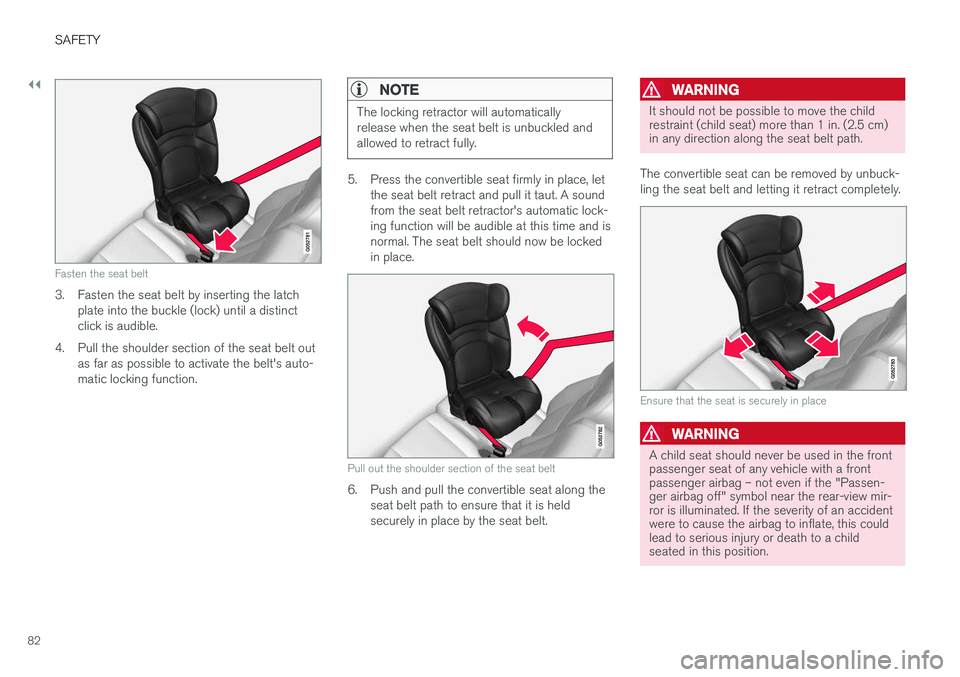
Fasten the seat belt
3. Fasten the seat belt by inserting the latchplate into the buckle (lock) until a distinct click is audible.
4. Pull the shoulder section of the seat belt out as far as possible to activate the belt's auto-matic locking function.
NOTE
The locking retractor will automatically release when the seat belt is unbuckled andallowed to retract fully.
5. Press the convertible seat firmly in place, letthe seat belt retract and pull it taut. A sound from the seat belt retractor's automatic lock-ing function will be audible at this time and isnormal. The seat belt should now be lockedin place.
Pull out the shoulder section of the seat belt
6. Push and pull the convertible seat along theseat belt path to ensure that it is held securely in place by the seat belt.
WARNING
It should not be possible to move the child restraint (child seat) more than 1 in. (2.5 cm)in any direction along the seat belt path.
The convertible seat can be removed by unbuck- ling the seat belt and letting it retract completely.
Ensure that the seat is securely in place
WARNING
A child seat should never be used in the front passenger seat of any vehicle with a frontpassenger airbag – not even if the "Passen-ger airbag off" symbol near the rear-view mir-ror is illuminated. If the severity of an accidentwere to cause the airbag to inflate, this couldlead to serious injury or death to a childseated in this position.
Page 85 of 560

SAFETY
}}
83
Related information
•ISOFIX/LATCH lower anchors (p. 84)
• Top tether anchors (p. 86)
• Booster cushions (p. 83)
• Buckling and unbuckling seat belts (p. 62)
• Child safety (p. 75)
Booster cushions
Securing a booster cushion
Position the child correctly on the booster cushion
Booster cushions are recommended for children who have outgrown convertible seats.
1. Place the booster cushion in the rear seat of
the vehicle.
2. With the child properly seated on the booster cushion, attach the seat belt to or around the cushion according to the manufacturer'sinstructions. 3. Fasten the seat belt by inserting the latch
plate into the buckle (lock) until a distinctclick is audible.Positioning the seat belt
4. Ensure that the seat belt is pulled taut and fits snugly around the child.
WARNING
• The hip section of the three-point seat belt must fit snugly across the child'ships, not across the stomach.
• The shoulder section of the three-pointseat belt should be positioned across thechest and shoulder.
• The shoulder belt must never be placedbehind the child's back or under the arm.
Page 89 of 560

SAFETY
}}
* Option/accessory.87
Securing a child seat
1. Place the child restraint on the rear seat.
2. Route the top tether strap under the head
restraint and attach it to the anchor.
3. Attach lower tether straps to the lower ISO- FIX/LATCH anchors. If the child restraint is not equipped with lower tether straps, or therestraint is used in the center seating posi-tion, follow instructions for securing a childrestraint using the Automatic LockingRetractor seat belt.
–Firmly tension all straps.
Refer also to the child seat manufacturer's instructions for information on securing the childseat.
NOTE
On models equipped with the optional cargo area cover, this cover should be removedbefore a child seat is attached to the childrestraint anchors.
WARNING
• Always refer to the recommendations made by the child restraint manufacturer.
• Volvo recommends that the top tetheranchors be used when installing a for-ward-facing child restraint.
• Never route a top tether strap over thetop of the head restraint. The strapshould be routed beneath the headrestraint.
• Child restraint anchorages are designedto withstand only those loads imposed bycorrectly fitted child restraints. Under nocircumstances are they to be used foradult seat belts or harnesses. The ancho-rages are not able to withstand excessiveforces on them in the event of collision iffull harness seat belts or adult seat beltsare installed to them. An adult who uses abelt anchored in a child restraint anchor-age runs a great risk of suffering severeinjuries should a collision occur.
• Do not install rear speakers that requirethe removal of the top tether anchors orinterfere with the proper use of the toptether strap.
Related information
•Child safety (p. 75)
• Child restraints (p. 77)
Integrated booster cushion
*
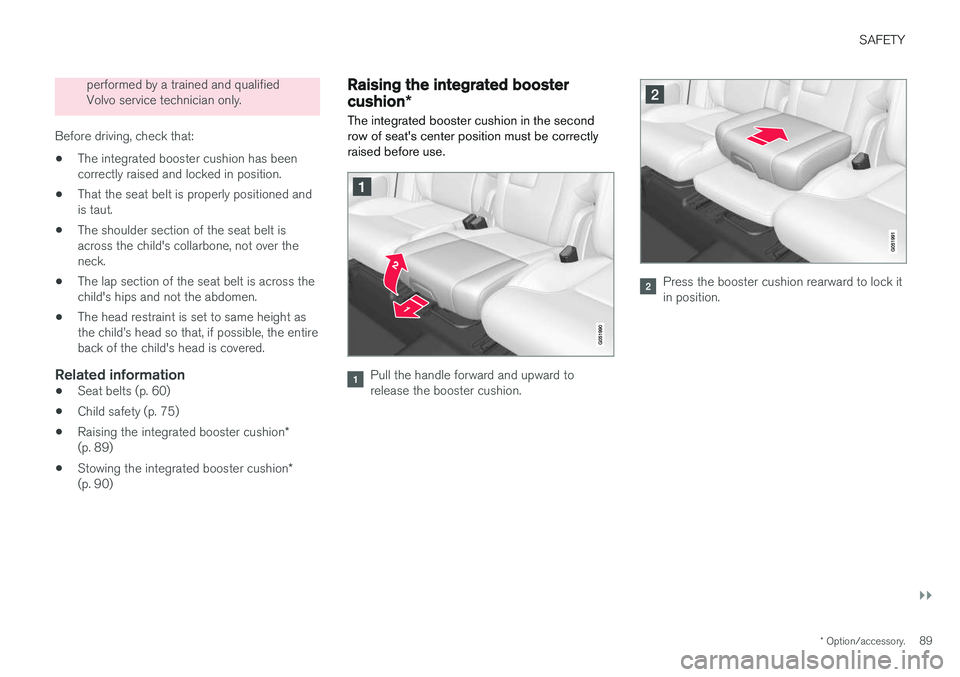
Volvo's optional integrated booster cushion is located in the rear seat's center position and isdesigned to raise the child higher so that theshoulder strap crosses over the child's collar-bone, not over the neck.
Page 91 of 560

SAFETY
}}
* Option/accessory.89
performed by a trained and qualified Volvo service technician only.
Before driving, check that:
• The integrated booster cushion has beencorrectly raised and locked in position.
• That the seat belt is properly positioned andis taut.
• The shoulder section of the seat belt isacross the child's collarbone, not over theneck.
• The lap section of the seat belt is across thechild's hips and not the abdomen.
• The head restraint is set to same height asthe child
Page 96 of 560

INSTRUMENTS AND CONTROLS
* Option/accessory.
94
Instruments and controls
This overview shows the location of the primary displays, and controls/buttons/switches.
Display/function/control
Parking lights, daytime running lights, low beams, high beams, turn signals, front fog lights/corner illumination *, rear fog
lights, trip computer reset
Transmission manual shifting paddle *
Head-up-display*
Instrument panel
Wipers/washers, rain sensor *
Right-side steering wheel keypad
Display/function/control
Steering wheel adjustment
Horn
Left-side steering wheel keypad
Hood open
Display lighting, tailgate unlock, tailgate open/close*
Display/function/control
Front reading lights and courtesy lighting
Laminated panoramic roof *
Display/function/control
Ceiling console display
Manual rearview mirror auto-dim (certain markets only)
Display/function/control
Center display
Hazard warning flashers, max. defroster/ heated windshield*, media player, glove
compartment open
Gear selector
Start knob
Drive modes *
Page 97 of 560

INSTRUMENTS AND CONTROLS
}}
* Option/accessory.95
Display/function/control
Parking brake
Auto-hold brakes
Display/function/control
Memory control for:
• power seats
*
• door mirrors
• head-up display
*
Door open, door/tailgate lock/unlock
Power windows, power door mirrors
Controls for power front seat *
Trip computer The trip computer registers and calculates infor- mation such as distance driven, fuel consump-tion and average speed. This information is dis-played in the instrument panel.
To help promote fuel efficient driving, the trip computer provides readings for current and aver-age fuel consumption. The trip computer includes the following gauges:
• Trip odometers
• Odometer
• Current fuel consumption
• Distance to empty
• Tourist (alternative speedometer)
12" instrument panel
8" instrument panel
Trip odometerThere are two trip odometers: TM and TA. During a drive, the trip odometer registers:
• Mileage
• Driving time
• Average speed
• Average fuel consumption
The values displayed are those since the lasttime the trip odometer was reset.
OdometerThe odometer registers the vehicle's total mile-age and cannot be reset.
Current fuel consumptionThis gauge shows the current fuel consumption.This reading is updated once a second.
Page 100 of 560

||
INSTRUMENTS AND CONTROLS
* Option/accessory.
98
The illustration is generic; the layout may vary depending on the model or due to software updates
Changing the unit of measureChange the units of measure for driven distance and fuel consumption in the center display's Topview. 1.
Tap
Settings in Top view.
2. Tap
SystemUnits.
3. Under
Units of Measurement, select:Metric, Imperial or US.
Related information
• Trip computer (p. 95)
• Displaying trip computer information (p. 96)
HomeLink ®
Wireless Control
System *
HomeLink ®
can be used to open garage doors,
gates, etc.
Button 1
Button 2
Button 3
Indicator light
The HomeLink ®
2
Wireless Control System pro-
vides a convenient way to replace up to three hand-held radio-frequency (RF) transmitters usedto activate devices such as gate operators,garage door openers, entry door locks, securitysystems, even home lighting. Additional informa- tion can be found on the Internet at,www.homelink.com/www.youtube.com/HomeLinkGentex or by phoning the hotline at 1–800–355–3515.
WARNING
•
If you use HomeLink ®
to open a garage
door or gate, be sure no one is near the gate or door while it is in motion.
• When programming a garage dooropener, it is advised to park outside of thegarage.
• Do not use HomeLink ®
with any garage
door opener that lacks safety stop andreverse features as required by U.S. fed-eral safety standards (this includes anygarage door opener model manufacturedbefore April 1, 1982). A garage door thatcannot detect an object - signaling thedoor to stop and reverse - does not meetcurrent U.S. federal safety standards. Formore information, contact HomeLink at:www.homelink.com.
Retain the original transmitter of the RF deviceyou are programming for use in other vehicles aswell as for future HomeLink programming. It isalso suggested that upon the sale of the vehicle,the programmed HomeLink buttons be erased
2 HomeLink and the HomeLink house are registered trademarks of Gentex Corporation.
Page 103 of 560

INSTRUMENTS AND CONTROLS
* Option/accessory.101
indicator light will glow steadily or flash when the button has been pressed. Activation will nowoccur for the trained device (i.e., garage dooropener, gate operator, security system, entry doorlock, home/office lighting, etc.).
NOTE
If the ignition is switched off, HomeLink will function for 30 minutes after the driver's doorhas been opened.
For convenience, the hand-held transmitter of the device may also be used at any time. In the event that there are still programming diffi- culties or questions, contact HomeLink at:www.HomeLink.com, www.youtube.com/HomeLinkGentex or by phoning the hotline at 1–800–355–3515.
Resetting HomeLink
®
buttonsUse the following procedure to reset (erase pro- gramming) from the three HomeLink ®
buttons
(individual buttons cannot be reset but can be “reprogrammed” as outlined in the following sec-tion): 1. Press and hold HomeLink ®
buttons 1 and 3
for approx. 10 seconds until the indicator light begins to flash green. 2. Release both buttons.
>HomeLink ®
is now in the training (or
learning) mode and can be programmedat any time beginning with “To program HomeLink ®
" above.
Reprogramming a single HomeLink ®
button
To reprogram an individual HomeLink ®
button:
1. Press and hold the desired HomeLink ®
but-
ton. DO NOT release the button.
2. The yellow indicator light will begin to flash after 20 seconds. Without releasing the HomeLink button, proceed with “To program HomeLink ®
" step 1 above.
For questions or comments, contact HomeLink at: www.HomeLink.com, www.youtube.com/HomeLinkGentex or by phoning the hotline at 1–800–355–3515.
FCC (USA) and IC (Canada)This device complies with FCC rules part 15 andIndustry Canada RSS-210. Operation is subjectto the following two conditions: (1) This devicemay not cause harmful interference, and (2) Thisdevice must accept any interference that may bereceived including interference that may causeundesired operation. WARNING: The transmitterhas been tested and complies with FCC and IC rules. Changes or modifications not expresslyapproved by the party are prohibited.
NOTE
The transmitter has been tested and complies with FCC and IC rules. Changes or modifica-tions not expressly approved by the partyresponsible for compliance could void the user