2017 VOLVO V90 odometer
[x] Cancel search: odometerPage 92 of 594

INSTRUMENTS AND CONTROLS
* Option/accessory.
90
Driver display
The driver display shows information about the car and driving.
The driver display contains gauges, indicators and indicator and warning symbols. The content ofthe driver display depends on the car's equip-ment, settings and which functions are active atthat time. The driver display is available in two versions, 12- inch and 8-inch.
WARNING
In the event of a fault in the driver display the information on e.g. brakes, airbags or othersafety systems may not be shown. In whichcase, the driver cannot check the status ofthe car's systems or receive current warningsand information.
WARNING
If the driver display should extinguish, not illu- minate on activation/start or be fully or parti-ally illegible, the car must not be used. Youshould visit a workshop immediately. Volvorecommends an authorised Volvo workshop.
Driver display, 12-inch
Location in the driver display:
On the left In the middleOn the right
Speedometer Indicator and warning symbols
TachometerA
Trip meter Outside temperature gauge
ECO gaugeA
Odometer ClockGear shift indicator
Cruise control and speed limiter information Messages, in some cases with graphics Drive mode Road Sign Information * Door and seatbelt information Fuel gauge
Page 94 of 594

||
INSTRUMENTS AND CONTROLS
* Option/accessory.
92
On the left In the middle On the right
Gear shift indicator Cruise control and speed limiter information Navigation information*
Tachometer A
Door and seatbelt information Clock
ECO gauge A
Status of the Start/Stop function App menu (activated via steering wheel keypad)
Distance to empty tank – Instantaneous fuel consumption
Outside temperature gauge – Odometer
Indicator and warning symbols – Trip meter
– – Indicator and warning symbols
– – Voice recognition
– – Engine temperature gauge
– – Messages, in some cases with graphics
A
Depending on selected drive mode.
Page 167 of 594

INSTRUMENTS AND CONTROLS
}}
* Option/accessory.165
1.
Depress buttons 1 and 3 on HomeLink ®
and
hold them depressed until the indicator lamp begins flashing green (about 10 seconds).
2. Release the buttons. >HomeLink ®
is now set to "learn mode"
and is ready to be reprogrammed; see the section "Programming HomeLink ®
"
above.
Programming individual buttons
To reprogram an individual HomeLink ®
button,
proceed as follows: 1. Depress the required button and do not
release .
2. After approx. 20 seconds when the indicator lamp on HomeLink ®
starts to flash yellow,
start with step 1 from the section "Program- ming HomeLink ®
" above.
Note: If the button to be reprogrammed is
not programmed with a new unit, it will resume the previously saved programming.
For more information or to provide feedback about HomeLink ®
, visit www.HomeLink.com,
www.youtube.com/HomeLinkGentex or call the toll-free number 00 8000 466 354 65 (or thetoll number +49 6838 907 277).
Related information
• HomeLink ®
* (p. 162)
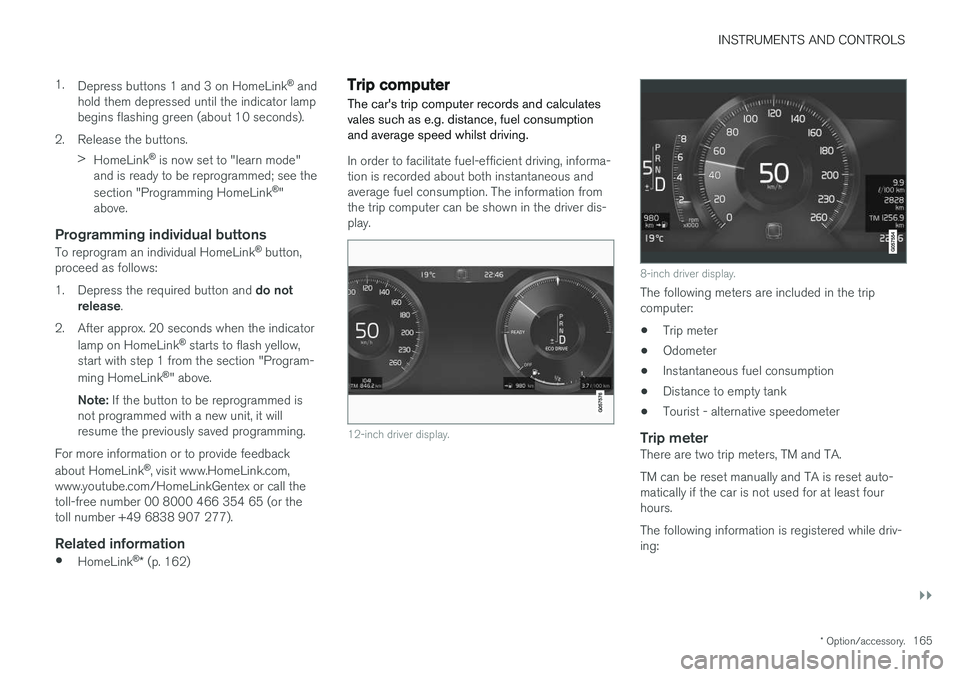
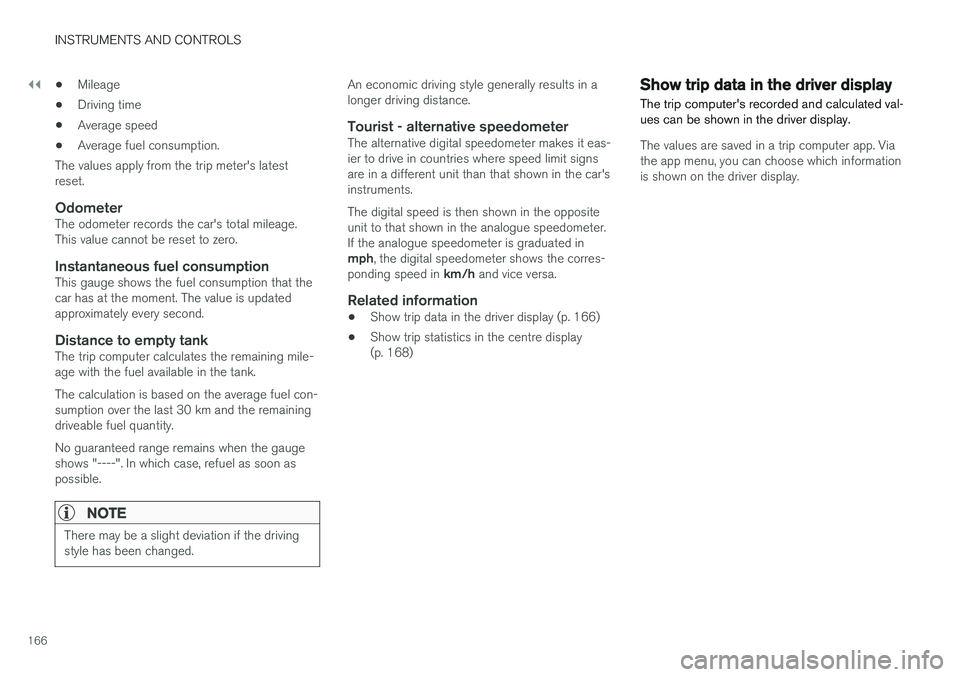
Trip computer The car's trip computer records and calculates vales such as e.g. distance, fuel consumptionand average speed whilst driving.
In order to facilitate fuel-efficient driving, informa- tion is recorded about both instantaneous andaverage fuel consumption. The information fromthe trip computer can be shown in the driver dis-play.
12-inch driver display.
8-inch driver display.
The following meters are included in the trip computer:
• Trip meter
• Odometer
• Instantaneous fuel consumption
• Distance to empty tank
• Tourist - alternative speedometer
Trip meterThere are two trip meters, TM and TA. TM can be reset manually and TA is reset auto- matically if the car is not used for at least fourhours. The following information is registered while driv- ing:
Page 168 of 594

||
INSTRUMENTS AND CONTROLS
166•
Mileage
• Driving time
• Average speed
• Average fuel consumption.
The values apply from the trip meter's latest reset.
OdometerThe odometer records the car's total mileage.This value cannot be reset to zero.
Instantaneous fuel consumptionThis gauge shows the fuel consumption that thecar has at the moment. The value is updatedapproximately every second.
Distance to empty tankThe trip computer calculates the remaining mile-age with the fuel available in the tank. The calculation is based on the average fuel con- sumption over the last 30 km and the remainingdriveable fuel quantity. No guaranteed range remains when the gauge shows "----". In which case, refuel as soon aspossible.
NOTE
There may be a slight deviation if the driving style has been changed.
An economic driving style generally results in a longer driving distance.
Tourist - alternative speedometerThe alternative digital speedometer makes it eas-ier to drive in countries where speed limit signsare in a different unit than that shown in the car'sinstruments. The digital speed is then shown in the opposite unit to that shown in the analogue speedometer.If the analogue speedometer is graduated in mph , the digital speedometer shows the corres-
ponding speed in km/h and vice versa.
Related information
•Show trip data in the driver display (p. 166)
• Show trip statistics in the centre display (p. 168)
Show trip data in the driver display
The trip computer's recorded and calculated val- ues can be shown in the driver display.
The values are saved in a trip computer app. Via the app menu, you can choose which informationis shown on the driver display.
Page 169 of 594

INSTRUMENTS AND CONTROLS
}}
167
Open and navigate in the app menu35
using the right-
hand steering wheel keypad.
App menu
Left/right
Up/down
Confirm
1. Open the app menu in the driver display by pressing (1). (It is not possible to open the app menu while there is an unacknowledged messagein the driver display. The message must beconfirmed before the app menu can beopened.) 2. Navigate to the trip computer app to left or
right with (2).
> The top four menu rows show measuredvalues for trip meter TM. The next four menu rows show measured values for tripmeter TA. Scroll up or down in the list with(3).
3. Scroll down to the option buttons to select which information to show in the driver dis-play:
• Instantaneous fuel consumption
• Distance to empty tank
• Odometer
• Mileage for trip meter TM, TA, or no dis-play of mileage
• Tourist (alternative speedometer).
Select or deselect an option with the O but-
ton (4). The change is made immediately.
Resetting the trip meter
Reset the trip meter TM with one long press on the RESET button on the left-hand stalk switch.
Trip meter TA only has automatic resetting. The meter is reset if the car is not used for four hoursor more.
Change unitChange the units for mileage, speed, etc. via thecentre display as follows: 1. Press
Settings in the top view.
2. Press
SystemUnits.
3. Under
Units of Measurement, select the
required unit standard: Metric, Imperial orUS.
35 The appearance of the display may vary depending on instrument variant.
Page 387 of 594

STARTING AND DRIVING
}}
385
Ignition positions The car's electrical system can be set in different levels/positions and in this way make the differ-ent functions available.
In order to facilitate the use of a limited number of functions with the engine switched off, thecar's electrical system can be set in 3 different levels - 0, I and II. These levels are described
with the denomination "ignition position" throughout the owner's manual. The following table shows the functions available in each ignition position/level:
Level Functions
0 •Odometer, clock and temperature gauge are illuminated.
• Power seats can be adjusted.
• The power windows can be used.
• The centre display is started andcan be used.
• It is possible to start the audio.
The functions are time-controlled inthis ignition position and are switchedoff automatically after a period of time.
I •Panorama roof, power windows,12V socket in the passenger com-partment, navigation, phone, venti-lation fan and windscreen wiperscan be used.
• Power seats can be adjusted.
• 12 V sockets in the cargo areacan be used.
• The audio is started automaticallyif it was running when the car wasleft.
Power is taken from the battery inthis ignition position.Level Functions
II •The headlamps come on.
• Warning/indicator lamps illuminate for 5 seconds.
• Several other systems are acti-vated. However, heating in seatcushions and the rear window canonly be activated after the car hasbeen started.
This ignition position consumes alot of current from the battery andshould therefore be avoided!
Selecting ignition position
Start knob in the tunnel console.
• Ignition position 0
- Unlock the car and
store the remote control key inside the car.