2017 VOLVO V90 CROSS COUNTRY transmission
[x] Cancel search: transmissionPage 10 of 552

8
STARTING AND DRIVING
Starting and driving348
Brakes 348
Brake functions 350
Auto-hold brake function 350
Brake assist system 351
Braking effect after a collision 351
Emergency brake lights 352
Hill Descent Control (HDC) 352
Low Speed Control (LSC) 353
Hill Start Assist 354
Parking brake 354
Using the parking brake 355
Parking brake malfunctions 357
Before a long distance trip 357
Driving economically 358
Driving through standing water 359
Overheating the engine and transmission 360
Winter driving 361
Towing eyelet 361
Towing recommendations 363
Fuel 365
Octane rating 366
Opening/closing the fuel filler door 367
Emission controls 368
Jump starting368
Driving with a trailer 370
Retractable towbar *
372
Trailer Stability Assist (TSA) 374
Ignition modes 375
Battery drain 377
Starting the engine 377
Turning the engine off 379
Drive modes *
379
ECO drive mode 382
Start/Stop 383
Using the Start/Stop function 383
Conditions for Start/Stop 385
Automatic transmission 386
Shiftlock 387
Gear shift indicator 388
Gear selector positions 388
Steering wheel paddles *
390
All Wheel Drive (AWD) 391
Leveling control * and suspension
392
INFOTAINMENT
The infotainment system
394
Apps (applications) 394
Sound settings 395
Radio 396
Radio settings 396
RBDS radio 397
Changing and searching for radio stations 397
HD Radio ™reception
398
Switching HD Radio on and off 400
HD Radio sub-channels 400
HD Radio limitations 401
SiriusXM ®
Satellite radio * 402
Using SiriusXM ®
Satellite radio *403
SiriusXM ®
Satellite radio * settings 404
SiriusXM Travel Link *
405
SiriusXM Travel Link - Weather 407
SiriusXM Travel Link - Alerts 408
SiriusXM Travel Link - Fuel 409
SiriusXM Travel Link - Sports 410
Phone 411
Pairing a cell phone 412
Connecting/disconnecting a cell phone 413
Handling phone calls 414
Page 13 of 552

11
SPECIFICATIONS
Label information524
Dimensions 527
Weights 529
Air conditioning refrigerant 531
Brake fluid specification and volume 531
Coolant specifications 532
Engine specifications 533
Engine oil specifications and volume 535
Fuel tank volume 535
Tire inflation pressure table 536
Transmission fluid specification and volume 537
INDEX
Index 539
Page 96 of 552

INSTRUMENTS AND CONTROLS
* Option/accessory.
94
Instruments and controls
This overview shows the location of the primary displays, and controls/buttons/switches.
Display/function/control
Parking lights, daytime running lights, low beams, high beams, turn signals, front fog lights/corner illumination *, trip com-
puter reset
Transmission manual shifting paddle *
Head-up-display*
Instrument panel
Wipers/washers, rain sensor *
Right-side steering wheel keypad
Display/function/control
Steering wheel adjustment
Horn
Left-side steering wheel keypad
Hood open
Display lighting, tailgate unlock, tailgate open/close*
Display/function/control
Front reading lights and courtesy lighting
Laminated panoramic roof *
Display/function/control
Ceiling console display
Manual rearview mirror auto-dim (certain markets only)
Display/function/control
Center display
Hazard warning flashers, max. defroster/ heated windshield*, media player, glove
compartment open
Gear selector
Start knob
Drive modes *
Page 103 of 552

INSTRUMENTS AND CONTROLS
}}
101
Gate Operator/Canadian Programming
Canadian radio-frequency laws require transmit- ter signals to “time-out” (or quit) after severalseconds of transmission – which may not be longenough for HomeLink to pick up the signal dur-ing programming. Similar to this Canadian law,some U.S. gate operators are designed to “time-out” in the same manner. If you live in Canada or you are having difficulties programming a gate operator or garage dooropener by using the “Programming” procedures, replace “Programming HomeLink” step 3 with the following:
• Continue to press and hold the HomeLink button while you
press and release - every
two seconds (“cycle”) your hand-held trans-
mitter until the HomeLink indicator light changes from a slow to a rapidly blinkinglight. Now you may release both the Home-Link and hand-held transmitter buttons.
Proceed with “Programming” step 4 to complete.
Using HomeLink ®When programming has been completed, HomeLink
®
can be used instead of the original
remote controls. To operate, press and hold the programmed HomeLink ®
button until the trained device begins
to operate 3
(this may take several seconds). The indicator light will glow steadily or flash when the button has been pressed. Activation will nowoccur for the trained device (i.e., garage dooropener, gate operator, security system, entry doorlock, home/office lighting, etc.).
NOTE
If the ignition is switched off, HomeLink will function for 30 minutes after the driver's doorhas been opened.
For convenience, the hand-held transmitter of the device may also be used at any time. In the event that there are still programming diffi- culties or questions, contact HomeLink at:www.HomeLink.com, www.youtube.com/HomeLinkGentex or by phoning the hotline at 1–800–355–3515.
Resetting HomeLink
®
buttonsUse the following procedure to reset (erase pro- gramming) from the three HomeLink ®
buttons
(individual buttons cannot be reset but can be “reprogrammed” as outlined in the following sec-tion): 1. Press and hold HomeLink ®
buttons 1 and 3
for approx. 10 seconds until the indicator light begins to flash green. 2. Release both buttons.
>HomeLink ®
is now in the training (or
learning) mode and can be programmedat any time beginning with “To program HomeLink ®
" above.
Reprogramming a single HomeLink ®
button
To reprogram an individual HomeLink ®
button:
1. Press and hold the desired HomeLink ®
but-
ton. DO NOT release the button.
2. The yellow indicator light will begin to flash after 20 seconds. Without releasing the HomeLink button, proceed with “To program HomeLink ®
" step 1 above.
For questions or comments, contact HomeLink at: www.HomeLink.com, www.youtube.com/HomeLinkGentex or by phoning the hotline at 1–800–355–3515.
FCC (USA) and IC (Canada)This device complies with FCC rules part 15 andIndustry Canada RSS-210. Operation is subjectto the following two conditions: (1) This devicemay not cause harmful interference, and (2) Thisdevice must accept any interference that may bereceived including interference that may causeundesired operation. WARNING: The transmitterhas been tested and complies with FCC and IC
3 Do not hold the button for more than 20 seconds as this will clear the programming of the button.
Page 173 of 552
INSTRUMENTS AND CONTROLS
}}
* Option/accessory.171
Folding down the rear seat backrests
The rear seat backrests are divided into two sec- tions that can be folded down together or sepa-rately.
CAUTION
To help avoid damage to the upholstery, there should be no objects on the rear seat and theseat belt should not be buckled when thebackrest is folded down.
CAUTION
• The integrated booster cushions
* should
be folded down (in the stowed position) before the backrest(s) are folded down
• The center armrest
* should be folded up
into the rear seat backrest before thatsection of the backrest is folded down
• It may be necessary to move the frontseats forward before the rear seat back-rests can be folded down
WARNING
•
When one or more sections of the back- rest is returned to the upright position,check that it is properly locked in place bypushing and pulling it.
• Return the outboard head restraints tothe upright position.
• Long loads should always be securelyanchored to help avoid injury in the eventof a sudden stop.
• Always turn the engine off and apply theparking brake when loading/unloadingthe vehicle.
• Place the transmission in the Park (
P)
position to help prevent inadvertentmovement of the gear selector.
Folding down a section of the backrest
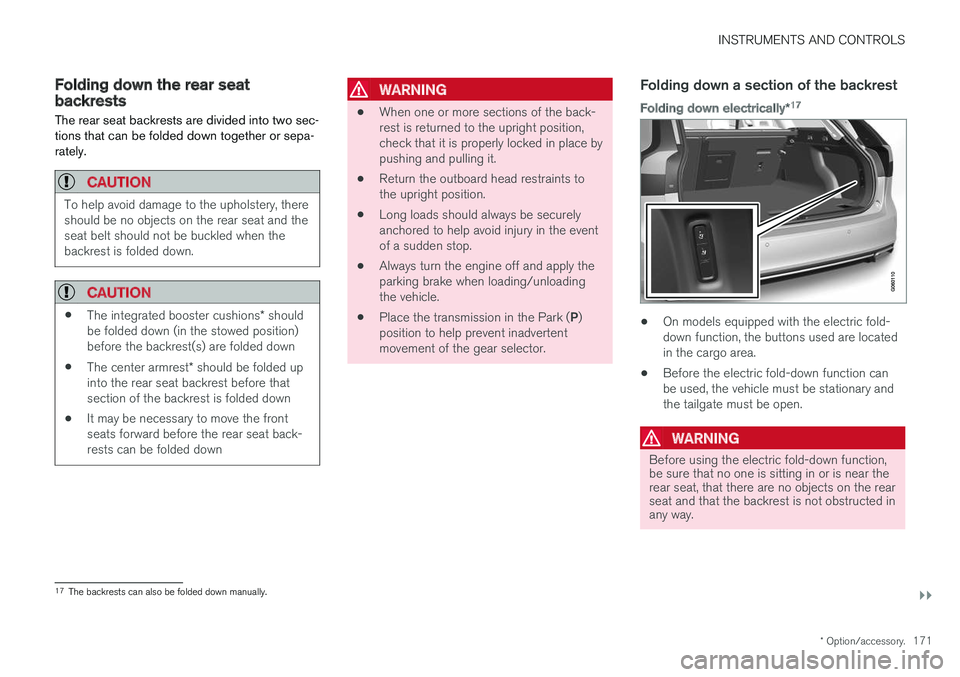
Folding down electrically *17
•
On models equipped with the electric fold- down function, the buttons used are locatedin the cargo area.
• Before the electric fold-down function canbe used, the vehicle must be stationary andthe tailgate must be open.
WARNING
Before using the electric fold-down function, be sure that no one is sitting in or is near therear seat, that there are no objects on the rearseat and that the backrest is not obstructed inany way.
17
The backrests can also be folded down manually.
Page 344 of 552

||
DRIVER SUPPORT
342
NOTE
If a trailer hitch is configured in the vehicle's electrical system, PAP will take the trailerhitch into consideration when determining thenecessary size of a parking space.
ParkingProcedure for parking:
1. The system searches for and measures apossible parking space.
2. The vehicle is steered while it is backing into the parking space.
3. The vehicle's position is adjusted in the park- ing space by moving forward and rearward.
1: Searching and measuring
Parallel parking
Perpendicular parking
PAP searches for a potential parking space and measures it to see if there is sufficient space foryour vehicle. To start this procedure:
1. Tap the
Park In button in
the center display's Function view. If necessary, slow down to:
• a speed below 20 mph (30 km/h) for parallel parking
• approx. 12 mph ( 20 km/h) for perpendicularparking. 2. Keep an eye on the display and be prepared
to stop the vehicle when you are instructedby PAP to do so.
3. Select
Parallel parking or Perpendicular
parking and put the transmission in reverse.
4. Keep an eye on the display and be prepared to stop the vehicle when you are instructed by PAP to do so.
5. Stop the vehicle when instructed to do so.
NOTE
PAP normally searches for available parking spaces along the curb on the right (passeng-er's) side of the vehicle. However, it can alsoassist in finding and parking in spaces on thedriver's side. To do so:
• Activate the left turn signal. PAP will thensearch for a parking space on the leftside of the vehicle.
Page 350 of 552

STARTING AND DRIVING
* Option/accessory.
348
Starting and driving The vehicle is equipped with features that sup- plement its basic functions, such as shifting gears with steering wheel paddles * and the fuel-
conserving start/stop function.
The vehicle is equipped with an automatic trans- mission that also makes it possible to shift gearsmanually. Certain functions can also be used when the engine is not running, depending on the ignitionmode being used.
Related information
• Starting the engine (p. 377)
• Ignition modes (p. 375)
• Automatic transmission (p. 386)
• Opening/closing the fuel filler door (p. 367)
• Start/Stop (p. 383)
• Parking brake (p. 354)
Brakes The brake system is a hydraulic system consist- ing of two separate brake circuits. If a problemshould occur in one of these circuits, it is stillpossible to stop the vehicle with the other brakecircuit.
Brake systemIf one of the brake circuits is not functioning, more pressure will be needed on the brake pedal(and the pedal will go down farther) for normalbraking effect. If the brake pedal must be depressed farther than normal and requires greater foot pressure,the stopping distance will be longer. Pressure on the brake pedal is enhanced by the power braking function. The power brakes only function when the engine is running. If the power brakes are not working, considerably higher pressure will be required on the brakepedal to compensate for the lack of power assis-tance. This can happen for example when towingyour vehicle or if the engine is switched off whenthe vehicle is rolling. The brake pedal feels stifferthan usual. When the Hill Start Assist function is being used, it will take slightly longer for the brake pedal toreturn to its normal position if the vehicle isparked on an incline or uneven surface. When driving in very hilly areas or if the vehicle iscarrying a heavy load, manual gear shifting canbe used for engine braking to augment the brakes. Use the
Off Road drive mode on steep
downgrades to increase the engine braking effect at low speeds.
Anti-lock Braking System ABS
The ABS system helps to improve vehicle control (stopping and steering) during severe brakingconditions by limiting brake lockup. When ABS is operating, there may be some vibration in the brake pedal, which is normal. The system performs a brief self-diagnostic test when the engine has been started and driverreleases the brake pedal. Another automatic testmay be performed when the vehicle first reachesa speed of approximately 6 mph (10 km/h). Thebrake pedal will pulsate several times and asound may be audible from the ABS controlmodule, which is normal.
Cleaning the brake discsCoatings of dirt and water on the brake discsmay result in delayed brake function. This delay isminimized by cleaning the brake linings. Cleaning the brake pads is advisable in wet weather, prior to long-term parking, and after thevehicle has been washed. Do this by braking gen-tly for a short period while the vehicle is moving.
Page 352 of 552

||
STARTING AND DRIVING
* Option/accessory.
350
WARNING
If both symbols illuminate at the same time and the brake level is below the MIN mark in
the reservoir or if a brake system-related mes-sage is shown in the instrument panel: DO
NOT DRIVE . Have the vehicle towed to a
trained and qualified Volvo service technician and have the brake system inspected. If both symbols illuminate at the same time and the brake level is normal (not below the
MIN mark in the reservoir) or if a brake sys-
tem-related message is shown in the instru- ment panel: drive the vehicle carefully to anauthorized Volvo workshop and have thebrake system inspected by a trained andqualified Volvo service technician.
Related information
• Brake functions (p. 350)
• Brake assist system (p. 351)
• Emergency brake lights (p. 352)
Brake functions
The vehicle's standard braking features are aug- mented by a number of auxiliary help functions.
In addition to the wheel brakes and the parking brake, the vehicle is equipped with several auto-matic brake assist functions. These systems helpthe driver by e.g., keeping the vehicle stationarywhen the brake pedal is not depressed (at a traf-fic light or intersection), when starting up a hill orwhen driving down a hill. These systems include: • Auto-hold brakes
• Hill Start Assist
• Braking assist after a collision
• Hill Descent Control
*
Related information
•Brakes (p. 348)
• Parking brake (p. 354)
• Hill Descent Control (HDC) (p. 352)
• Auto-hold brake function (p. 350)
Auto-hold brake function
With the Auto-hold brake function, the driver can release the brake pedal and the brakes willremain applied, for example, when the vehiclehas stopped at a traffic light or intersection.
When the vehicle is no longer moving forward, Auto-hold applies the brakes automatically, eitherusing the normal brakes or the parking brake.The brakes will be released when the acceleratorpedal is depressed. If the driver's door is opened or the engine is turned off, the parking brake will be applied auto-matically. Auto-hold is deactivated when the transmission is in neutral or if the driver's door is open and theseat belt is unbuckled.
Auto-hold control
Auto-hold control and indicator light