2017 TOYOTA TACOMA headlights
[x] Cancel search: headlightsPage 236 of 640
2364-5. Using the driving support systems
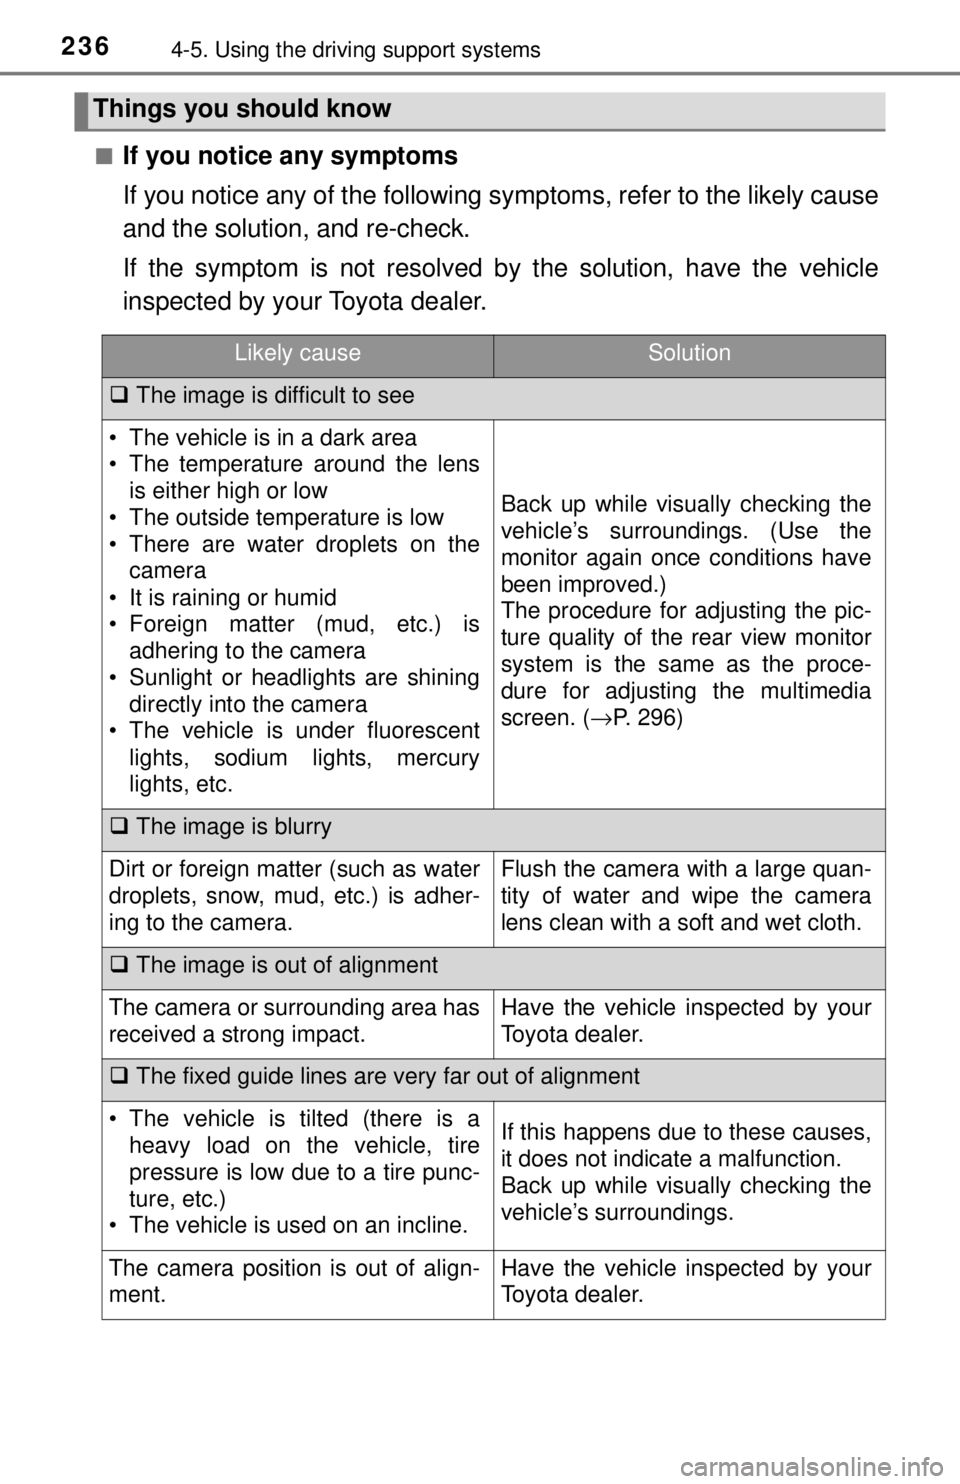
■If you notice any symptoms
If you notice any of the following symptoms, refer to the likely cause
and the solution, and re-check.
If the symptom is not resolved by the solution, have the vehicle
inspected by your Toyota dealer.
Things you should know
Likely causeSolution
The image is difficult to see
• The vehicle is in a dark area
• The temperature around the lens
is either high or low
• The outside temperature is low
• There are water droplets on the camera
• It is raining or humid
• Foreign matter (mud, etc.) is adhering to the camera
• Sunlight or headlights are shining directly into the camera
• The vehicle is under fluorescent
lights, sodium lights, mercury
lights, etc.
Back up while visually checking the
vehicle’s surroundings. (Use the
monitor again once conditions have
been improved.)
The procedure for adjusting the pic-
ture quality of the rear view monitor
system is the same as the proce-
dure for adjusting the multimedia
screen. ( →P. 296)
The image is blurry
Dirt or foreign matter (such as water
droplets, snow, mud, etc.) is adher-
ing to the camera.Flush the camera with a large quan-
tity of water and wipe the camera
lens clean with a soft and wet cloth.
The image is out of alignment
The camera or surrounding area has
received a strong impact.Have the vehicle inspected by your
Toyota dealer.
The fixed guide lines are very far out of alignment
• The vehicle is tilted (there is a
heavy load on the vehicle, tire
pressure is low due to a tire punc-
ture, etc.)
• The vehicle is used on an incline.If this happens due to these causes,
it does not indicate a malfunction.
Back up while visually checking the
vehicle’s surroundings.
The camera position is out of align-
ment.Have the vehicle inspected by your
Toyota dealer.
Page 296 of 640
2965-2. Setup
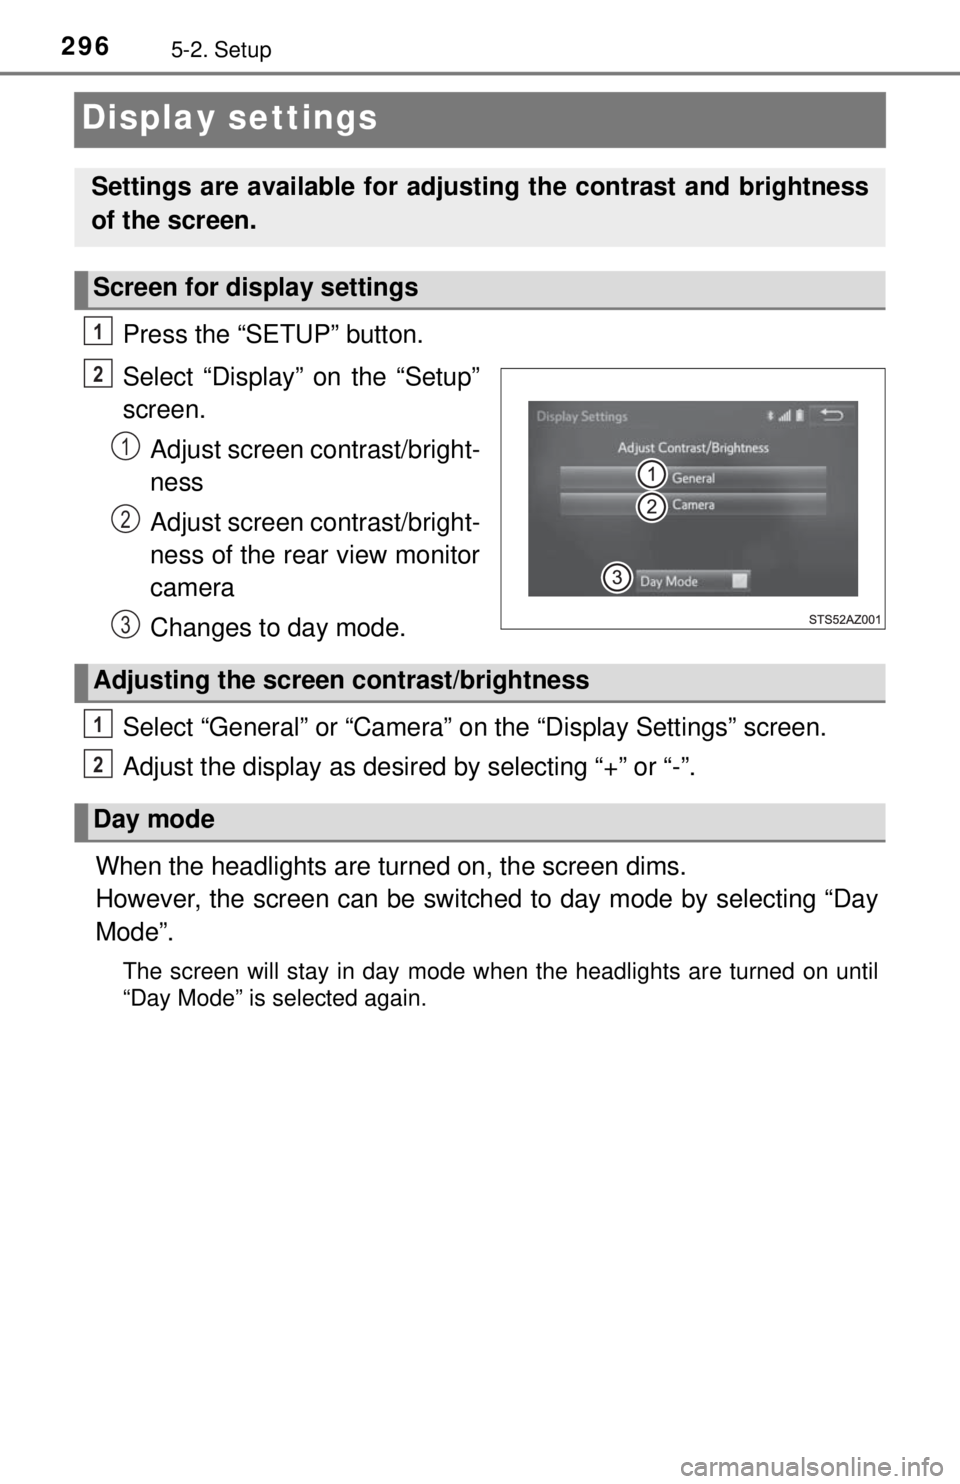
Display settings
Press the “SETUP” button.
Select “Display” on the “Setup”
screen.Adjust screen contrast/bright-
ness
Adjust screen contrast/bright-
ness of the rear view monitor
camera
Changes to day mode.
Select “General” or “Camera” on the “Display Settings” screen.
Adjust the display as desired by selecting “+” or “-”.
When the headlights are tur ned on, the screen dims.
However, the screen can be switch ed to day mode by selecting “Day
Mode”.
The screen will stay in day mode when the headlights are turned on until
“Day Mode” is selected again.
Settings are available for adjusting the contrast and brightness
of the screen.
Screen for display settings
1
2
1
2
3
Adjusting the screen contrast/brightness
Day mode
1
2
Page 415 of 640

4156-4. Other interior features
6
Interior features
■If the engine is started with th e power outlet main switch on
The maximum capacity of the power supply may decrease to below the stan-
dard, or may be cut off completely, even when the vehicle is stationary.
■ The protection circuit may be activated to cut the power supply if any of
the following conditions apply:
● The engine is started with the power outlet main switch on.
● Use of electrical appliances exceeding the maximum capacity is attempted.
A sound may be heard when the protection circuit is activated. This is nor-
mal and does not indicate a malfunction.
● Electrical appliances, which consume power exceeding 100 W, have been
used continuously for a long time period.
● The total power usage by all electrical features (headlights, air conditioning,
etc.) has exceeded the total vehicle maximum for an extended period of
time.
■ If the protection circuit is activated and the power supply is cut, conduct
the following procedure:
Park the vehicle in a safe place, and then securely apply the parking
brake.
Check and ensure the following conditions:
Vehicles with an automatic transmission
The shift lever is in P or N.
Vehicles with a manual transmission
The shift lever is in N and the clutch pedal is not depressed.
Make sure that the power consumption of the electric appliance is within
the maximum capacity of the power outlet and the appliance is not bro-
ken.
Press the power outlet main switch again.
When the cabin temperature is high, open the windows to cool the tempera-
ture down. Once it reaches the normal temperature, turn the power outlet
main switch on again.
If the power supply does not resume even after the above procedure has
been performed, have the vehicle inspected by your Toyota dealer.
1
2
3
4
Page 417 of 640
4176-4. Other interior features
6
Interior features
NOTICE
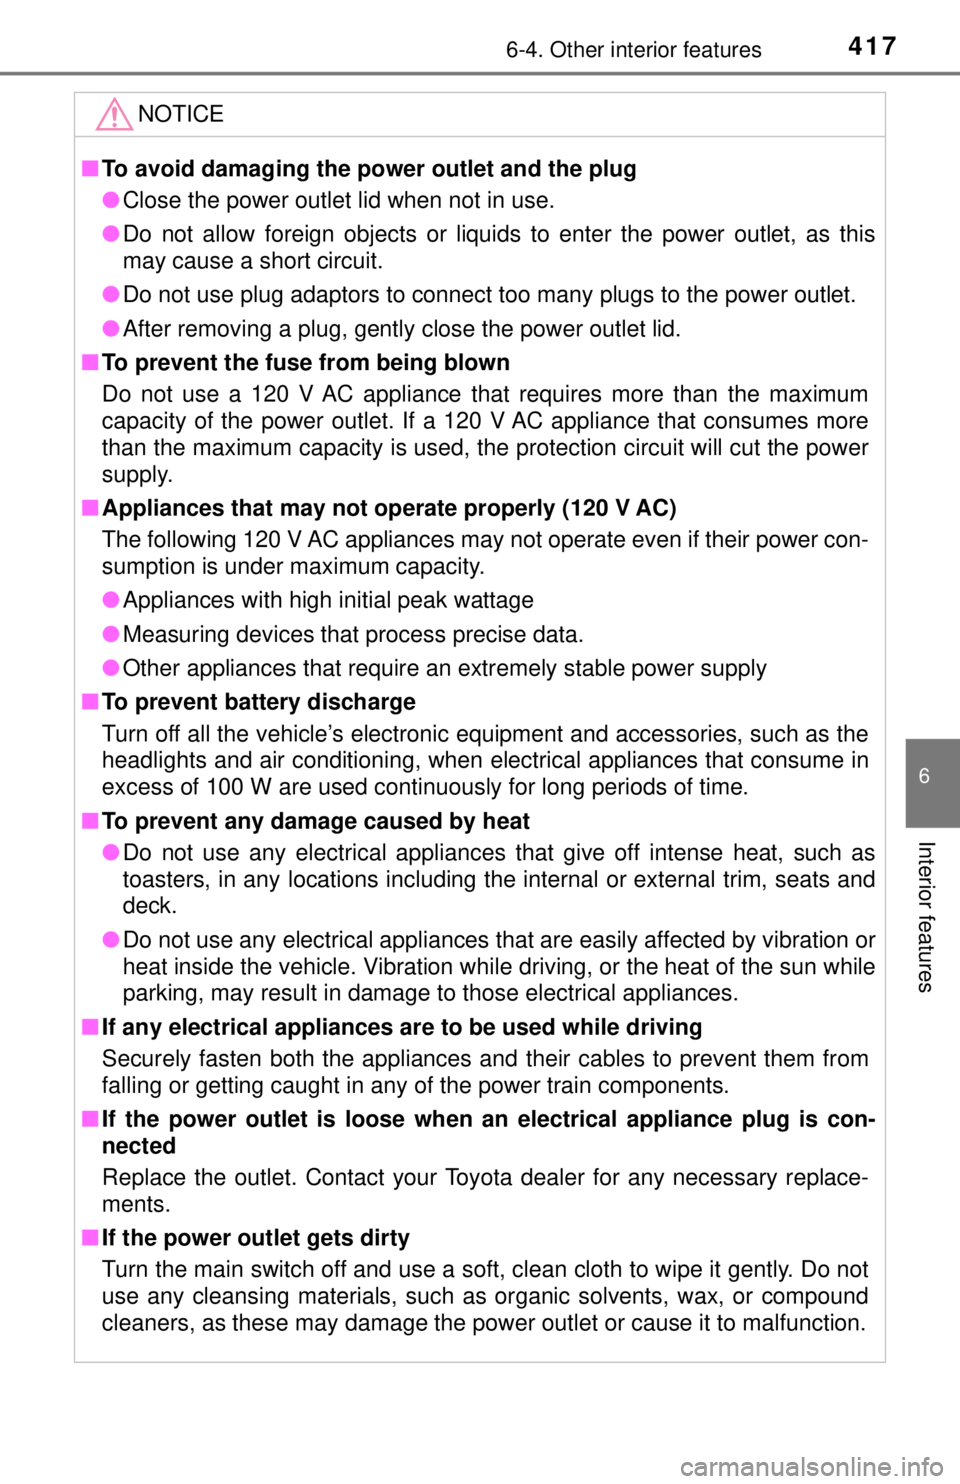
■To avoid damaging the power outlet and the plug
● Close the power outlet lid when not in use.
● Do not allow foreign objects or liquids to enter the power outlet, as this
may cause a short circuit.
● Do not use plug adaptors to connect too many plugs to the power outlet.
● After removing a plug, gently close the power outlet lid.
■ To prevent the fuse from being blown
Do not use a 120 V AC appliance that requires more than the maximum
capacity of the power outlet. If a 120 V AC appliance that consumes more
than the maximum capacity is used, the protection circuit will cut the power
supply.
■ Appliances that may not op erate properly (120 V AC)
The following 120 V AC appliances may not operate even if their power con-
sumption is under maximum capacity.
● Appliances with high initial peak wattage
● Measuring devices that process precise data.
● Other appliances that require an extremely stable power supply
■ To prevent battery discharge
Turn off all the vehicle’s electronic equipment and accessories, such as the
headlights and air conditioning, when elec trical appliances that consume in
excess of 100 W are used continuously for long periods of time.
■ To prevent any damage caused by heat
● Do not use any electrical appliances that give off intense heat, such as
toasters, in any locations including t he internal or external trim, seats and
deck.
● Do not use any electrical appliances that are easily affected by vibration or
heat inside the vehicle. Vibration while driving, or the heat of the sun while
parking, may result in damage to those electrical appliances.
■ If any electrical appliances are to be used while driving
Securely fasten both the appliances and their cables to prevent them from
falling or getting caught in any of the power train components.
■ If the power outlet is loose when an electrical appliance plug is con-
nected
Replace the outlet. Contact your Toyota dealer for any necessary replace-
ments.
■ If the power outlet gets dirty
Turn the main switch off and use a soft, clean cloth to wipe it gently. Do not
use any cleansing materials, such as organic solvents, wax, or compound
cleaners, as these may damage the power outlet or cause it to malfunction.
Page 561 of 640

5618-2. Steps to take in an emergency
8
When trouble arises
■Starting the engine when the batt ery is discharged (vehicles with an
automatic transmission)
The engine cannot be started by push-starting.
■ To prevent battery discharge
●Turn off the headlights and the audio system while the engine is off.
● Turn off any unnecessary electrical components when the vehicle is running
at a low speed for an extended period, such as in heavy traffic.
■ Charging the battery
The electricity stored in the battery will discharge gradually even when the
vehicle is not in use, due to natural discharge and the draining effects of cer-
tain electrical appliances. If the vehicle is left for a long time, the battery may
discharge, and the engine may be unable to start. (The battery recharges
automatically during driving.)
■ When recharging or replacing the battery
●Vehicles with a smart key system: In some cases, it may not be possible to
unlock the doors using the smart key system when the battery is dis-
charged. Use the wireless remote control or the mechanical key to lock or
unlock the doors.
● The engine may not start on the first attempt after the battery has recharged
but will start normally after the second attempt. This is not a malfunction.
● Vehicles with a smart key system: The engine switch mode is memorized by
the vehicle. When the battery is reconnected, the system will return to the
mode it was in before the battery was discharged. Before disconnecting the
battery, turn the engine switch off.
If you are unsure what mode the engine switch was in before the battery dis-
charged, be especially careful when reconnecting the battery.
Page 580 of 640
5809-1. Specifications
*1: If equipped
*2: Bulb type only
*3: Parking lights/daytime running lights are LED type
*4: Vehicles without a cargo lamp
A: H11 halogen bulbs
B: H9 halogen bulbs
C: H16 halogen bulbs
D: Wedge base bulbs (amber) E: Wedge base bulbs (clear)F: Double end bulbs
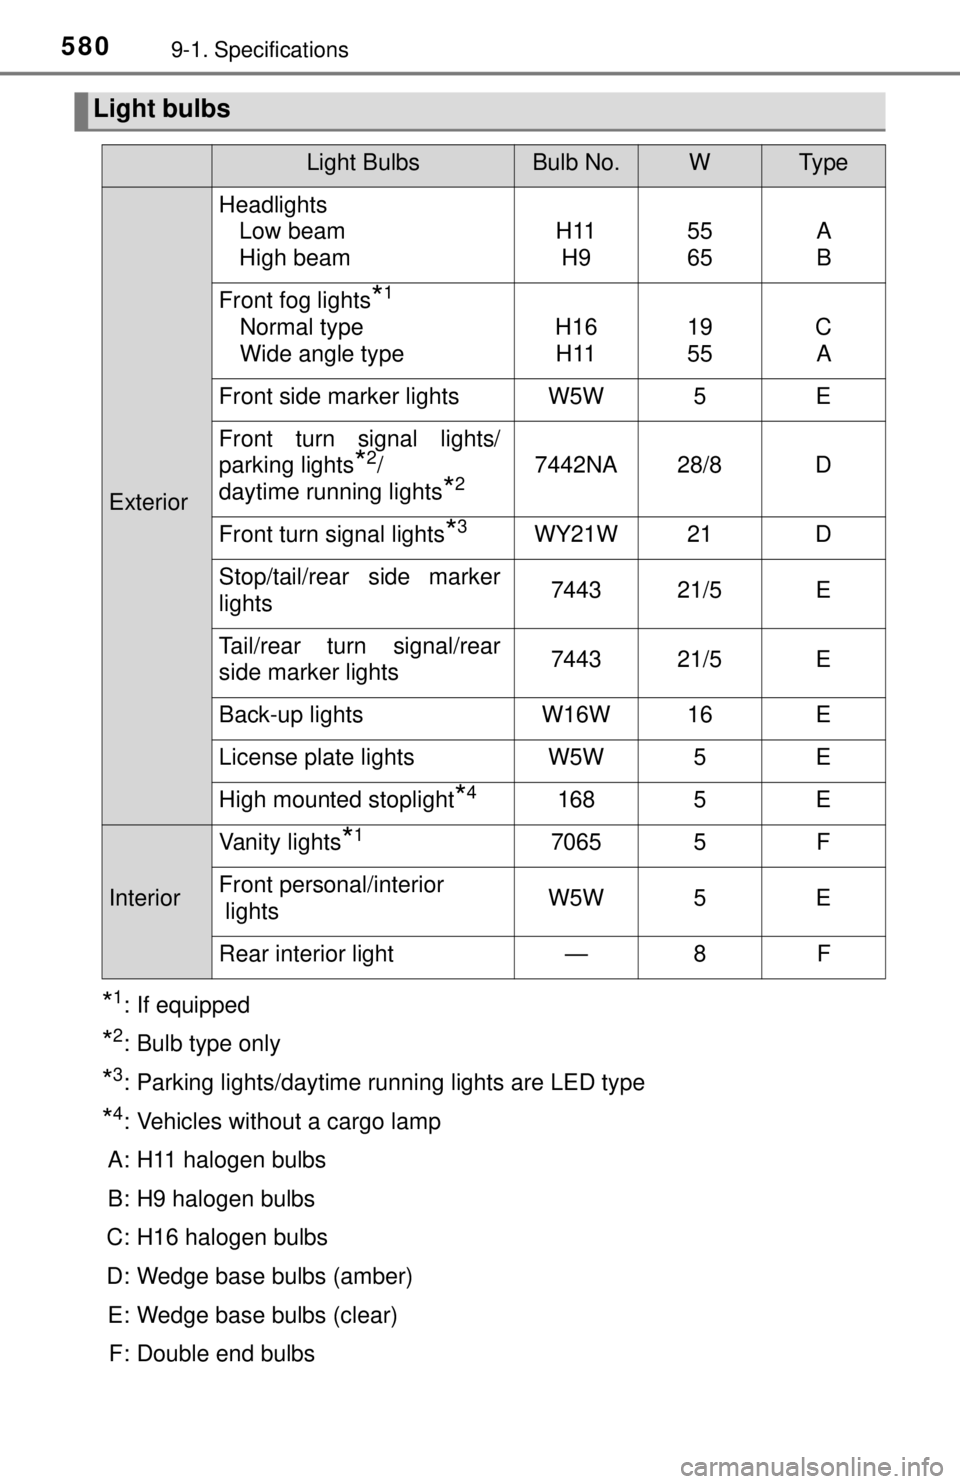
Light bulbs
Light BulbsBulb No.WTy p e
Exterior Headlights
Low beam
High beam H11
H9 55
65 A
B
Front fog lights
*1
Normal type
Wide angle type H16
H11 19
55C
A
Front side marker lights W5W 5 E
Front turn signal lights/
parking lights
*2/
daytime running lights
*27442NA 28/8 D
Front turn signal lights
*3WY21W 21 D
Stop/tail/rear side marker
lights 7443 21/5 E
Tail/rear turn signal/rear
side marker lights 7443 21/5 E
Back-up lights W16W 16 E
License plate lights W5W 5 E
High mounted stoplight
*4168 5 E
Interior Vanity lights
*17065 5 F
Front personal/interior
lights W5W 5 E
Rear interior light — 8 F
Page 600 of 640

6009-2. Customization
■Automatic light off system* (→ P. 206)
*: If equipped
■
Illumination ( →P. 389)
*: Vehicles with a smart key system
■
Intuitive parking assist* ( → P. 223)
*: If equipped
FunctionDefault settingCustomized
setting
Light sensor sensitivity Level 3 Level 1 to 5 — O O
Time elapsed before
headlights automatically
turn off after doors are
closed 30 seconds0 seconds
—O O
60 seconds
90 seconds
123
FunctionDefault settingCustomized
setting
Time elapsed before lights
turn off 15 seconds7.5 seconds
—O O
30 seconds
Operation after the engine
is off On Off — — O
Operation when the doors
are unlocked On Off — — O
Operation when you
approach the vehicle with
the electronic key on your
person
*
On Off — — O
123
FunctionDefault settingCustomized
setting
Detection distance of the
rear center sensor Far Near — O O
Buzzer Volume Level 3 Level 1 to 5 — O O
Display setting All sensors
displayed Display off — O O
123
Page 631 of 640
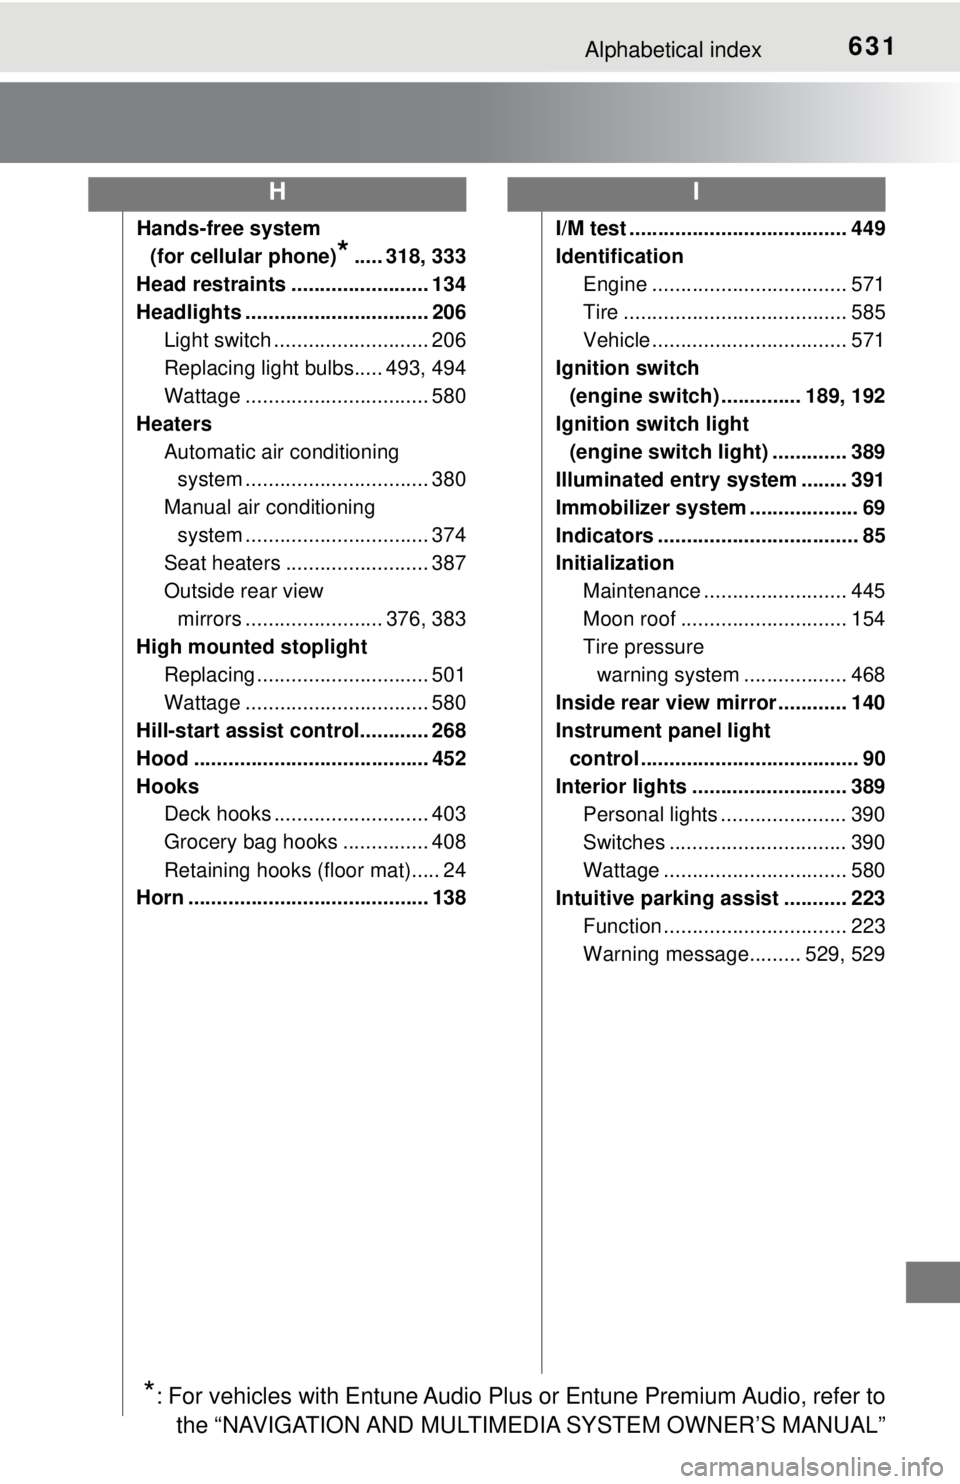
631Alphabetical index
Hands-free system (for cellular phone)
*..... 318, 333
Head restraints ........................ 134
Headlights ................................ 206 Light switch ........................... 206
Replacing light bulbs..... 493, 494
Wattage ................................ 580
Heaters Automatic air conditioning system ......... ....................... 380
Manual air conditioning system ......... ....................... 374
Seat heaters ......................... 387
Outside rear view
mirrors ........................ 376, 383
High mounted stoplight
Replacing .............................. 501
Wattage ................................ 580
Hill-start assist control............ 268
Hood ......................................... 452
Hooks Deck hooks ........................... 403
Grocery bag hooks ............... 408
Retaining hooks (floor mat)..... 24
Horn .......................................... 138 I/M test ...................................... 449
Identification
Engine .................................. 571
Tire ....................................... 585
Vehicle .................................. 571
Ignition switch (engine switch) .............. 189, 192
Ignition switch light (engine switch light) ............. 389
Illuminated entry system ........ 391
Immobilizer system ................... 69
Indicators ................................... 85
Initialization
Maintenance ......................... 445
Moon roof ............................. 154
Tire pressure warning system .... .............. 468
Inside rear view mirror ............ 140
Instrument panel light control ...................................... 90
Interior lights ........................... 389 Personal lights ...................... 390
Switches ............................... 390
Wattage ................................ 580
Intuitive parking assist ........... 223
Function ................................ 223
Warning message......... 529, 529
HI
*: For vehicles with Entune Audio Plus or Entune Premium Audio, refer tothe “NAVIGATION AND MULTIMEDIA SYSTEM OWNER’S MANUAL”