Page 478 of 672

478
SIENNA_OM_OM08007U_(U)
7-2. Maintenance
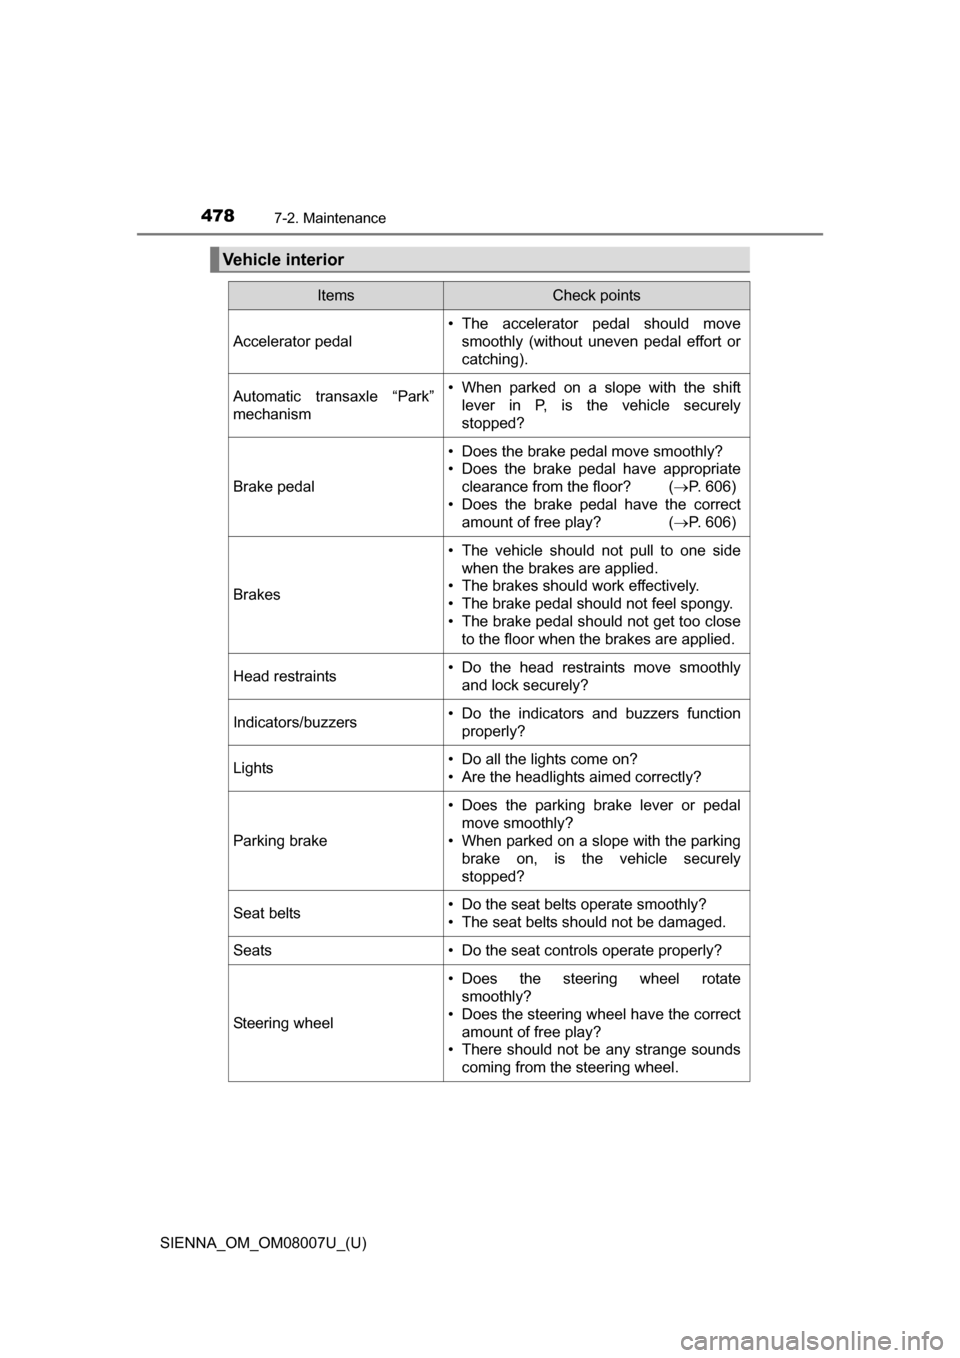
Vehicle interior
ItemsCheck points
Accelerator pedal • The accelerator pedal should move
smoothly (without uneven pedal effort or
catching).
Automatic transaxle “Park”
mechanism• When parked on a slope with the shift
lever in P, is the vehicle securely
stopped?
Brake pedal
• Does the brake pedal move smoothly?
• Does the brake pedal have appropriateclearance from the floor? ( P. 606)
• Does the brake pedal have the correct amount of free play? ( P. 606)
Brakes
• The vehicle should not pull to one side
when the brakes are applied.
• The brakes should work effectively.
• The brake pedal should not feel spongy.
• The brake pedal should not get too close to the floor when the brakes are applied.
Head restraints• Do the head restraints move smoothlyand lock securely?
Indicators/buzzers• Do the indicators and buzzers function
properly?
Lights• Do all the lights come on?
• Are the headlights aimed correctly?
Parking brake
• Does the parking brake lever or pedalmove smoothly?
• When parked on a slope with the parking brake on, is the vehicle securely
stopped?
Seat belts• Do the seat belts operate smoothly?
• The seat belts should not be damaged.
Seats• Do the seat controls operate properly?
Steering wheel
• Does the steering wheel rotatesmoothly?
• Does the steering wheel have the correct amount of free play?
• There should not be any strange sounds
coming from the steering wheel.
Page 521 of 672
SIENNA_OM_OM08007U_(U)
5217-3. Do-it-yourself maintenance
7
Maintenance and care
Install a new light bulb.
Align the 3 tabs on the light bulb
with the mounting, and insert.
Turn and secure the bulb
base.
Install the connector.
Shake the bulb base gently to
check that it is not loose, turn
the headlights on once and visu-
ally confirm that no light is leak-
ing through the mounting.
For left side only: Install the fuse box cover.
4
5
6
7
Page 522 of 672
522
SIENNA_OM_OM08007U_(U)
7-3. Do-it-yourself maintenance
■Headlight high beams and bulb type daytime running lights (if
equipped)
For left side only:
Open the fuse box cover. ( P. 514)
Turn the bulb base counter-
clockwise.
Unplug the connector while
pushing the lock release.
Install a new light bulb.
Align the 3 tabs on the light bulb
with the mounting, and insert.
Turn and secure the bulb
base.
Shake the bulb base gently to
check that it is not loose, turn
the headlights on once and visu-
ally confirm that no light is leak-
ing through the mounting.
For left side only: Install the fuse box cover.
1
2
ITO43P165
P
Q
R
S
Page 532 of 672
532
SIENNA_OM_OM08007U_(U)
7-3. Do-it-yourself maintenance
■Discharge headlights (if equipped)
If voltage to the discharge bulbs is insufficient, the bulbs may not come on, or
may go out temporarily. The discharge bulbs will come on when normal
power is restored.
■ LED lights
The daytime running lights (LED type), parking lights (LED type), stop/tail
(LED type), side turn signal light, r ear side marker lights and high mounted
stoplight consists of a number of LEDs. If any of the LEDs burn out, take your
vehicle to your Toyota dealer to have the light replaced.
■ Condensation build-up on the inside of the lens
Temporary condensation build-up on the inside of the headlight lens does not
indicate a malfunction. Contact your Toyota dealer for more information in the
following situations:
●Large drops of water have built up on the inside of the lens.
● Water has built up inside the headlight.
■ When replacing light bulbs
P. 516
Page 533 of 672

SIENNA_OM_OM08007U_(U)
5337-3. Do-it-yourself maintenance
7
Maintenance and care
WARNING
■Replacing light bulbs
●Turn off the lights. Do not attempt to replace the bulb immediately after
turning off the lights.
The bulbs become very hot and may cause burns.
● Do not touch the glass portion of the light bulb with bare hands. When it is
unavoidable to hold the glass portion, use and hold with a clean dry cloth
to avoid getting moisture and oils on the bulb. Also, if the bulb is scratched
or dropped, it may blow out or crack.
● Fully install light bulbs and any parts used to secure them. Failure to do so
may result in heat damage, fire, or water entering the headlight unit. This
may damage the headlights or cause condensation to build up on the lens.
● Do not attempt to repair or disassemble the bulb, socket, electrical wiring,
or sub components. This may cause serious injury due to electric shock.
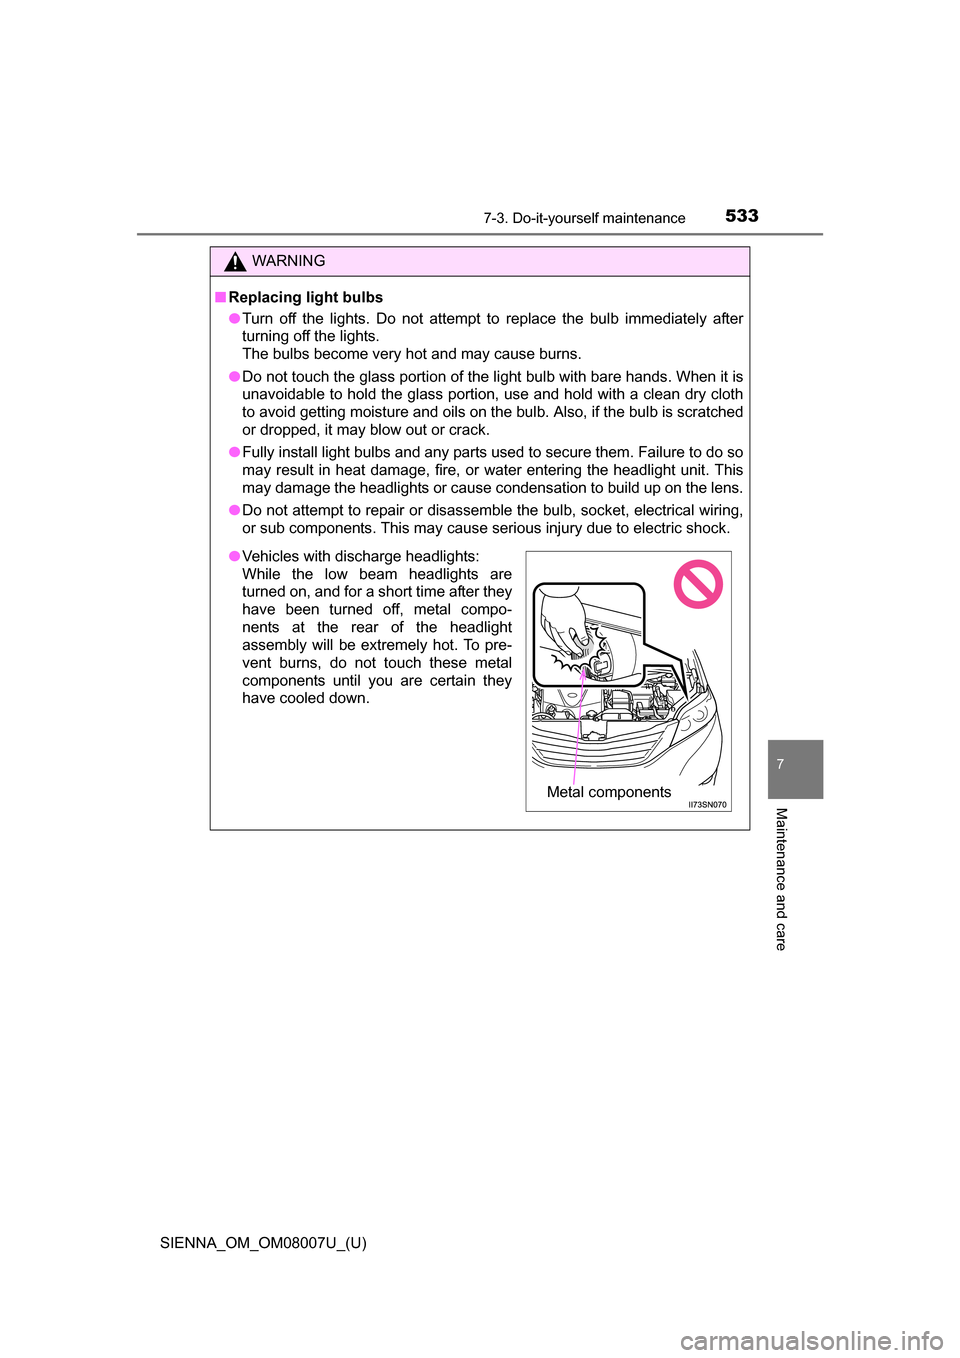
●Vehicles with discharge headlights:
While the low beam headlights are
turned on, and for a short time after they
have been turned off, metal compo-
nents at the rear of the headlight
assembly will be extremely hot. To pre-
vent burns, do not touch these metal
components until you are certain they
have cooled down.
Metal components
Page 534 of 672

534
SIENNA_OM_OM08007U_(U)
7-3. Do-it-yourself maintenance
WARNING
■Discharge headlights (if equipped)
●Contact your Toyota dealer before replacing the discharge headlights
(including light bulbs).
● Do not touch the discharge headlight’s high voltage socket when the head-
lights are turned on.
An extremely high voltage of 30000 V will be discharged and could result
in serious injury or death by electric shock.
● Do not attempt to take apart or repair the low beam headlight bulbs, con-
nectors, power supply circuits, or related components.
Doing so could result in electric shock and death or serious injury.
■ When replacing the rear turn signal lights or stop/tail lights
Inspect the gasket for any damage (rip, tear, hole, etc.). If there is any dam-
age, please contact your Toyota dealer and have the gasket replaced.
Improper installation of the gasket may result in water entering the rear light
unit.
■ To prevent damage or fire
●Make sure bulbs are fully seated and locked.
● Check the wattage of the bulb before installing to prevent heat damage.
NOTICE
■When installing the back door trim
To prevent damage, be careful not to pinch any of the wire harnesses or
connectors with the back door trim.
Page 592 of 672
5928-2. Steps to take in an emergency
SIENNA_OM_OM08007U_(U)
■Starting the engine when the battery is discharged
The engine cannot be started by push-starting.
■ To prevent battery discharge
●Turn off the headlights and the audio system while the engine is off.
● Turn off any unnecessary electrical components when the vehicle is running
at a low speed for an extended period, such as in heavy traffic.
■ When the battery is removed or discharged
●The power sliding door (if equipped) must be initialized. ( P. 128)
● The power back door (if equipped) must be initialized. ( P. 138)
■ Charging the battery
The electricity stored in the battery will discharge gradually even when the
vehicle is not in use, due to natural discharge and the draining effects of cer-
tain electrical appliances. If the vehicle is left for a long time, the battery may
discharge, and the engine may be unable to start. (The battery recharges
automatically during driving.)
Page 608 of 672

608
SIENNA_OM_OM08007U_(U)
9-1. Specifications
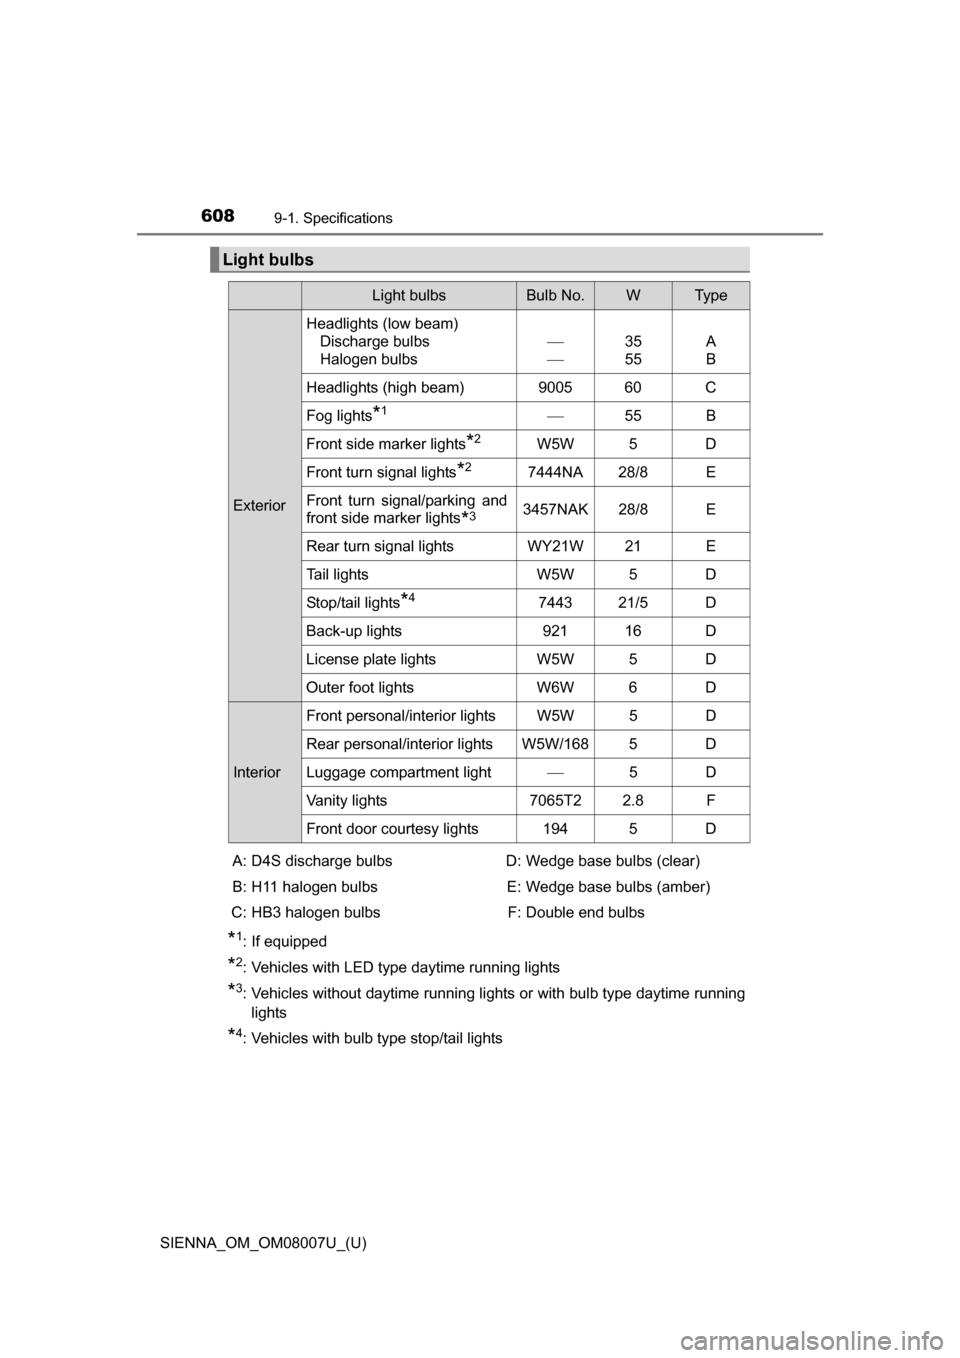
Light bulbs
Light bulbsBulb No.WTy p e
ExteriorHeadlights (low beam)
Discharge bulbs
Halogen bulbs
35
55 A
B
Headlights (high beam) 9005 60 C
Fog lights
*1 55 B
Front side marker lights
*2W5W 5 D
Front turn signal lights
*27444NA 28/8 E
Front turn signal/parking and
front side marker lights
*33457NAK 28/8 E
Rear turn signal lights WY21W 21 E
Tail lights W5W 5 D
Stop/tail lights
*47443 21/5 D
Back-up lights 921 16 D
License plate lights W5W 5 D
Outer foot lights W6W 6 D
InteriorFront personal/interior lights W5W 5 D
Rear personal/interior lights W5W/168 5 D
Luggage compartment light
5D
Vanity lights 7065T2 2.8 F
Front door courtesy lights 194 5 D
A: D4S discharge bulbs
B: H11 halogen bulbs
C: HB3 halogen bulbs D: Wedge base bulbs (clear)
E: Wedge base bulbs (amber) F: Double end bulbs
*1: If equipped
*2: Vehicles with LED type daytime running lights
*3: Vehicles without daytime running li ghts or with bulb type daytime running
lights
*4: Vehicles with bulb type stop/tail lights