2017 TOYOTA PROACE VERSO fuse box
[x] Cancel search: fuse boxPage 3 of 504

.
.
Driving recommendations 192Starting-switching off the engine, manual key, remote control 195Starting and switching off the engine, 198"Smart Entry & Start System" 198Parking brake 201Hill start assist control (HAC) 2025-speed manual gearbox 2036-speed manual gearbox 203Gear shift indicator 204Automatic gearbox 205Electronic gearbox 210Stop & Start 214Head-up display 218Adjustable Speed Limiter (ASL) 220Road Sign Assist 221Speed limiter 225Cruise control 228Adaptive cruise control 232For ward collision warning and Autonomous emergency braking system with Pedestrian Detection 239Lane Departure Alert 245Driver Attention Alert 247Blind spot monitoring system 249Parking sensors 252Reversing camera, interior mirror 254180° rear vision 255Tyre Pressure Warning System (TPWS) 258
Fuel tank 261Diesel misfuel prevention 262Snow chains 264Towing a trailer 265Energy economy mode 266Accessories 267Roof bars / Roof rack 268Changing a wiper blade 269B o nnet 271Diesel engine 272Checking levels 273Checks 276AdBlue® and SCR system (Diesel) 278
Warning triangle (stowing) 282Tool box 282Temporary puncture repair kit 285Changing a wheel 291Changing a bulb 298Changing a fuse 31112 V battery 316To w i n g 3 2 0Running out of fuel (Diesel) 322
Dimensions 323Engines 324Weights 324Identification markings 327
DrivingPractical information
In the event of a breakdown
Technical data
Emergency or assistance 328Toyota Pro Touch with navigation system 331To y o t a P r o To u c h 419Toyota Radio Bluetooth 473
Audio and telematics
Alphabetical index
Contents
Page 6 of 504

6
Instruments and
controls
Courtesy lamps 140Interior mood lighting 153- courtesy lamp- panoramic roofRear view mirror 143Reversing camera on interior mirror 254ERA-GLONASS emergency call system 158, 328 -329
12 V accessory socket 113USB port - JACK auxiliary socket 113 -114Deactivating the passenger front a i r b a g 170, 176
5/6-speed manual gearbox 203Gear shift indicator 204Automatic gearbox 205-209Electronic gearbox 210-213Stop & Start 214-217Hill start assist control 202
Manual air conditioning 125-126Dual-zone air conditioning 127-130Rear heating, air conditioning 136Air recirculation 125, 130Front demist - defrost 131Rear screen demist - def rost 13 3
Parking brake 201
Opening the bonnet 271
Dashboard fuses 311-314
Touch screen (Toyota Pro Touch with navigation system) 41- 43, 331- 418Touch screen (Toyota Pro To u c h) 41- 4 3 , 419 - 47 2
Toyota Radio Bluetooth 44, 473 - 495
Air vents 134
Setting the date and time 44
Over view
Page 267 of 504

267
Accessories
A wide range of accessories and genuine parts is available from the Toyota dealer network.These accessories and parts are all suitable for your vehicle and benefit from Toyota's recommendation and warranty.
"Comfort"
Door deflectors, cigarette lighter, boot dividers, coat hanger fixed to head restraint, front and rear parking sensors, styling mudflaps, boot management system, ...
"Transport solutions"
Boot liners, roof bars, bicycle carrier on roof bars, ski carrier, roof box, towbar harness, ...Tow bar, which must be fitted by an authorized Toyota dealer or repairer, or another duly qualified and equipped professional.
"Styling"
Wheel trims, wheel caps, door sills, gear lever knobs, ...
"Security and safety"
Anti-theft alarm, window engraving, wheel security bolts, child seats, breathalyzer, first aid kit, warning triangle, high visibility jacket, stolen
vehicle tracking system, fleet management unit, snow chains, tyre snow socks, front foglamps kit, ...
"Protection"
Mats*, seat covers compatible with lateral airbags, mud flaps, side protection rubbing strips, bumper protectors, loading area protection (on wood or plastic), rear sill finishers, rear mat, ...
The fitting of electrical equipment or accessories which are not recommended by Toyota may result in a failure of your vehicle's electronic system and excessive electrical consumption.Contact a Toyota dealer for information on the range of recommended equipment and accessories.
Installation of radio communication transmitters
Before installing any after-market radio communication transmitter, you can contact a Toyota dealer for the specification of transmitters which can be fitted (frequency, maximum power, aerial position, specific installation requirements), in line with the Vehicle Electromagnetic Compatibility Directive (2004/104/EC).
Depending on the legislation in force in the country, certain safety equipment may be compulsory: high visibility safety vests, warning triangles, breathalyzers, spare bulbs, spare fuses,
fire extinguisher, first aid kit, mud flaps at the rear of the vehicle.* To avoid any risk of jamming of the pedals:- ensure that the mat is positioned and secured correctly,- never fit one mat on top of another.
7
Practical information
Page 272 of 504

272
* According to engine.
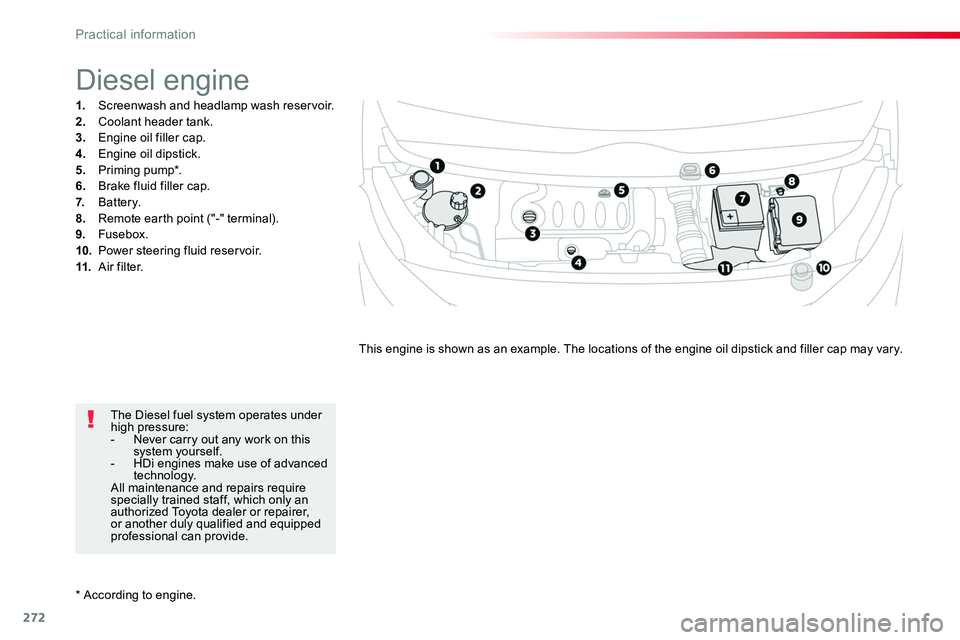
Diesel engine
1. Screenwash and headlamp wash reservoir.2. Coolant header tank.3. Engine oil filler cap.4. Engine oil dipstick.5. Priming pump*.6. Brake fluid filler cap.7. Battery.8. Remote earth point ("-" terminal).
9. Fusebox.10. Power steering fluid reservoir.11. A i r f i l t e r.
This engine is shown as an example. The locations of the engine oil dipstick and filler cap may vary.
The Diesel fuel system operates under high pressure:- Never carry out any work on this system yourself.- HDi engines make use of advanced technology.All maintenance and repairs require specially trained staff, which only an authorized Toyota dealer or repairer, or another duly qualified and equipped professional can provide.
Practical information
Page 311 of 504

311
F Unclip the cover by pulling at the top left, then right.F Disengage the cover completely and turn it over.
GoodFailed
Tw e e z e r
Access to the tools
F Take the tweezer from its housing.
The extraction tweezer is located behind the fusebox cover, on the dashboard pillar.
Before changing a fuse:F the cause of the failure must be identified and rectified,F all electrical consumers must be switched off,F the vehicle must be immobilised with the ignition off,F identify the failed fuse using the tables and layout drawings in the following pages.
Changing a fuse
To replace a fuse, you must:F use the special tweezer to extract the fuse from its housing and check the condition of its filament.F always replace the failed fuse with a fuse of the same rating (same colour); using a different rating could cause faults (risk of f i r e).If the fuse fails again soon after replacement, have the vehicle's electrical system checked by an authorized Toyota dealer or repairer, or another duly qualified and equipped professional.
The replacement of a fuse not shown in the tables below may cause a serious malfunction of your vehicle. Contact an authorized Toyota dealer or repairer, or another duly qualified and equipped professional.
Changing a fuse
8
In the event of a breakdown
Page 312 of 504

312
Toyota will not accept responsibility for the cost incurred in repairing your vehicle or for rectifying malfunctions resulting from the installation of accessories not supplied and not recommended by Toyota and not installed in accordance with its instructions, in particular when the combined consumption of all of the additional equipment connected exceeds 10 milliamperes.
Installing electrical accessories
Your vehicle's electrical system is designed to operate with standard or optional equipment.Before installing other electrical equipment or accessories on your vehicle, contact an authorized Toyota dealer or repairer, or another duly qualified and equipped professional.
For more information on installing a towbar or equipment of the TA XI type, contact a Toyota dealer.
Dashboard fuses
The fusebox is placed in the lower dashboard (left-hand side).
Access to the fuses
F Unclip the cover by pulling at top left, then right.
In the event of a breakdown
Page 314 of 504

314
FuseN°Rating(A)Functions
F13Smart Entry & Start System or ignition switch.
F55Touch screen, reversing camera and parking sensors.
F710Rear air conditioning controls, Hi-Fi amplifier.
F820Single or double rear wiper.
F10/F1130Front and rear, exterior, interior locks.
F123Alarm.
F1710Rear 12 V accessory socket.
F185ERA-GLONASS emergency call system.
F213Torch charger, rear courtesy lamp.
F223Glove box lamp, rear courtesy lamps.
F235Blind spot monitoring system, door mirror electric controls.
F245Steering mounted controls.
F255Headlamp beam height control.
F263Seat belt unfastened or not fastened display screen.
F273Rain and sunshine sensor, multifunction detection camera.
F2810Front air conditioning controls, radio controls, gear lever, head-up display.
F30A or B15Audio system (battery +).
F315Airbags.
F3315Front 12 V accessory socket.
F355Instrument panel.
F3620Audio system, touch screen, CD player, navigation.
Version 2 (Full)
The fuses described hereafter vary according to the equipment in your vehicle.
In the event of a breakdown
Page 315 of 504

315
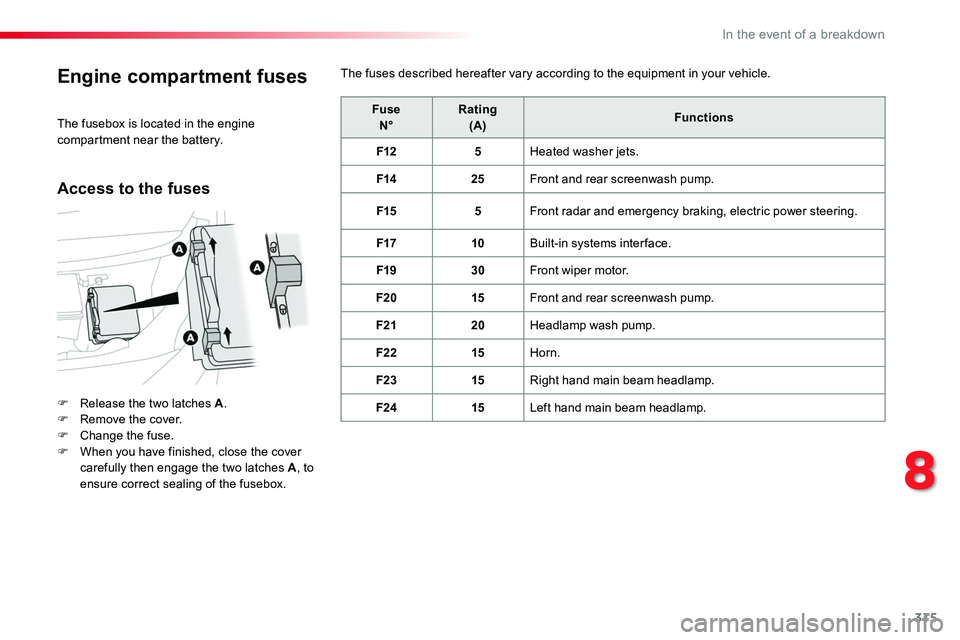
Engine compartment fuses
F Release the two latches A.F Remove the cover.F Change the fuse.F When you have finished, close the cover carefully then engage the two latches A, to ensure correct sealing of the fusebox.
FuseN°Rating(A)Functions
F125Heated washer jets.
F1425Front and rear screenwash pump.
F155Front radar and emergency braking, electric power steering.
F1710Built-in systems inter face.
F1930Front wiper motor.
F2015Front and rear screenwash pump.
F2120Headlamp wash pump.
F2215Horn.
F2315Right hand main beam headlamp.
F2415Left hand main beam headlamp.
The fusebox is located in the engine compartment near the battery.
The fuses described hereafter vary according to the equipment in your vehicle.
Access to the fuses
8
In the event of a breakdown