Page 161 of 784
PRIUS PRIME_OM_OM47A88U_(U)
1612-2. Charging
2
Plug-in hybrid system
■How to read the “Charge Schedule” screen
Charge schedules (calendar display)
Displays the week-long registered charge schedule in a list using icons.
“Add” button
Press to add a new item to the charge schedule. (→P. 162)
Charge schedules (list display)
A list of items on the registered charge schedule is displayed. If there are
more than 3 registered items, the list can be scrolled up and down to
change the displayed items.
“Edit” button
Press to change or delete registered items on the charge schedule.
(→P. 164)
Return button
Press to close the “Charge Schedule” screen.
Charge schedules (icon display)
When an item is registered on the charge schedule, an icon is displayed
on the calendar.
“Charge Now” button
Press to set “Charge Now” to on. ( →P. 165)
1
2
3
4
5
6
7
Page 162 of 784

162
PRIUS PRIME_OM_OM47A88U_(U)
2-2. Charging
“ON”/“OFF” button
The charge schedule switches between “ON” and “OFF” each time this
button is pressed. (→P. 164)
Scroll bar
When the number of registered charge schedules exceeds 3, the dis-
played contents can be changed by operating the button.
Main content displayed on the calendar:
*1: A row with a red line indicates the current time.
*2: While a registered setting is being changed, the icon of the related setting
is highlighted (except when the icon overlaps with another icon).
*3: When “Charge Now” ( →P. 165) is set to on, the orange icon moves to the
position of the red line and changes to display “Charge Now”.
*4: The content of the charge schedule that corresponds to the “Next Charging
Event” is not displayed in the list.
■
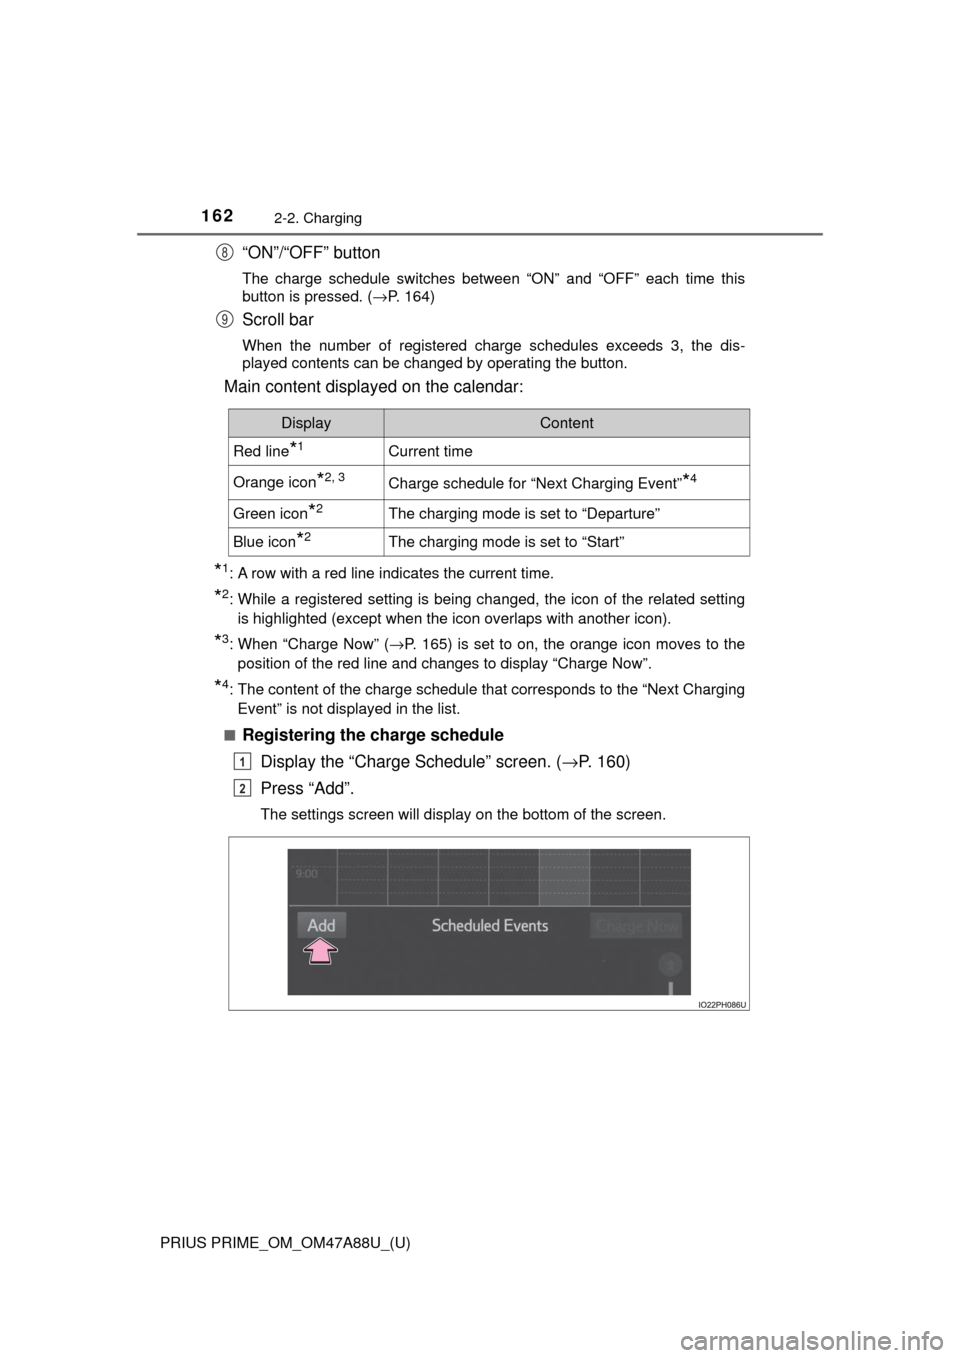
Registering the charge schedule Display the “Charge Schedule” screen. ( →P. 160)
Press “Add”.
The settings screen will display on the bottom of the screen.
8
9
DisplayContent
Red line*1Current time
Orange icon*2, 3Charge schedule for “Next Charging Event”*4
Green icon*2The charging mode is set to “Departure”
Blue icon*2The charging mode is set to “Start”
1
2
Page 164 of 784

164
PRIUS PRIME_OM_OM47A88U_(U)
2-2. Charging
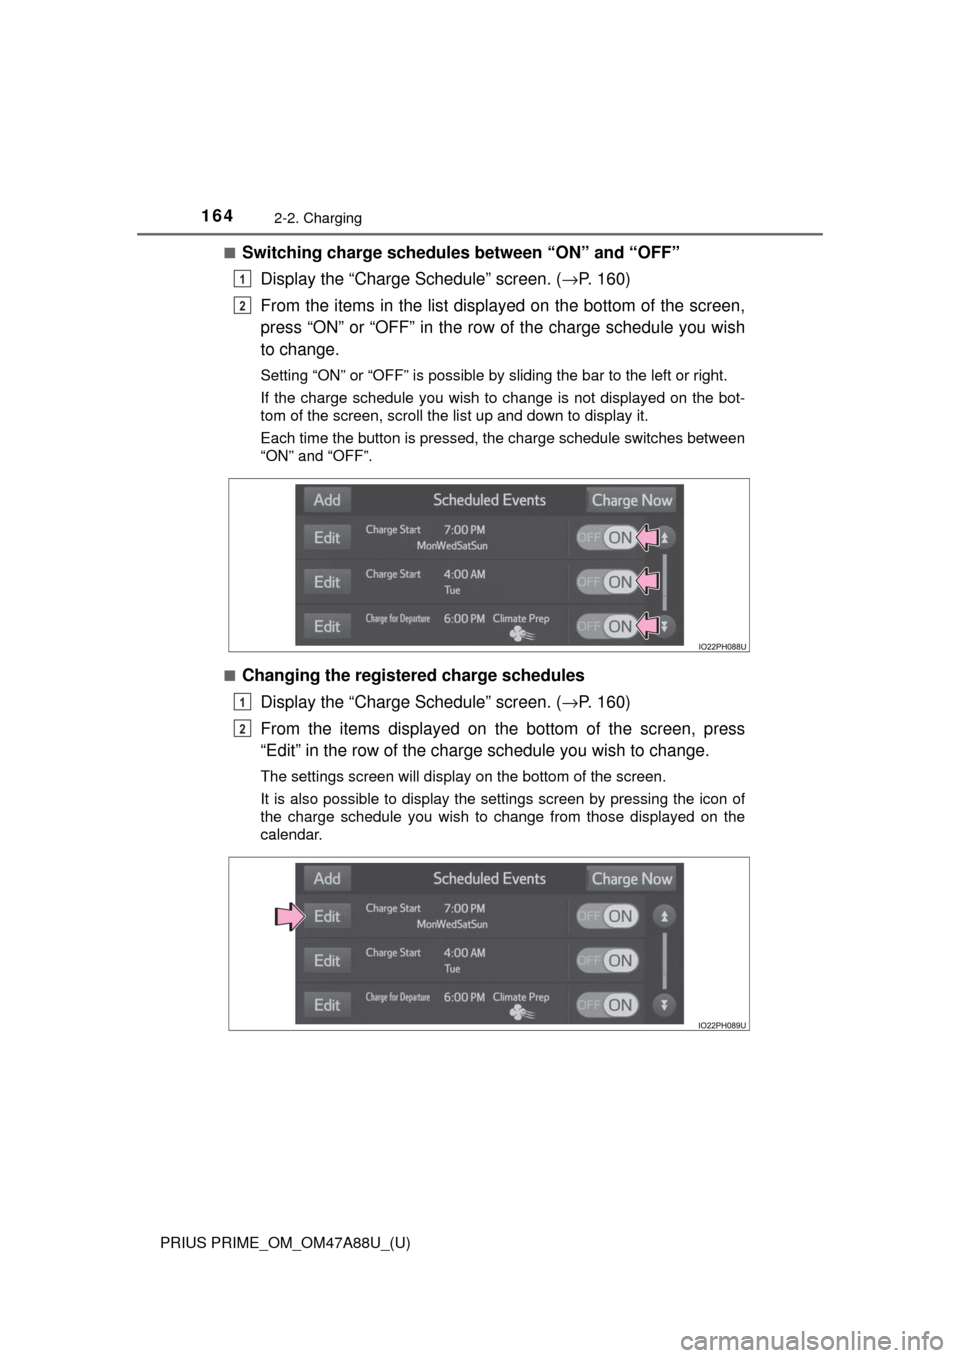
■Switching charge schedules between “ON” and “OFF”Display the “Charge Schedule” screen. ( →P. 160)
From the items in the list displayed on the bottom of the screen,
press “ON” or “OFF” in the row of the charge schedule you wish
to change.
Setting “ON” or “OFF” is possible by sliding the bar to the left or right.
If the charge schedule you wish to change is not displayed on the bot-
tom of the screen, scroll the list up and down to display it.
Each time the button is pressed, the charge schedule switches between
“ON” and “OFF”.
■
Changing the registered charge schedules Display the “Charge Schedule” screen. ( →P. 160)
From the items displayed on the bottom of the screen, press
“Edit” in the row of the charge schedule you wish to change.
The settings screen will display on the bottom of the screen.
It is also possible to display the settings screen by pressing the icon of
the charge schedule you wish to change from those displayed on the
calendar.
1
2
1
2
Page 165 of 784
PRIUS PRIME_OM_OM47A88U_(U)
1652-2. Charging
2
Plug-in hybrid system
●Changing registered items:
Change the desired settings as described in step to step of
the “Registering the charge schedule” procedure. ( →P. 162)
When a setting is changed, its icon on the calendar also changes.
● Deleting registered items:
Press “Delete”.
A deletion confirmation message will display.
Press “Yes” to delete the selected charge schedule.
To cancel deletion, press “No”.
When a charge schedule is deleted, its icon is also deleted from the cal-
endar.
■
Turning “Charge Now” on
The “Charge Now” setting can be changed by performing one of the
two following procedures.
Operations on “Charge Schedule” screen
Display the “Charge Schedule” screen. ( →P. 160)
Press “Charge Now”.
Each time the button is pressed, “Charge Now” switches between on
and off and the indicator on the button turns on and off.
37
1
2
Page 186 of 784

186
PRIUS PRIME_OM_OM47A88U_(U)
3. Instrument cluster
■The meters and display illuminate when
The power switch is in ON mode.
■ Adjusting the instrument cluster brightness (→P. 182)
● The brightness levels that can be selected differ depending on whether the
tail lights are on and surrounding brightness levels, as shown in the table
below.
*: 22 levels of the brightness are displayed on the setting screen. However,
the brightness setting will be the brightest when other than 1st level (the
darkest) is selected. If other than 1st or 22nd level is selected, when the
tail lights are turned on in a dark place, the instrument cluster brightness
setting will be the selected level.
● If the taillights are illuminated in a dark environment, the instrument cluster
light dims. However, when the brightness of the instrument cluster is set to
minimum or maximum (1st or 22nd level of the instrument cluster bright-
ness), even if the taillights are illuminated, the instrument cluster light will
not dim.
■ When disconnecting and reconnect ing 12-volt battery terminals
The settings of the clock will be reset.
■ Calendar settings
●Until the calendar settings are set, the check screen is displayed every time
the power switch is turned to ON mode.
● After the calendar information is set, it can be changed in the “Meter Cus-
tomize” settings. ( →P. 233)
The tail lights are offThe tail lights are on
In a bright place2 levels*2 levels*
In a dark place22 levels
If calendar recording is interrupted due to
replacement of the 12-volt battery or 12-
volt battery discharge, etc., when the
power switch is turned to ON mode after
maintenance, the calendar settings check
screen is automatically displayed on the
multi-information display.
● If date information is not set, the electric-
ity and fuel consumption record cannot
be stored correctly. When the calendar
settings check screen is displayed,
make sure to always set the settings.
(→P. 231)
Page 224 of 784
224
PRIUS PRIME_OM_OM47A88U_(U)
3. Instrument cluster
■Checking history
When each screen is selected, past records from the following
ranges can be displayed by pressing or of the meter con-
trol switches.
●If the above number of records is exceeded, the oldest informa-
tion is deleted.
● To reset the history, perform “History Reset” in the “Meter Cus-
tomize” settings ( →P. 233). (“Daily” and “Monthly” information
can be reset independently.)
■ Calendar settings
→P. 236
Displayed screenDisplayed informationStored information
“Daily”
4 reports
Up to 32 reports
(8 screens)
“Monthly”Up to 24 reports (6 screens)
Page 234 of 784
234
PRIUS PRIME_OM_OM47A88U_(U)
3. Instrument cluster
“Pop-up Display
On/Off”
“Navigation”*2“On”
Turns the pop-up display of the
selected item on the multi-
information display on and off.
“Off”
“Instrument
Panel Light”“On”
“Off”
“Climate
Settings”“On”
“Off”
“Cruise
Control
Operation
Display”“On”
“Off”
“HUD
Settings”
*2
“On”
“Off”
“Driving Mode
Select”
“On”
“Off”
“Multimedia
Menu”
*2
“On”
“Off”
“Traction
Battery
Cooler”“On”
“Off”
“Speed
Limit”
*2, 3
(
→ P. 243)
“Off”Switches the operation con-
tents of the speed limit func-
tion.
“Only Display”
“With Caution”
“Language”
“English” (English)
Switches the language dis-
played on the screen.“Français” (French)
“Español” (Spanish)
“Calendar”
Month/Day/Year*4Changes the date used to
record electricity and fuel con-
sumption data.
Day/Month/Year*5
ItemSettingsSetting result
Page 236 of 784
236
PRIUS PRIME_OM_OM47A88U_(U)
3. Instrument cluster
■Setting items
●“Meter Customize” and “Vehicle Settings” setting items are not selectable
during driving and cannot be operated.
Also, the settings screen is temporarily canceled in the following situations.
• A warning message is displayed.
• The vehicle starts off.
● Settings for functions not equipped to the vehicle are not displayed.
● When a function is turned off, the related settings for that function are not
selectable.
■ Calendar settings
Calendar settings contents are linked to the recorded information of “\
Eco-
Diary” ( →P. 223). When the calendar date is changed, “Eco-Diary” record is
processed as follows:
*: Month/date information not recorded is set to “0” or “0.0”.
Contents of date change“Eco-Diary” record
Date changed to future dateNot cleared*
Date changed to before last monthAll cleared
Date changed to earlier date within
current monthOnly “Daily” data cleared