Page 394 of 796
394
PRIUS_OM_OM47B54U_(U)
4-5. Using the driving support systems
■Area displayed on screen
The rear view monitor system
displays an image of the view
from the bumper of the rear
area of the vehicle.
The image adjustment proce-
dure for the rear view monitor
system screen is the same as
the procedure for adjusting the
screen. (→P. 430)
• The area displayed on the
screen may vary according to
vehicle orientation conditions.
• Objects which are close to either corner of the bumper or under
the bumper cannot be dis-
played.
• The camera uses a special lens. The distance of the image that appears
on the screen differs from the actual distance.
• Items which are located higher than the camera may not be displayed on the monitor.
Rear view monitor system precautions
Corners of bumper
Page 395 of 796

PRIUS_OM_OM47B54U_(U)
3954-5. Using the driving support systems
4
Driving
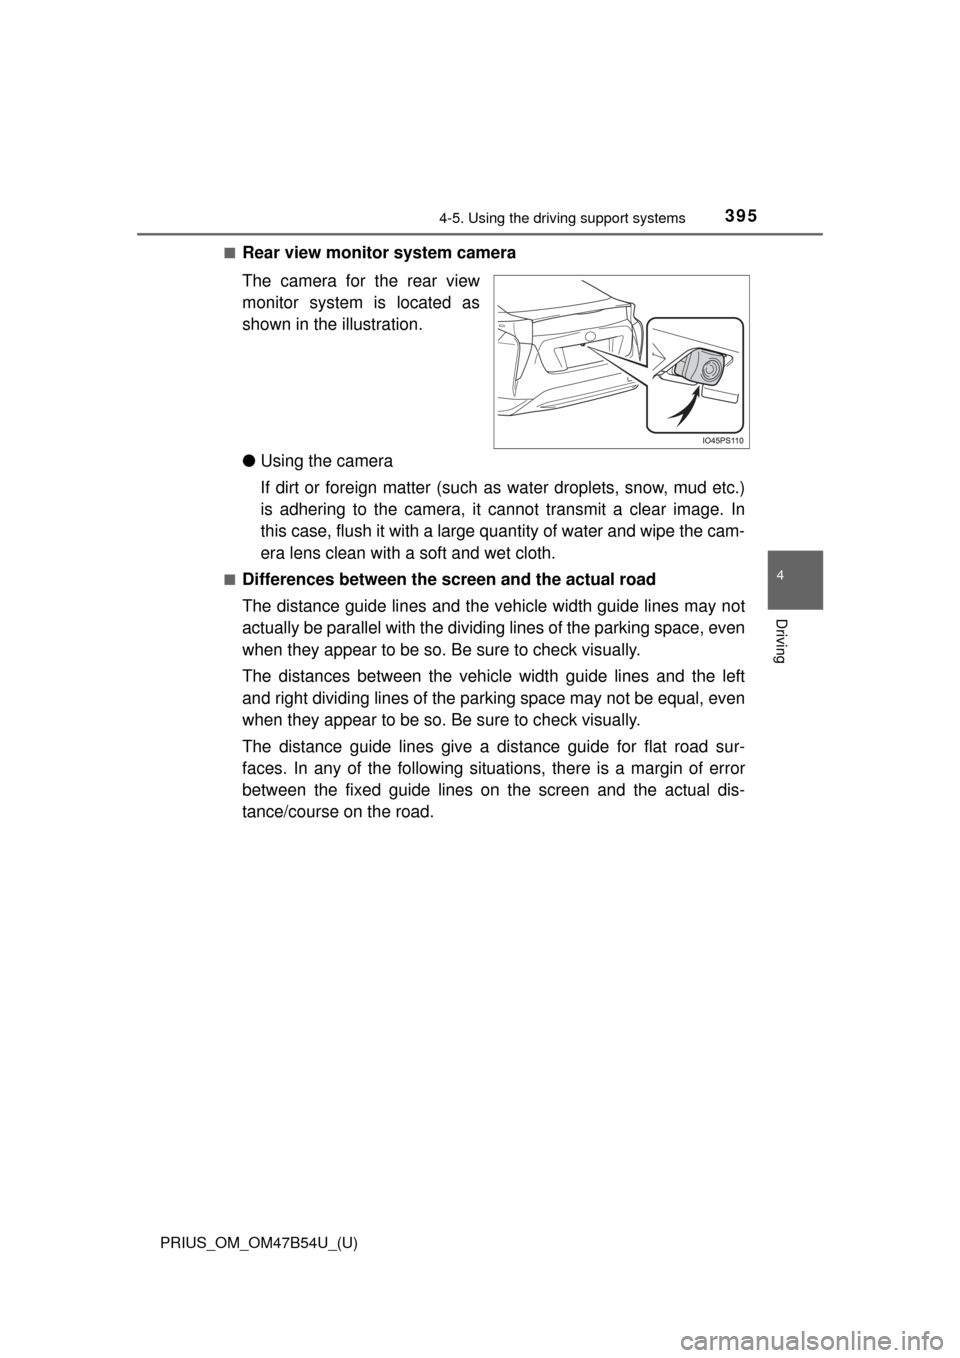
■Rear view monitor system camera
The camera for the rear view
monitor system is located as
shown in the illustration.
● Using the camera
If dirt or foreign matter (such as water droplets, snow, mud etc.)
is adhering to the camera, it cannot transmit a clear image. In
this case, flush it with a large quantity of water and wipe the cam-
era lens clean with a soft and wet cloth.
■Differences between the screen and the actual road
The distance guide lines and the v ehicle width guide lines may not
actually be parallel with the dividi ng lines of the parking space, even
when they appear to be so. Be sure to check visually.
The distances between the vehicle width guide lines and the left
and right dividing lines of the parking space may not be equal, even
when they appear to be so. Be sure to check visually.
The distance guide lines give a distance guide for flat road sur-
faces. In any of the following situations, there is a margin of error
between the fixed guide lines on the screen and the actual dis-
tance/course on the road.
Page 399 of 796

PRIUS_OM_OM47B54U_(U)
3994-5. Using the driving support systems
4
Driving
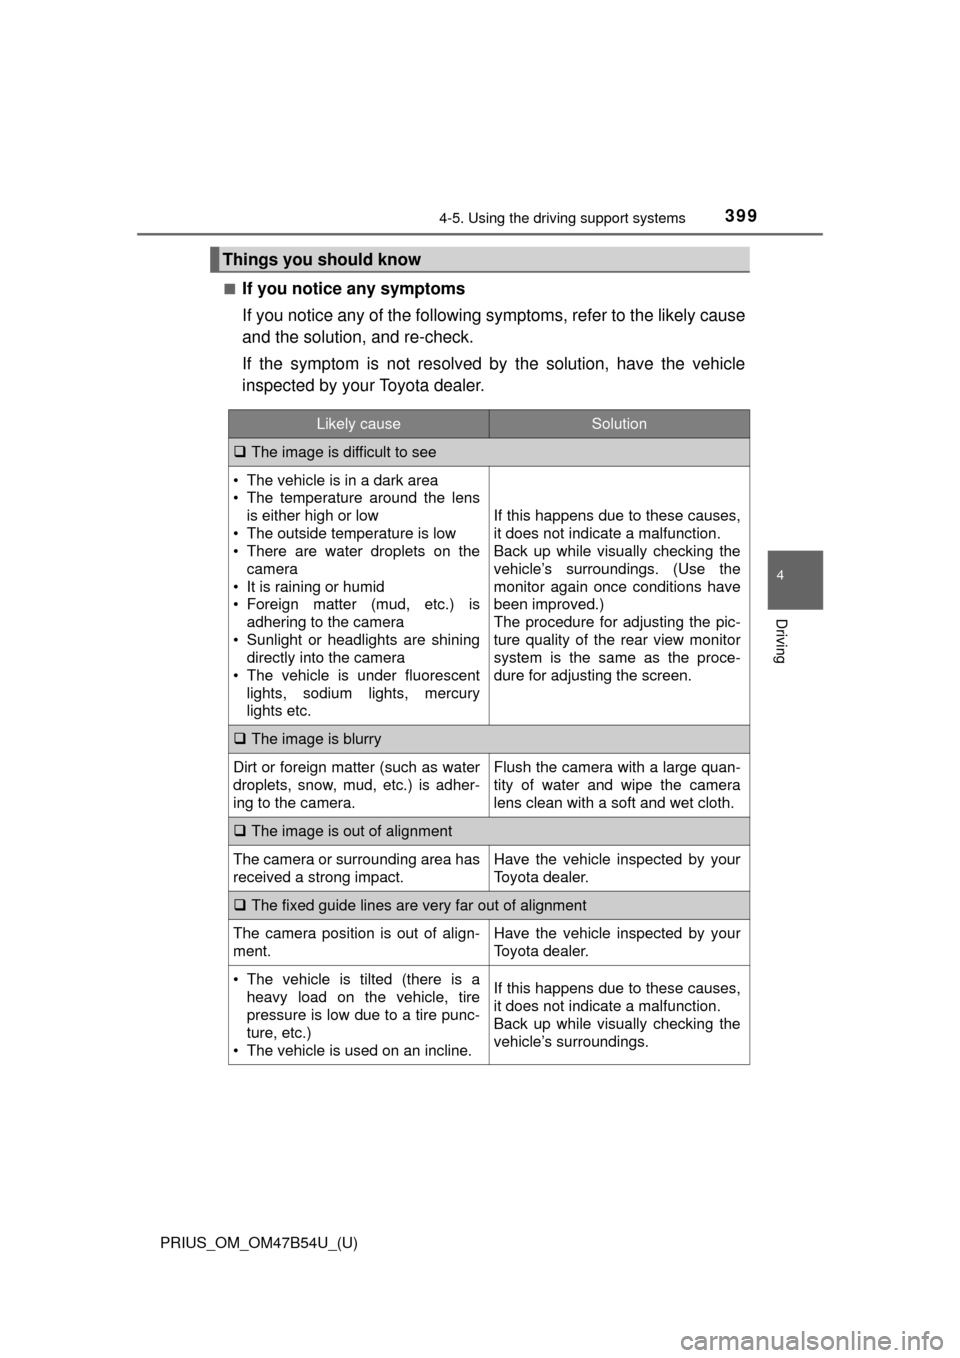
■If you notice any symptoms
If you notice any of the following symptoms, refer to the likely cause
and the solution, and re-check.
If the symptom is not resolved by the solution, have the vehicle
inspected by your Toyota dealer.
Things you should know
Likely causeSolution
The image is difficult to see
• The vehicle is in a dark area
• The temperature around the lens
is either high or low
• The outside temperature is low
• There are water droplets on the camera
• It is raining or humid
• Foreign matter (mud, etc.) is adhering to the camera
• Sunlight or headlights are shining directly into the camera
• The vehicle is under fluorescent
lights, sodium lights, mercury
lights etc.
If this happens due to these causes,
it does not indicate a malfunction.
Back up while visually checking the
vehicle’s surroundings. (Use the
monitor again once conditions have
been improved.)
The procedure for adjusting the pic-
ture quality of the rear view monitor
system is the same as the proce-
dure for adjusting the screen.
The image is blurry
Dirt or foreign matter (such as water
droplets, snow, mud, etc.) is adher-
ing to the camera.Flush the camera with a large quan-
tity of water and wipe the camera
lens clean with a soft and wet cloth.
The image is out of alignment
The camera or surrounding area has
received a strong impact.Have the vehicle inspected by your
Toyota dealer.
The fixed guide lines are very far out of alignment
The camera position is out of align-
ment.Have the vehicle inspected by your
Toyota dealer.
• The vehicle is tilted (there is a
heavy load on the vehicle, tire
pressure is low due to a tire punc-
ture, etc.)
• The vehicle is used on an incline.If this happens due to these causes,
it does not indicate a malfunction.
Back up while visually checking the
vehicle’s surroundings.
Page 400 of 796

400
PRIUS_OM_OM47B54U_(U)
4-5. Using the driving support systems
WARNING
■When using the rear view monitor system
The rear view monitor system is a supplemental device intended to assist
the driver when backing up. When backing up, be sure to visually check all
around the vehicle both directly and using the mirrors before proceeding.
Observe the following precautions to avoid an accident that could result in
death or serious injuries.
● Never depend on the rear view monitor system entirely when backing up.
The image and the position of the guide lines displayed on the screen may
differ from the actual state.
Use caution, just as you would when backing up any vehicle.
● Be sure to back up slowly, depressing the brake pedal to control vehicle
speed.
● The instructions given are only guide lines.
When and how much to turn the steering wheel will vary according to traf-
fic conditions, road surface conditions, vehicle condition, etc. when park-
ing. It is necessary to be fully aware of this before using the rear view
monitor system.
● When parking, be sure to check that the parking space will accommodate
your vehicle before maneuvering into it.
● Do not use the rear view monitor system in the following cases:
• On icy or slick road surfaces, or in snow
• When using tire chains or emergency tires
• When the back door is not closed completely
• On roads that are not flat or straight, such as curves or slopes
● In low temperatures, the screen may darken or the image may become
faint. The image could distort when the vehicle is moving, or you may
become unable to see the image on the screen. Be sure to visually check
all around the vehicle both directly and using the mirrors before proceed-
ing.
● If the tire sizes are changed, the position of the fixed guide lines displayed
on the screen may change.
● The camera uses a special lens. The distances between objects and
pedestrians that appear in the image displayed on the screen will differ
from the actual distances. ( →P. 395)
Page 401 of 796

PRIUS_OM_OM47B54U_(U)
4014-5. Using the driving support systems
4
Driving
NOTICE
■How to use the camera
● The rear view monitor system may not operate properly in the following
cases.
• If the back of the vehicle is hit, the position and mounting angle of the
camera may change.
• As the camera has a water proof construction, do not detach, disassem- ble or modify it. This may cause incorrect operation.
• When cleaning the camera lens, flush the camera with a large quantity of water and wipe it with a soft and wet cloth. Strongly rubbing the cam-
era lens may cause the camera lens to be scratched and unable to
transmit a clear image.
• Do not allow organic solvent, car wax, window cleaner or a glass coat- ing to adhere to the camera. If this happens, wipe it off as soon as pos-
sible.
• If the temperature changes rapidly, such as when hot water is poured on the vehicle in cold weather, the system may not operate normally.
• When washing the vehicle, do not apply intensive bursts of water to the camera or camera area. Doing so may result in the camera malfunc-
tioning.
● Do not expose the camera to strong impact as this could cause a malfunc-
tion. If this happens, have the vehicle inspected by your Toyota dealer as
soon as possible.
Page 430 of 796
430
PRIUS_OM_OM47B54U_(U)
5-2. Setup
Display settings
Press the “SETUP” button.
Select “Display” on the “Setup” screen.Adjust screen contrast/bright-
ness.
Adjust screen contrast/bright-
ness of the rear view monitor
camera.
Changes to day mode.
Select “General” or “Camera” on the “Display Settings” screen.
Adjust the display as desired by selecting “+” or “-”.
When the headlights are tur ned on, the screen dims.
However, the screen can be switch ed to day mode by selecting “Day
Mode”.
The screen will stay in day mode when the headlights are turned on until
“Day Mode” is selected again.
Settings are available for adjusting the contrast and brightness
of the screen.
Screen for display settings
1
2
1
2
3
Adjusting the screen contrast/brightness
Day mode
1
2
Page 571 of 796
PRIUS_OM_OM47B54U_(U)
5717-1. Maintenance and care
7
Maintenance and care
NOTICE
■When using a high pressure car wash
● When washing the vehicle, do not let water of the high pressure washer hit
directly or the vicinity of the camera. Due to the shock from the high pres-
sure water, it is possible the device may not operate as normal.
● Do not bring the nozzle tip close to boots (rubber or resin manufactured
cover), connectors or the following parts. The parts may be damaged if
they come into contact with high-pressure water.
• Traction related parts
• Steering parts
• Suspension parts
• Brake parts
■ When raising the windshield wiper arms
Make sure to hold the hook parts of the
wiper arms to raise them.
Do not hold only the wiper blades when
raising them, or it may cause deformation
of the wiper blades.Hook parts
Page 628 of 796
628
PRIUS_OM_OM47B54U_(U)
7-3. Do-it-yourself maintenance
Remove the depleted battery.
When removing the cover, if the
battery cannot be seen due to the
electronic key module attaching to
the upper cover, remove the elec-
tronic key module from the cover
so that the battery is visible as
shown in the illustration.
When removing the battery, use a
screwdriver of an appropriate size.
Insert a new battery with the “+” terminal facing up.
When installing, reverse the steps listed.
■Use a CR2032 lithium battery
●Batteries can be purchased at your Toyota dealer, local electrical appliance
shops or camera stores.
● Replace only with the same or equivalent type recommended by the manu-
facturer.
● Dispose of used batteries according to the local laws.
■ If the electronic key battery is depleted
The following symptoms may occur:
●The smart key system and wireless remote control will not function properly.
● The operational range will be reduced.
3
4