2017 TOYOTA MIRAI trunk release
[x] Cancel search: trunk releasePage 17 of 464
17Pictorial index
MIRAI_OM_USA_OM62023UParking brake . . . . . . . . . . . . . . . . . . . . . . . . . . . . . . . . . . . . . P. 186
Applying/releasing . . . . . . . . . . . . . . . . . . . . . . . . . . . . . . . . . . P. 186
Precautions against winter season . . . . . . . . . . . . . . . . . . . . . P. 254
Warning buzzer/warning message. . . . . . . . . . . . . . . . . . P. 371, 376
Turn signal lever . . . . . . . . . . . . . . . . . . . . . . . . . . . . . . . . . . P. 185
Headlight switch . . . . . . . . . . . . . . . . . . . . . . . . . . . . . . . . . . P. 187
Headlights/parking lights/side marker lights/tail lights/
daytime running lights . . . . . . . . . . . . . . . . . . . . . . . . . . . . . . . P. 187
Windshield wiper and washer switch . . . . . . . . . . . . . . . . . P. 195
Usage . . . . . . . . . . . . . . . . . . . . . . . . . . . . . . . . . . . . . . . . . . . P. 195
Adding washer fluid . . . . . . . . . . . . . . . . . . . . . . . . . . . . . . . . . P. 327
Emergency flasher switch . . . . . . . . . . . . . . . . . . . . . . . . . . P. 360
Fuel door opener switch . . . . . . . . . . . . . . . . . . . . . . . . . . . . P. 198
Trunk opener switch . . . . . . . . . . . . . . . . . . . . . . . . . . . . . . . P. 126
Hood lock release lever. . . . . . . . . . . . . . . . . . . . . . . . . . . . . P. 320
Tilt and telescopic steering control switch . . . . . . . . . . . . . P. 147
Adjustment . . . . . . . . . . . . . . . . . . . . . . . . . . . . . . . . . . . . . . . . P. 147
Driving position memory . . . . . . . . . . . . . . . . . . . . . . . . . . . . . P. 141
Air conditioning system . . . . . . . . . . . . . . . . . . . . . . . . . . . . P. 258
Usage . . . . . . . . . . . . . . . . . . . . . . . . . . . . . . . . . . . . . . . . . . . P. 258
Rear window defogger . . . . . . . . . . . . . . . . . . . . . . . . . . . . . . . P. 261
Trunk opener main switch . . . . . . . . . . . . . . . . . . . . . . . . . . P. 127
Page 128 of 464
1284-2. Opening, closing and locking the doors
MIRAI_OM_USA_OM62023U
■Tr u n k l i g h t
The trunk light turns on when the trunk is opened.
■ Function to prevent the tr unk being locked with the electronic key inside
● When all doors are locked, closing the trunk lid with the electronic key left
inside the trunk will sound an alarm.
In this case, the trunk lid can be opened by pressing the trunk release but-
ton on the trunk lid.
● If the spare electronic key is put in the trunk with all the doors locked, the
key confinement prevention function is activated so the trunk can be
opened. In order to prevent theft, take all electronic keys with you when
leaving the vehicle.
● If the electronic key is put in the trunk with all the doors locked, the key may
not be detected depending on the location of the key and the surrounding
radio wave conditions. In this case, the key confinement prevention function
cannot be activated, causing the doors to lock when the trunk is closed.
Make sure to check where the key is before closing the trunk.
● The key confinement prevention function cannot be activated if any one of
the doors is unlocked. In this case, open the trunk using the trunk opener
switch.
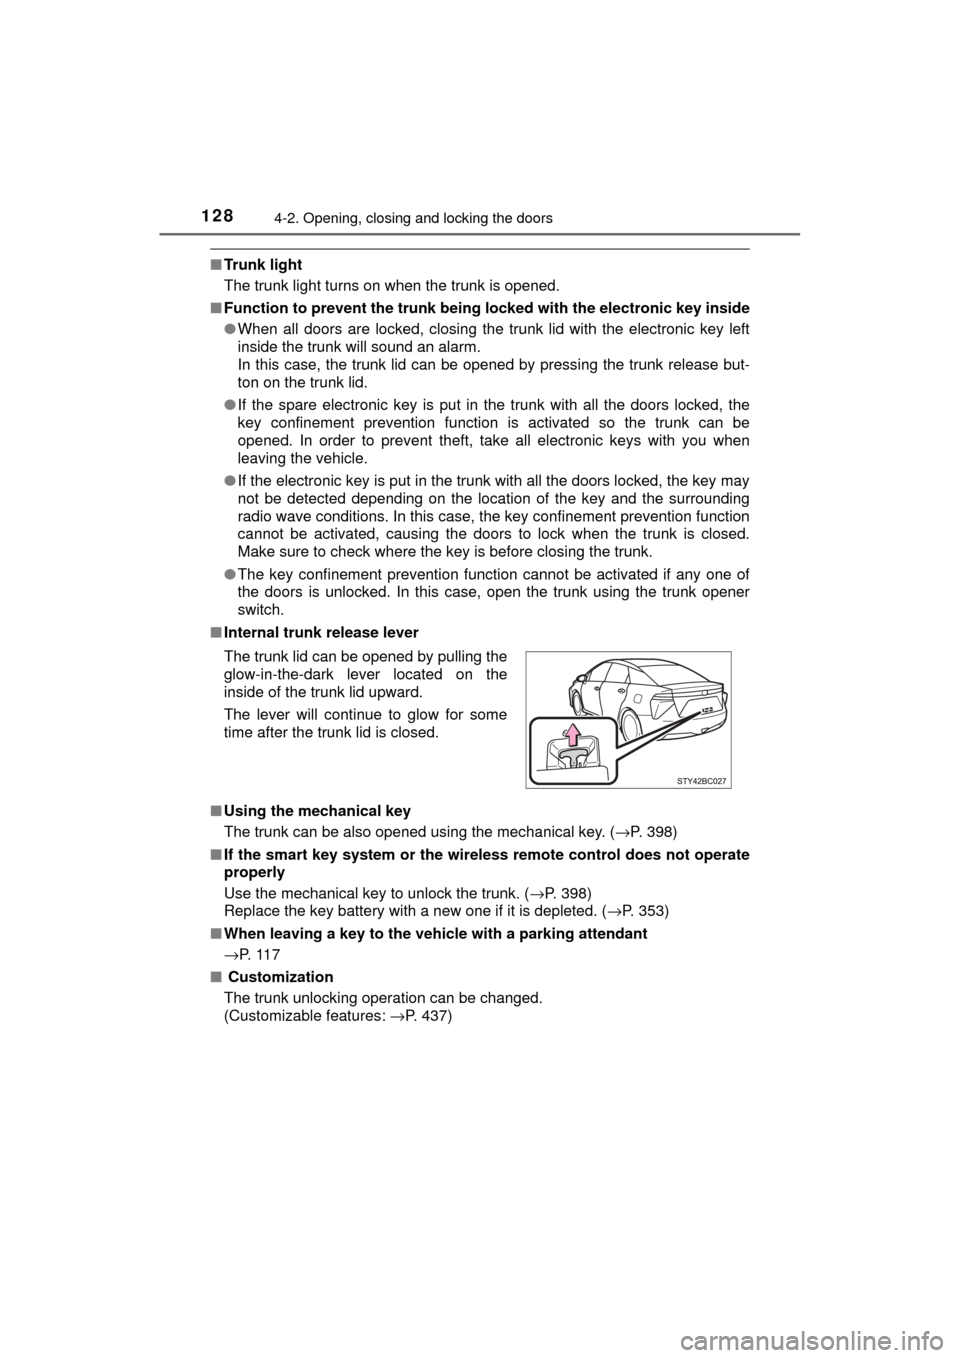
■ Internal trunk release lever
■ Using the mechanical key
The trunk can be also opened using the mechanical key. ( →P. 398)
■ If the smart key system or the wireless remote control does not operate
properly
Use the mechanical key to unlock the trunk. ( →P. 398)
Replace the key battery with a new one if it is depleted. ( →P. 353)
■ When leaving a key to the vehicle with a parking attendant
→P. 1 1 7
■ Customization
The trunk unlocking operation can be changed.
(Customizable features: →P. 437)
The trunk lid can be opened by pulling the
glow-in-the-dark lever located on the
inside of the trunk lid upward.
The lever will continue to glow for some
time after the trunk lid is closed.
Page 132 of 464
1324-2. Opening, closing and locking the doors
MIRAI_OM_USA_OM62023U■
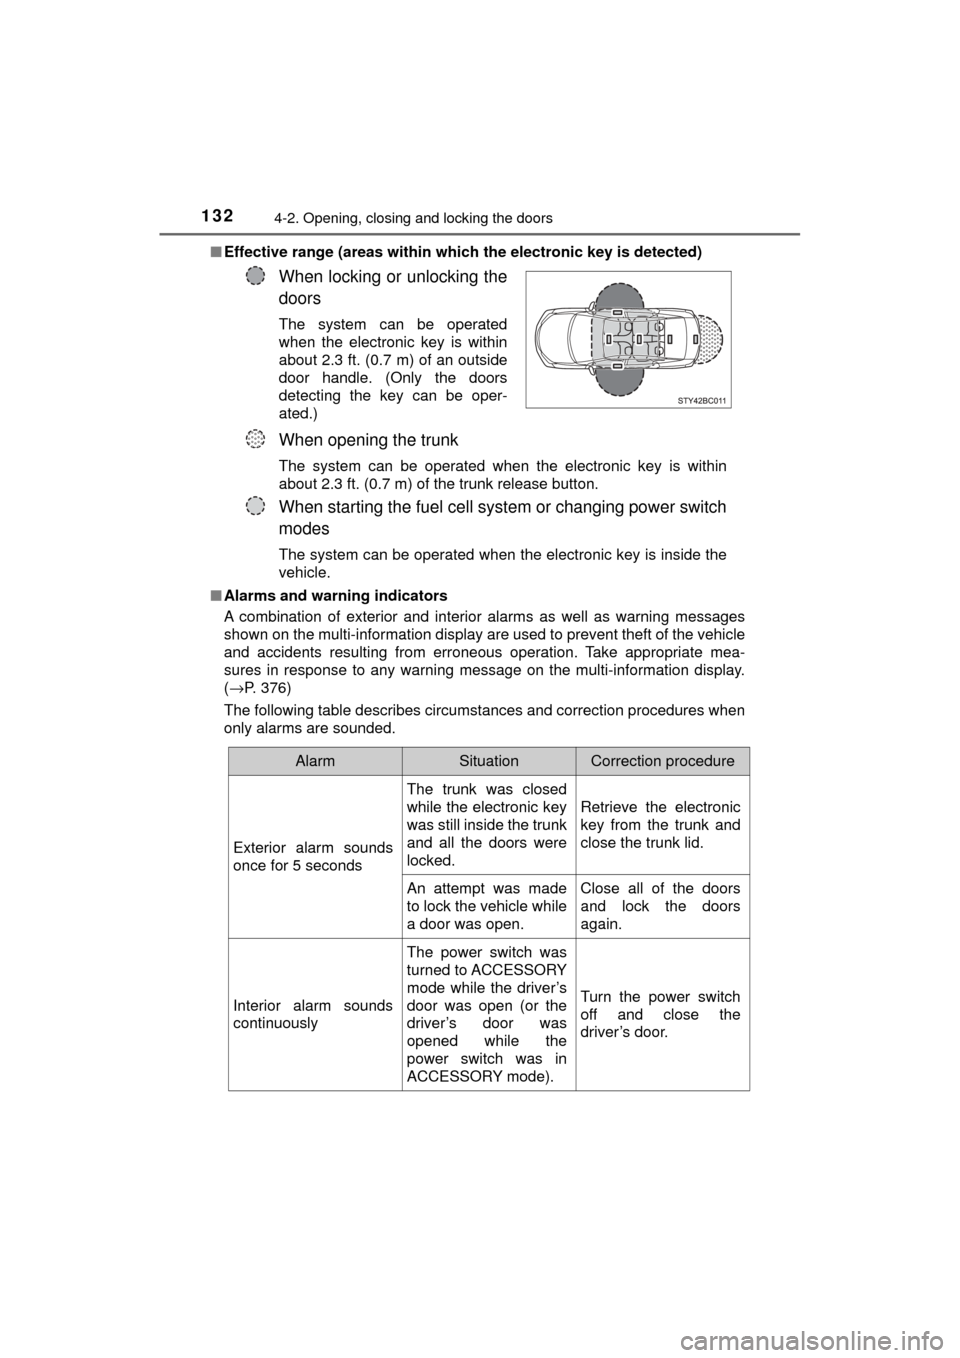
Effective range (areas within whic h the electronic key is detected)
■ Alarms and warning indicators
A combination of exterior and interior alarms as well as warning messages
shown on the multi-information display are used to prevent theft of the vehicle
and accidents resulting from erroneous operation. Take appropriate mea-
sures in response to any warning message on the multi-information display.
(→P. 376)
The following table describes circumstances and correction procedures when
only alarms are sounded.
When locking or unlocking the
doors
The system can be operated
when the electronic key is within
about 2.3 ft. (0.7 m) of an outside
door handle. (Only the doors
detecting the key can be oper-
ated.)
When opening the trunk
The system can be operated when the electronic key is within
about 2.3 ft. (0.7 m) of the trunk release button.
When starting the fuel cell system or changing power switch
modes
The system can be operated when the electronic key is inside the
vehicle.
AlarmSituationCorrection procedure
Exterior alarm sounds
once for 5 seconds The trunk was closed
while the electronic key
was still inside the trunk
and all the doors were
locked.
Retrieve the electronic
key from the trunk and
close the trunk lid.
An attempt was made
to lock the vehicle while
a door was open. Close all of the doors
and lock the doors
again.
Interior alarm sounds
continuously The power switch was
turned to ACCESSORY
mode while the driver’s
door was open (or the
driver’s door was
opened while the
power switch was in
ACCESSORY mode).Turn the power switch
off and close the
driver’s door.
Page 201 of 464
2015-4. Refueling
5
Driving
MIRAI_OM_USA_OM62023U
■If “Open H2 Filler Door in a Safe Place when Vehicle is Powered OFF” is
displayed on the mult i-information display
Stop the vehicle in a safe place and press the fuel door opener switch once
more with the following procedure:
Shift the shift position to P.
Turn the power switch off.
Press the fuel door opener switch.
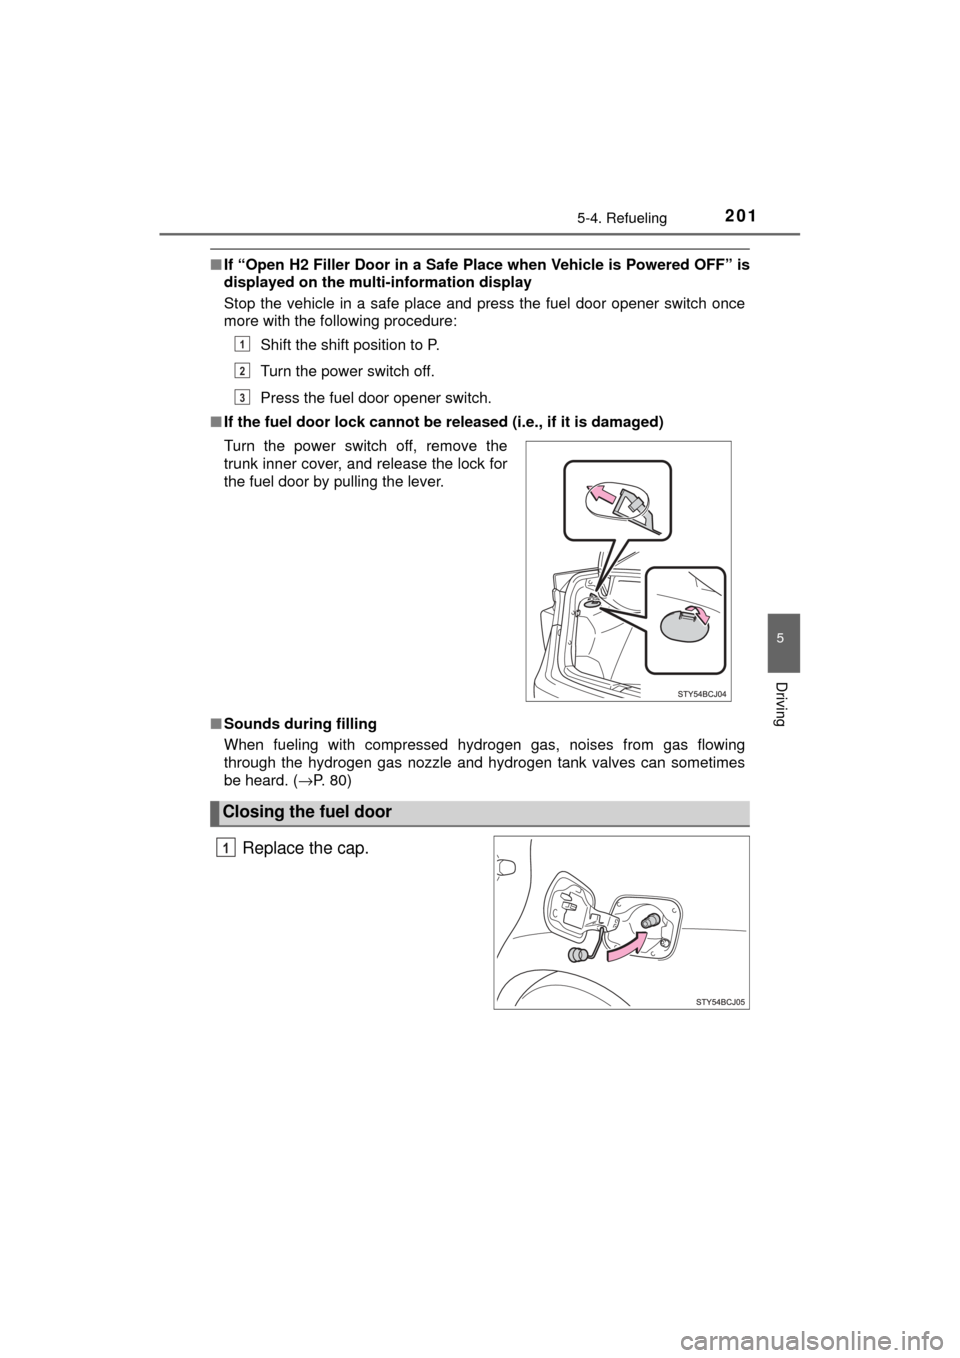
■ If the fuel door lock cannot be released (i.e., if it is damaged)
■ Sounds during filling
When fueling with compressed hydrogen gas, noises from gas flowing
through the hydrogen gas nozzle and hydrogen tank valves can sometimes
be heard. ( →P. 80)
Replace the cap.
Turn the power switch off, remove the
trunk inner cover, and release the lock for
the fuel door by pulling the lever.
Closing the fuel door
1
2
3
1
Page 371 of 464
3718-2. Steps to take in an emergency
MIRAI_OM_USA_OM62023U
8
When trouble arises
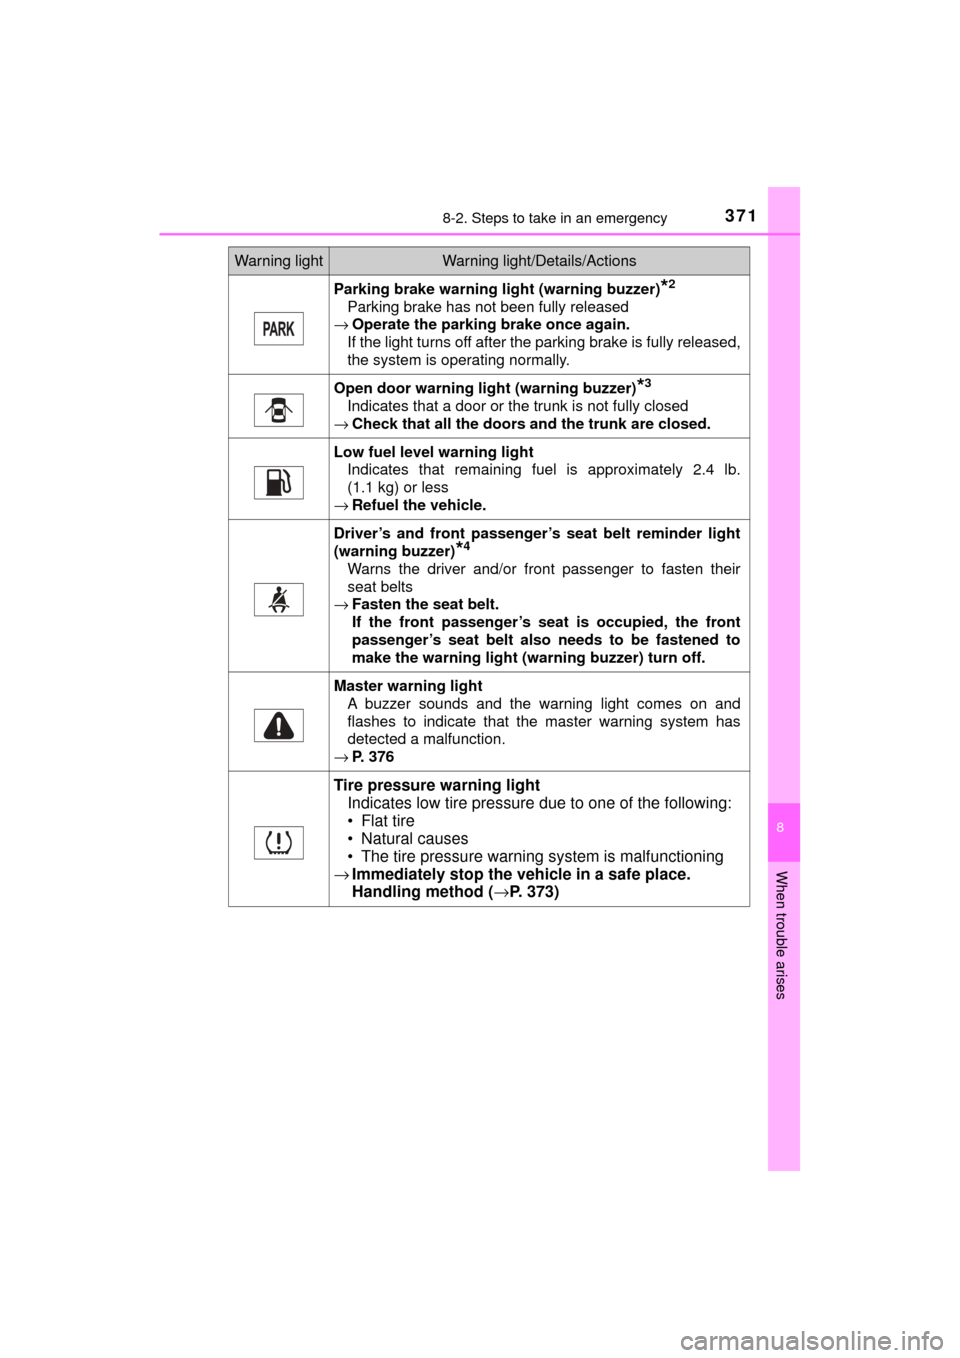
Parking brake warning light (warning buzzer)*2
Parking brake has not been fully released
→ Operate the parking brake once again.
If the light turns off after the parking brake is fully released,
the system is operating normally.
Open door warning light (warning buzzer)*3
Indicates that a door or the trunk is not fully closed
→ Check that all the doors and the trunk are closed.
Low fuel level warning light
Indicates that remaining fuel is approximately 2.4 lb.
(1.1 kg) or less
→ Refuel the vehicle.
Driver’s and front passenger’ s seat belt reminder light
(warning buzzer)
*4
Warns the driver and/or front passenger to fasten their
seat belts
→ Fasten the seat belt.
If the front passenger’s seat is occupied, the front
passenger’s seat belt also needs to be fastened to
make the warning light (warning buzzer) turn off.
Master warning light A buzzer sounds and the warning light comes on and
flashes to indicate that the master warning system has
detected a malfunction.
→ P. 376
Tire pressure warning light
Indicates low tire pressure due to one of the following:
• Flat tire
• Natural causes
• The tire pressure warning system is malfunctioning
→ Immediately stop the vehicle in a safe place.
Handling method ( →P. 373)
Warning lightWarning light/Details/Actions
Page 389 of 464
3898-2. Steps to take in an emergency
MIRAI_OM_USA_OM62023U
8
When trouble arises
With the compressor switch off, disconnect the hose from the valve
on the tire and then pull out the power plug from the power outlet
socket.
Some sealant may leak when the hose is removed.
Install the valve cap onto the valve of the emergency repaired tire.
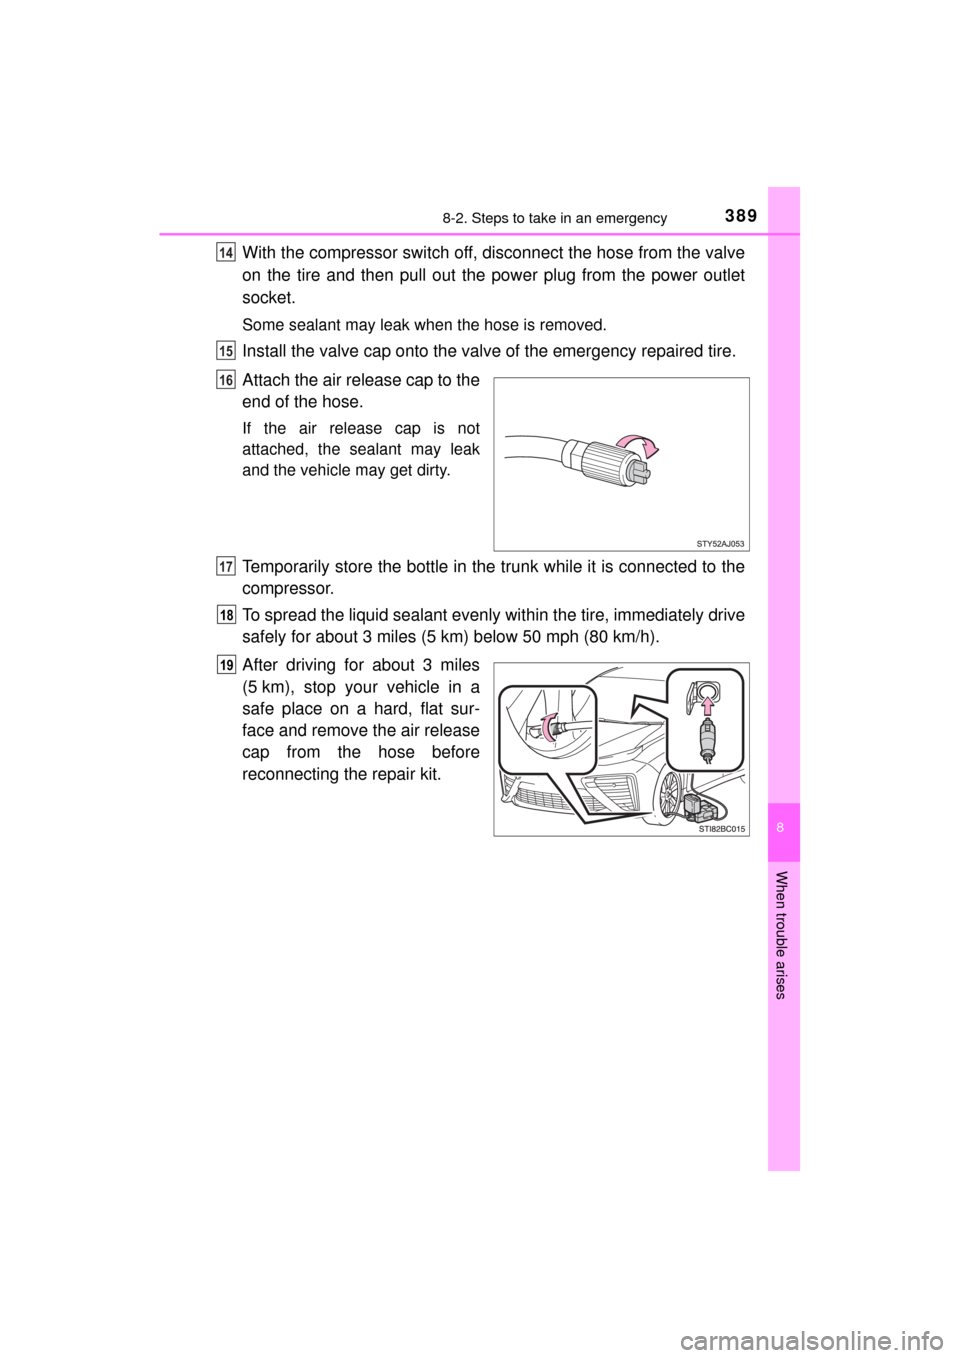
Attach the air release cap to the
end of the hose.
If the air release cap is not
attached, the sealant may leak
and the vehicle may get dirty.
Temporarily store the bottle in the trunk while it is connected to the
compressor.
To spread the liquid sealant evenly within the tire, immediately drive
safely for about 3 miles (5 km) below 50 mph (80 km/h).
After driving for about 3 miles
(5 km), stop your vehicle in a
safe place on a hard, flat sur-
face and remove the air release
cap from the hose before
reconnecting the repair kit.
14
15
16
17
18
19
Page 390 of 464
3908-2. Steps to take in an emergency
MIRAI_OM_USA_OM62023U
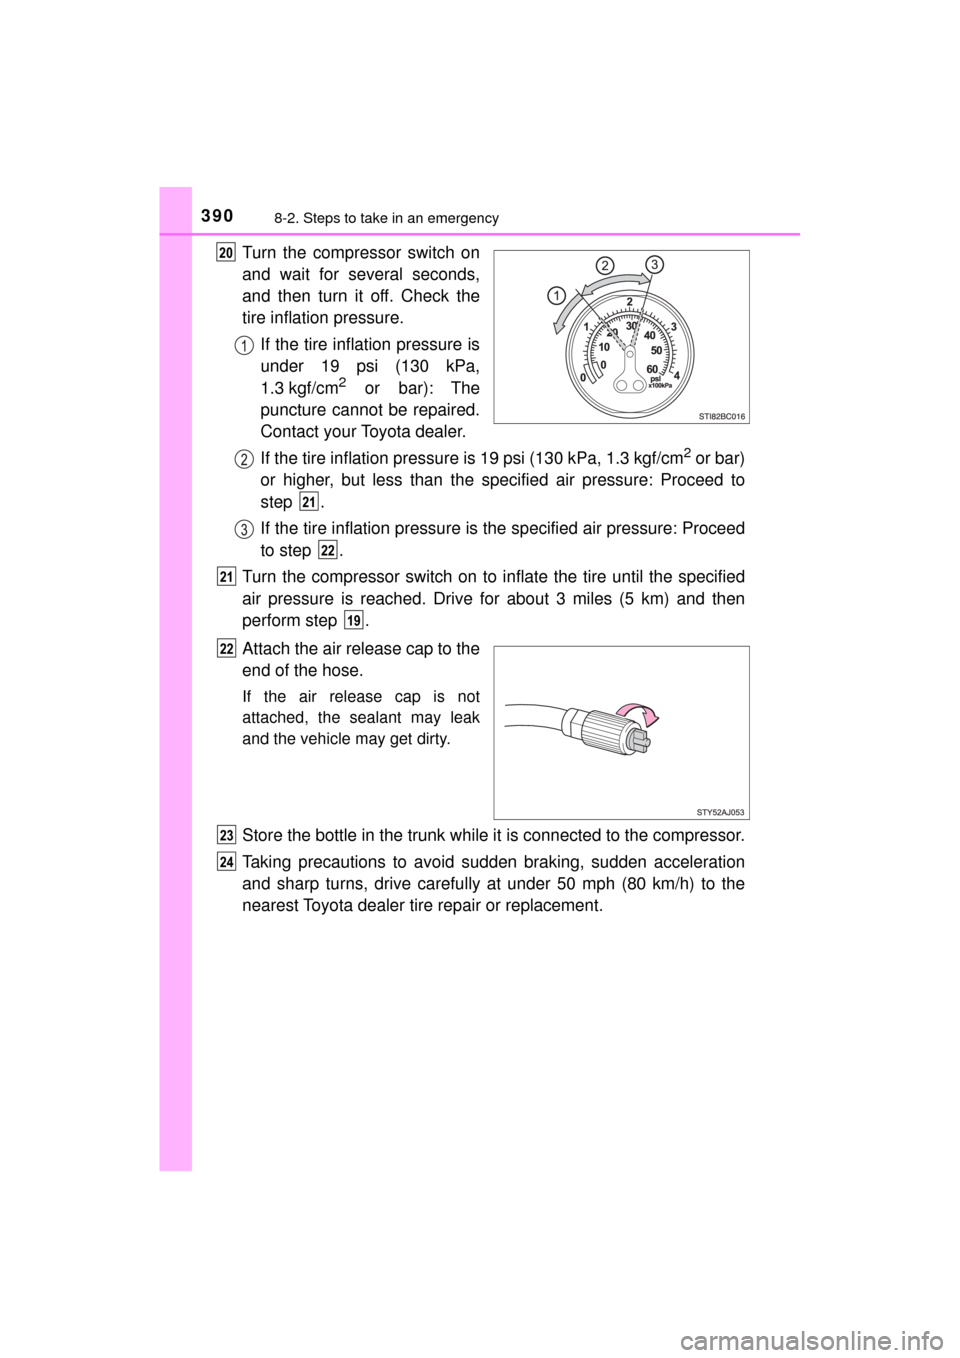
Turn the compressor switch on
and wait for several seconds,
and then turn it off. Check the
tire inflation pressure.If the tire inflation pressure is
under 19 psi (130 kPa,
1.3 kgf/cm
2 or bar): The
puncture cannot be repaired.
Contact your Toyota dealer.
If the tire inflation pressure is 19 psi (130 kPa, 1.3 kgf/cm
2 or bar)
or higher, but less than the specified air pressure: Proceed to
step .
If the tire inflation pressure is the specified air pressure: Proceed
to step .
Turn the compressor switch on to in flate the tire until the specified
air pressure is reached. Drive for about 3 miles (5 km) and then
perform step .
Attach the air release cap to the
end of the hose.
If the air release cap is not
attached, the sealant may leak
and the vehicle may get dirty.
Store the bottle in the trunk while it is connected to the compressor.
Taking precautions to avoid su dden braking, sudden acceleration
and sharp turns, drive carefully at under 50 mph (80 km/h) to the
nearest Toyota dealer tire repair or replacement.
20
21
22
21
19
22
23
24
Page 392 of 464
3928-2. Steps to take in an emergency
MIRAI_OM_USA_OM62023U■
If the tire is inflated to more
than the specified air pressure
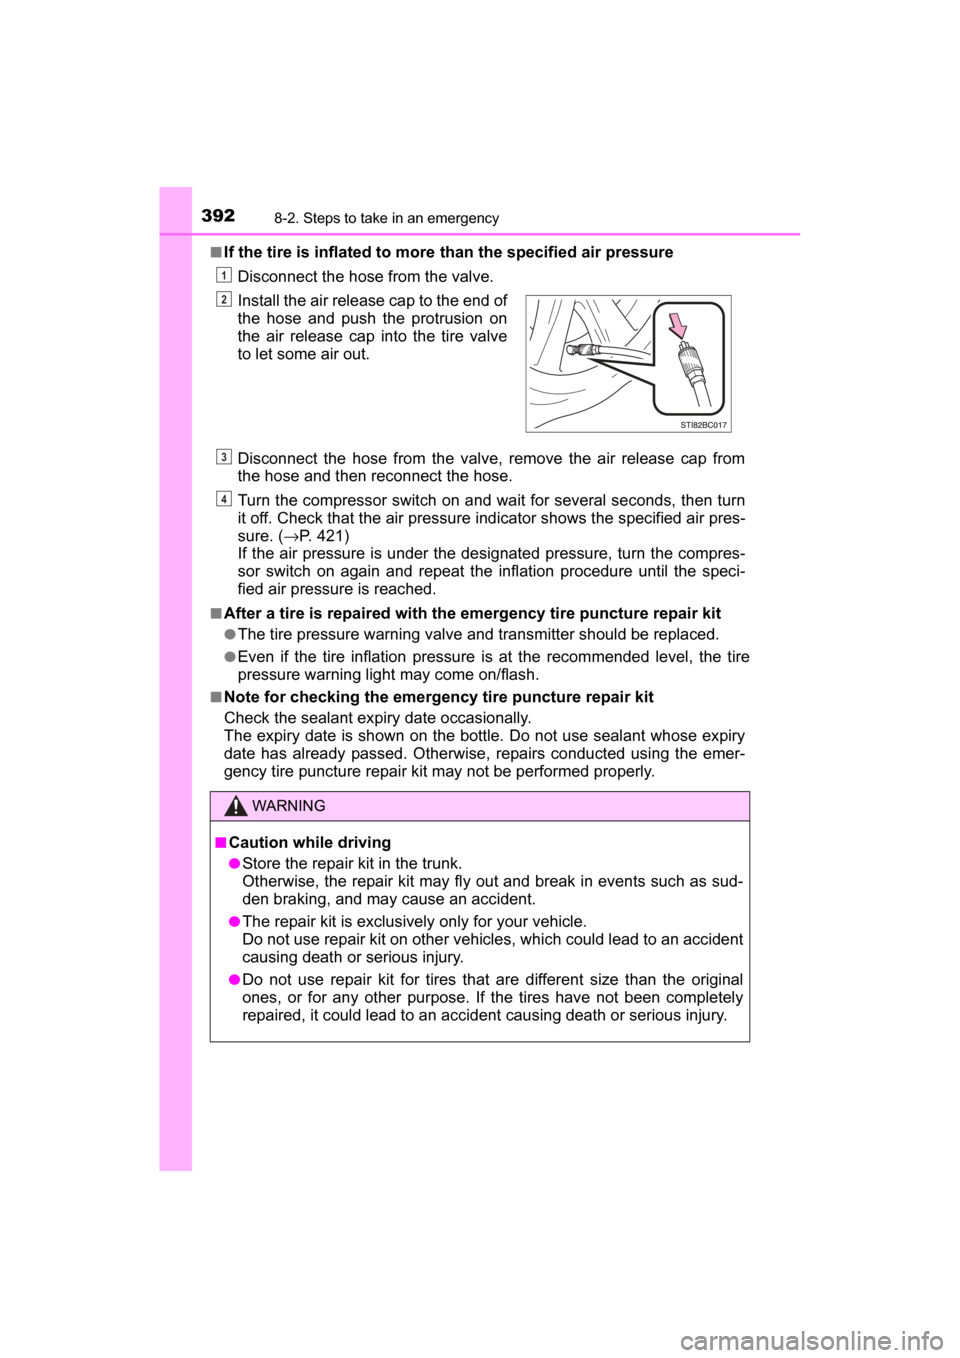
Disconnect the hose from the valve.
Disconnect the hose from the valve, remove the air release cap from
the hose and then reconnect the hose.
Turn the compressor switch on and wait for several se conds, then turn
it off. Check that the air pressure indicator shows the specified air pres-
sure. ( →P. 421)
If the air pressure is under the designated pressure, turn the compres-
sor switch on again and repeat the inflation procedure until the speci-
fied air pressure is reached.
■After a tire is repaired with the emergency tire puncture repair kit
●The tire pressure warning valve and transmitter should be replaced.
●Even if the tire inflation pressure is at the recommended level, the tire
pressure warning light may come on/flash.
■Note for checking the emergency tire puncture repair kit
Check the sealant expiry date occasionally.
The expiry date is shown on the bottle. Do not use sealant whose expiry
date has already passed. Otherwise, repairs conducted using the emer-
gency tire puncture repair kit may not be performed properly.Install the air release cap to the end of
the hose and push the protrusion on
the air release cap into the tire valve
to let some air out.
WARNING
■
Caution while driving
●Store the repair kit in the trunk.
Otherwise, the repair kit may fly out and break in events such as sud-
den braking, and may cause an accident.
●The repair kit is exclusively only for your vehicle.
Do not use repair kit on other vehicles, which could lead to an accident
causing death or serious injury.
●Do not use repair kit for tires that are different size than the original
ones, or for any other purpose. If the tires have not been completely
repaired, it could lead to an accide nt causing death or serious injury.
1
2
3
4