Page 88 of 720

881-2. Child safety
HILUX_OM_OM0K322E_(EE)
Key of letters inserted in the above table:
X: Not suitable seat position for ISOFIX child restraint systems in
this mass group and/or size class.
IUF: Suitable for ISOFIX forward-facing child restraint systems of “uni-
versal” category approved for use in this mass group.
IL: Suitable for ISOFIX child restraint systems of the categories for
“specific vehicles”, “restricted”, or “semi-universal” approved for
use in this mass group.
*: If the head restraint interferes with your child restraint system, and the
head restraint can be removed, remove the head restraint. Otherwise, put
the head restraint in the upper most position.
When securing some types of child restraint systems in rear seat, it
may not be possible to properly use the seat belts in positions next to
the child restraint without interfering with it or affecting seat belt effec-
tiveness. Be sure your seat belt fits snugly across your shoulder and
low on your hips. If it does not, or if it interferes with the child restraint,
move to a different position. Failure to do so may result in death or
serious injury.
The child restraint systems mentioned in the table may not be avail-
able outside the EU area.
● When installing a child restraint in the rear seats, adjust the front
seat so that it does not interfere with the child or child restraint sys-
tem.
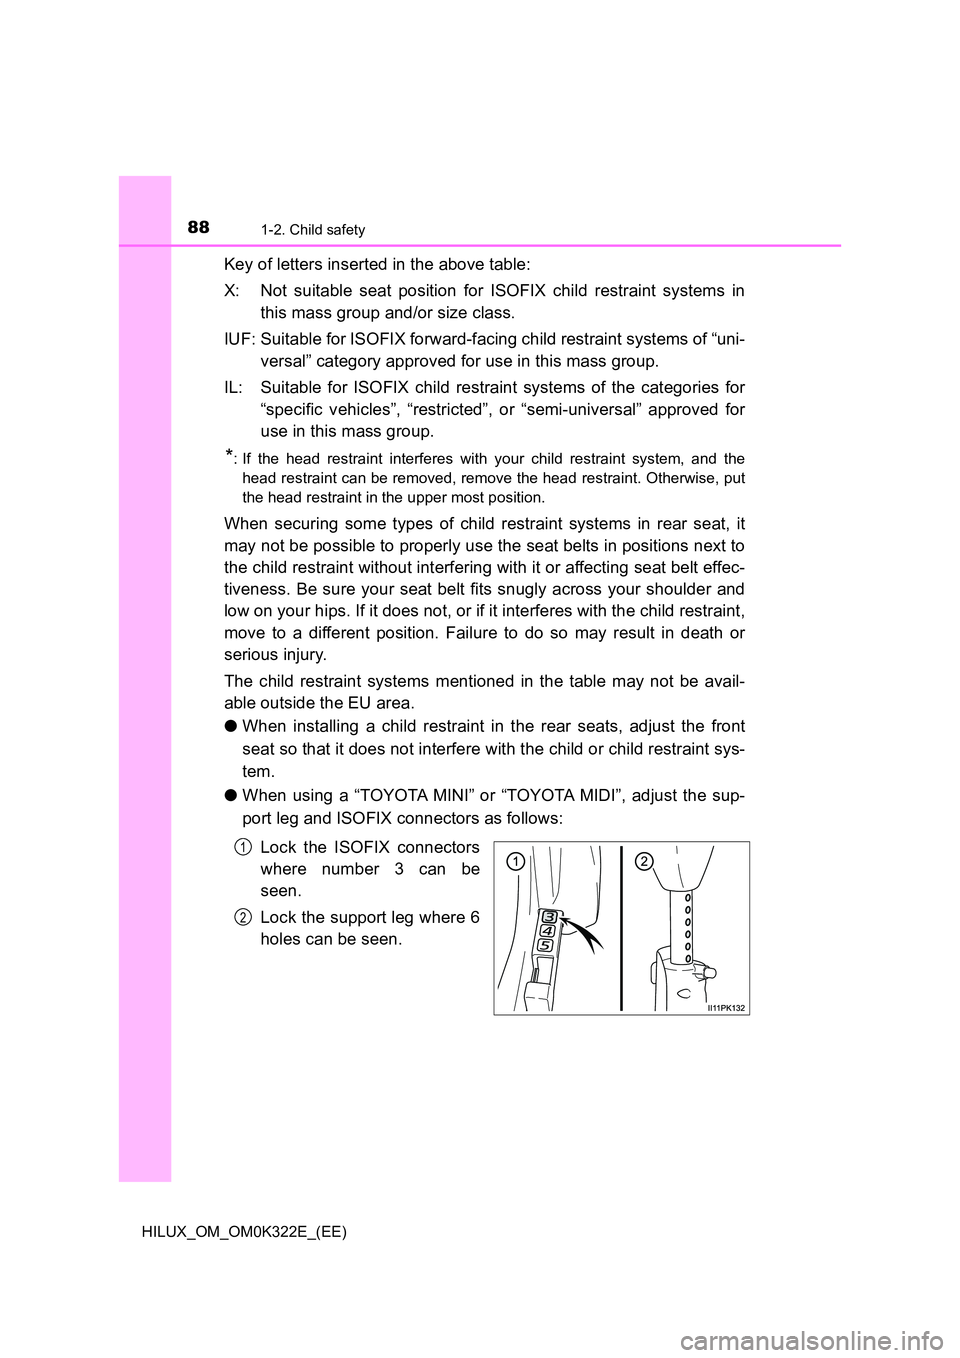
● When using a “TOYOTA MINI” or “TOYOTA MIDI”, adjust the sup-
port leg and ISOFIX connectors as follows:
Lock the ISOFIX connectors
where number 3 can be
seen.
Lock the support leg where 6
holes can be seen.
1
2
Page 89 of 720

891-2. Child safety
1
HILUX_OM_OM0K322E_(EE)
For safety and security
■i-Size child restraint systems fastened with ISOFIX
(ECE R129) - Compatibility table
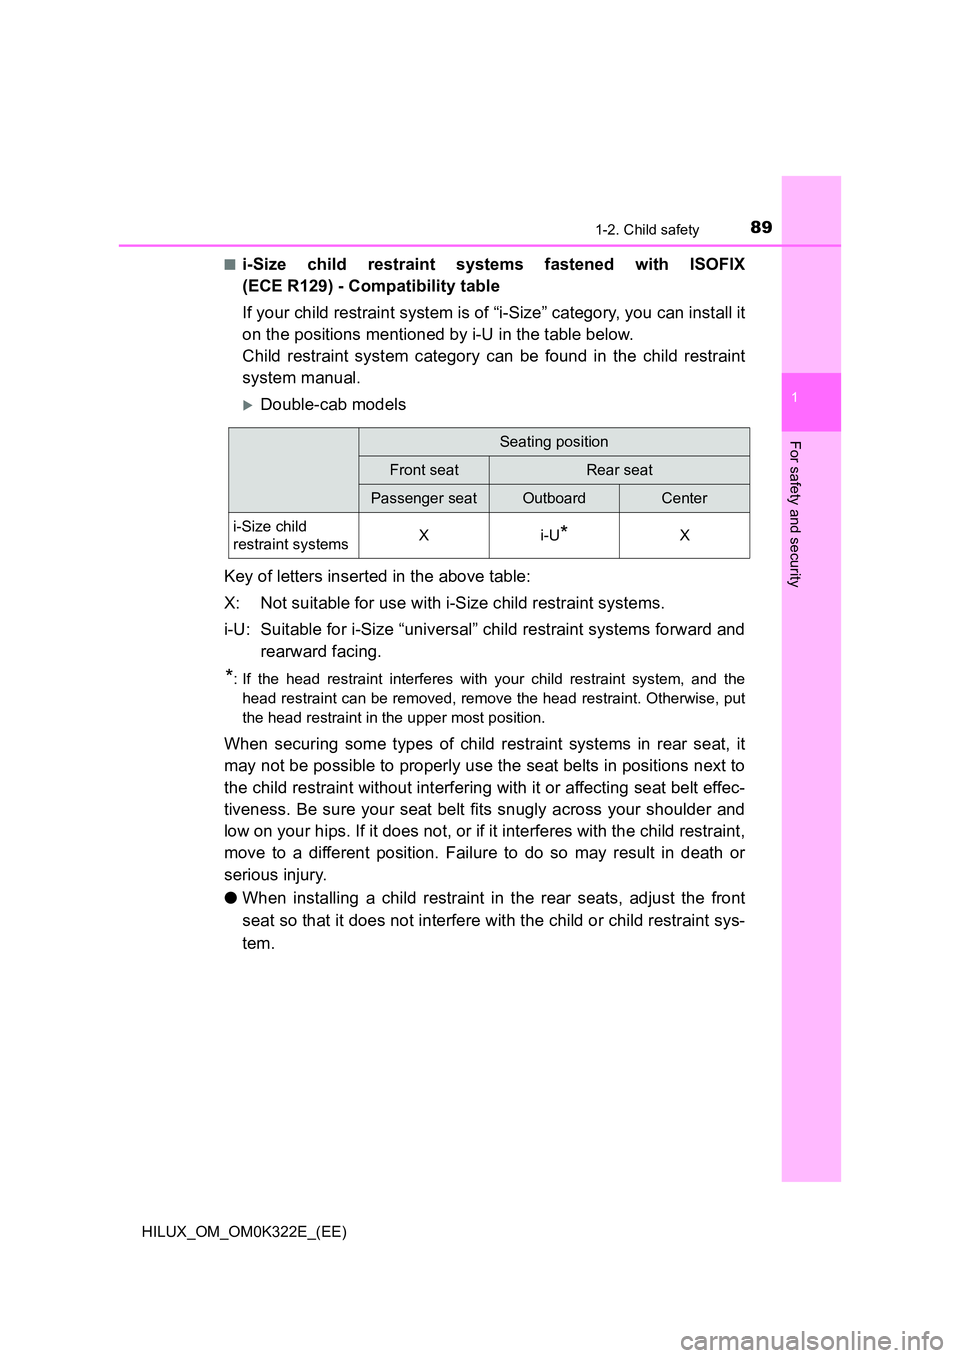
If your child restraint system is of “i-Size” category, you can install it
on the positions mentioned by i-U in the table below.
Child restraint system category can be found in the child restraint
system manual.
Double-cab models
Key of letters inserted in the above table:
X: Not suitable for use with i-Size child restraint systems.
i-U: Suitable for i-Size “universal” child restraint systems forward and
rearward facing.
*: If the head restraint interferes with your child restraint system, and the
head restraint can be removed, remove the head restraint. Otherwise, put
the head restraint in the upper most position.
When securing some types of child restraint systems in rear seat, it
may not be possible to properly use the seat belts in positions next to
the child restraint without interfering with it or affecting seat belt effec-
tiveness. Be sure your seat belt fits snugly across your shoulder and
low on your hips. If it does not, or if it interferes with the child restraint,
move to a different position. Failure to do so may result in death or
serious injury.
● When installing a child restraint in the rear seats, adjust the front
seat so that it does not interfere with the child or child restraint sys-
tem.
Seating position
Front seatRear seat
Passenger seatOutboardCenter
i-Size child
restraint systemsXi-U*X
Page 90 of 720
901-2. Child safety
HILUX_OM_OM0K322E_(EE)
■Installation with ISOFIX rigid anchor (ISOFIX child restraint
system)
Install the child restraint system in accordance to the operation
manual enclosed with the child restraint system.
If the head restraint interferes with your child restraint system,
and the head restraint can be removed, remove the head
restraint. Otherwise, put the head restraint in the upper most
position. ( P. 223)
Check the positions of the
exclusive fixing bars, and
install the child restraint sys-
tem to the seat.
The bars are installed in the
clearance between the seat
cushion and seatback.
After installing the child restraint system, rock it back and forth to
ensure that it is installed securely. ( P. 8 3 )
1
2
3
Page 709 of 720

709Alphabetical index
HILUX_OM_OM0K322E_(EE)
Automatic air conditioning
system
Air conditioning filter.............. 573
Automatic air conditioning
system ................................ 500
Automatic disconnecting
differential .............................. 363
Automatic light
control system ....................... 296
Automatic transmission .......... 277
If the shift lever cannot be
shifted from P ..................... 282
AUX port*................................. 450
Auxiliary boxes ........................ 518
Back-up lights
Replacing light bulbs ............. 594
Wattage................................. 691
Battery
Battery checking ................... 555
If the vehicle battery is
discharged .......................... 648
Preparing and checking
before winter....................... 402
Warning light ......................... 610
Bluetooth®*.............................. 478
Audio system ........................ 471
Hands-free system
(for cellular phone).............. 451
Registering/removing a
Bluetooth® device ............... 459
Selecting a Bluetooth®
device ......................... 460, 461
Wireless
communication ................... 451
Bluetooth® audio*................... 451
Bluetooth® phone*.................. 451
Deleting the call history......... 466
Making a call ......................... 473
Managing speed dials ........... 473
Managing the contacts.......... 468
Phone settings ...................... 464
Receiving a call..................... 475
Speaking on the phone ......... 473
Bottle holders .......................... 517
Brake
Fluid ...................................... 688
Override system warning
light..................................... 613
Parking brake........................ 291
Warning light ......................... 610
Brake assist ............................. 387
Break-in tips ............................. 241
Brightness control
Instrument panel light
control................................. 134
Care
Aluminum wheels.................. 535
Exterior ................................. 534
Interior................................... 537
Seat belts .............................. 538
CD player*................................ 425
Chains....................................... 403
Child restraint system ............... 65
Child seats definition............... 68
Child seats installation ...... 81, 90
Installing CRS with
ISOFIX rigid anchor.............. 86
Installing CRS with
seat belts .............................. 74
Installing CRS with
top strap ............................... 92
B
C
*: Refer to “Navigation and multimedia system Owner’s manual”.