Page 596 of 720
5967-3. Do-it-yourself maintenance
HILUX_OM_OM0K322E_(EE)
■Replacing the following bulbs
If any of the lights listed below has burnt out, have it replaced by
any authorized Toyota retailer or Toyota authorized repairer, or any
reliable repairer.
● Headlight low beams (vehicles with LED headlights)
● Front position lights/daytime running lights (vehicles with LED
headlights)
● Side turn signal lights
● LED front fog lights (if equipped)
● High mounted stoplight (if equipped)
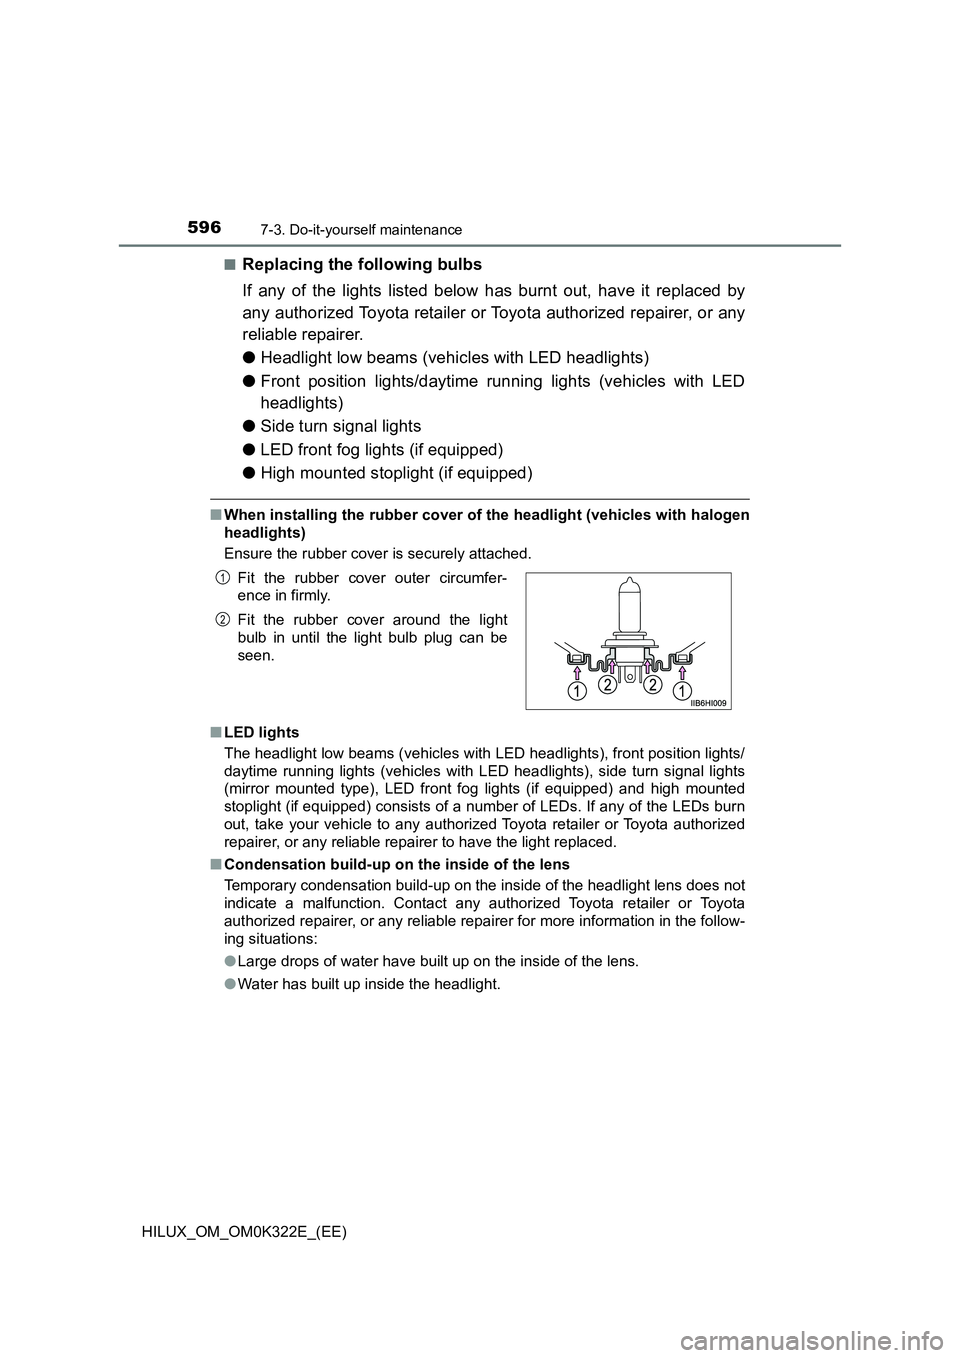
■When installing the rubber cover of the headlight (vehicles with halogen
headlights)
Ensure the rubber cover is securely attached.
■ LED lights
The headlight low beams (vehicles with LED headlights), front position lights/
daytime running lights (vehicles with LED headlights), side turn signal lights
(mirror mounted type), LED front fo g lights (if equipped) and high mounted
stoplight (if equipped) consists of a number of LEDs. If any of the LEDs burn
out, take your vehicle to any authorized Toyota retailer or Toyota authorized
repairer, or any reliable repairer to have the light replaced.
■ Condensation build-up on the inside of the lens
Temporary condensation build-up on the inside of the headlight lens does not
indicate a malfunction. Contact any authorized Toyota retailer or Toyota
authorized repairer, or any reliable repairer for more information in the follow-
ing situations:
● Large drops of water have built up on the inside of the lens.
● Water has built up inside the headlight.
Fit the rubber cover outer circumfer-
ence in firmly.
Fit the rubber cover around the light
bulb in until the light bulb plug can be
seen.
1
2
Page 597 of 720
5977-3. Do-it-yourself maintenance
HILUX_OM_OM0K322E_(EE)
7
Maintenance and care
WARNING
■Replacing light bulbs
● Turn off the lights. Do not attempt to replace the bulb immediately after
turning off the lights.
The bulbs become very hot and may cause burns.
● Do not touch the glass portion of the light bulb with bare hands. When it is
unavoidable to hold the glass portion, use and hold with a clean dry cloth
to avoid getting moisture and oils on the bulb.
Also, if the bulb is scratched or dropped, it may blow out or crack.
● Fully install light bulbs and any parts used to secure them. Failure to do so
may result in heat damage, fire, or water entering the headlight unit. This
may damage the headlights or cause condensation to build up on the lens.
● Do not attempt to repair or disassemble light bulbs, connectors, electric
circuits or component parts.
Doing so may result in death or serious injury due to electric shock.
■ To prevent damage or fire
● Make sure bulbs are fully seated and locked.
● Check the wattage of the bulb before installing to prevent heat damage.
Page 601 of 720
6018-1. Essential information
HILUX_OM_OM0K322E_(EE)
8
When trouble arises
If your vehicle has to be stopped in an
emergency
Steadily step on the brake pedal with both feet and firmly depress it.
Do not pump the brake pedal repeatedly as this will increase the effort
required to slow the vehicle.
Shift the shift lever to N.
If the shift lever is shifted to N
After slowing down, stop the vehicle in a safe place by the road.
Stop the engine.
If the shift lever cannot be shifted to N
Keep depressing the brake pedal with both feet to reduce vehicle
speed as much as possible.
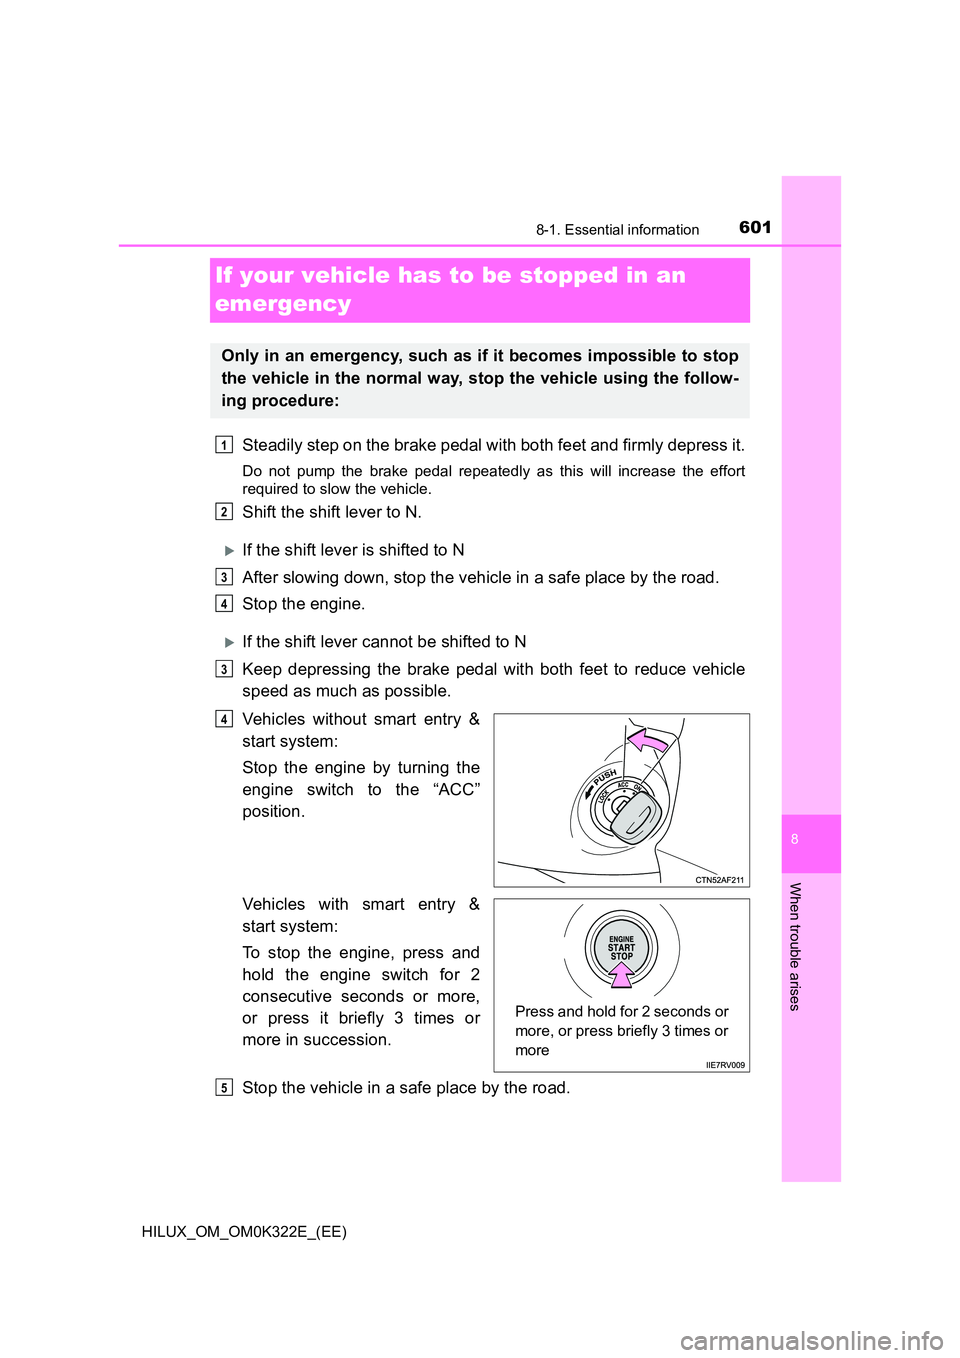
Vehicles without smart entry &
start system:
Stop the engine by turning the
engine switch to the “ACC”
position.
Vehicles with smart entry &
start system:
To stop the engine, press and
hold the engine switch for 2
consecutive seconds or more,
or press it briefly 3 times or
more in succession.
Stop the vehicle in a safe place by the road.
Only in an emergency, such as if it becomes impossible to stop
the vehicle in the normal way, stop the vehicle using the follow-
ing procedure:
1
2
3
4
3
4
Press and hold for 2 seconds or
more, or press briefly 3 times or
more
5
Page 605 of 720
6058-2. Steps to take in an emergency
HILUX_OM_OM0K322E_(EE)
8
When trouble arises
If a tow truck is not available in an emergency, your vehicle may be
temporarily towed using cables or chains secured to the emergency
towing hooks. This should only be attempted on hard surfaced roads
for at most 80 km (50 miles) at under 30 km/h (18 mph).
A driver must be in the vehicle to steer and operate the brakes. The
vehicle’s wheels, drive train, axles, steering and brakes must be in
good condition.
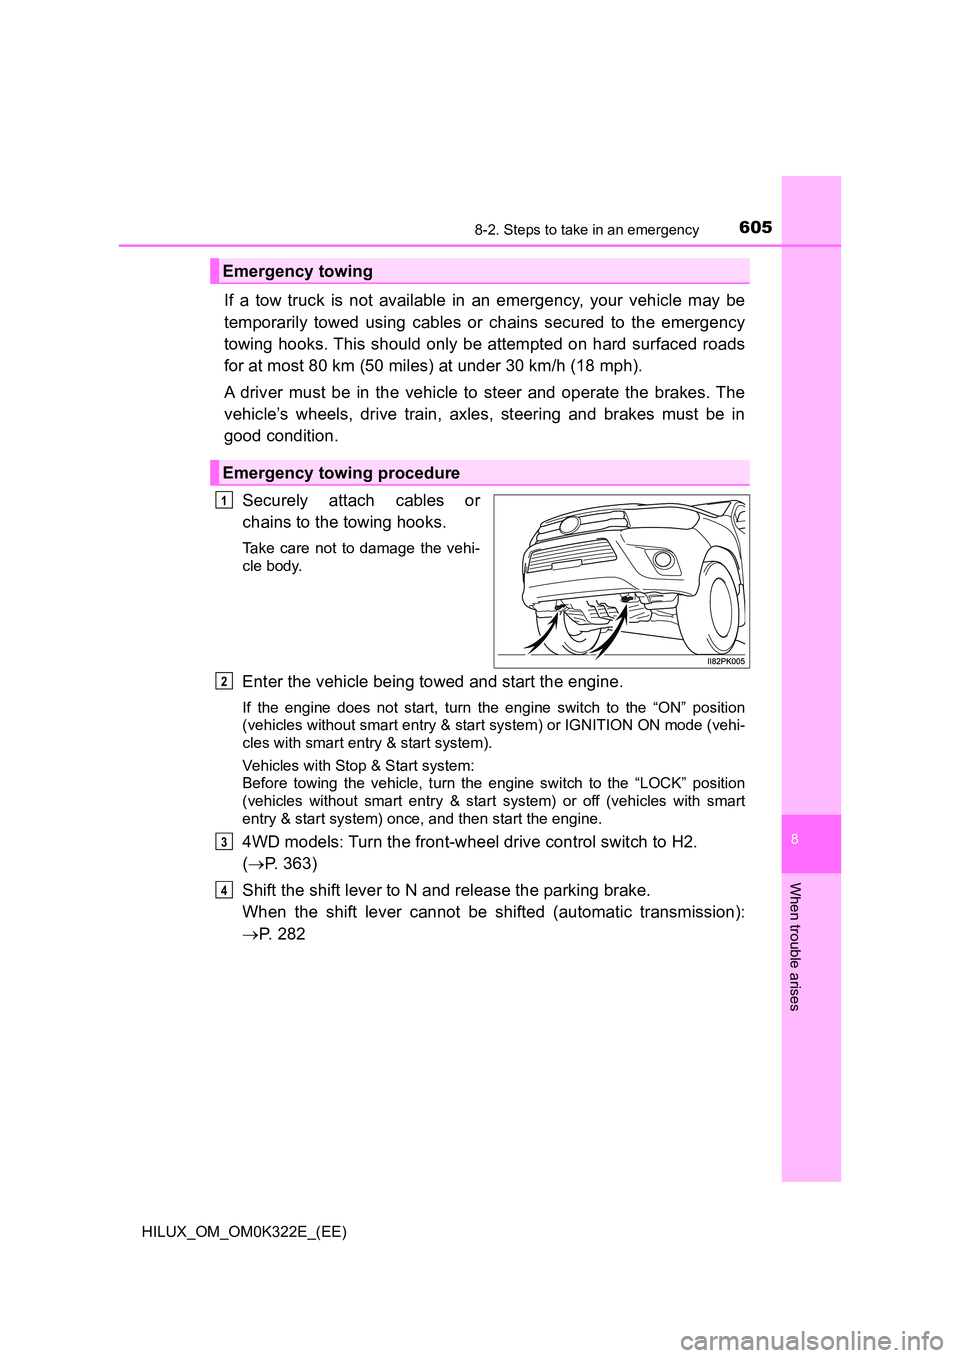
Securely attach cables or
chains to the towing hooks.
Take care not to damage the vehi-
cle body.
Enter the vehicle being towed and start the engine.
If the engine does not start, turn the engine switch to the “ON” position
(vehicles without smart entry & start system) or IGNITION ON mode (vehi-
cles with smart entry & start system).
Vehicles with Stop & Start system:
Before towing the vehicle, turn the engine switch to the “LOCK” position
(vehicles without smart entry & start system) or off (vehicles with smart
entry & start system) once, and then start the engine.
4WD models: Turn the front-wheel drive control switch to H2.
( P. 363)
Shift the shift lever to N and release the parking brake.
When the shift lever cannot be shifted (automatic transmission):
P. 2 8 2
Emergency towing
Emergency towing procedure
1
2
3
4
Page 607 of 720
6078-2. Steps to take in an emergency
HILUX_OM_OM0K322E_(EE)
8
When trouble arises
NOTICE
■To prevent damage to the vehicle when towing using a wheel-lift type
truck
● Do not tow the vehicle from the rear when the engine switch is in the
“LOCK” position or the key is removed (vehicles without smart entry & start
system) or the engine switch is turned to off (vehicles with smart entry &
start system). The steering lock mechanism is not strong enough to hold
the front wheels straight.
● When raising the vehicle, ensure adequate ground clearance for towing at
the opposite end of the raised vehicle. Without adequate clearance, the
vehicle could be damaged while being towed.
■ To prevent damage to the vehicle when towing with a sling-type truck
Do not tow with a sling-type truck, either from the front or rear.
■ To prevent damage to the vehicle during emergency towing
Do not secure cables or chains to the suspension components.
■ When towing a vehicle equipped with the Stop & Start system (if
equipped)
When it is necessary to tow the vehicle with all four wheels contacting the
ground, perform the following procedure before towing the vehicle to protect
the system.
Turn the engine switch to the “LOCK” position (vehicles without smart entry
& start system) or off (vehicles with smart entry & start system) once, and
then start the engine. If the engine does not start, turn the engine switch to
the “ON” position (vehicles without smart entry & start system) or IGNITION
ON mode (vehicles with smart entry & start system).
Page 627 of 720

6278-2. Steps to take in an emergency
HILUX_OM_OM0K322E_(EE)
8
When trouble arises
WARNING
■Using the tire jack
Improper use of the tire jack may cause the vehicle to suddenly fall off the
jack, leading to death or serious injury.
● Do not use the tire jack for any purpose other than replacing tires or install-
ing and removing tire chains.
● Only use the tire jack that comes with this vehicle for replacing a flat tire.
Do not use it on other vehicles, and do not use other tire jacks for replac-
ing tires on this vehicle.
● Make sure the tire jack can be moved properly.
● Always check that the tire jack is securely set to the correct jack up point.
● Do not put any part of your body under the vehicle while it is supported by
the jack.
● Do not start or run the engine while your vehicle is supported by the jack.
● Do not raise the vehicle while someone is inside.
● When raising the vehicle, do not put an object on or under the jack.
● Do not raise the vehicle to a height greater than that required to replace
the tire.
● Use a jack stand if it is necessary to get under the vehicle.
Take particular care when lowering the vehicle to ensure that no one work-
ing on or near the vehicle may be injured.
■ Using the jack handle
Insert the square head securely until you hear a click to prevent the exten-
sion parts from coming apart unexpectedly.
● Do not continue jacking up once the yel-
low caution line has appeared.Ye l l o w
caution line
Page 639 of 720
6398-2. Steps to take in an emergency
HILUX_OM_OM0K322E_(EE)
8
When trouble arises
Raise the tire.
While raising, secure the tire, tak-
ing care that the tire goes straight
up without catching on any sur-
rounding part, to prevent it from fly-
ing forward during a collision or
sudden braking.
After the tire goes half way up,
check that the suspended chain is
able to enter the tire hole, for
proper storage.
Tightening torque:
37.0 N•m (3.8 kgf•m, 27.3 ft•lbf)
Confirm that the tire is not loose
after tightening:
Push and pull the tire
Try rotating
Visually check to ensure the tire is
not hung on surrounding parts.
If looseness or misassembly exists, repeat step and step .
Repeat step , any time the tire is lowered or disturbed.
Push in the projection on the
jack handle and disassemble
the jack handle end, jack han-
dle extensions and wheel nut
wrench.
Stow the tools and jack securely.
2
3
1
2
23
43
5
6
Page 641 of 720
6418-2. Steps to take in an emergency
HILUX_OM_OM0K322E_(EE)
8
When trouble arises
WARNING
■After using the tools and jack
Before driving, make sure all the tools and jack are securely in place in their
storage location to reduce the possibility of personal injury during a collision
or sudden braking.
NOTICE
■ When stowing the flat tire
Ensure that there is no object caught between the tire and the vehicle
underbody.
■ When assembling the jack handle extension
Insert the square head securely until you hear a click. Otherwise the exten-
sion may come off and it may damage the paint or vehicle body.