Page 433 of 505

5
433
5-2. Steps to take in an emergency
When trouble arises
86_EE (OM18071E)
WARNING
■
Do not drive the vehicle with a flat tire
Do not continue driving with a flat tire.
Driving even a short distance with a flat tire can damage the tire and the
wheel beyond repair.
Driving with a flat tire may cause a circumferential groove on the side wall. In
such a case, the tire may explode when using a repair kit.
■ Caution while driving
●Store the repair kit in the trunk.
Injuries may result in the event of an accident or sudden braking.
● The repair kit is exclusively only for your vehicle.
Do not use repair kit on other vehicles, which could lead to an accident
causing death or serious injury.
● Do not use repair kit for tires that are different size than the original ones,
or for any other purpose. If the tires have not been completely repaired, it
could lead to an accident causing death or serious injury.
■ Precautions for use of the sealant
●Ingesting the sealant is hazardous to your health. If you ingest sealant,
consume as much water as possible, and then immediately consult a doc-
tor.
● If sealant gets in eyes or adheres to skin, immediately wash it off with
water. If discomfort persists, consult a doctor.
Page 436 of 505

436
5-2. Steps to take in an emergency
86_EE (OM18071E)
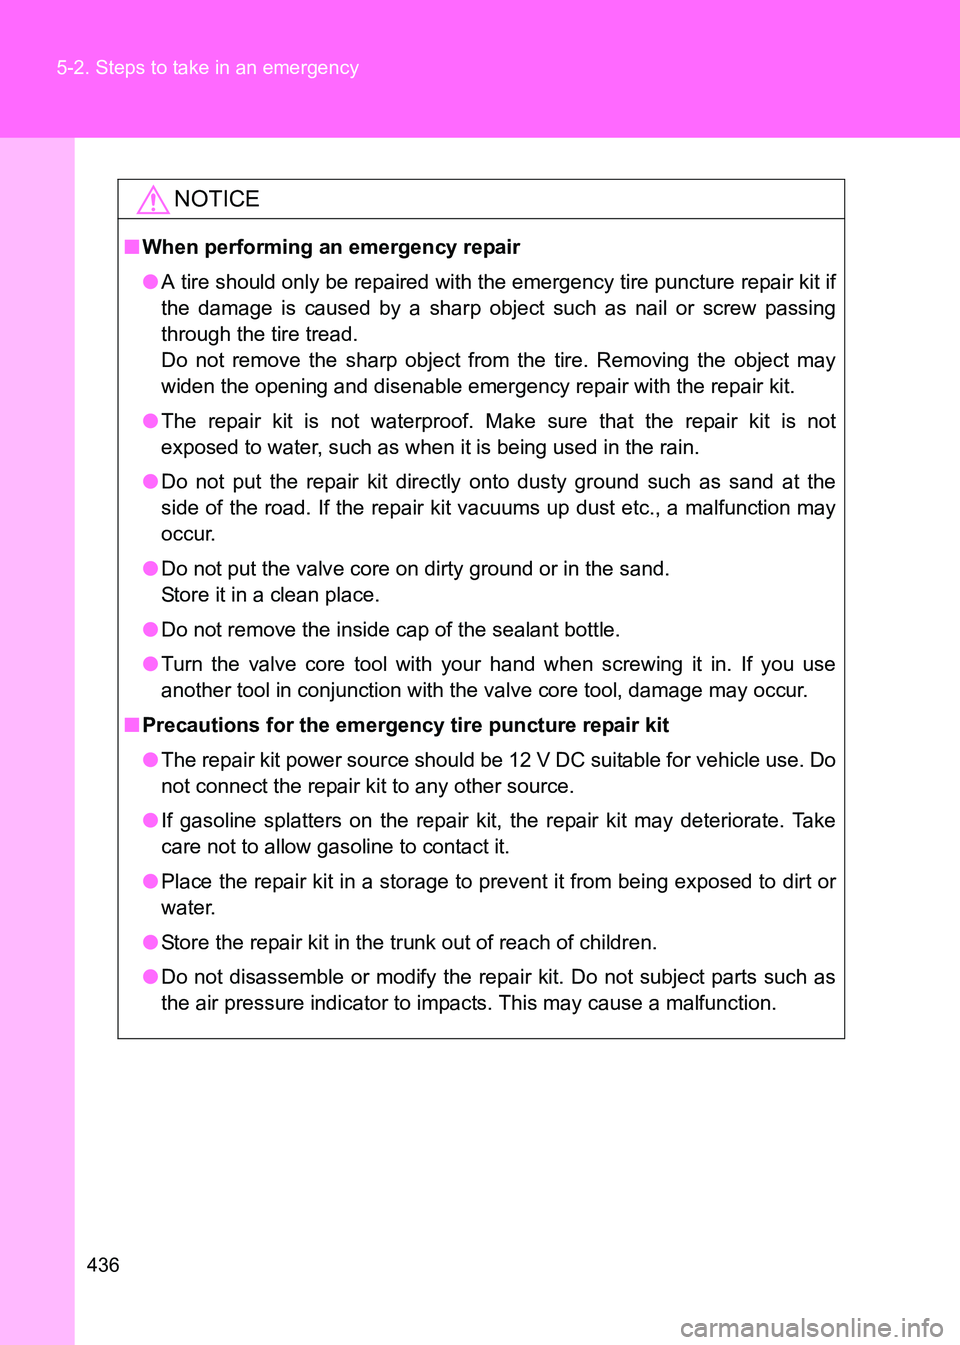
NOTICE
■
When performing an emergency repair
●A tire should only be repaired with the emergency tire puncture repair kit if
the damage is caused by a sharp object such as nail or screw passing
through the tire tread.
Do not remove the sharp object from the tire. Removing the object may
widen the opening and disenable emergency repair with the repair kit.
● The repair kit is not waterproof. Make sure that the repair kit is not
exposed to water, such as when it is being used in the rain.
● Do not put the repair kit directly onto dusty ground such as sand at the
side of the road. If the repair kit vacuums up dust etc., a malfunction may
occur.
● Do not put the valve core on dirty ground or in the sand.
Store it in a clean place.
● Do not remove the inside cap of the sealant bottle.
● Turn the valve core tool with your hand when screwing it in. If you use
another tool in conjunction with the valve core tool, damage may occur.
■ Precautions for the emergency tire puncture repair kit
●The repair kit power source should be 12 V DC suitable for vehicle use. Do
not connect the repair kit to any other source.
● If gasoline splatters on the repair kit, the repair kit may deteriorate. Take
care not to allow gasoline to contact it.
● Place the repair kit in a storage to prevent it from being exposed to dirt or
water.
● Store the repair kit in the trunk out of reach of children.
● Do not disassemble or modify the repair kit. Do not subject parts such as
the air pressure indicator to impacts. This may cause a malfunction.
Page 449 of 505

5
449
5-2. Steps to take in an emergency
When trouble arises
86_EE (OM18071E)
NOTICE
■
Do not drive the vehicle with a flat tire.
Do not continue driving with a flat tire.
Driving even a short distance with a flat tire can damage the tire and the
wheel beyond repair.
■ Be careful when driving over bumps with the compact spare tire
installed on the vehicle. (vehicles with a compact spare tire)
The vehicle becomes lower when driving with the compact spare tire com-
pared to when driving with standard tires. Be careful when driving over
uneven road surfaces.
■ Driving with tire chains and the compact spare tire (vehicles with a
compact spare tire)
Do not fit tire chains to the compact spare tire.
Tire chains may damage the vehicle body and adversely affect driving per-
formance.
■ Stowing the jack
When stowing the jack in the jack holder, make sure that the part that the
jack handle attaches to is pointing towards the inside of the trunk. Failure to
do so may damage the vehicle body.
■ When replacing the tires
When removing or fitting the wheels, tires or the tire pressure warning valve
and transmitter, contact any authorized To yota dealer or repairer, or another
duly qualified and equipped professional as the tire pressure warning valve
and transmitter may be damaged if not handled correctly.
■ To avoid damage to the tire pressure warning valves and transmitters
When a tire is repaired with liquid sealants, the tire pressure warning valve
and transmitter may not operate properly. If a liquid sealant is used, contact
any authorized Toyota dealer or re pairer, or another duly qualified and
equipped professional or other qualified service shop as soon as possible.
Make sure to replace the tire pressure warning valve and transmitter when
replacing the tire. ( →P. 343)
Page 455 of 505
5
455
5-2. Steps to take in an emergency
When trouble arises
86_EE (OM18071E)
If the electronic key does not operate properly (vehicles with a smart entr y & start system)
Unlocking and locking the doors, unlocking the trunkUse the mechanical key built in to the electronic keys to operate the
doors and trunk. ( →P. 33)
Doors Vehicles without a double
locking systemLocks driver’s door
Unlocks driver’s door
Vehicles with a double lock-
ing system Locks both side doors
Unlocks both side doors
Trunk (left-hand drive vehicles only)
Turn the mechanical key clock-
wise to open.
If communication between the electronic key and vehicle is inter-
rupted (→P. 41) or the electronic key cannot be used because the
battery is depleted, the smart entry & start system and wireless
remote control cannot be used. In such cases, the doors and trunk
can be opened or the engine can be started by following the proce-
dure below.
Page 484 of 505
484
6-1. Specifications
86_EE (OM18071E)
Light bulbs
A: Wedge base bulbs (clear) B: Wedge base bulbs (amber)
C: Double end bulbs
Light BulbsWTy p e
Exterior
Back-up lights 16 A
Rear fog lights 21 A
License plate lights 5 A
Side turn signal lights 5 B
InteriorVanity lights (if equipped) 2 C
Interior light 10 C
Door courtesy lights (if equipped) 5 B
Trunk light 5 B
Page 487 of 505

487
6
Vehicle specifications
86_EE (OM18071E)
6-2. Customization
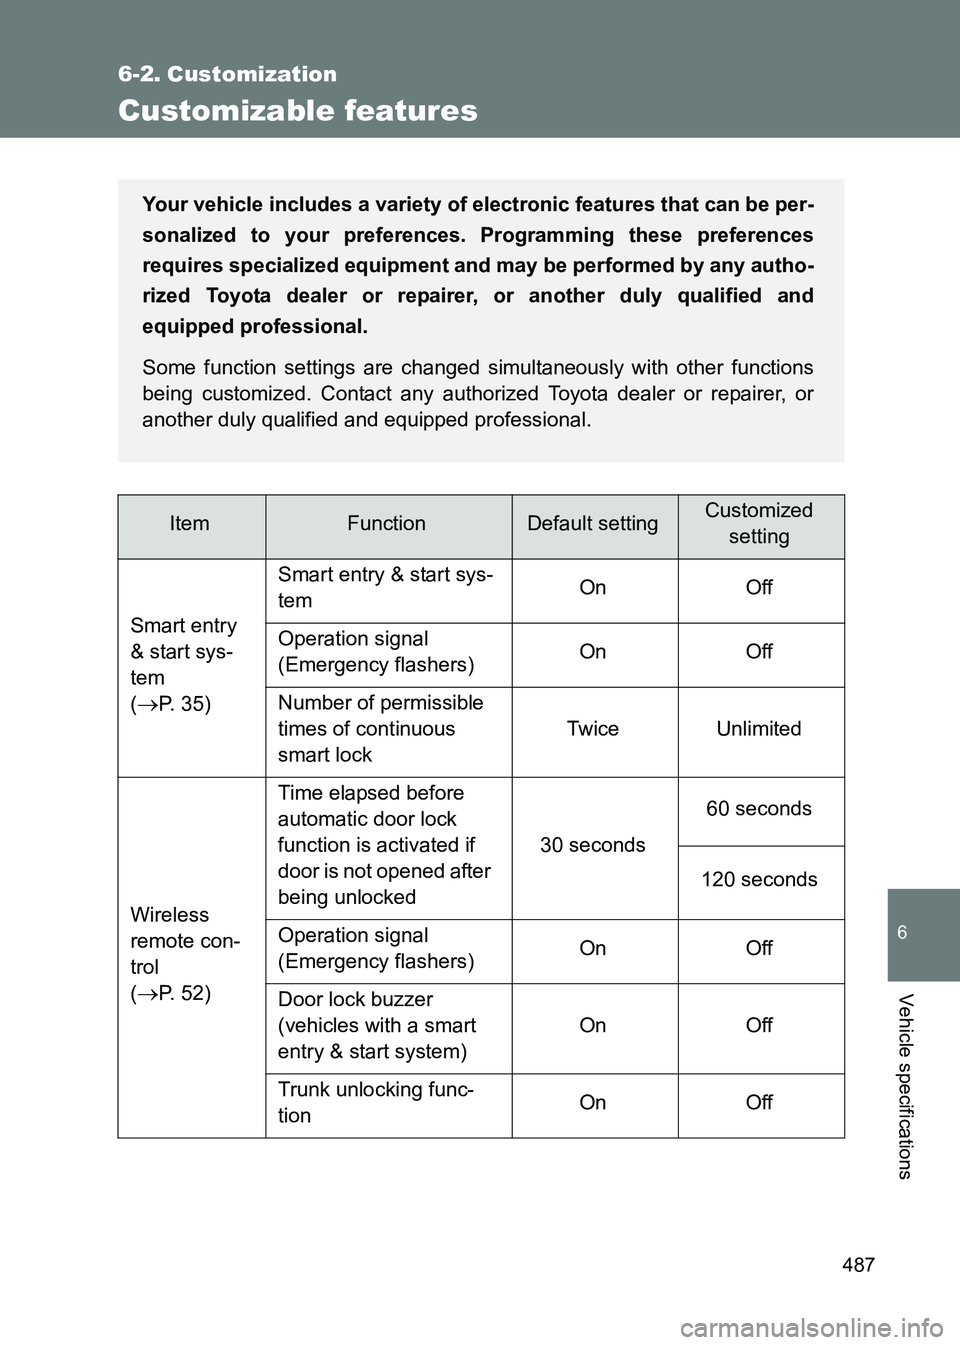
Customizable features
ItemFunctionDefault settingCustomizedsetting
Smart entry
& start sys-
tem
(
→P. 35) Smart entry & start sys-
tem
On Off
Operation signal
(Emergency flashers) On Off
Number of permissible
times of continuous
smart lock Twice Unlimited
Wireless
remote con-
trol
(
→P. 52) Time elapsed before
automatic door lock
function is activated if
door is not opened after
being unlocked
30 seconds
60 seconds
120 seconds
Operation signal
(Emergency flashers) On Off
Door lock buzzer
(vehicles with a smart
entry & start system) On Off
Trunk unlocking func-
tion On Off
Your vehicle includes a variety of
electronic features that can be per-
sonalized to your preferences. Programming these preferences
requires specialized equipment and may be performed by any autho-
rized Toyota dealer or repairer, or another duly qualified and
equipped professional.
Some function settings are changed simultaneously with other functions
being customized. Contact any authorized Toyota dealer or repairer, or
another duly qualified and equipped professional.
Page 488 of 505

488
6-2. Customization
86_EE (OM18071E)
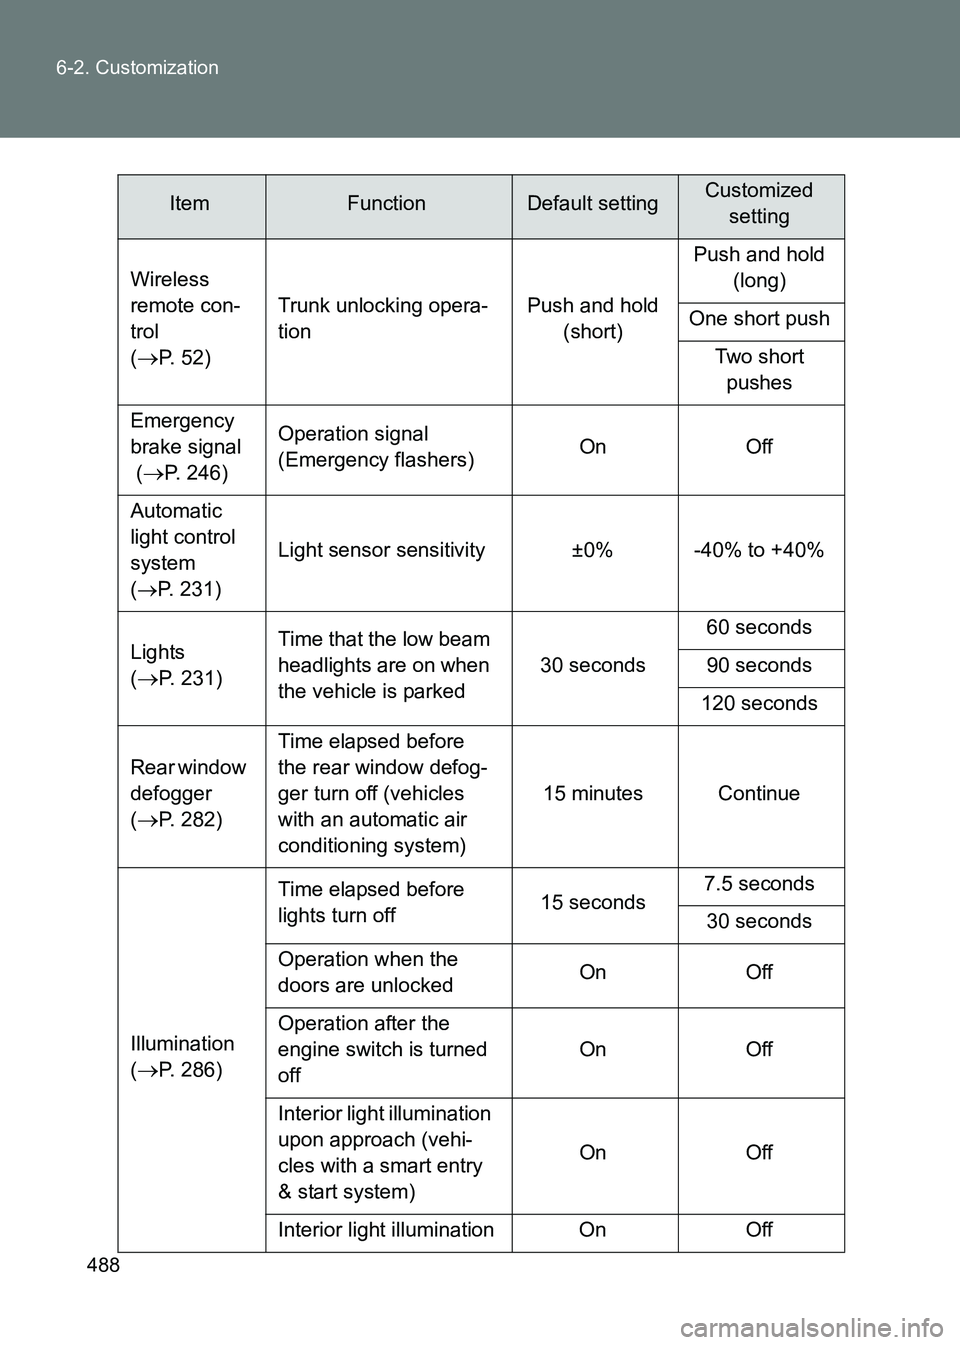
Wireless
remote con-
trol
(
→P. 52)
Trunk unlocking opera-
tion
Push and hold
(short) Push and hold
(long)
One short push Two short pushes
Emergency
brake signal
(
→P. 246) Operation signal
(Emergency flashers)
On Off
Automatic
light control
system
( → P. 231) Light sensor sensitivity ±0% -40% to +40%
Lights
(
→P. 231) Time that the low beam
headlights are on when
the vehicle is parked
30 seconds60 seconds
90 seconds
120 seconds
Rear window
defogger
(
→P. 282) Time elapsed before
the rear window defog-
ger turn off (vehicles
with an automatic air
conditioning system)
15 minutes Continue
Illumination
(
→P. 286) Time elapsed before
lights turn off
15 seconds7.5 seconds
30 seconds
Operation when the
doors are unlocked On Off
Operation after the
engine switch is turned
off On Off
Interior light illumination
upon approach (vehi-
cles with a smart entry
& start system) On Off
Interior light illumination On Off
ItemFunctionDefault settingCustomized setting
Page 493 of 505

493
Alphabetical index
86_EE (OM18071E)
Child safety
Airbag precautions ................ 127
Battery precautions ....... 338, 462
Child restraint system ........... 136
How your child should wear the seat belt ................. 75
Installing child restraints........ 145
Power window lock switch ...... 85
Power window precautions ..... 88
Removed key battery precautions ......................... 363
Seat belt guide ........................ 74
Seat belt precautions .............. 76
Seat heater precautions........ 299
Trunk precautions ................... 62
Cleaning Alcantara
®............................. 316
Aluminum wheels.................. 309
Exterior.................................. 308
Interior................................... 312
Seat belts .............................. 313
Clock ......................................... 295
Condenser ................................ 334
Console tray ............................. 291
Coolant Capacity ................................ 479
Checking ............................... 332
Cooling system Engine overheating ............... 464
Cruise control .......................... 241
Cup holders .............................. 291
Curtain airbags ........................ 106
Customizable features ............ 487 Daytime running light
system .................................... 233
Defogger Rear window ......................... 282
Side mirror ............................ 282
Dimensions .............................. 472
Display Drive information................... 218
Multi-information display ........................ 210, 215
Trip information ............. 213, 216
Warning messages ............... 404
Do-it-yourself maintenance .... 321
Door courtesy lights Door courtesy lights .............. 286
Wattage ................................ 484
Doors
Door lock..................... 35, 52, 57
Door windows ......................... 85
Double locking system .......... 102
Side mirrors ............................ 82
Drive information ..................... 218
Driver's seat belt reminder light ........................ 399
Driving Break-in tips .......................... 163
Correct posture ..................... 104
Procedures ........................... 160
Winter drive tips .................... 259
D