Page 310 of 505

310
4-1. Maintenance and care
86_EE (OM18071E)
NOTICE
■
To prevent paint deterioration and corrosion on the body and compo-
nents (aluminum wheels etc.)
●Wash the vehicle immediately in the following cases:
• After driving near the sea coast
• After driving on salted roads
• If you see coal tar or tree sap on the paint surface
• If you see dead insects, insect droppings or bird droppings on the paint
• After driving in an area contaminated with soot, oily smoke, mine dust,
iron powder or chemical substances
• If the vehicle becomes heavily soiled in dust or mud
• If liquids such as benzene and gasoline are spilled on the paint surface
● If the paint is chipped or scratched, have it repaired immediately.
● To prevent the wheels from corroding, remove any dirt and store in a place
with low humidity when storing the wheels.
■ Protective film for side sill plates (if equipped)
Make sure to remove the protective film. Failure to do so may cause rust,
depending on conditions.
■ Cleaning the exterior lights
●Wash carefully. Do not use organic substances or scrub with a hard brush.
This may damage the surfaces of the lights.
● Do not apply wax on the surfaces of the lights.
Wax may cause damage to the lenses.
■ To prevent damage to the windshield wiper arms
When lifting the wiper arms away from the windshield, pull the driver side
wiper arm upward first, and repeat for the passenger side. When returning
the wipers to their original position, do so from the passenger side first.
Page 314 of 505

314
4-1. Maintenance and care
86_EE (OM18071E)
NOTICE
■
Cleaning detergents
●Do not use organic substances such as benzene or gasoline, acidic or
alkaline solutions, dye, bleach or other detergent. Doing so may discolor
the vehicle interior or cause streaks or damage to painted surfaces.
● Do not use polish wax or polish cleaner. The instrument panel's or other
interior part’s painted surface may be damaged.
● Do not use a chemical agent containing silicone (highly-polymerized sili-
con compound) when cleaning any of the electrical appliances such as the
air conditioning, all switches and their surrounding areas.
If silicon (highly-polymerized silicon compound) contacts these compo-
nents, it may cause the electrical appliances to malfunction.
■ Preventing damage to leather surfaces
Observe the following precautions to avoid damage to and deterioration of
leather surfaces.
●Remove any dust, dirt, sand, oil spots etc. on leather surfaces immedi-
ately.
● Do not expose the vehicle to direct sunlight for extended periods of time.
Park the vehicle in the shade, especially during summer.
● Do not place items made of vinyl, plastic, or that contain wax on the uphol-
stery, as they may stick to the leather surface if the vehicle interior heats
up significantly.
■ Water on the floor
Do not wash the vehicle floor with water.
Vehicle systems such as the audio system may be damaged if water comes
into contact with electrical components under the floor of the vehicle, and
may also cause the body to rust.
Page 317 of 505

317
4-1. Maintenance and care
4
Maintenance and care
86_EE (OM18071E)
■
When removing dirt or dust from the Alcantara® areas
Remove dirt or dust from the Alcantara
® areas by lighting brushing with a
soft brush. If this does not remove the dirt or dust, remove it using adhesive
tape.
NOTICE
■ When soaking up spilled liquids
Do not press down too firmly with the cloth, tissue paper etc., as doing so
may cause the liquid to further penetrate the material, making soaking up
the liquid more difficult.
If the Alcantara® upholstery surface becomes uneven,
lightly brush it with a soft brush.
Allow the surface to dry completely.
■ Oil stains
You will need the following items:
●A cloth that has been dampened with benzene
● A dry cloth
Using a dry cloth or tissue paper, wipe away as much of the
oil as possible to prevent the stained area from expanding.
After patting the area from the outside to the inside from
multiple angles using the cloth dampened with benzene,
soak up the oil and benzene that floats up by patting the
area with a dry cloth.
If the Alcantara
® upholstery surface becomes uneven,
lightly brush it with a soft brush.
STEP 2
STEP 3
STEP 1
STEP 2
STEP 3
Page 321 of 505

321
4
Maintenance and care
86_EE (OM18071E)
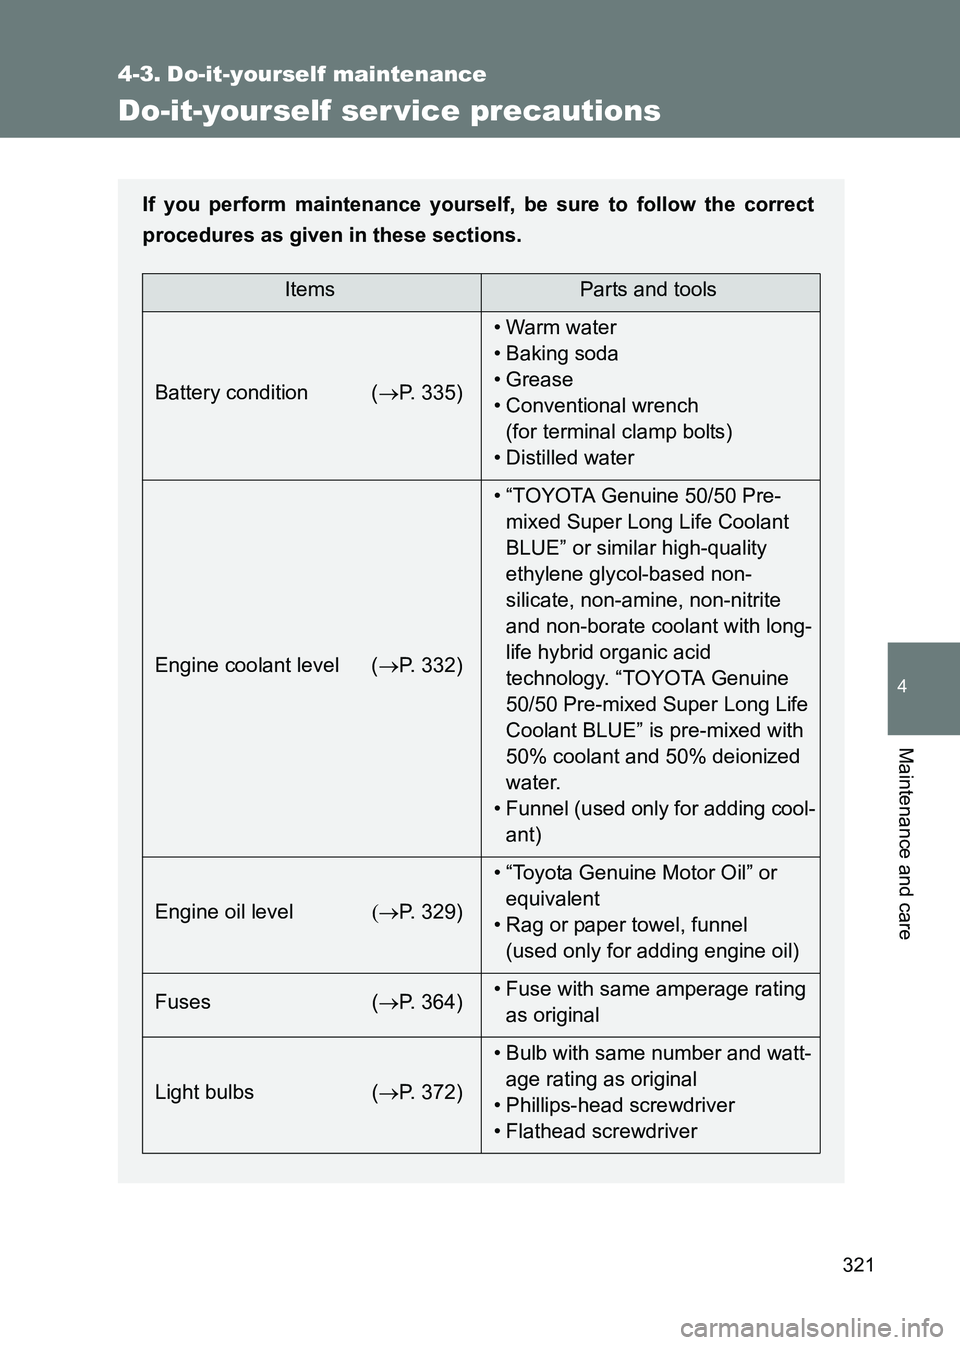
4-3. Do-it-yourself maintenance
Do-it-yourself ser vice precautions
If you perform maintenance yourself, be sure to follow the correct
procedures as given in these sections.
ItemsParts and tools
Battery condition ( →P. 335) •Warm water
• Baking soda
• Grease
• Conventional wrench
(for terminal clamp bolts)
• Distilled water
Engine coolant level ( →P. 332) • “TOYOTA Genuine 50/50 Pre-
mixed Super Long Life Coolant
BLUE” or similar high-quality
ethylene glycol-based non-
silicate, non-amine, non-nitrite
and non-borate coolant with long-
life hybrid organic acid
technology. “TOYOTA Genuine
50/50 Pre-mixed Super Long Life
Coolant BLUE” is pre-mixed with
50% coolant and 50% deionized
water.
• Funnel (used only for adding cool- ant)
Engine oil level (→P. 329) • “Toyota Genuine Motor Oil” or
equivalent
• Rag or paper towel, funnel (used only for adding engine oil)
Fuses ( →P. 364) • Fuse with same amperage rating
as original
Light bulbs ( →P. 372) • Bulb with same number and watt-
age rating as original
• Phillips-head screwdriver
• Flathead screwdriver
Page 322 of 505

322
4-3. Do-it-yourself maintenance
86_EE (OM18071E)
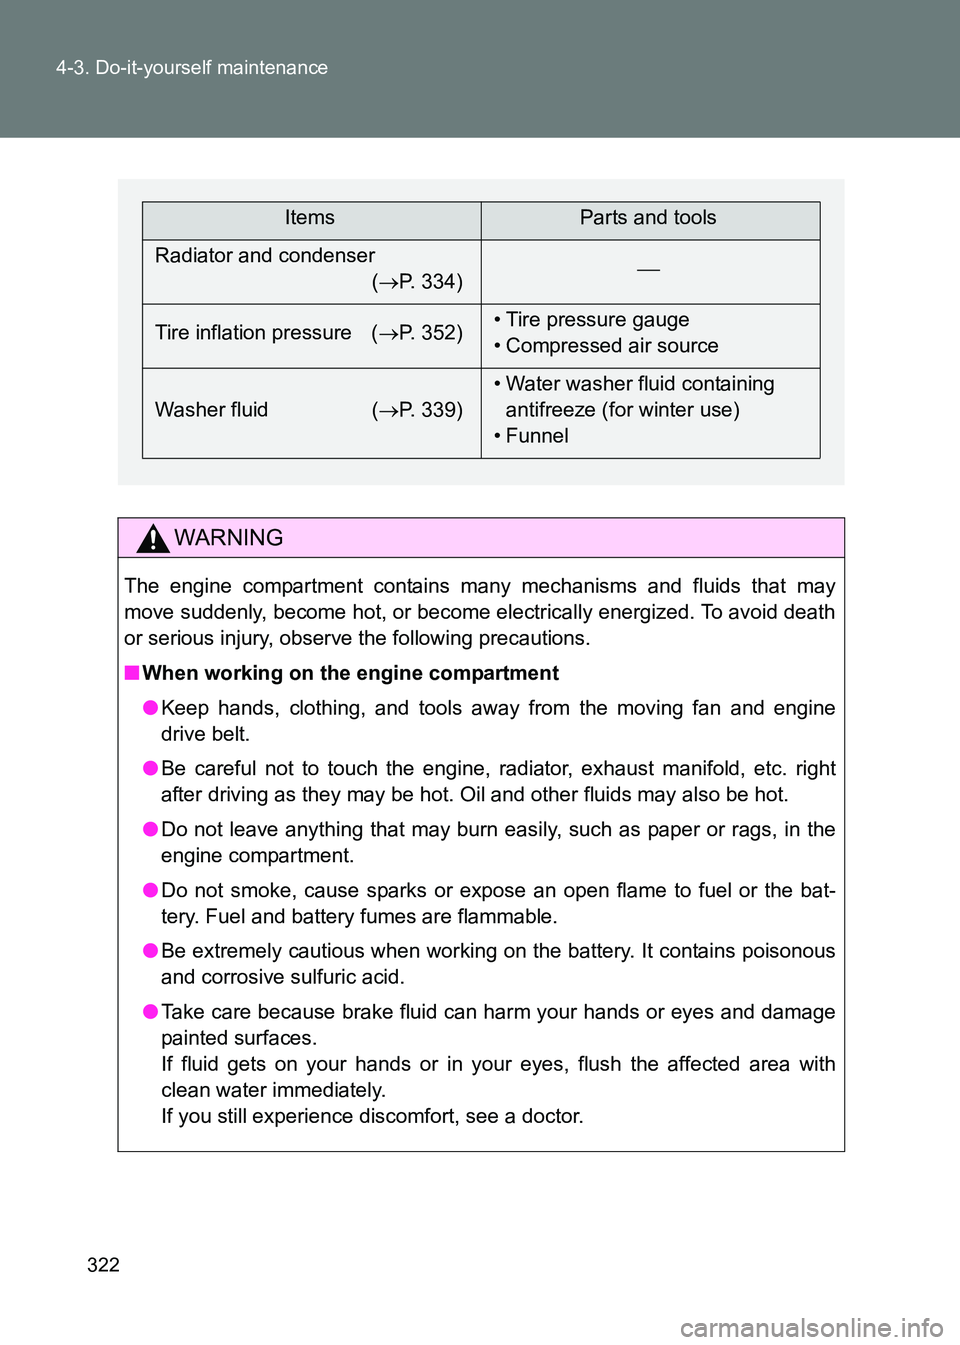
WARNING
The engine compartment contains many mechanisms and fluids that may
move suddenly, become hot, or become electrically energized. To avoid death
or serious injury, observe the following precautions.
■
When working on the engine compartment
●Keep hands, clothing, and tools away from the moving fan and engine
drive belt.
● Be careful not to touch the engine, radiator, exhaust manifold, etc. right
after driving as they may be hot. Oil and other fluids may also be hot.
● Do not leave anything that may burn easily, such as paper or rags, in the
engine compartment.
● Do not smoke, cause sparks or expose an open flame to fuel or the bat-
tery. Fuel and battery fumes are flammable.
● Be extremely cautious when working on the battery. It contains poisonous
and corrosive sulfuric acid.
● Take care because brake fluid can harm your hands or eyes and damage
painted surfaces.
If fluid gets on your hands or in your eyes, flush the affected area with
clean water immediately.
If you still experience discomfort, see a doctor.
ItemsParts and tools
Radiator and condenser (→ P. 334)
Tire inflation pressure ( →P. 352) • Tire pressure gauge
• Compressed air source
Washer fluid ( →P. 339) • Water washer fluid containing
antifreeze (for winter use)
• Funnel
Page 328 of 505
328
4-3. Do-it-yourself maintenance
86_EE (OM18071E)
Engine compar tment
*: For right-hand drive vehicles: This is located on the opposite side of theengine compartment.
Battery* ( →P. 335)
Engine oil level dipstick (→ P. 329)
Engine oil filler cap (→ P. 330)
Washer fluid tank ( →P. 339)Electric cooling fans
Condenser (if equipped)
(→ P. 334)
Radiator ( →P. 334)
Engine coolant reservoir (→ P. 332)
Fuse box ( →P. 364)
Page 329 of 505
329
4-3. Do-it-yourself maintenance
4
Maintenance and care
86_EE (OM18071E)
Engine oil
With the engine at operating temperature and turned off, check the oil
level on the dipstick.
■ Checking the engine oil
Park the vehicle on level ground. After warming up the engine
and turning it off, wait more than five minutes for the oil to
drain back into the bottom of the engine.
Hold a rag under the end and
pull the dipstick out.
Wipe the dipstick clean.
Reinsert the dipstick fully.
Holding a rag under the end, pull the dipstick out and check
the oil level.
When checking the oil, look at both sides of the dipstick and use the
lower measurement to determine the level of oil.
Wipe the dipstick and reinsert it fully. Low
Full
STEP 1
STEP 2
STEP 3
STEP 4
STEP 5
STEP 6
Page 330 of 505
330
4-3. Do-it-yourself maintenance
86_EE (OM18071E)
■
Adding engine oil
If the oil level is below or near
the low level mark, add engine
oil of the same type as already in
the engine.
Make sure to check the oil type and prepare the items needed before
adding oil.
Remove the oil filler cap by turning it counterclockwise.
Add engine oil slowly, checking the dipstick.
Install the oil filler cap by turning it clockwise.
Engine oil selection →
P. 476
Oil quantity
(Low → Full) 1.0 L (1.1 qt., 0.9 Imp. qt.)
Items
Clean funnel
STEP 1
STEP 2
STEP 3