Page 146 of 568

1464-1. Before driving
CAMRY_U (OM33C64U)
NOTICE
■When driving the vehicle
● Do not depress the accelerator and brake pedals at the same time during
driving, as this may restrain driving torque.
● Do not use the accelerator pedal or depress the accelerator and brake
pedals at the same time to hold the vehicle on a hill.
■ When parking the vehicle
Always shift the shift lever to P. Failure to do so may cause the vehicle to
move or the vehicle may accelerate suddenly if the accelerator pedal is
accidentally depressed.
■ Avoiding damage to vehicle parts
● Do not turn the steering wheel fully in either direction and hold it there for
an extended period of time.
Doing so may damage the power steering motor.
● When driving over bumps in the road, drive as slowly as possible to avoid
damaging the wheels, underside of the vehicle, etc.
■ If you get a flat tire while driving
A flat or damaged tire may cause the following situations. Hold the steering
wheel firmly and gradually depress the brake pedal to slow down the vehi-
cle.
● It may be difficult to control your vehicle.
● The vehicle will make abnormal sounds or vibrations.
● The vehicle will lean abnormally.
Information on what to do in case of a flat tire ( P. 470)
■ When encounterin g flooded roads
Do not drive on a road that has flooded after heavy rain etc. Doing so may
cause the following serious damage to the vehicle:
● Engine stalling
● Short in electrical components
● Engine damage caused by water immersion
In the event that you drive on a flooded road and the vehicle is flooded, be
sure to have your Toyota dealer check the following:
● Brake function
● Changes in quantity and quality of oil and fluid used for the engine, tran-
saxle, etc.
● Lubricant condition for the bearings and suspension joints (where possi-
ble), and the function of all joints, bearings, etc.
Page 153 of 568
153
4
Driving
CAMRY_U (OM33C64U)
4-2. Driving procedures
Check that the parking brake is set.
Check that the shift lever is in P.
Firmly depress the brake pedal.
Turn the engine switch to the “START” position and start the
engine.
“LOCK”
The steering wheel is locked and
the key can be removed. (The key
can be removed only when the
shift lever is in P.)
“ACC”
Some electrical components such
as the audio system can be used.
“ON”
All electrical components can be used.
“START”
For starting the engine.
■ Turning the key from “ACC” to “LOCK”
Shift the shift lever to P. ( P. 160)
Engine (ignition) switch (vehicles without a
smart key system)
Starting the engine
Changing the engine switch positions
1
2
3
4
1
2
Push in the key and turn it to the
“LOCK” position.
3
4
1
2
Page 155 of 568

1554-2. Driving procedures
4
Driving
CAMRY_U (OM33C64U)
Check that the parking brake is set.
Check that the shift lever is in P.
Firmly depress the brake pedal.
Messages indicating how to start the engine and how to turn to ACCES-
SORY mode will be displayed alternately on the multi-information display.
Press the engine switch shortly
and firmly.
When operating the engine switch,
one short, firm press is enough. It
is not necessary to press and hold
the switch.
The engine will crank until it starts
or for up to 30 seconds, whichever
is less.
Continue depressing the brake
pedal until the engine is completely
started.
The engine can be started from
any engine switch mode.
Stop the vehicle.
Shift the shift lever to P.
Set the parking brake. (P. 165)
Press the engine switch.
Driving-related data will be displayed on the multi-information display.
Engine (ignition) swit ch (vehicles with a
smart key system)
Performing the following operati ons when carrying the elec-
tronic key on your person starts the engine or changes engine
switch modes.
Starting the engine
1
2
3
4
Stopping the engine
1
2
3
4
Page 156 of 568

1564-2. Driving procedures
CAMRY_U (OM33C64U)
Modes can be changed by pressing the engine switch with the brake
pedal released. (The mode changes ea ch time the switch is pressed.)
Off
*
The emergency flashers can be
used.
The multi-information display will
not be displayed.
ACCESSORY mode
Some electrical components such
as the audio system can be used.
A message indicating how to start
the engine will be displayed on the
multi-information display.
IGNITION ON mode
All electrical components can be used.
*: If the shift lever is in a position other than P when turning off the engine, the engine switch will be turned to ACCESSORY mode, not to off.
If the engine is stopped with the shif t lever in a position other than P,
the engine switch will not be turned off but instead be turned to
ACCESSORY mode. Perform the following procedure to turn the
switch off:
Check that the parking brake is set.
Shift the shift lever to P.
Check that “Turn Power OFF” is displayed on the multi-information
display and then press the engine switch once.
Check that “Turn Power OFF” on the multi-information display is
turned off.
Changing engine switch modes
When stopping the engine with the shift lever in a position other
than P
1
2
3
4
Page 165 of 568
1654-2. Driving procedures
4
Driving
CAMRY_U (OM33C64U)
To set the parking brake, fully
depress the parking brake pedal
with your left foot while depress-
ing the brake pedal with your right
foot.
(Depressing the pedal again
releases the parking brake.)
■Parking brake engaged warning buzzer
P. 446, 455
■ Usage in winter time
P. 234
Parking brake
Operating instructions
U.S.A. Canada
NOTICE
■Before driving
Fully release the parking brake.
Driving the vehicle with the parking brake set will lead to brake components
overheating, which may affect braking performance and increase brake
wear.
Page 167 of 568

1674-3. Operating the lights and wipers
4
Driving
CAMRY_U (OM33C64U)
With the headlights on, push
the lever away from you to turn
on the high beams.
Pull the lever toward you to the
center position to turn the high
beams off.
Pull the lever toward you and
release it to flash the high
beams once.
You can flash the high beams with the headlights on or off.
■Daytime running light system
●Vehicles with halogen daytime running lights:
To make your vehicle more visible to other drivers during daytime driving,
the daytime running lights turn on automatically whenever the engine is
started and the parking brake is released with the headlight switch in the
“AUTO” position. (Illuminate darker than headlight high beams.) Daytime
running lights are not designed for use at night.
Vehicles with LED daytime running lights:
To make your vehicle more visible to other drivers during daytime driving,
the daytime running lights turn on automatically whenever the engine is
started and the parking brake is released with the headlight switch in the
“AUTO” position. (Illuminate brighter than parking lights.) Daytime running
lights are not designed for use at night.
U.S.A.: Daytime running lights can be turned off by operating the switch.
Canada: Daytime running lights are turned on even when the headlight
switch is in position.
● Compared to turning on the headlights, the daytime running light system
offers greater durability and consumes less electricity, so it can help improve
fuel economy.
■ Headlight control sensor
Turning on the high beam headlights
1
2
The sensor may not function properly if an
object is placed on the sensor, or anything
that blocks the sensor is affixed to the
windshield.
Doing so interferes with the sensor
detecting the level of ambient light and
may cause the automatic headlight sys-
tem to malfunction.
Page 212 of 568

2124-5. Using the driving support systems
CAMRY_U (OM33C64U)
WARNING
■When using the rear view monitor system
The rear view monitor system is a supplemental device intended to assist
the driver when backing up. When backing up, be sure to check visually
behind and all around the vehicle before proceeding.
Observe the following precautions to avoid an accident that could result in
death or serious injuries.
● Never depend on the rear view monitor system entirely when backing up.
The image and the position of the guide lines displayed on the screen may
differ from the actual state.
Use caution, just as you would when backing up any vehicle.
● Be sure to back up slowly, depressing the brake pedal to control vehicle
speed.
● The instructions given are only guidelines.
When and how much to turn the steering wheel will vary according to traf-
fic conditions, road surface conditions, vehicle condition, etc. when park-
ing. It is necessary to be fully aware of this before using the rear view
monitor system.
● When parking, be sure to check that the parking space will accommodate
your vehicle before maneuvering into it.
● Do not use the rear view monitor system in the following cases:
• On icy or slick road surfaces, or in snow
• When using tire chains or the compact spare tire
• When the trunk lid is not closed completely
• On roads that are not flat or straight, such as curves or slopes.
● In low temperatures, the screen may darken or the image may become
faint. The image could distort when the vehicle is moving, or you may
become unable to see the image on the screen. Be sure to check direct
visually and with the mirrors all around the vehicle before proceeding.
● If the tire sizes are changed, the position of the fixed guide lines displayed
on the screen may change.
● The camera uses a special lens. The distances between objects and
pedestrians that appear in the image displayed on the screen will differ
from the actual distances. ( P. 208)
Page 235 of 568

2354-6. Driving tips
4
Driving
CAMRY_U (OM33C64U)
Accelerate the vehicle slowly, keep a safe distance between you and
the vehicle ahead, and drive at a reduced speed suitable to road con-
ditions.
Park the vehicle and move the shift lever to P without setting the park-
ing brake. The parking brake may fr eeze up, preventing it from being
released. If necessary, block the wheels to prev ent inadvertent sliding
or creeping.
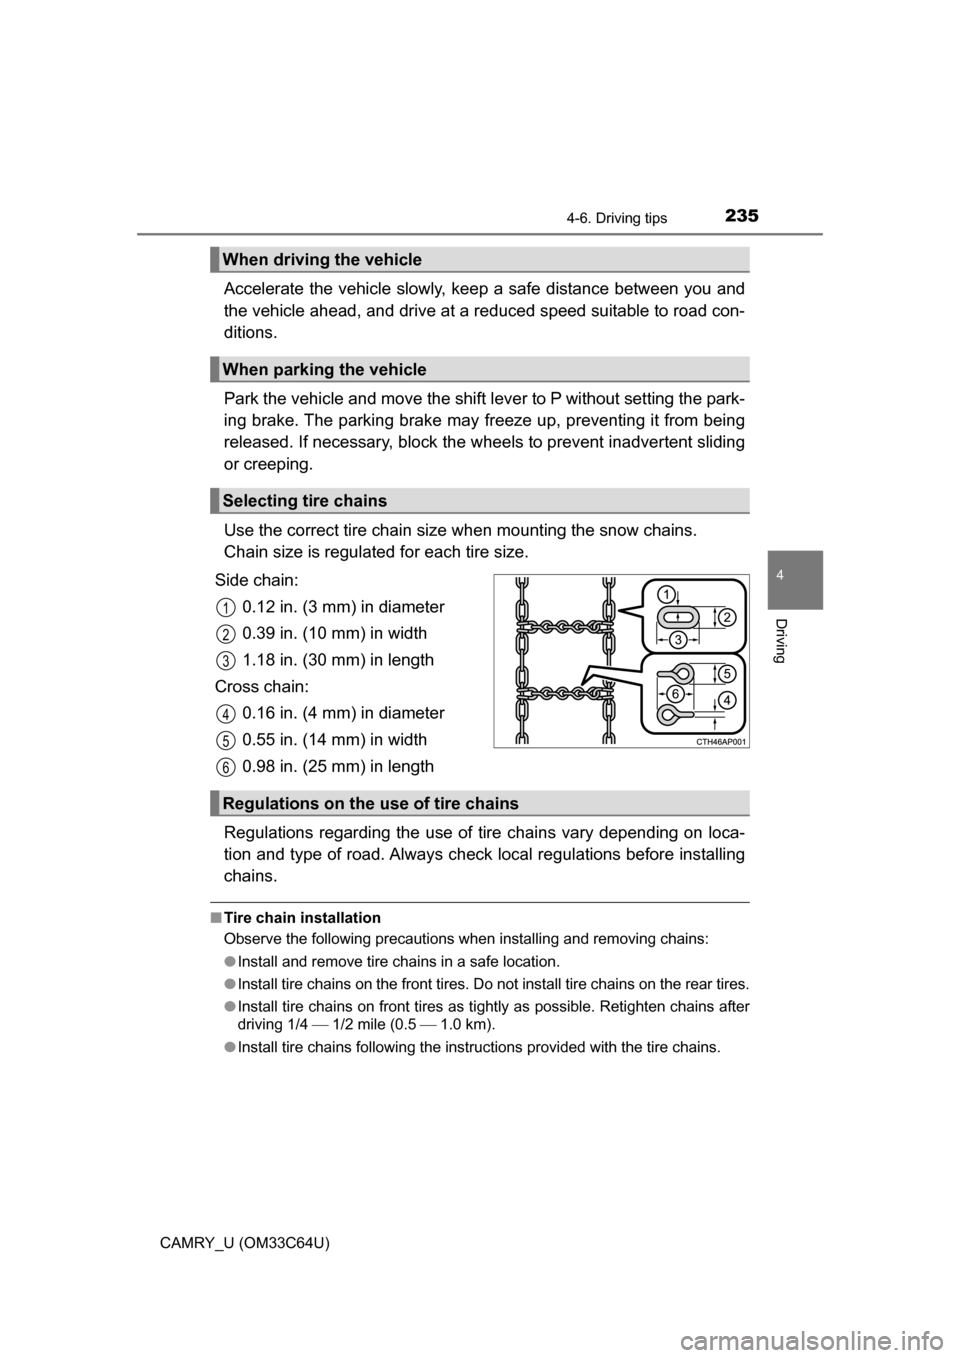
Use the correct tire chain size when mounting the snow chains.
Chain size is regulated for each tire size.
Side chain: 0.12 in. (3 mm) in diameter
0.39 in. (10 mm) in width
1.18 in. (30 mm) in length
Cross chain: 0.16 in. (4 mm) in diameter
0.55 in. (14 mm) in width
0.98 in. (25 mm) in length
Regulations regarding the use of tire chains vary depending on loca-
tion and type of road. Al ways check local regulations before installing
chains.
■ Tire chain installation
Observe the following precautions when installing and removing chains:
●Install and remove tire chains in a safe location.
● Install tire chains on the front tires. Do not install tire chains on the rear tires.
● Install tire chains on front tires as tightly as possible. Retighten chains after
driving 1/4 1/2 mile (0.5 1.0 km).
● Install tire chains following the instructions provided with the tire ch\
ains.
When driving the vehicle
When parking the vehicle
Selecting tire chains
1
2
3
4
5
6
Regulations on the use of tire chains