2017 TOYOTA AURIS HYBRID bulb
[x] Cancel search: bulbPage 6 of 664

TABLE OF CONTENTS6
AURIS Touring Sports_EE (12L13E)7-1. Maintenance and care
Cleaning and protecting
the vehicle exterior ..........452
Cleaning and protecting
the vehicle interior ...........456
7-2. Maintenance
Maintenance
requirements....................459
7-3. Do-it-yourself
maintenance
Do-it-yourself service
precautions ......................462
Hood ..................................465
Positioning a floor jack .......467
Engine compartment..........468
Tires ...................................490
Tire inflation pressure ........504
Wheels ...............................506
Air conditioning filter ..........509
Wireless remote control/
electronic key battery .......511
Checking and replacing
fuses ................................514
Light bulbs .........................519
8-1. Essential information
Emergency flashers ...........534
If your vehicle has
to be stopped
in an emergency ..............5358-2. Steps to take
in an emergency
If your vehicle needs
to be towed ..................... 537
If you think something
is wrong........................... 543
Fuel pump shut off
system............................. 544
If a warning light turns
on or a warning buzzer
sounds ............................ 545
If a warning message
is displayed ..................... 557
If you have a flat tire
(vehicles with
a spare tire) ..................... 563
If you have a flat tire
(vehicles with
an emergency tire
puncture repair kit) .......... 576
If the engine will not
start ................................. 592
If the electronic key
does not operate
properly ........................... 594
If the vehicle battery is
discharged ...................... 597
If your vehicle overheats ... 603
If you run out of fuel and
the engine stalls .............. 607
If the vehicle becomes
stuck................................ 608
7Maintenance and care
8When trouble arises
AURIS Touring Sports_OM_Europe_OM12L13E.book 6 ページ 2016年6月27日 月曜日 午後5時21分
Page 15 of 664

15Pictorial index
AURIS Touring Sports_EE (12L13E)Fuel filler door . . . . . . . . . . . . . . . . . . . . . . . . . . . . . . . . . . . . P. 249
Refueling method . . . . . . . . . . . . . . . . . . . . . . . . . . . . . . . . . . P. 249
Fuel type/fuel tank capacity . . . . . . . . . . . . . . . . . . . . . . . . . . . P. 618
Tires . . . . . . . . . . . . . . . . . . . . . . . . . . . . . . . . . . . . . . . . . . . . P. 490
Tire size/inflation pressure . . . . . . . . . . . . . . . . . . . . . . . . . . . . P. 630
Winter tires/tire chains . . . . . . . . . . . . . . . . . . . . . . . . . . . . . . . P. 337
Checking/rotation/tire pressure warning system
*1 . . . . . . . . . P. 490
Coping with flat tires . . . . . . . . . . . . . . . . . . . . . . . . . . . . . . . . P. 563
Hood . . . . . . . . . . . . . . . . . . . . . . . . . . . . . . . . . . . . . . . . . . . . P. 465
Opening . . . . . . . . . . . . . . . . . . . . . . . . . . . . . . . . . . . . . . . . . . P. 465
Engine oil . . . . . . . . . . . . . . . . . . . . . . . . . . . . . . . . . . . . . . . . . P. 619
Coping with overheating . . . . . . . . . . . . . . . . . . . . . . . . . . . . . P. 603
Headlights/front position lights/daytime running lights/
turn signal lights . . . . . . . . . . . . . . . . . . . . . . . . . . . . . . P. 233, 235
Front fog lights
*1. . . . . . . . . . . . . . . . . . . . . . . . . . . . . . . . . . P. 241
Stop lights/tail lights/turn signal lights . . . . . . . . . . . . P. 233, 235
License plate lights . . . . . . . . . . . . . . . . . . . . . . . . . . . . . . . . P. 235
Tail lights . . . . . . . . . . . . . . . . . . . . . . . . . . . . . . . . . . . . . . . . P. 235
Rear fog light
*4 . . . . . . . . . . . . . . . . . . . . . . . . . . . . . . . . . . . P. 241
Back-up light
*3
Shifting the shift lever to R. . . . . . . . . . . . . . . . . . . . . . . . P. 223, 230
Tail lights . . . . . . . . . . . . . . . . . . . . . . . . . . . . . . . . . . . . . . . . P. 235
Rear fog light
*3 . . . . . . . . . . . . . . . . . . . . . . . . . . . . . . . . . . . P. 241
Back-up light
*4
Shifting the shift lever to R. . . . . . . . . . . . . . . . . . . . . . . . P. 223, 230
Roof rails
*1 . . . . . . . . . . . . . . . . . . . . . . . . . . . . . . . . . . . . . . P. 198
5
6
7
Light bulbs of the exterior lights for driving
(Replacing method: P. 519, Watts: P. 632)
*1: If equipped
*2: Vehicles with a 2-ring meter
*3: Left-hand drive vehicles
*4: Right-hand drive vehicles
8
9
10
11
12
13
14
AURIS Touring Sports_OM_Europe_OM12L13E.book 15 ページ 2016年6月27日 月曜日 午後5時21分
Page 233 of 664

2334-2. Driving procedures
AURIS Touring Sports_EE (12L13E)
4
Driving
Right turn
Lane change to the right (move
the lever partway and release
it)
The right hand signals will flash 3
times.
Lane change to the left (move
the lever partway and release
it)
The left hand signals will flash 3
times.
Left turn
■Turn signals can be operated when
Vehicles without a smart entry & start system
The engine switch is in the “ON” position.
Vehicles with a smart entry & start system
The engine switch is in IGNITION ON mode.
■If the indicator flashes faster than usual
Check that a light bulb in the front or rear turn signal lights has not burned
out.
■Customization
The number of times the turn signals flash during a lane change can be
changed. (Customizable feature P. 635)
Turn signal lever
Operating instructions
1
2
3
4
AURIS Touring Sports_OM_Europe_OM12L13E.book 233 ページ 2016年6月27日 月曜日 午後5時21分
Page 451 of 664

451
7Maintenance and care
AURIS Touring Sports_EE (12L13E)7-1. Maintenance and care
Cleaning and protecting
the vehicle exterior .......... 452
Cleaning and protecting
the vehicle interior ........... 456
7-2. Maintenance
Maintenance
requirements.................... 459
7-3. Do-it-yourself
maintenance
Do-it-yourself service
precautions ...................... 462
Hood .................................. 465
Positioning a floor jack ....... 467
Engine compartment.......... 468
Tires ................................... 490
Tire inflation pressure ........ 504
Wheels ............................... 506
Air conditioning filter .......... 509
Wireless remote control/
electronic key battery....... 511
Checking and replacing
fuses ................................ 514
Light bulbs ......................... 519
AURIS Touring Sports_OM_Europe_OM12L13E.book 451 ページ 2016年6月27日 月曜日 午後5時21分
Page 462 of 664

462
AURIS Touring Sports_EE (12L13E)
7-3. Do-it-yourself maintenance
Do-it-yourself service precautions
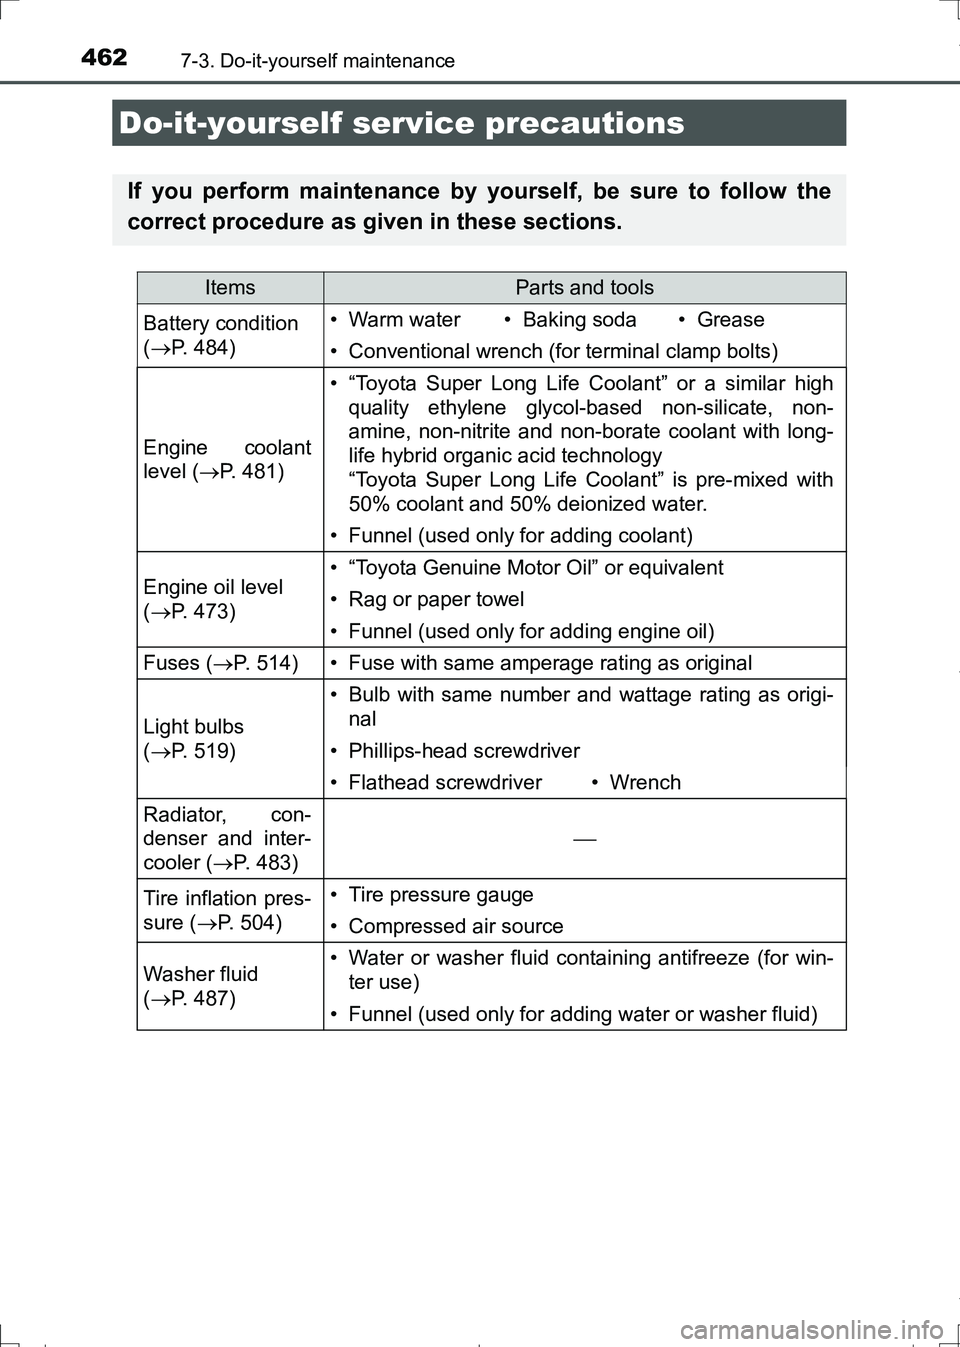
If you perform maintenance by yourself, be sure to follow the
correct procedure as given in these sections.
ItemsParts and tools
Battery condition
(P. 484)• Warm water• Baking soda• Grease
• Conventional wrench (for terminal clamp bolts)
Engine coolant
level (P. 481)
• “Toyota Super Long Life Coolant” or a similar high
quality ethylene glycol-based non-silicate, non-
amine, non-nitrite and non-borate coolant with long-
life hybrid organic acid technology
“Toyota Super Long Life Coolant” is pre-mixed with
50% coolant and 50% deionized water.
• Funnel (used only for adding coolant)
Engine oil level
(P. 473)• “Toyota Genuine Motor Oil” or equivalent
• Rag or paper towel
• Funnel (used only for adding engine oil)
Fuses (P. 514)• Fuse with same amperage rating as original
Light bulbs
(P. 519)
• Bulb with same number and wattage rating as origi-
nal
• Phillips-head screwdriver
• Flathead screwdriver• Wrench
Radiator, con-
denser and inter-
cooler (P. 483)
Tire inflation pres-
sure (P. 504)• Tire pressure gauge
• Compressed air source
Washer fluid
(P. 487)• Water or washer fluid containing antifreeze (for win-
ter use)
• Funnel (used only for adding water or washer fluid)
AURIS Touring Sports_OM_Europe_OM12L13E.book 462 ページ 2016年6月27日 月曜日 午後5時21分
Page 518 of 664

5187-3. Do-it-yourself maintenance
AURIS Touring Sports_EE (12L13E)
■After a fuse is replaced
●If the lights do not turn on even after the fuse has been replaced, a bulb may
need replacement. (P. 519)
●If the replaced fuse blows again, have the vehicle inspected by any autho-
rized Toyota dealer or repairer, or another duly qualified and equipped pro-
fessional.
■If there is an overload in a circuit
The fuses are designed to blow, protecting the wiring harness from damage.
■When replacing light bulbs
Toyota recommends that you use genuine Toyota products designed for this
vehicle. Because certain bulbs are connected to circuits designed to prevent
overload, non-genuine parts or parts not designed for this vehicle may be
unusable.
WARNING
■To prevent system breakdowns and vehicle fire
Observe the following precautions.
Failure to do so may cause damage to the vehicle, and possibly a fire or
injury.
●Never use a fuse of a higher amperage rating than that indicated, or use
any other object in place of a fuse.
●Always use a genuine Toyota fuse or equivalent.
Never replace a fuse with a wire, even as a temporary fix.
●Do not modify the fuses or fuse boxes.
NOTICE
■Before replacing fuses
Have the cause of electrical overload determined and repaired by any
authorized Toyota dealer or repairer, or another duly qualified and equipped
professional as soon as possible.
AURIS Touring Sports_OM_Europe_OM12L13E.book 518 ページ 2016年6月27日 月曜日 午後5時21分
Page 519 of 664

5197-3. Do-it-yourself maintenance
AURIS Touring Sports_EE (12L13E)
7
Maintenance and care
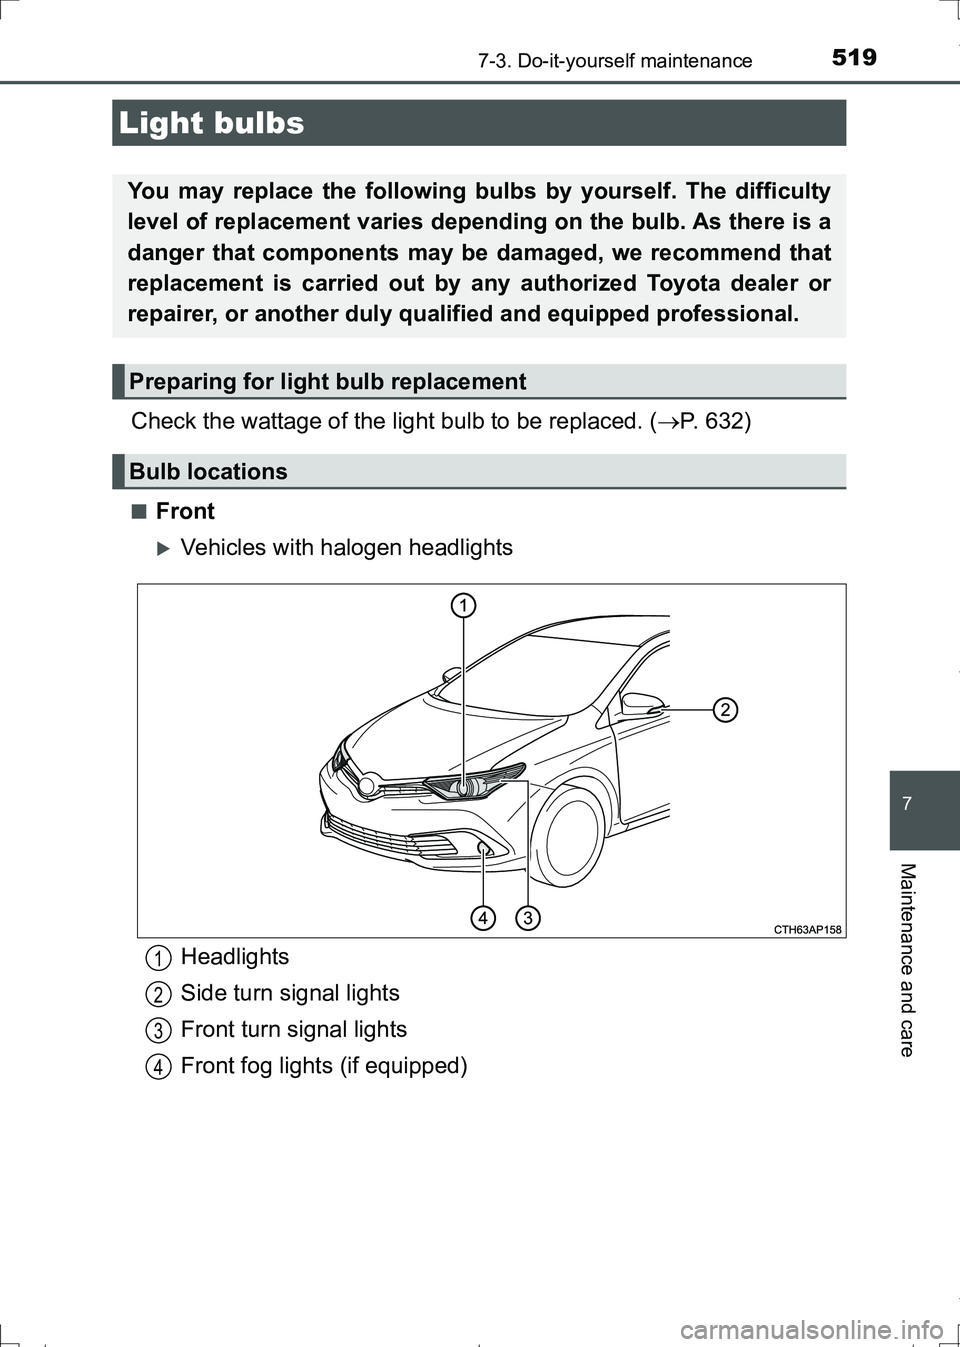
Check the wattage of the light bulb to be replaced. (P. 632)
■Front
Vehicles with halogen headlights
Light bulbs
You may replace the following bulbs by yourself. The difficulty
level of replacement varies depending on the bulb. As there is a
danger that components may be damaged, we recommend that
replacement is carried out by any authorized Toyota dealer or
repairer, or another duly qualified and equipped professional.
Preparing for light bulb replacement
Bulb locations
Headlights
Side turn signal lights
Front turn signal lights
Front fog lights (if equipped)1
2
3
4
AURIS Touring Sports_OM_Europe_OM12L13E.book 519 ページ 2016年6月27日 月曜日 午後5時21分
Page 522 of 664

5227-3. Do-it-yourself maintenance
AURIS Touring Sports_EE (12L13E)■
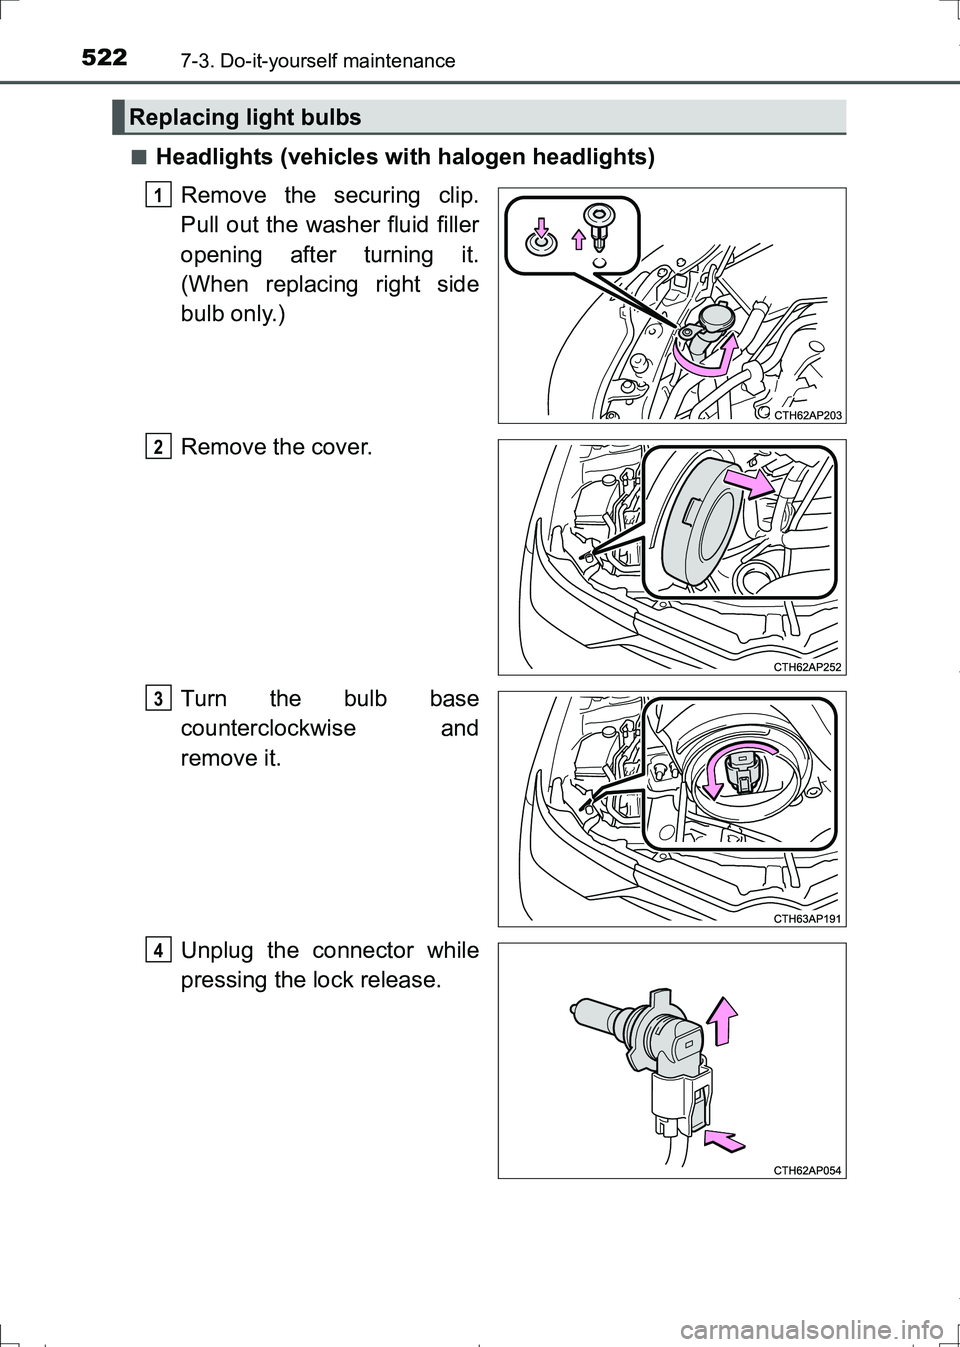
Headlights (vehicles with halogen headlights)
Remove the securing clip.
Pull out the washer fluid filler
opening after turning it.
(When replacing right side
bulb only.)
Remove the cover.
Turn the bulb base
counterclockwise and
remove it.
Unplug the connector while
pressing the lock release.
Replacing light bulbs
1
2
3
4
AURIS Touring Sports_OM_Europe_OM12L13E.book 522 ページ 2016年6月27日 月曜日 午後5時21分