Page 556 of 664
5568-2. Steps to take in an emergency
AURIS Touring Sports_EE (12L13E)
NOTICE
■To ensure the tire pressure warning system operates properly (vehi-
cles with a tire pressure warning system)
Do not install tires with different specifications or makers, as the tire pres-
sure warning system may not operate properly.
■When the DPF system warning light comes on (diesel engine)
If the DPF system warning light is left on without performing cleaning, after
an additional 100 to 300 km (62 to 187 miles), the malfunction indicator
lamp may come on. If this happens, have the vehicle inspected by any
authorized Toyota dealer or repairer, or another duly qualified and equipped
professional immediately.
■If the fuel filter warning light comes on (diesel engine)
Never drive the vehicle with the warning light on. Continued driving with
water accumulated in the fuel filter will damage the fuel injection pump.
AURIS Touring Sports_OM_Europe_OM12L13E.book 556 ページ 2016年6月27日 月曜日 午後5時21分
Page 571 of 664

5718-2. Steps to take in an emergency
AURIS Touring Sports_EE (12L13E)
8
When trouble arises
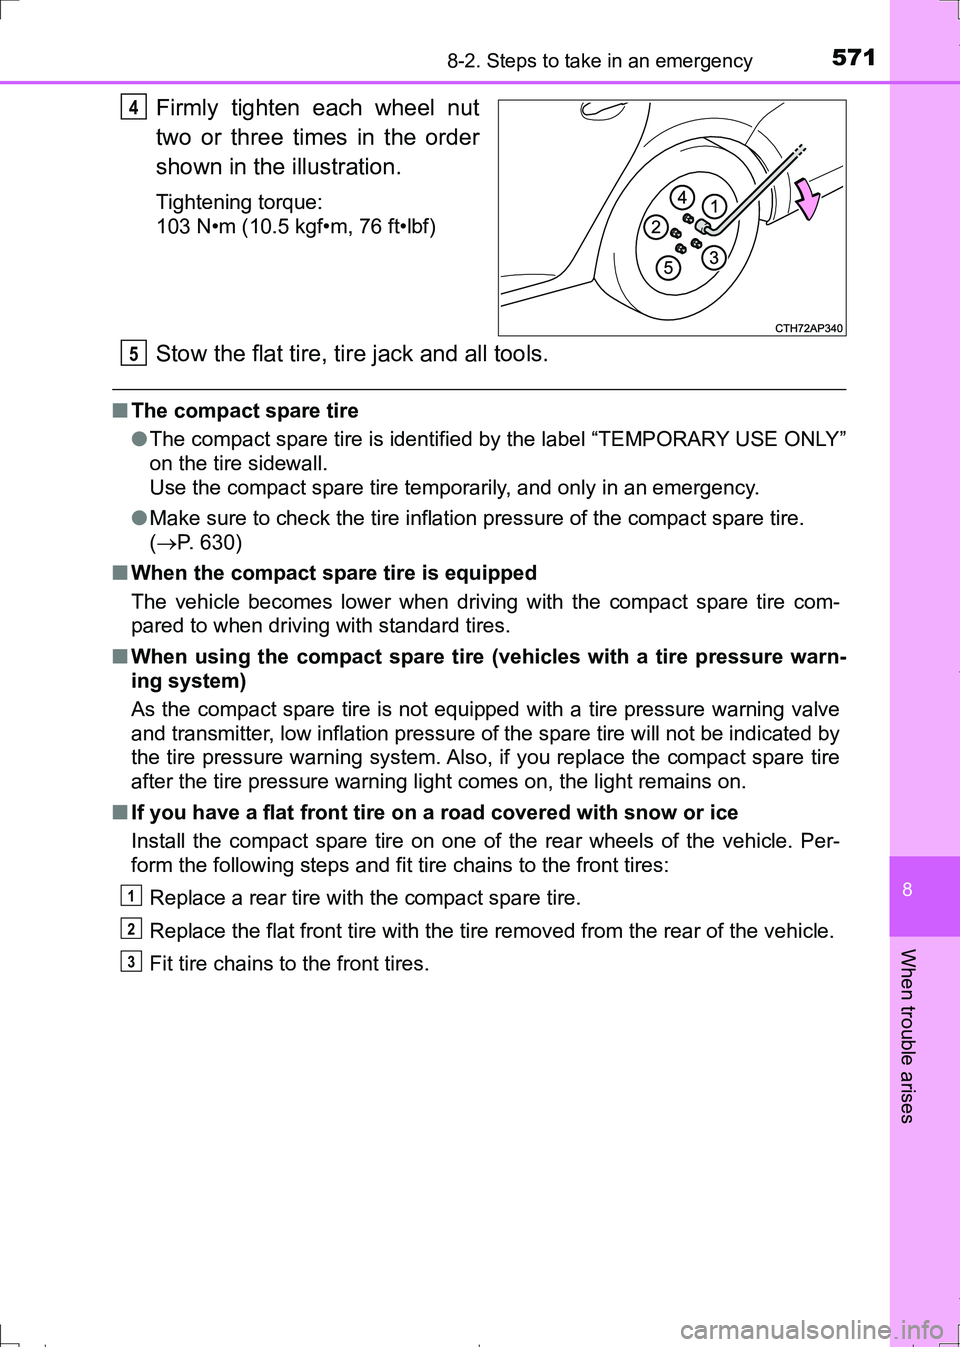
Firmly tighten each wheel nut
two or three times in the order
shown in the illustration.
Tightening torque:
103 N•m (10.5 kgf•m, 76 ft•lbf)
Stow the flat tire, tire jack and all tools.
■The compact spare tire
●The compact spare tire is identified by the label “TEMPORARY USE ONLY”
on the tire sidewall.
Use the compact spare tire temporarily, and only in an emergency.
●Make sure to check the tire inflation pressure of the compact spare tire.
(P. 630)
■When the compact spare tire is equipped
The vehicle becomes lower when driving with the compact spare tire com-
pared to when driving with standard tires.
■When using the compact spare tire (vehicles with a tire pressure warn-
ing system)
As the compact spare tire is not equipped with a tire pressure warning valve
and transmitter, low inflation pressure of the spare tire will not be indicated by
the tire pressure warning system. Also, if you replace the compact spare tire
after the tire pressure warning light comes on, the light remains on.
■If you have a flat front tire on a road covered with snow or ice
Install the compact spare tire on one of the rear wheels of the vehicle. Per-
form the following steps and fit tire chains to the front tires:
Replace a rear tire with the compact spare tire.
Replace the flat front tire with the tire removed from the rear of the vehicle.
Fit tire chains to the front tires.
4
5
1
2
3
AURIS Touring Sports_OM_Europe_OM12L13E.book 571 ページ 2016年6月27日 月曜日 午後5時21分
Page 575 of 664

5758-2. Steps to take in an emergency
AURIS Touring Sports_EE (12L13E)
8
When trouble arises
NOTICE
■Be careful when driving over bumps with the compact spare tire
installed on the vehicle.
The vehicle becomes lower when driving with the compact spare tire com-
pared to when driving with standard tires. Be careful when driving over
uneven road surfaces.
■Driving with tire chains and the compact spare tire
Do not fit tire chains to the compact spare tire.
Tire chains may damage the vehicle body and adversely affect driving per-
formance.
■When replacing the tires (vehicles with a tire pressure warning system)
When removing or fitting the wheels, tires or the tire pressure warning valve
and transmitter, contact any authorized Toyota dealer or repairer, or another
duly qualified and equipped professional as the tire pressure warning valve
and transmitter may be damaged if not handled correctly.
■To avoid damage to the tire pressure warning valves and transmitters
(vehicles with a tire pressure warning system)
When a tire is repaired with liquid sealants, the tire pressure warning valve
and transmitter may not operate properly. If a liquid sealant is used, contact
any authorized Toyota dealer or repairer, or another duly qualified and
equipped professional or other qualified service shop as soon as possible.
Make sure to replace the tire pressure warning valve and transmitter when
replacing the tire. (P. 491)
AURIS Touring Sports_OM_Europe_OM12L13E.book 575 ページ 2016年6月27日 月曜日 午後5時21分
Page 577 of 664

5778-2. Steps to take in an emergency
AURIS Touring Sports_EE (12L13E)
8
When trouble arises
■Before repairing the tire
●Stop the vehicle in a safe place on a hard, flat surface.
●Set the parking brake.
●Shift the shift lever to P (Multidrive) or N (manual transmission).
●Stop the engine.
●Turn on the emergency flashers. (P. 534)
●Check the degree of the tire
damage.
Do not remove the nail or
screw from the tire. Remov-
ing the object may widen the
opening and prevent emer-
gency repair with the repair
kit.
■A flat tire that cannot be repaired with the emergency tire puncture repair
kit
In the following cases, the tire cannot be repaired with the emergency tire
puncture repair kit. Contact any authorized Toyota dealer or repairer, or
another duly qualified and equipped professional.
●When the tire is damaged due to driving without sufficient air pressure
●When there are any cracks or damage at any location on the tire, such as on
the side wall, except the tread
●When the tire is visibly separated from the wheel
●When the cut or damage to the tread is 4 mm (0.16 in.) long or more
●When the wheel is damaged
●When two or more tires have been punctured
●When 2 or more sharp objects such as nails or screws have passed through
the tread on a single tire
●When the sealant has expired
AURIS Touring Sports_OM_Europe_OM12L13E.book 577 ページ 2016年6月27日 月曜日 午後5時21分
Page 579 of 664
5798-2. Steps to take in an emergency
AURIS Touring Sports_EE (12L13E)
8
When trouble arises
■Emergency tire puncture repair kit components
Vehicles with deck boards: Remove the deck center boards and the
storage box. (P. 433)
Remove the luggage floor
cover.
Take out the emergency tire puncture repair kit. (P. 578)
Nozzle
Hose
Compressor switch
Air pressure gaugePressure release button
Power plug
Stickers1
2
3
4
5
6
7
Taking out the emergency tire puncture repair kit
1
2
3
AURIS Touring Sports_OM_Europe_OM12L13E.book 579 ページ 2016年6月27日 月曜日 午後5時21分
Page 583 of 664
5838-2. Steps to take in an emergency
AURIS Touring Sports_EE (12L13E)
8
When trouble arises
Check the specified tire inflation pressure.
Tire inflation pressure is specified on the label as shown. (P. 630)
Start the vehicle’s engine.
To inject the sealant and inflate
the tire, turn the compressor
switch on.
12
Left-hand drive vehiclesRight-hand drive vehicles
13
14
AURIS Touring Sports_OM_Europe_OM12L13E.book 583 ページ 2016年6月27日 月曜日 午後5時21分
Page 584 of 664
5848-2. Steps to take in an emergency
AURIS Touring Sports_EE (12L13E)
Inflate the tire until the specified
air pressure is reached.
The sealant will be injected
and the pressure will surge
and then gradually decrease.
The air pressure gauge will
display the actual tire infla-
tion pressure about 1 minute
(5 minutes at low tempera-
ture) after the switch is
turned on.
Inflate the tire until the speci-
fied air pressure.
• If the tire inflation pressure is
still lower than the specified
point after inflation for 35 min-
utes with the switch on, the tire
is too damaged to be repaired.
Turn the compressor switch off
and contact any authorized
Toyota dealer or repairer, or
another duly qualified and
equipped professional.
• If the tire inflation pressure exceeds the specified air pressure, let out
some air to adjust the tire inflation pressure. (P. 587, 630)
15
1
2
3
AURIS Touring Sports_OM_Europe_OM12L13E.book 584 ページ 2016年6月27日 月曜日 午後5時21分
Page 585 of 664
5858-2. Steps to take in an emergency
AURIS Touring Sports_EE (12L13E)
8
When trouble arises
Turn the compressor off.
Disconnect the nozzle from the valve on the tire and then pull out
the power plug from the power outlet socket.
Some sealant may leak when the hose is removed.
Press the button to release
pressure from the bottle.
Attach the cap to the nozzle.
Install the valve cap onto the valve of the repaired tire.
Disconnect the hose from the
bottle and attach the cap to the
bottle.
Place the bottle in the original bag
and zip it.
16
17
18
19
20
21
AURIS Touring Sports_OM_Europe_OM12L13E.book 585 ページ 2016年6月27日 月曜日 午後5時21分