2017 TESLA MODEL X maintenance
[x] Cancel search: maintenancePage 120 of 202

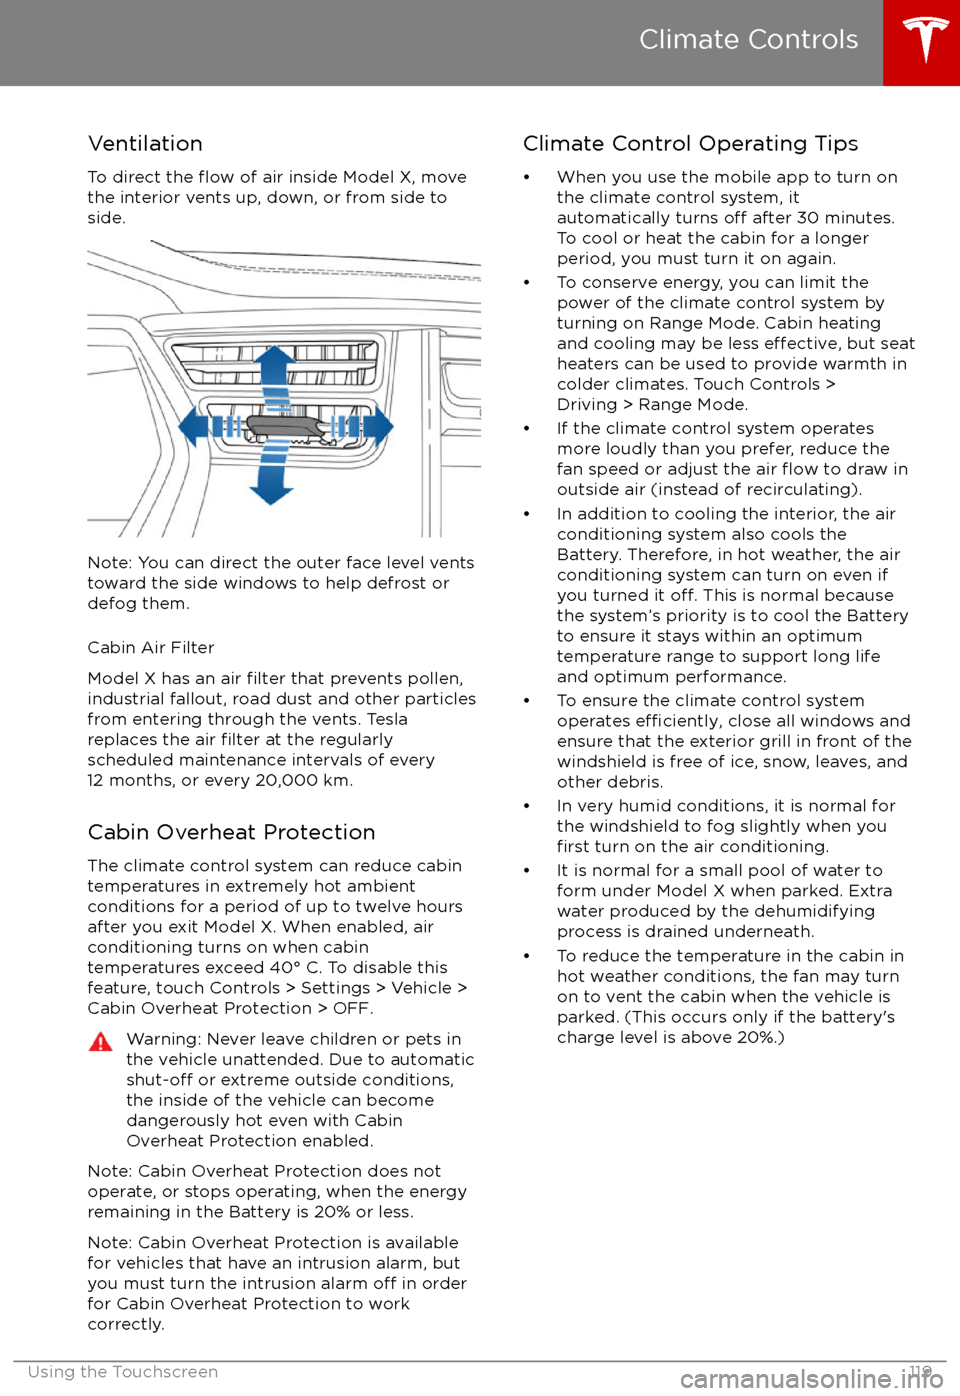
VentilationTo direct the
flow of air inside Model X, move
the interior vents up, down, or from side to
side.
Note: You can direct the outer face level vents
toward the side windows to help defrost or
defog them.
Cabin Air Filter
Model X has an air
filter that prevents pollen,
industrial fallout, road dust and other particles
from entering through the vents. Tesla
replaces the air
filter at the regularly
scheduled maintenance intervals of every
12 months, or every 20,000 km.
Cabin Overheat Protection The climate control system can reduce cabin
temperatures in extremely hot ambient conditions for a period of up to twelve hours
after you exit Model X. When enabled, air
conditioning turns on when cabin
temperatures exceed 40
Page 151 of 202

Service Intervals
Regular maintenance is the key to ensuring
the continued reliability and
efficiency of your
Model X.
Maintain the correct tire pressures, and take
Model X to Tesla at the regularly scheduled
maintenance intervals of every 12 months, or
every 20,000 km, whichever comes
first. It is
also important to perform the daily and
monthly checks described below.
Model X must be serviced by
Tesla-certifiedtechnicians. Damages or failures caused by
maintenance or repairs performed by non-
Tesla
certified technicians are not covered by
the warranty.
Daily Checks
Page 156 of 202

TPMS Malfunction
Model X has also been equipped with a TPMS
malfunction indicator to indicate when the
system is not operating properly.The TPMS malfunction indicator is
combined with the tire pressure
indicator light. When the system
detects a malfunction, the indicator
flashes for approximately one minute
after Model X powers on, and then
remains continuously lit. This
sequence continues upon
subsequent vehicle start-ups as long
as the malfunction exists. When the
TPMS malfunction indicator is on, the
system might not be able to detect
or signal under- and
over-inflatedtires as intended.
TPMS malfunctions can occur for a variety of
reasons, including installing replacement or
alternate tires or wheels that prevent the
TPMS from functioning properly. Always check
the TPMS malfunction indicator light after replacing one or more tires or wheels on yourvehicle to ensure that the replacement tires or
wheels allow the TPMS to continue to function
properly.
Note: If a tire has been replaced or repaired
using a
different tire sealant than the one
available from Tesla, and a low tire pressure is
detected, it is possible that the tire sensor has
been damaged. Contact Tesla to have the fault repaired as soon as possible.
Tire Care and Maintenance
Maintenance155
Page 160 of 202

Replacing the Sealant CanisterIf you have a Tesla tire repair kit, you can
purchase additional or replacement canisters
of tire sealant from Tesla.
Follow these steps to replace the canister in
your Tesla tire repair kit:
1. Unwrap the clear hose from the compressor. This hose is included with the
tire repair sealant canister.
2. Remove the canister cover by sliding it upward to release it from the compressor.
3. Remove the canister.
4. Insert the new canister and replace the
cover.
Temporary Tire Repair
Maintenance159
Page 162 of 202

Cleaning the Interior
Frequently inspect and clean the interior to maintain its appearance and to prevent
premature wear. If possible, immediately wipe up spills and remove marks. For general
cleaning, wipe interior surfaces using a soft
cloth (such as micro
fiber) dampened with a
mixture of warm water and mild non-
detergent cleaner (test all cleaners on a
concealed area before use). To avoid streaks,
dry immediately with a soft lint-free cloth.
Interior Glass
Do not scrape, or use any abrasive cleaning
fluid on glass or mirrored surfaces. This can
damage the reflective surface of the mirror
and the heating elements in the rear window.
Airbags
Do not allow any substance to enter an airbag
cover. This could
affect correct operation.
Dashboard and Plastic Surfaces
Do not polish the upper surfaces of the
dashboard. Polished surfaces are
reflectiveand could interfere with your driving view.
Leather Seats
Leather is prone to dye-transfer which can
cause discoloration, particularly on light colored leather. White and tan leather iscoated with an anti-soiling treatment. Wipespills as soon as possible using a soft cloth
moistened with warm water and non-
detergent soap. Wipe gently in a circular
motion. Then wipe dry using a soft, lint-free
cloth. Using detergents or commercially
available leather cleaners and conditioners is
not recommended because they can discolor or dry out the leather.
Polyurethane Seats
Wipe spills as soon as possible using a soft
cloth moistened with warm water and non-
detergent soap. Wipe gently in a circular
motion. For
difficult stains on ultra-white
seats, use isopropyl alcohol, then wipe with a
damp cloth. After cleaning, allow the seats to air dry.
Cloth Seats
Wipe spills as soon as possible using a soft
cloth moistened with warm water and non-
detergent soap. Wipe gently in a circular
motion. Then wipe dry using a soft, lint-free
cloth. Vacuum the seats as needed to remove
any loose dirt.
Carpets
Avoid over-wetting carpets. For heavily soiled
areas, use a diluted upholstery cleaner.
Seat Belts
Extend the belts to wipe. Do not use any type
of detergent or chemical cleaning agent.
Allow the belts to dry naturally while
extended, preferably away from direct
sunlight.
Touchscreen and Instrument Panel
Clean the touchscreen and instrument panel
using a soft lint-free cloth
specificallydesigned to clean monitors and displays. Do
not use cleaners (such as a glass cleaner) and do not use a wet wipe or a dry statically-charged cloth (such as a recently washed
microfiber). To wipe the touchscreen without
activating buttons and changing settings, you
can enable clean mode. Touch Controls > Displays > Clean Mode. The display darkens to
make it easy to see dust and smudges.
Chrome and Metal Surfaces
Polish, abrasive cleaners or hard cloths can
damage the
finish on chrome and metal
surfaces.
Cautions for Interior Cleaning
Warning: If you notice any damage on an
airbag or seat belt, contact Tesla
immediately.Warning: Do not allow any water,
cleaners, or fabric to enter a seat belt
mechanism.Caution: Using solvents (including alcohol), bleach, citrus, naphtha, orsilicone-based products or additives on
interior components can cause damage.Caution: Statically-charged materials can
cause damage to the touchscreen or
instrument panel.
Cleaning
Maintenance161
Page 165 of 202

Removing the Maintenance Panel
To check
fluid levels, remove the maintenance
panel:
1. Pull the rear edge of the maintenance panel upward to release the
five clips that
hold the panel in place.
2. Maneuver the maintenance panel toward the windshield to remove.
Caution: The maintenance panel protects
the front trunk from water. When re-
attaching, make sure it is fully seated.
Checking Battery Coolant
If the quantity of
fluid in the cooling system
drops below the recommended level, the
instrument panel displays a warning message.
Stop Model X as soon as safety permits and
contact Tesla.
Fluid Level Check
Tesla checks the Battery coolant level at the
regularly scheduled maintenance intervals.
DO NOT ADD FLUID. Doing so can result in
damage not covered by the warranty.
Topping Up the Battery Coolant
Under no circumstances should you add
coolant. If the instrument panel warns you that
the
fluid level is low, contact Tesla
immediately.
To maximize the performance and life of the
Battery, the cooling system uses a
specifictype of G-48 ethylene-glycol coolant (HOAT).
Contact Tesla for more specific information
about the coolant.
Checking Brake FluidWarning: Contact Tesla immediately if you
notice increased movement of the brake
pedal or a
significant loss of brake fluid.Driving under these conditions can result in extended stopping distances or
complete brake failure.
The Brake indicator on the
instrument panel alerts you if the
quantity of
fluid in the brake
reservoir drops below the
recommended level. If it displays
while driving, stop as soon as safety
permits by gently applying the
brakes. Do not continue driving.
Contact Tesla immediately.
Fluid Level Check
Tesla checks the brake
fluid level at the
regularly scheduled maintenance intervals.
Topping Up the Brake Fluid
Do not top up your brake
fluid. Tesla service
does this when you bring Model X in for
regular servicing. The following instructions
are provided for information purposes and future reference only:
1. Clean the
filler cap before removing to
prevent dirt from entering the reservoir.
2. Unscrew the cap and remove.
3. Top up the reservoir to the MAX mark using brake
fluid meeting DOT3specifications.4. Replace the filler cap.
Warning: Only use new fluid from a sealed
air-tight container. Never use previously
used
fluid or fluid from a previously
opened container
Page 166 of 202

Topping Up Washer Fluid
The only reservoir into which you can add
fluid is the washer fluid reservoir located
under the front trunk. When the level is low, a
message displays on the instrument panel.
Do not use formulated washer
fluids that
contain water repellent or bug wash. These
fluids can cause streaking, smearing, and
squeaking or other noises.
Operate the washers periodically to check that
the nozzles are clear and properly directed.
To top up washer
fluid:
1. Clean the filler cap before opening to
prevent dirt from entering the reservoir.
2. Open the
filler cap.
3. Fill the reservoir until the fluid level is
visible just below the filler neck.
4. Replace the filler cap.
Note: Some national or local regulations
restrict the use of Volatile Organic
Compounds (VOCs). VOCs are commonly
used as antifreeze in washer
fluid. Use a
washer fluid with limited VOC content only if it
provides adequate freeze resistance for all climates in which you drive Model X.
Caution: Under no circumstances do you
need to inspect or top up other fluidreservoirs. Two additional fluid reservoirs
are located next to the washer fluid, but
underneath the maintenance panel. In the
unlikely event that you see a message on the instrument panel that one of these
fluid levels is low, stop Model X as soon as
safe to do so, and contact Tesla.
Caution: Do not spill washer fluid on body
panels. Doing so can cause damage. Wipe
up spills immediately and wash the
affected area with water.
Warning: In temperatures below 4
Page 197 of 202

HomeLinkFCC certification 190
programming and using 137
hood 14
horn 42, 44
I
IC
certifications 189identification labels 168
Insane setting (dual-motor) 107
instant range 67
instrument panelcharging status 149
cleaning 161
overview of 48interiorcleaning 161
dimensions 173
lights 53
overview 2
temperature control 115
Internet radio 124
intrusion detection 136
ISOFIX child seats, installing 30
J
J1772 143
Jack mode 121
jacking 166
K
keyFCC and IC certifications 189
how to use 4
key not inside 46
ordering extras 6
replacing battery 5
keyless entry 4
L
labelStatutory Plate 170
Tire and Loading Information 170
lane assist 95
lane change flash 57
lane change, automatic 88
lane departure warning 95
Language & Units 111
language setting 111
Launch Mode 65
liftgateliftgate (continued)adjust opening height 12
opening 12
lifting 166
lightsadaptive headlights 56
hazard warning 57
headlights after exit 56
turn signals 57
load limits 169
location-based suspension 120
locking and unlocking doors 4
Ludicrous setting (dual-motor) 107
lumbar support 18
M
maintenancebrake fluid, checking 164
cleaning 160
daily and monthly checks 150
fluid replacement intervals 150
panel, removing 164
replacing wipers 163
service intervals 150
tires 151
washer
fluid, topping up 165
map updates 133
maps 129
mats 162
Max Battery Power 107
media 122
mileage upon delivery 187
mirrors 45
mobile app 141
Mobile Connectordescription 143
using 145
modifications 167
motor specifications 174
N naming 114
navigation 129
NCC
certifications 189
Neutral gear 47
night mode 111
nose cone, removing 184
O odometer 66
overhang dimensions 172
overtake acceleration 79
Owner Information, about 185, 186
Index
196Model X Owner