2017 SUZUKI SWIFT MAN
[x] Cancel search: MANPage 145 of 336

5-18
OTHER CONTROLS AND EQUIPMENT
74LH0-74E
The track currently being played will be
played repeatedly.
FOLDER REPEAT
The repeat indicator “RPT.F” will light.
All tracks in the currently selected folder
will be played repeatedly.
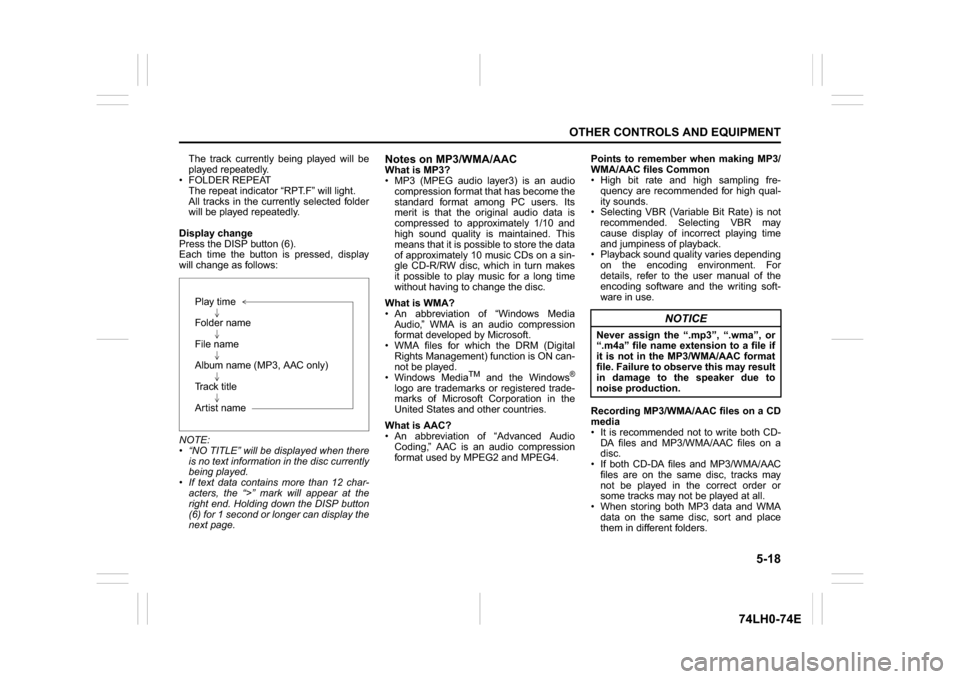
Display change
Press the DISP button (6).
Each time the button is pressed, display
will change as follows:
NOTE:
“NO TITLE” will be displayed when there
is no text information in the disc currently
being played.
If text data contains more than 12 char-
acters, the “>” mark will appear at the
right end. Holding down the DISP button
(6) for 1 second or longer can display the
next page.
Notes on MP3/WMA/AACWhat is MP3?
MP3 (MPEG audio layer3) is an audio
compression format that has become the
standard format among PC users. Its
merit is that the original audio data is
compressed to approximately 1/10 and
high sound quality is maintained. This
means that it is possible to store the data
of approximately 10 music CDs on a sin-
gle CD-R/RW disc, which in turn makes
it possible to play music for a long time
without having to change the disc.
What is WMA?
An abbreviation of “Windows Media
Audio,” WMA is an audio compression
format developed by Microsoft.
WMA files for which the DRM (Digital
Rights Management) function is ON can-
not be played.
Windows Media
TM
and the Windows
®
logo are trademarks or registered trade-
marks of Microsoft Corporation in the
United States and other countries.
What is AAC?
An abbreviation of “Advanced Audio
Coding,” AAC is an audio compression
format used by MPEG2 and MPEG4.Points to remember when making MP3/
WMA/AAC files Common
High bit rate and high sampling fre-
quency are recommended for high qual-
ity sounds.
Selecting VBR (Variable Bit Rate) is not
recommended. Selecting VBR may
cause display of incorrect playing time
and jumpiness of playback.
Playback sound quality varies depending
on the encoding environment. For
details, refer to the user manual of the
encoding software and the writing soft-
ware in use.
Recording MP3/WMA/AAC files on a CD
media
It is recommended not to write both CD-
DA files and MP3/WMA/AAC files on a
disc.
If both CD-DA files and MP3/WMA/AAC
files are on the same disc, tracks may
not be played in the correct order or
some tracks may not be played at all.
When storing both MP3 data and WMA
data on the same disc, sort and place
them in different folders. Play time
Folder name
File name
Album name (MP3, AAC only)
Track title
Artist name
NOTICE
Never assign the “.mp3”, “.wma”, or
“.m4a” file name extension to a file if
it is not in the MP3/WMA/AAC format
file. Failure to observe this may result
in damage to the speaker due to
noise production.
Page 148 of 336

5-21OTHER CONTROLS AND EQUIPMENT
74LH0-74E
Notes on USB deviceCompatible USB devices
USB Mass Storage Class
For details as to whether your USB
memory/USB Audio is compatible with
USB Mass Storage Class, please con-
tact the USB memory/USB Audio manu-
facturer.
USB Standard Compatibility 1.1/2.0 Full
Speed
File System FAT12/16/32, VFAT
Maximum current less than 1.0 A
If devices such as USB hub, extension
cable are connected to the audio sys-
tem, it may not be recognized. In such
case connect the USB device directly to
the audio system.
Devices such as MP3 player/Mobile
phone/digital camera may not be recog-
nized by the audio system for playing
music.
USB device connection
When connecting a USB device, make
sure that the connector is pushed all the
way into the port.
Do not leave the USB device for long
periods of time in places inside the vehi-
cle where the temperature can rise too
high.
Back up any important data beforehand.
We cannot accept responsibility for any
lost data.
It is recommended not to connect a USB
device that contains data files other than
MP3/WMA/AAC format.Recording MP3/WMA/AAC files on a
USB device
Playback or display may not be possible
depending on the type of USB device in
use or the condition of the recording.
Depending on the connected USB mem-
ory, the files may be played in different
order from the order that the files were
stored.
Compression formats
MP3
Bit rate
:
MPEG1 Audio Layer III: 32 k - 320 kbps
MPEG2 Audio Layer III: 8 k - 160 kbps
MPEG2.5 Audio Layer III: 8 k - 160 kbps Sampling frequency
:
MPEG1 Audio Layer III: 32 k/44.1 k/48 kHz
MPEG2 Audio Layer III: 16 k/22.05 k/24 kHz
MPEG2.5 Audio Layer III: 8 k/11.025 k/12 kHzWMA (Ver. 7, Ver. 8, Ver. 9*)
Bit rate: CBR 32 k -320 kbps
Sampling frequency: 32 k/44.1 k/48 kHz
* WMA 9 Professional/LossLess/Voice are
not supported.
AAC*
Bit rate: ABR 16k - 320 kbbs
Sampling frequency: 32 k/44.1 k/48 kHz
* Apple Lossless is not supported.
Maximum number of files/folders
Maximum number of files: 2500
Maximum number of files in a folder: 255
Maximum depth of tree structure: 8
Maximum number of folders: 255
(Root folder is included.)
Listening to an iPod
®
74LHT5007
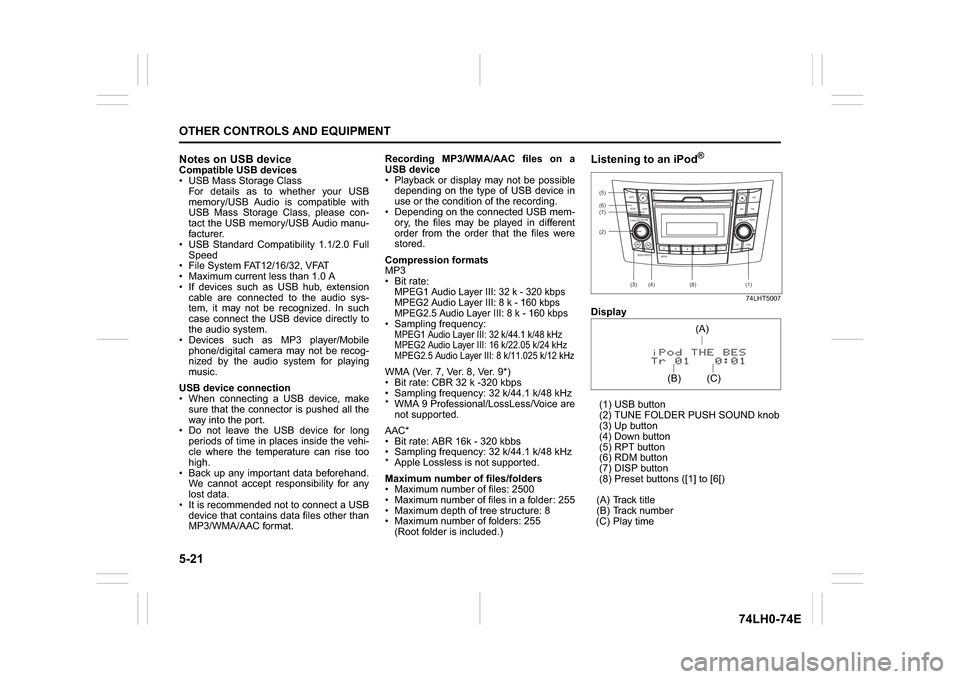
Display
(1) USB button
(2) TUNE FOLDER PUSH SOUND knob
(3) Up button
(4) Down button
(5) RPT button
(6) RDM button
(7) DISP button
(8) Preset buttons ([1] to [6[)
(A) Track title
(B) Track number
(C) Play time(2) (6)
B S U
CD
2
3 4 5 6
SEEK/TRACK
AS
AMFM RPT
RDM
DISP
PUSHSOUND
TUNE/FLD
VOLPWRPUSH
11
MENU
(3)
(5)
(4) (7)
(1)
(8)
(C)(A)
(B)
Page 151 of 336

5-24
OTHER CONTROLS AND EQUIPMENT
74LH0-74E
NOTE:
Please consult your place of purchase
for details about whether a given auxil-
iary audio source can be connected and
the proper auxiliary cord to use.
The volume and tone controls of the
auxiliary audio source can be adjusted
on the unit.
In AUX mode, the volume setting is dif-
ferent from another mode.
® Hands-Free (if equipped)
74LHT5008
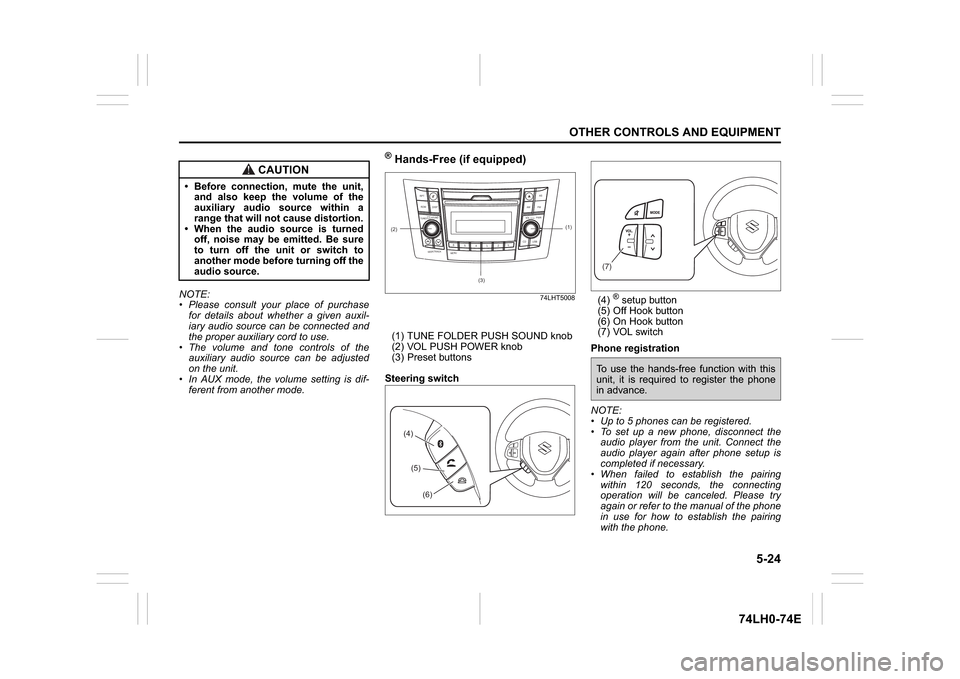
(1) TUNE FOLDER PUSH SOUND knob
(2) VOL PUSH POWER knob
(3) Preset buttons
Steering switch(4)
® setup button
(5) Off Hook button
(6) On Hook button
(7) VOL switch
Phone registration
NOTE:
Up to 5 phones can be registered.
To set up a new phone, disconnect the
audio player from the unit. Connect the
audio player again after phone setup is
completed if necessary.
When failed to establish the pairing
within 120 seconds, the connecting
operation will be canceled. Please try
again or refer to the manual of the phone
in use for how to establish the pairing
with the phone.
CAUTION
Before connection, mute the unit,
and also keep the volume of the
auxiliary audio source within a
range that will not cause distortion.
When the audio source is turned
off, noise may be emitted. Be sure
to turn off the unit or switch to
another mode before turning off the
audio source.
(2)
B S U
CD
2
3 4 5 6
SEEK/TRACK
AS
AMFM RPT
RDM
DISP
PUSHSOUND
TUNE/FLD
VOLPWRPUSH
11
MENU
(3)
(1)
(4)(5)
(6)
(7)To use the hands-free function with this
unit, it is required to register the phone
in advance.
Page 152 of 336

5-25OTHER CONTROLS AND EQUIPMENT
74LH0-74E
/Telephone setup mode can be entered
only during vehicle is stationary speed
less than ~ 8 kmph)
1) Press the
® setup button (4).
The
® setup menu will be displayed.
2) Turn the TUNE FOLDER PUSH
SOUND knob (1) to select “Setup ”, and
press the knob (1) to determine the
selection.
3) Turn the TUNE FOLDER PUSH
SOUND knob (1) to select “Pairing”,
and press the knob (1) to determine the
selection.
4) Select “CAR AUDIO” from the
® menu
of the phone and establish the pairing.
Refer to the manual of the phone in use
for further information.
5) Enter the Passkey displayed on the unit
to the phone.
6) Press the On Hook button (6).
NOTE:
When selecting “Go Back”, the previous
menu will be displayed.
When additionally registering a phone,
operate the same step from 1).
Receiving a call
Press the Off Hook button (5) to receive a
call.
Ending a call
Press the On Hook button (6) to end a call.
Rejecting a call (only for supported
models)Press the On Hook button (6) to reject a
incoming call.
Adjusting the listening volume
Turn the VOL PUSH POWER knob (2)
during a call.
Turning it clockwise increases the vol-
ume; turning it counterclockwise
decreases the volume.
Press the VOL switch (7) during a call.
Pressing “+” of the switch increases the
volume, pressing “-” of the switch
decreases the volume.
Adjusting the ring volume
Turn the VOL PUSH POWER knob (2)
while a call coming in.
Turning it clockwise increases the vol-
ume; turning it counterclockwise
decreases the volume.
Press the VOL switch (7) during a call.
Pressing “+” of the switch increases the
volume, pressing “-” of the switch
decreases the volume.
Adjusting the call or ringtone volume
Follow the instructions below to adjust the
call or ringtone volume.
1) Press the
® setup button (4).
The
® setup menu will be displayed.
2) Turn the TUNE FOLDER PUSH
SOUND knob (1) to select “Setup Tele-
phone”, and press the knob (1) to deter-
mine the selection.
3) Turn the TUNE FOLDER PUSH
SOUND knob (1) to select “Sound Set-ting”, and press the knob (1) to deter-
mine the selection.
4) Turn the TUNE FOLDER PUSH
SOUND knob (1) to select “Call Vol-
ume” or “Ringtone Volume”, and press
the knob (1) to determine the selection.
The current call or ringtone volume will
be displayed.
5) Turn the TUNE FOLDER PUSH
SOUND knob (1) to select desired call
or ringtone volume, and press the knob
(1) to determine the selection.
NOTE:
When selecting “Go Back”, the previous
menu will be displayed.
Selecting the Ringtone
Follow the instructions below to select a
ringtone.
1) Press the
® setup button (4).
The
® setup menu will be displayed.
2) Turn the TUNE FOLDER PUSH
SOUND knob (1) to select “Setup Tele-
phone”, and press the knob (1) to deter-
mine the selection.
3) Turn the TUNE FOLDER PUSH
SOUND knob (1) to select “Sound Set-
ting”, and press the knob (1) to deter-
mine the selection.
4) Turn the TUNE FOLDER PUSH SOUND
knob (1) to select “Ringtone”, and press
the knob (1) to determine the selection.
The current ringtone will be sounded.
5) Turn the TUNE FOLDER PUSH SOUND
knob (1) to select desired ringtone, and
Page 157 of 336

5-30
OTHER CONTROLS AND EQUIPMENT
74LH0-74E
key”, and press the knob (1) to deter-
mine the selection.
5) Press or turn the TUNE FOLDER
PUSH SOUND knob (1) to select “Con-
firm”.
6) Turn the TUNE FOLDER PUSH
SOUND knob (1) to select a number for
the first digit, and press the knob (1) to
determine the selection. Select and
determine numbers for the second,
third and fourth digits in order in the
same manner. When not entering up to
the eighth digit, enter blanks for the
successive digits.
7) Turn the TUNE FOLDER PUSH
SOUND knob (1) to determine the
passkey setting.
NOTE:
When selecting “Go Back”, the previous
menu will be displayed.
Deletion of phone information (Delete
Phone)
Follow the instructions below to delete the
registered information of the phone.
1) Press the
® setup button (4).
The
® setup menu will be displayed.
2) Turn the TUNE FOLDER PUSH
SOUND knob (1) to select “Setup ”, and
press the knob (1) to determine the
selection.
3) Turn the TUNE FOLDER PUSH
SOUND knob (1) to select “List Phone”,
and press the knob (1) to determine the
selection.4) Turn the TUNE FOLDER PUSH
SOUND knob (1) to select a phone to
be deleted, and press the knob (1) to
determine the selection.
5) Turn the TUNE FOLDER PUSH
SOUND knob (1) to select “Delete
Phone”, and press the knob (1) to
determine the selection.
6) Turn the TUNE FOLDER PUSH
SOUND knob (1) to select “Delete?”,
and press the knob (1) to determine the
selection.
7) Turn the TUNE FOLDER PUSH
SOUND knob (1) to select “Confirm”,
and press the knob (1) to determine the
selection.
NOTE:
When selecting “Go Back”, the previous
menu will be displayed.
BT function on/off (BT Power)
Follow the instructions below to turn on/off
the
® function.
1) Press the
® setup button (4).
The
® setup menu will be displayed.
2) Turn the TUNE FOLDER PUSH
SOUND knob (1) to select “Setup ”, and
press the knob (1) to determine the
selection.
3) Turn the TUNE FOLDER PUSH
SOUND knob (1) to select “BT Power”,
and press the knob (1) to determine the
selection.
4) Press the TUNE FOLDER PUSH
SOUND knob (1) to select “BT Power
On” or “BT Power Off ”.NOTE:
When the BT function is turned off, the
connection between this unit and the
registered phone in use will be discon-
nected.
When selecting “Go Back”, the previous
menu will be displayed.
® audio (if equipped)
74LHT5009
NOTE:
Applicable for
® audio version 2.1 and
above
(2)
B
S U
CD
2
3 4 5 6
SEEK/TRACK
AS
AMFM RPT
RDM
DISP
PUSHSOUND
TUNE/FLD
VOLPWRPUSH
1
MENU
(3)
(4) (5)
Bluetooth
R(1)
Page 158 of 336

5-31OTHER CONTROLS AND EQUIPMENT
74LH0-74E
Steering switch
Display
(1) CD button
(2)TUNE FOLDER PUSH SOUND knob
(3)UP button
(4) Down button
(5) DISP button
(6) setup button
(A) Track number
(B) Play timeRegistration of audio devices
NOTE:
To set up a new audio player, disconnect
the phone from the unit. Connect the
phone after audio player setup is com-
pleted if necessary.
When failed to establish the connection
within 120 seconds, the connecting
operation will be canceled. Please try
again or refer to the audio player manual
for assistance with the pairing process.
A separate audio mobile device can be
selected for audio, even if a phone is
already connected to the hands free pro-
file.
1) Press the
® setup button (6).
The
® setup menu will be displayed.
2) Turn the TUNE FOLDER PUSH
SOUND knob (2) to select “Setup ”, and
press the knob (2) to determine the
selection.
3) Turn the TUNE FOLDER PUSH
SOUND knob (2) to select “Pairing”,
and press the knob (2) to determine the
selection.
4) Select “CAR AUDIO” from the
® menu
of the audio player and establish the
pairing.
Refer to the manual of the audio player
in use for further information.5) Enter the Passkey displayed on the unit
to the audio player. (For phones with
version 2.1 or above passkey input is
not required)
NOTE:
When selecting “Go Back”, the previous
menu will be displayed.
When additionally registering audio
devices, operate the same step from 1).
(6)
(B)(A)
To use
® ready audio devices with this
unit, it is required to register the devices.
Page 160 of 336

5-33OTHER CONTROLS AND EQUIPMENT
74LH0-74E
List of audio devices (List Audio)
Follow the instructions below to display the
names of the registered audio devices in
sequence.
1) Press the
® setup button (6).
The
® setup menu will be displayed.
2) Turn the TUNE FOLDER PUSH
SOUND knob (2) to select “Setup ”, and
press the knob (2) to determine the
selection.
3) Turn the TUNE FOLDER PUSH
SOUND knob (2) to select “List Audio”,
and press the knob (2) to determine the
selection. The names of registered
audio devices will be displayed in
sequence.
NOTE:
When selecting “Go Back”, the previous
menu will be displayed.
Passkey setting (Set Passkey)
Follow the instructions below to set the
security number (Passkey).
1) Press the
® setup button (6).
The
® setup menu will be displayed.
2) Turn the TUNE FOLDER PUSH
SOUND knob (2) to select “Setup ”, and
press the knob (2) to determine the
selection.
3) Turn the TUNE FOLDER PUSH
SOUND knob (2) to select “Passkey”,
and press the knob (2) to determine the
selection.
4) Turn the TUNE FOLDER PUSH
SOUND knob (2) to select “New Pass-key”, and press the knob (2) to deter-
mine the selection.
5) Press or turn the TUNE FOLDER
PUSH SOUND knob (2) to select “Con-
firm”.
6) Turn the TUNE FOLDER PUSH
SOUND knob (2) to select a number for
the first digit, and press the knob (2) to
determine the selection. Select and
determine numbers for the second,
third and fourth digits in order in the
same manner. When not entering up to
the eighth digit, enter blanks for the
successive digits.
7) Turn the TUNE FOLDER PUSH
SOUND knob (2) to determine the
passkey setting.
NOTE:
When selecting “Go Back”, the previous
menu will be displayed.
Deletion of audio device information
(Delete Audio)
Follow the instructions below to delete the
registered information of audio device.
1) Press the
® setup button (6).
The
® setup menu will be displayed.
2) Turn the TUNE FOLDER PUSH
SOUND knob (2) to select “Setup ”, and
press the knob (2) to determine the
selection.
3) Turn the TUNE FOLDER PUSH
SOUND knob (2) to select “List Audio”,
and press the knob (2) to determine the
selection.4) Turn the TUNE FOLDER PUSH
SOUND knob (2) to select an audio
device to be deleted, and press the
knob (2) to determine the selection.
5) Turn the TUNE FOLDER PUSH
SOUND knob (2) to select “Delete”, and
press the knob (2) to determine the
selection.
6) Turn the TUNE FOLDER PUSH
SOUND knob (2) to select “Delete?”,
and press the knob (2) to determine the
selection.
7) Turn the TUNE FOLDER PUSH
SOUND knob (2) to select “Confirm”,
and press the knob (2) to complete the
deletion.
NOTE:
When selecting “Go Back”, the previous
menu will be displayed.
Disclaimer for
® function
Depending on the mobile phone models,
some phones may not be compatible
fully or partially (some function may be
restricted).
Connectivity or voice quality may get
affected depending on circumstances.
After the ignition switch is turned to the
“ON” position, the audio system takes
few seconds to detect and connect to the® device (if already paired).
Make sure that you are aware of all
applicable local laws and accordingly
use device.
Page 170 of 336

5-43OTHER CONTROLS AND EQUIPMENT
74LH0-74E
TroubleshootingWhen encountered a problem, check and follow the instructions as described below.
If the described suggestions do not solve the problem, it is recommended to take the unit to your authorized MARUTI SUZUKI dealer.
Problem
Possible cause
Possible solution
Common
Unable to operate The security function is on.When “SECURITY” is displayed, enter
the ID.
When “HELP” is displayed, contact your
authorized MARUTI SUZUKI dealer.
Unable to turn on the power (no sound).
(No sound is produced)Fuse is blown.Contact your authorized MARUTI
SUZUKI dealer.
Radio
Much noiseIt may not be exactly tuned in to the sta-
tion.Tune it in exactly to the station.
Unable to receive by auto tuningThere may be no station emitting signals
powerful enough.Pick up a station by manual tuning.
CD
Sound skips or noise producedThe disc is dirty. Wipe the disc with a soft cloth.
The disc has a major scratch or is
warped.Replace the disc with the one with no
scratch and also not warped.