2017 SUZUKI SWIFT audio
[x] Cancel search: audioPage 89 of 336

3-4
OPERATING YOUR VEHICLE
74LH0-74E
Engine Switch
(Vehicle with Keyless Push
Start System)
61MM0B001
LOCK (OFF)This mode is for parking the vehicle. When
this mode is selected by pressing the engine
switch and then any door is opened or closed,
the steering will be locked automatically.
ACC
Press the engine switch to select this igni-
tion mode to use such electric equipment
as the audio system, outside rearview mir-
rors and accessory socket with the engine
off. When this position is selected, the
information display in the instrument clus-
ter come on. Refer to “Warning and Indica-
tor Lights” in the “BEFORE DRIVING”
section for details.
ON
With the engine off
You can use such electric equipment as
the power windows and wipers with the
engine off. When this ignition mode is
selected by pressing the engine switch,
the information display in the instrument
cluster will come on.
With the engine on
All electric equipment is operational. The
vehicle can be driven when you have
selected this ignition mode by pressing
the engine switch.
START
Automatic transaxle – Provided you have
the keyless push start system remote con-
troller with you, the engine automatically
starts when you press the engine switch to
select this ignition mode after placing the
gearshift lever in the “P” position and
depressing the brake pedal. (If you need to
re-start the engine while the vehicle is
moving, shift into “N”.)
WA R N I N G
(Continued)
Always return the ignition switch to
the “LOCK” position and remove
the ignition key when leaving the
vehicle even if only for a short time.
Also do not leave children alone in
a parked vehicle. Unattended chil-
dren could cause accidental move-
ment of the vehicle or could tamper
with power windows or power sun-
roof. They also could suffer from
heat stroke in warm or hot weather.
These could result in severe injury
or even death.
NOTICE
Do not use the starter motor for
more than 12 seconds at a time. If
the engine does not start, wait 15
seconds before trying again. If the
engine does not start after several
attempts, check the fuel and igni-
tion systems or consult your MAR-
UTI SUZUKI dealer.
Do not leave the ignition switch in
the “ON” position if the engine is
not running as the battery will dis-
charge.
NOTICE
If you stop the engine while the vehi-
cle is in motion, the automatic
transaxle may be damaged. Avoid
stopping the engine while driving.EXAMPLE
Using the Transaxle: 10
Page 91 of 336

3-6
OPERATING YOUR VEHICLE
74LH0-74E
Selection of Ignition ModesPress the engine switch to select the
“ACC” or “ON” mode as follows when you
use an electric accessory or check the
operation of instruments without running
the engine.
1) Bring the keyless push start system
remote controller with you and sit in the
driver’s seat.
2) Without depressing the clutch pedal,
press the engine switch (1).
82K254
Every time you press the engine switch,
the ignition mode changes as follows.
74LHM0301
If the “PUSH” indicator light blinks and
the ignition modes cannot be selected
Your keyless push start system remote con-
troller may not be sensed as being within the
“interior workable area” (refer to the related
explanation in this section). Try again after
making sure you have the remote controller
with you. If the ignition modes still cannot be
selected, the battery of the remote controller
may be discharged. To be able to select an
ignition mode, you must then use the follow-
ing method:
57L21131
1) Without depressing the brake pedal
and the clutch pedal, push the engine
switch (1).
2) Within about 10 seconds during which
the “PUSH” indicator light in the instru-
ment cluster is blinking, touch the
engine switch with the lock switch end
of the remote controller (2) for about 2
seconds.NOTE:
If you still cannot select the ignition
modes, there may be some problem with
the keyless push start system. Contact
an authorized MARUTI SUZUKI dealer
for an inspection of the system.
The immobilizer/keyless push start sys-
tem warning light come on for about 5
seconds while the “PUSH” indicator light
is blinking. Refer to “Warning and Indica-
tor Lights” in the “BEFORE DRIVING”
section for details.
You may customize the system to cause
the interior buzzer to sound once for the
“remote controller out of sensing range”
warning. To incorporate this customiza-
tion, please contact an authorized MAR-
UTI SUZUKI dealer.
If the battery of the remote controller is
about to become completely discharged,
the keyless push start system remote con-
troller battery consumption warning light in
the instrument cluster will come on for a
few seconds when you press the engine
switch to change the ignition mode to
“ON”. Refer to “Warning and Indicator
Lights” in the “BEFORE DRIVING” section
for details. For details on replacing the bat-
tery, refer to the “Keyless Push Start Sys-
tem Remote Controller” in the “BEFORE
DRIVING” section.
(1)
(OFF)
(Audio equipment)
(1)
(2)
EXAMPLE
Using the Transaxle: 10
Braking: 6
Page 127 of 336

OTHER CONTROLS AND EQUIPMENT
OTHER CONTROLS AND EQUIPMENT
Heating and Air Conditioning System (if equipped) ........ 5-1
Manual Heating and Air Conditioning System
(if equipped) ......................................................................... 5-2
Automatic Heating and Air Conditioning System
(Climate Control) (if equipped) .......................................... 5-5
Radio Antenna ..................................................................... 5-9
Installation of Radio Frequency Transmitters .................. 5-9
5
Audio System (if equipped) ................................................ 5-10
Fuel Filler Cap ..................................................................... 5-47
Engine Bonnet ..................................................................... 5-48
Sun Visor ............................................................................. 5-48
Interior Light ........................................................................ 5-49
Luggage Compartment Light (if equipped) ...................... 5-50
Accessory Socket (if equipped) ......................................... 5-50
Assist Grips ......................................................................... 5-51
Glove Box ............................................................................ 5-51
Cup Holder and Storage Area ............................................ 5-51
Front Seat Back Pocket (if equipped) ............................... 5-52
Floor Mats (if equipped) ..................................................... 5-52
Shopping Hook (if equipped) ............................................. 5-53
Luggage Area Cover (if equipped) .................................... 5-53
Frame Hooks ....................................................................... 5-53
Luggage Carpet Hook (if equipped) ................................... 5-55
74LH0-74E
Page 137 of 336

5-10
OTHER CONTROLS AND EQUIPMENT
74LH0-74E
Audio System (if equipped)
B S U
CD
2
3 4 5 6
SEEK/TRACK
AS
AMFM RPT
RDM
DISP
PUSHSOUND
TUNE/FLD
VOL
PWRPUSH
1
B S U
CD
1
2
3 4 5 6
MENU
AMFM RPT
RDM
DISPAS
Bluetooth
R
1
L PWRPUSHVO
SEEK/TRACKPUSHSOUND
TUNE/FLD
MENU
Type 1 Type 2
Page 138 of 336

5-11OTHER CONTROLS AND EQUIPMENT
74LH0-74E
Safety Information Notes on Discs
Precautions
When the inside of the vehicle is very
cold and the player is used soon after
switching on the heater, condensation
may form on the disc or the optical parts
of the player and proper playback may
not be possible. If condensation forms
on the disc, wipe it off with a soft cloth. If
condensation forms on the optical parts
of the player, do not use the player for
about one hour. This will allow the con-
densation to disappear normally.
Driving on extremely bumpy roads which
cause severe vibrations may cause
sound to skip.
This unit uses a precision mechanism.
Even in the event that trouble arises,
never open the case, disassemble the
unit, or lubricate the rotating parts.
Please bring the unit to an authorized
MARUTI SUZUKI dealer.Cautions on Handling
This unit has been designed specifically for
playback of compact discs bearing mark
(A) shown above.
No other discs can be played.
To remove the compact disc from its stor-
age case, press down on the center of the
case and lift the disc out, holding it care-
fully by the edges.
Always handle the compact disc by the
edges. Never touch the surface.
WA R N I N G
If you pay extended attention to oper-
ating the audio system or viewing the
audio system display while driving,
an accident can occur. If you set the
sound volume too loud, it could pre-
vent you from being aware of road
and traffic conditions.
Keep your eyes on the road and
your mind on the drive. Avoid pay-
ing extended attention to operating
the audio system or viewing the
audio system display.
Familiarize yourself with the audio
system controls and operation of
the audio system before driving.
Preset your favorite radio stations
before driving so that you can
quickly tune to them using the pre-
sets.
Set the sound volume to a level
that will allow you to continue to be
aware of road and traffic conditions
while driving.
(A)
Removing the disc
Proper way to hold
the compact disc
Page 145 of 336

5-18
OTHER CONTROLS AND EQUIPMENT
74LH0-74E
The track currently being played will be
played repeatedly.
FOLDER REPEAT
The repeat indicator “RPT.F” will light.
All tracks in the currently selected folder
will be played repeatedly.
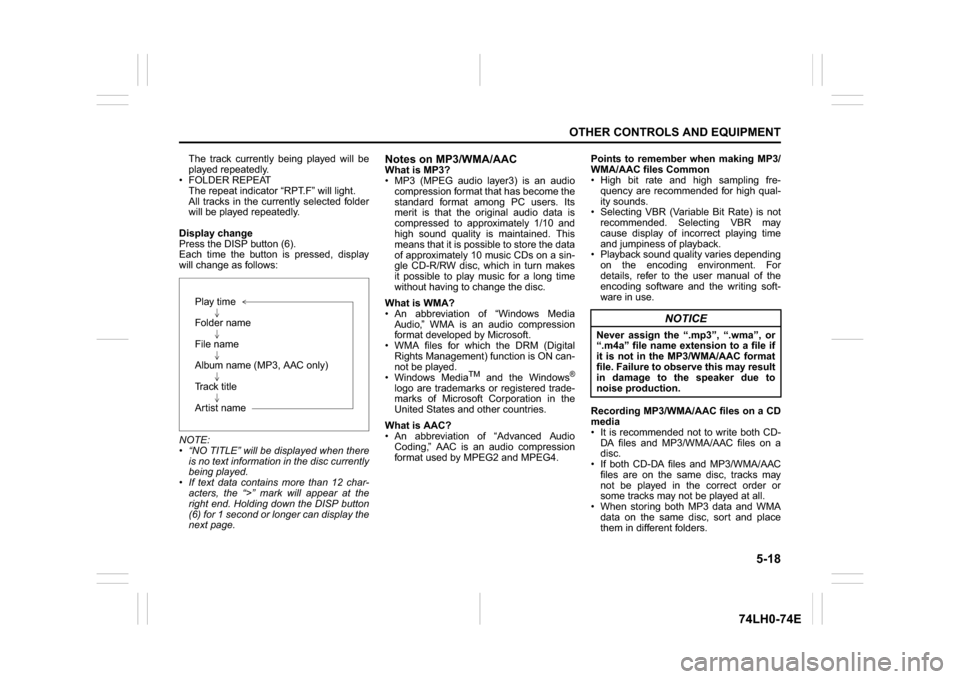
Display change
Press the DISP button (6).
Each time the button is pressed, display
will change as follows:
NOTE:
“NO TITLE” will be displayed when there
is no text information in the disc currently
being played.
If text data contains more than 12 char-
acters, the “>” mark will appear at the
right end. Holding down the DISP button
(6) for 1 second or longer can display the
next page.
Notes on MP3/WMA/AACWhat is MP3?
MP3 (MPEG audio layer3) is an audio
compression format that has become the
standard format among PC users. Its
merit is that the original audio data is
compressed to approximately 1/10 and
high sound quality is maintained. This
means that it is possible to store the data
of approximately 10 music CDs on a sin-
gle CD-R/RW disc, which in turn makes
it possible to play music for a long time
without having to change the disc.
What is WMA?
An abbreviation of “Windows Media
Audio,” WMA is an audio compression
format developed by Microsoft.
WMA files for which the DRM (Digital
Rights Management) function is ON can-
not be played.
Windows Media
TM
and the Windows
®
logo are trademarks or registered trade-
marks of Microsoft Corporation in the
United States and other countries.
What is AAC?
An abbreviation of “Advanced Audio
Coding,” AAC is an audio compression
format used by MPEG2 and MPEG4.Points to remember when making MP3/
WMA/AAC files Common
High bit rate and high sampling fre-
quency are recommended for high qual-
ity sounds.
Selecting VBR (Variable Bit Rate) is not
recommended. Selecting VBR may
cause display of incorrect playing time
and jumpiness of playback.
Playback sound quality varies depending
on the encoding environment. For
details, refer to the user manual of the
encoding software and the writing soft-
ware in use.
Recording MP3/WMA/AAC files on a CD
media
It is recommended not to write both CD-
DA files and MP3/WMA/AAC files on a
disc.
If both CD-DA files and MP3/WMA/AAC
files are on the same disc, tracks may
not be played in the correct order or
some tracks may not be played at all.
When storing both MP3 data and WMA
data on the same disc, sort and place
them in different folders. Play time
Folder name
File name
Album name (MP3, AAC only)
Track title
Artist name
NOTICE
Never assign the “.mp3”, “.wma”, or
“.m4a” file name extension to a file if
it is not in the MP3/WMA/AAC format
file. Failure to observe this may result
in damage to the speaker due to
noise production.
Page 146 of 336

5-19OTHER CONTROLS AND EQUIPMENT
74LH0-74E
Do not write files other than MP3/WMA/
AAC files and unnecessary folders on a
disc.
MP3/WMA/AAC files should be named
to meet the standards and the file sys-
tem specifications as shown below.
The file extension “.mp3”, “.wma” or
“.m4a” should be assigned to files based
on their format independently.
You may encounter a trouble in playing
MP3/WMA/AAC files or displaying infor-
mation of MP3/WMA/AAC files depend-
ing on the writing software or CD
recorder in use.
This unit does not have a play list func-
tion.
It is recommended to write discs in Disc-
at-Once mode even though Multi-ses-
sion mode is supported.
Compression formats
MP3
Bit rate
:
MPEG1 Audio Layer III: 32 k - 320 kbps
MPEG2 Audio Layer III: 8 k - 160 kbps
MPEG2.5 Audio Layer III: 8 k - 160 kbps
Sampling frequency
:
MPEG1 Audio Layer III: 32 k/44.1 k/
48 kHz
MPEG2 Audio Layer III: 16 k/22.05 k/
24 kHz
MPEG2.5 Audio Layer III: 8 k/11.025 k/
12 kHz
WMA (Ver. 7, Ver. 8, Ver. 9*)
Bit rate: CBR 32 k - 320 kbps
Sampling frequency: 32 k/44.1 k/48 kHz
* WMA 9 Professional/LossLess/Voice are
not supported.
AAC*
Bit rate: ABR 16k - 320 kbbs
Sampling frequency: 32 k/44.1 k/48 kHz
* Apple Lossless is not supported.
Supported file systems
ISO 9660 Level 1/Level 2, Joliet, Romeo
Maximum number of files/folders
Maximum number of files: 512
Maximum number of files in a folder: 255
Maximum depth of tree structure: 8
Maximum number of folders: 255
(Root folder is included.)Listening to files stored in a USB
device
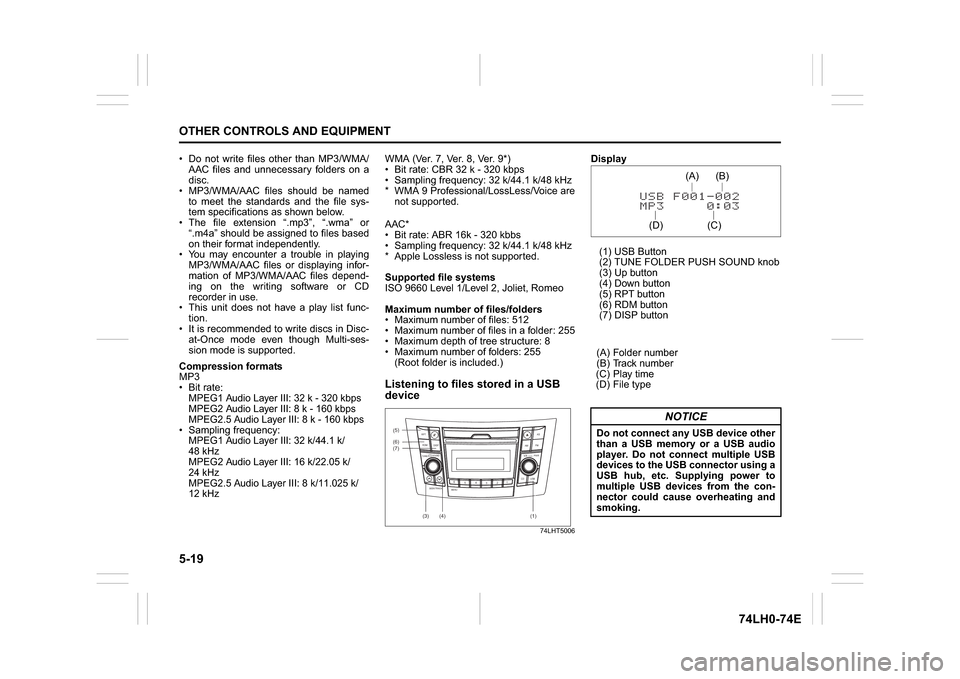
74LHT5006
Display
(1) USB Button
(2) TUNE FOLDER PUSH SOUND knob
(3) Up button
(4) Down button
(5) RPT button
(6) RDM button
(7) DISP button
(A) Folder number
(B) Track number
(C) Play time
(D) File type
(6)
B S
U
CD
2
3 4 5 6
SEEK/TRACK
AS
AMFM RPT
RDM
DISP
PUSHSOUND
TUNE/FLD
VOLPWRPUSH
11
MENU
(3)
(5)
(4) (7)
(1)
NOTICE
Do not connect any USB device other
than a USB memory or a USB audio
player. Do not connect multiple USB
devices to the USB connector using a
USB hub, etc. Supplying power to
multiple USB devices from the con-
nector could cause overheating and
smoking.
(C)(B) (A)
(D)
Page 148 of 336

5-21OTHER CONTROLS AND EQUIPMENT
74LH0-74E
Notes on USB deviceCompatible USB devices
USB Mass Storage Class
For details as to whether your USB
memory/USB Audio is compatible with
USB Mass Storage Class, please con-
tact the USB memory/USB Audio manu-
facturer.
USB Standard Compatibility 1.1/2.0 Full
Speed
File System FAT12/16/32, VFAT
Maximum current less than 1.0 A
If devices such as USB hub, extension
cable are connected to the audio sys-
tem, it may not be recognized. In such
case connect the USB device directly to
the audio system.
Devices such as MP3 player/Mobile
phone/digital camera may not be recog-
nized by the audio system for playing
music.
USB device connection
When connecting a USB device, make
sure that the connector is pushed all the
way into the port.
Do not leave the USB device for long
periods of time in places inside the vehi-
cle where the temperature can rise too
high.
Back up any important data beforehand.
We cannot accept responsibility for any
lost data.
It is recommended not to connect a USB
device that contains data files other than
MP3/WMA/AAC format.Recording MP3/WMA/AAC files on a
USB device
Playback or display may not be possible
depending on the type of USB device in
use or the condition of the recording.
Depending on the connected USB mem-
ory, the files may be played in different
order from the order that the files were
stored.
Compression formats
MP3
Bit rate
:
MPEG1 Audio Layer III: 32 k - 320 kbps
MPEG2 Audio Layer III: 8 k - 160 kbps
MPEG2.5 Audio Layer III: 8 k - 160 kbps Sampling frequency
:
MPEG1 Audio Layer III: 32 k/44.1 k/48 kHz
MPEG2 Audio Layer III: 16 k/22.05 k/24 kHz
MPEG2.5 Audio Layer III: 8 k/11.025 k/12 kHzWMA (Ver. 7, Ver. 8, Ver. 9*)
Bit rate: CBR 32 k -320 kbps
Sampling frequency: 32 k/44.1 k/48 kHz
* WMA 9 Professional/LossLess/Voice are
not supported.
AAC*
Bit rate: ABR 16k - 320 kbbs
Sampling frequency: 32 k/44.1 k/48 kHz
* Apple Lossless is not supported.
Maximum number of files/folders
Maximum number of files: 2500
Maximum number of files in a folder: 255
Maximum depth of tree structure: 8
Maximum number of folders: 255
(Root folder is included.)
Listening to an iPod
®
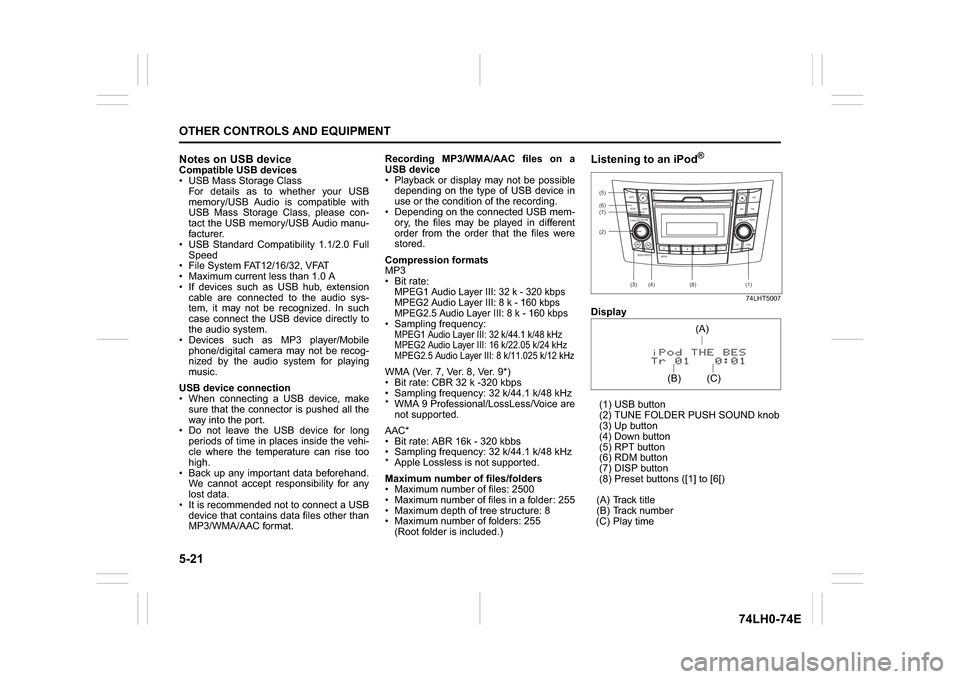
74LHT5007
Display
(1) USB button
(2) TUNE FOLDER PUSH SOUND knob
(3) Up button
(4) Down button
(5) RPT button
(6) RDM button
(7) DISP button
(8) Preset buttons ([1] to [6[)
(A) Track title
(B) Track number
(C) Play time(2) (6)
B S U
CD
2
3 4 5 6
SEEK/TRACK
AS
AMFM RPT
RDM
DISP
PUSHSOUND
TUNE/FLD
VOLPWRPUSH
11
MENU
(3)
(5)
(4) (7)
(1)
(8)
(C)(A)
(B)