2017 SUBARU LEGACY heater
[x] Cancel search: heaterPage 23 of 610

&Instrument panel1) Power windows (page 2-34)
2) Remote control mirror switch (page 3-82)
3) Combination meter (page 3-8)
4) Audio (page 5-1/Navigation system (Re-
fer to the Owner ’s Manual supplement for
the navigation system)
5) Hazard warning flasher switch (page 3-8)
6) Seat heater switch (page 1-9)
7) Climate control (page 4-1)
8) Memory switch for power rear gate (page 2-45)
9) Illumination brightness control dial (page 3-55)
10) Power rear gate switch (page 2-42)/ Trunk lid opener switch (page 2-39)
11) BSD/RCTA OFF switch (page 7-60)
12) Vehicle Dynamics Control OFF switch (page 7-37)
13) Steering responsive fog light off switch (page 3-56)
14) Hood lock release knob (page 11-7)
A: Models without EyeSight system
B: Models with EyeSight system
NOTE
For details about the EyeSight system,
refer to the Owner ’s Manual supple-
ment for the EyeSight system.
18
Page 34 of 610

Front seats........................................................... 1-2
Manual seat (if equipped) .................................... 1-4
Power seat (if equipped) ...................................... 1-5
Head restraint adjustment .................................... 1-8
Seat heater (if equipped).................................... 1-9
Front seat heater (if equipped) ............................ 1-10
Rear seat heater (if equipped) ............................. 1-10
Rear seats........................................................... 1-11Reclining the seatback (Outback) ........................ 1-11
Folding down the rear seatback .......................... 1-12
Head restraint adjustment ................................... 1-14
Armrest ............................................................. 1-15
Seatbelts ............................................................. 1-16Seatbelt safety tips ............................................. 1-16
Emergency Locking Retractor (ELR) ................... 1-17
Automatic Locking Retractor/Emergency Locking Retractor (ALR/ELR) ......................................... 1-17
Seatbelt warning light and chime ........................ 1-17
Fastening the seatbelt ........................................ 1-17
Seatbelt maintenance ......................................... 1-24
Front seatbelt pretensioners ............................. 1-24System monitors................................................ 1-26
System servicing ................................................ 1-26 Precautions against vehicle modification
............ 1-27
Child restraint systems..................................... 1-27Where to place a child restraint system .............. 1-28
Choosing a child restraint system ...................... 1-30
Installing child restraint systems with ALR/ELR seatbelt ........................................................... 1-30
Installing a booster seat ..................................... 1-34
Installation of child restraint systems by use of lower and tether anchorages (LATCH) .............. 1-36
Top tether anchorages ....................................... 1-39
*SRS airbag (Supplemental Restraint
System airbag) ................................................ 1-41
General precautions regarding SRS airbag
system ............................................................ 1-42
Components ...................................................... 1-48
SUBARU advanced frontal airbag system, SRS seat cushion airbag, SRS side airbag and SRS
curtain airbag .................................................. 1-51
System operation ............................................... 1-56
SRS airbag system monitors .............................. 1-68
SRS airbag system servicing ............................. 1-69
Precautions against vehicle modification ............ 1-70
Seat, seatbelt and SRS airbags
1
Page 36 of 610

for the child’s age, height and
weight.
Secure ALL types of child restraint
devices (including forward facing
child seats) in the REAR seats at
all times.
NEVER INSTALL A REARWARD FA-
CING CHILD SEAT IN THE FRONT
SEAT. DOING SO RISKS SERIOUS
INJURY OR DEATH TO THE CHILD
BY PLACING THE CHILD ’S HEAD
TOO CLOSE TO THE SRS AIRBAG.
According to accident statistics,
children are safer when properly
restrained in the rear seating posi-
tions than in the front seating posi-
tions. For instructions and precau-
tions concerning child restraint sys-
tems, refer to “Child restraint sys-
tems ”F 1-27.
WARNING
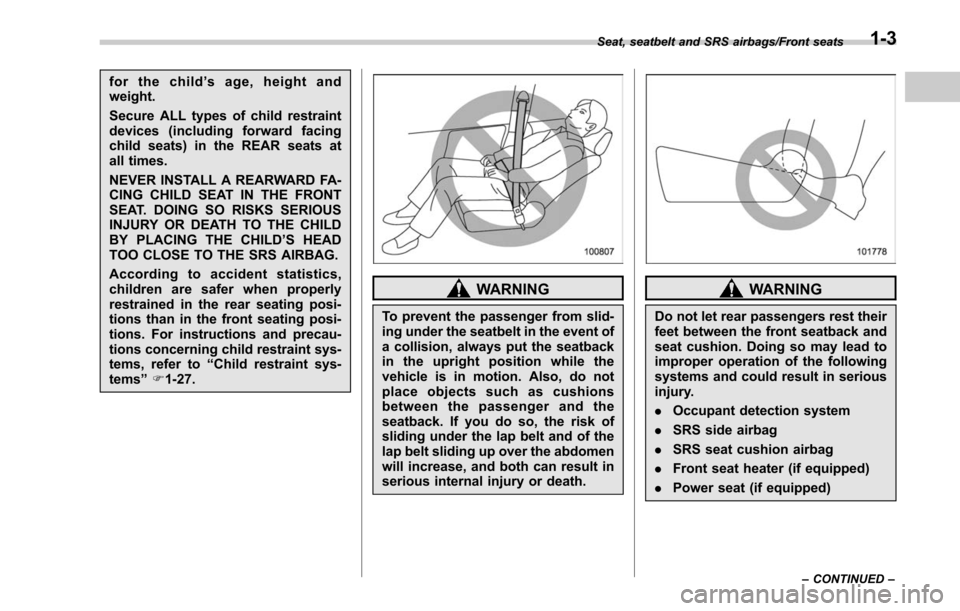
To prevent the passenger from slid-
ing under the seatbelt in the event of
a collision, always put the seatback
in the upright position while the
vehicle is in motion. Also, do not
place objects such as cushions
between the passenger and the
seatback. If you do so, the risk of
sliding under the lap belt and of the
lap belt sliding up over the abdomen
will increase, and both can result in
serious internal injury or death.
WARNING
Do not let rear passengers rest their
feet between the front seatback and
seat cushion. Doing so may lead to
improper operation of the following
systems and could result in serious
injury.
. Occupant detection system
. SRS side airbag
. SRS seat cushion airbag
. Front seat heater (if equipped)
. Power seat (if equipped)
Seat, seatbelt and SRS airbags/Front seats
–CONTINUED –1-3
Page 42 of 610

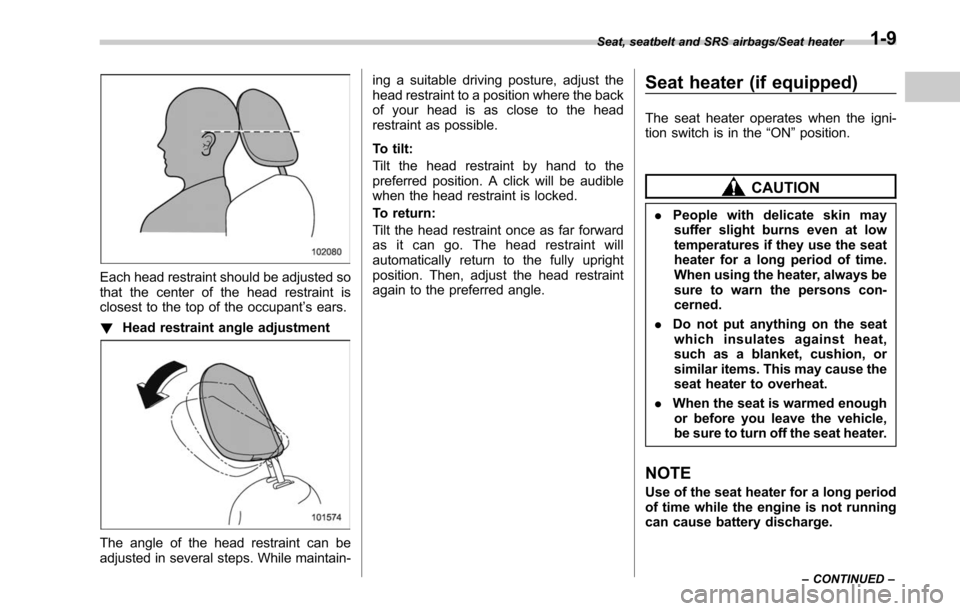
Each head restraint should be adjusted so
that the center of the head restraint is
closest to the top of the occupant’s ears.
! Head restraint angle adjustment
The angle of the head restraint can be
adjusted in several steps. While maintain- ing a suitable driving posture, adjust the
head restraint to a position where the back
of your head is as close to the head
restraint as possible.
To tilt:
Tilt the head restraint by hand to the
preferred position. A click will be audible
when the head restraint is locked.
To return:
Tilt the head restraint once as far forward
as it can go. The head restraint will
automatically return to the fully upright
position. Then, adjust the head restraint
again to the preferred angle.
Seat heater (if equipped)
The seat heater operates when the igni-
tion switch is in the
“ON ”position.
CAUTION
. People with delicate skin may
suffer slight burns even at low
temperatures if they use the seat
heater for a long period of time.
When using the heater, always be
sure to warn the persons con-
cerned.
. Do not put anything on the seat
which insulates against heat,
such as a blanket, cushion, or
similar items. This may cause the
seat heater to overheat.
. When the seat is warmed enough
or before you leave the vehicle,
be sure to turn off the seat heater.
NOTE
Use of the seat heater for a long period
of time while the engine is not running
can cause battery discharge.
Seat, seatbelt and SRS airbags/Seat heater
–CONTINUED –1-9
Page 43 of 610

Seat, seatbelt and SRS airbags/Seat heater
&Front seat heater (if
equipped)
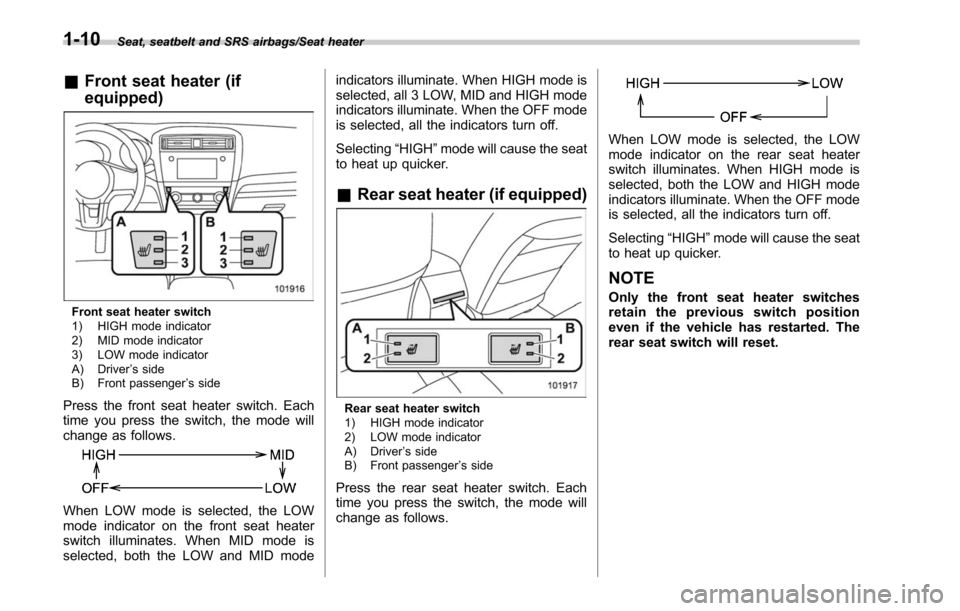
Front seat heater switch
1) HIGH mode indicator
2) MID mode indicator
3) LOW mode indicator
A) Driver ’s side
B) Front passenger ’s side
Press the front seat heater switch. Each
time you press the switch, the mode will
change as follows.
When LOW mode is selected, the LOW
mode indicator on the front seat heater
switch illuminates. When MID mode is
selected, both the LOW and MID mode indicators illuminate. When HIGH mode is
selected, all 3 LOW, MID and HIGH mode
indicators illuminate. When the OFF mode
is selected, all the indicators turn off.
Selecting
“HIGH”mode will cause the seat
to heat up quicker.
& Rear seat heater (if equipped)
Rear seat heater switch
1) HIGH mode indicator
2) LOW mode indicator
A) Driver ’s side
B) Front passenger ’s side
Press the rear seat heater switch. Each
time you press the switch, the mode will
change as follows.
When LOW mode is selected, the LOW
mode indicator on the rear seat heater
switch illuminates. When HIGH mode is
selected, both the LOW and HIGH mode
indicators illuminate. When the OFF mode
is selected, all the indicators turn off.
Selecting “HIGH”mode will cause the seat
to heat up quicker.
NOTE
Only the front seat heater switches
retainthepreviousswitchposition
even if the vehicle has restarted. The
rear seat switch will reset.
1-10
Page 240 of 610

Ventilator control................................................. 4-2
Center ventilators ................................................ 4-2
Side ventilators ................................................... 4-2
Rear ventilators (if equipped) ............................... 4-2
Climate control panel.......................................... 4-3
Type A ................................................................ 4-3
Type B ................................................................ 4-4
Automatic climate control system (type B) ....... 4-5Sensors.............................................................. 4-5
Manual climate control ....................................... 4-6Airflow mode selection........................................ 4-6
Temperature control ............................................ 4-7
Fan speed control ............................................... 4-8
Air conditioner control ........................................ 4-8
Air inlet selection ................................................ 4-8
Defrosting............................................................ 4-9 Operating tips for heater and air
conditioner ........................................................ 4-9
Cleaning ventilator grille ...................................... 4-9
Efficient cooling after parking in direct sunlight ............................................................. 4-9
Lubrication oil circulation in the refrigerant circuit .............................................................. 4-10
Checking air conditioning system before summer season ............................................................ 4-10
Cooling and dehumidifying in high humidity and low temperature weather condition ................... 4-10
Air conditioner compressor shut-off when engine is heavily loaded .............................................. 4-10
Refrigerant for your climate control system ... ..... 4-10
Air filtration system (if equipped)..................... 4-10Replacing an air filter......................................... 4-11
Climate control
4
Page 248 of 610

WARNING
Continued operation in the ON posi-
tion may fog up the windows. Switch
to the OFF position as soon as the
outside dusty condition clears.
Defrosting
Select the desired“”mode or “”mode
to defrost or dehumidify the windshield
and front door windows by performing the
following procedures.
. To select the “
”mode, press the
defroster button.
. To select the “
”mode, press the
airflow mode selection button and select
the “
”mode.
NOTE
. When the “”mode or “”mode
is selected, the air conditioner com-
pressor automatically operates to more
quickly defog the windshield. (The air
conditioner indicator light does not
illuminate in this case.) At the same
time, the air inlet selection is automa-
tically set to the outside air mode. For
details, refer to “Airflow mode selec-
tion ”F 4-6.
. If the defroster button is pressed
while the “
”mode is selected, it will
return to the previous mode before
selecting the “
”mode.
Operating tips for heater and
air conditioner
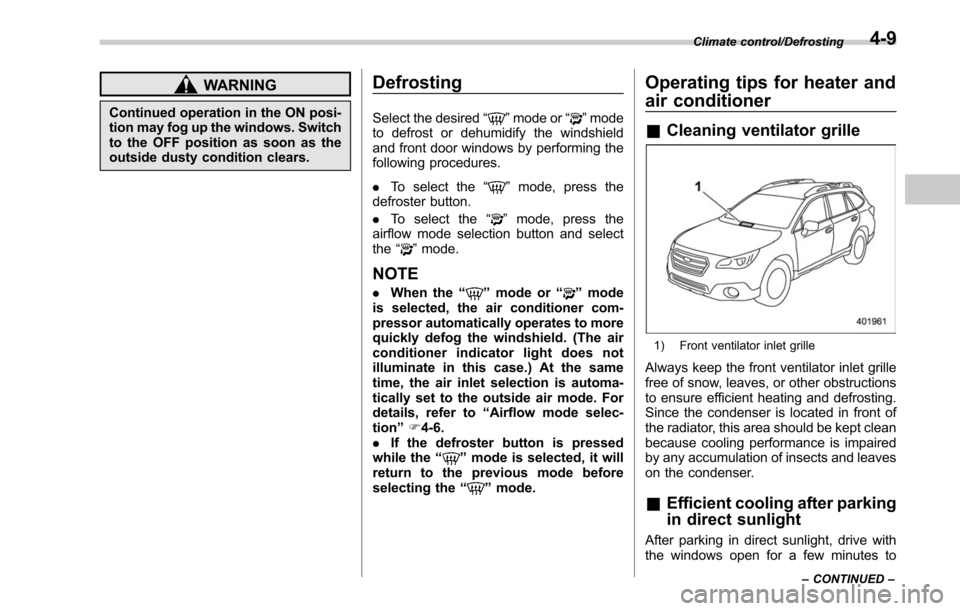
& Cleaning ventilator grille
1) Front ventilator inlet grille
Always keep the front ventilator inlet grille
free of snow, leaves, or other obstructions
to ensure efficient heating and defrosting.
Since the condenser is located in front of
the radiator, this area should be kept clean
because cooling performance is impaired
by any accumulation of insects and leaves
on the condenser.
&Efficient cooling after parking
in direct sunlight
After parking in direct sunlight, drive with
the windows open for a few minutes to
Climate control/Defrosting
–CONTINUED –4-9
Page 386 of 610

!Operation indicator flashing in
green
1. Check that the select lever is set in the
“P ”position.
2. Depress the brake pedal and keep it.
3. Press the push-button ignition switch
while turning the steering wheel left and
right.
! Operation indicator flashing in
orange
There may be a malfunction in the
steering lock function. Immediately con-
tact your nearest SUBARU dealer.Remote engine start system
(dealer option)
WARNING
. There are some general precau-
tions when starting the engine.
Carefully read the precautions
described in “General precau-
tions when starting/stopping en-
gine” F7-9.
. Do not remote start a vehicle in
an enclosed environment (e.g.
closed garage). Prolonged opera-
tion of a motor vehicle in an
enclosed environment can cause
a harmful build-up of Carbon
Monoxide. Carbon Monoxide is
harmful to your health. Exposure
to high levels of Carbon Monox-
ide can cause headaches, dizzi-
ness or in extreme cases uncon-
sciousness and/or death.
. Before performing any servicing
of the vehicle, temporarily place
the remote engine start system in
service mode to prevent the
system from unexpectedly start-
ing the engine.
The remote engine start system allows you to start the engine from outside the
vehicle. In addition, the remote engine
start system can activate the heater or air
conditioner, providing you with a comfor-
table cabin upon entry.NOTE
Thelengthoftimeforwhichitis
acceptable to allow the engine to
remain idling may be bound by local
laws and regulations. Check the local
rules when using the remote engine
start system.
Starting and operating/Remote engine start system (dealer option)
–CONTINUED –7-15