2017 SUBARU LEGACY ignition
[x] Cancel search: ignitionPage 193 of 610

Instruments and controls/Multi information display
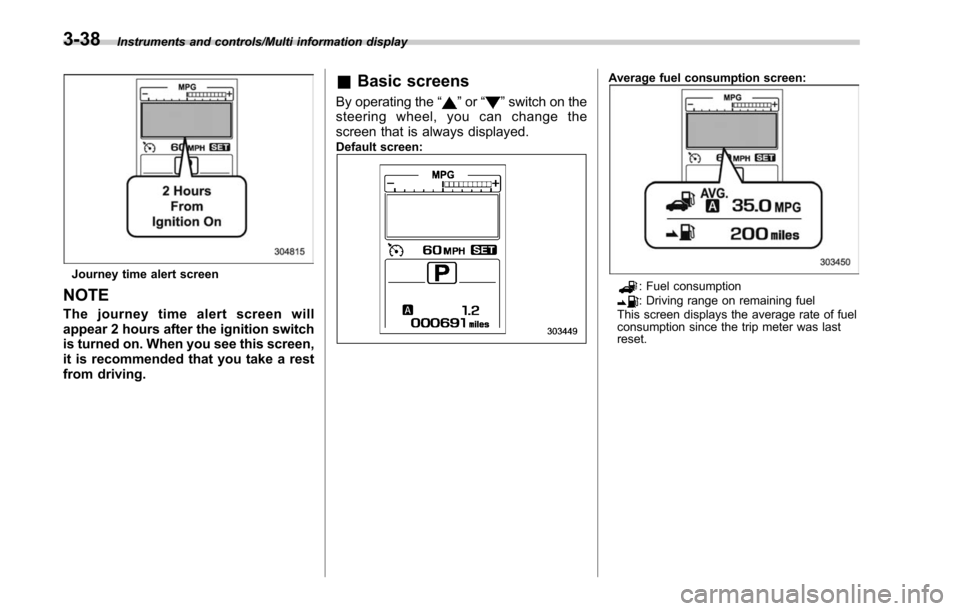
Journey time alert screen
NOTE
The journey time alert screen will
appear 2 hours after the ignition switch
is turned on. When you see this screen,
it is recommended that you take a rest
from driving.
&Basic screens
By operating the “”or “”switch on the
steering wheel, you can change the
screen that is always displayed.
Default screen:
Average fuel consumption screen:
: Fuel consumption: Driving range on remaining fuel
This screen displays the average rate of fuel
consumption since the trip meter was last
reset.
3-38
Page 194 of 610

Current fuel consumption screen:
: Fuel consumption: Driving range on remaining fuel
This screen displays the rate of fuel con-
sumption at the present moment. Driving information screen:: Journey time: Journey distance
This screen displays the journey time (the
time that has elapsed since the ignition switch
was turned to the “ON ”position) and journey
distance (the distance that has been driven
since the ignition switch was turned to the
“ ON ”position). Digital speed screen:This screen displays the current vehicle
speed.
Multi Media Link screen (while not selecting
the destination) (models with genuine
SUBARU navigation system):
Instruments and controls/Multi information display
–CONTINUED –3-39
Page 199 of 610

Instruments and controls/Multi information display
!Screen Settings
After entering the “Screen Settings”menu,
select one of the following menus.
!Welcome Screen
The welcome screen can be activated or
deactivated. Select “On (with Sound)”to
activate the screen and sound. Select “On
(without Sound) ”to activate the screen
and deactivate the sound. Select “Off”to
deactivate the screen.
!Good-bye Screen
The Good-bye screen can be activated or
deactivated. Select “On”to activate the
screen. Select “Off ”to deactivate the
screen.
!Gauge Initial Movement
The movement of the meter needles and
gauge needles that occurs when the
ignition switch is turned to the “ON ”
position can be activated or deactivated.
Select “On”to activate. Select “Off”to
deactivate.
!Gear Position Indicator Settings
(MT models)
The gear position indicator light can be
activated or deactivated. Select “On”to
activate. Select “Off”to deactivate. !
Units
You can select the displayed units of the
distance, vehicle speed and volume.
Operate the “
”or “”switch on the
steering wheel to display the preferred
units. Then pull the “
/SET”switch to
select the displayed units.
!Languages
Operate the “
”or “”switch on the
steering wheel to display the preferred
language. Then pull the “
/SET”switch to
select the displayed language.
! Combination Meter Illumination (if
equipped)
After entering the “Combination Meter
Illumination ”menu, select the following
menu.
!Meter Ring Illumination
The illumination of the combination meter
rings can be activated or deactivated.
Select “On ”to activate the illumination.
Select “Off”to deactivate the illumination.
! EyeSight (models with EyeSight
system)
NOTE
For models with the EyeSight system,
refer to the Owner ’s Manual supple-
ment for the EyeSight system. After entering the
“EyeSight ”menu, select
one of the following menus.
!Warning Volume
The volume of the warning buzzer that
sounds when the EyeSight system is in
use can be set in 3 stages (“Max ”,“Mid ”
and “Min”).
! Lead Vehicle Acquisition Sound
When adaptive cruise control is used, the
buzzer that sounds under any of the
following conditions can be activated or
deactivated.
. A vehicle is detected in front
. Detection is not possible
Select “On”to activate the buzzer. Select
“Off ”to deactivate the buzzer.
! Lead Vehicle Moving Monitor
Function
When the lead vehicle moving monitor
function is operated, the buzzer that
sounds if a vehicle in front has started
can be activated or deactivated. Select
“On ”to activate the buzzer. Select “Off”to
deactivate the buzzer.
!Vehicle Icon
The vehicle icon indication can be acti-
vated or deactivated. Select “On ”to
activate. Select “Off”to deactivate.
3-44
Page 201 of 610

Instruments and controls/Light control switch
!Auto Headlights
. Light Sensitivity:
The operational sensitivity of the auto on/
off headlights can be set. You can select
“ Max ”,“Mid ”,“Low ”or “Min ”.
. Wiper Link:
The automatic headlight turn on function
that is linked with the wiper operation can
be activated or deactivated. Select “On”to
activate. Select “Off”to deactivate.
! Welcome Lighting
After entering the “Welcome Lighting ”
menu, select either of the following me-
nus.
. Approaching Time Set:
The setting for the period of time in which
the low beam headlights remain on when
approaching the vehicle can be set or
customized. Select the preferred seconds
to customize the operation period. Select
“Off ”to deactivate the welcome lighting
function when approaching.
. Leaving Time Set:
The setting for the period of time in which
the low beam headlights remain on when
exiting the vehicle can be set or custo-
mized. Select the preferred seconds to
customize the operation period. Select
“Off ”to deactivate the welcome lighting function when exiting.
!
Default Settings
Select “Ye s”to use the menu screen to
restore customized settings to the factory
default settings. Select “No”to return to
the previous screen without restoring to
the factory default settings.Light control switch
CAUTION
. Use of any lights for a long period
of time while the engine is not
running can cause the battery to
discharge.
. Before leaving the vehicle, make
sure that the light control switch
is turned to the off position. If the
vehicle is left unattended for a
long time with the light control
switch set to a position other
than the off position, the battery
may be discharged.
Models with “keyless access with
push-button start system ”:
The light control switch operates when the
push-button ignition switch is in the “ACC”
or “ON ”position.
Regardless of the position of the light
control switch, the illuminated lights are
turned off when the push-button ignition
switch is turned off.
Models without “keyless access with
push-button start system ”:
The light control switch operates when the
key is inserted in the ignition switch.
3-46
Page 202 of 610

Regardless of the position of the light
control switch, the illuminated lights are
turned off when the key is removed from
the ignition switch.
NOTE
The light control switch can be oper-
ated (except auto on/off headlights),
even under the following conditions.
.when the push-button ignition
switch is turned off (models with “key-
less access with push-button start
system ”)
. when the key is not inserted into the
ignition switch (models without “key-
less access with push-button start
system ”)
If the driver ’s door is opened while the
headlights are illuminated under such
conditions, a chirp sound will inform
the driver that the lights are illumi-
nated.
& Headlights
To turn on the headlights, turn the knob on
the end of the turn signal lever.
“
”position:
The headlights are all off.
“
” position:
Instrument panel illumination, headlights,
parking lights, front side marker lights, rear
side marker lights, tail lights and license
plate lights are on.
“
” position:
Instrument panel illumination, parking
lights, front side marker lights, rear side
marker lights, tail lights and license plate
lights are on. “
”
position: auto on/off headlights
When the ignition switch is in the “ON”
position, the instrument panel illumination,
headlights, parking lights, front side mar-
ker lights, rear side marker lights, tail lights
and license plate lights are automatically
on or off depending on the level of the
ambient light.
The light sensitivity of the auto on/off
headlights can be changed by operating
the multi information display. For details,
refer to “Auto Headlights ”F 3-46. Also, the
setting can be changed by a SUBARU
dealer. Consult your SUBARU dealer for
details.
Automatic headlight turn on function
that is linked with wiper operation:
While the light control switch is in the
“AUTO ”position, the headlights will auto-
matically turn on when the windshield
wipers operate several times. The head-
lights will automatically turn off when the
wipers stop.
The ON/OFF setting of this function can
be changed by operating the multi in-
formation display. For details, refer to
“Auto Headlights ”F 3-46. Also, the setting
can be changed by a SUBARU dealer.
Consult your SUBARU dealer for details.
Instruments and controls/Light control switch
–CONTINUED –3-47
Page 203 of 610

Instruments and controls/Light control switch
!Welcome lighting function
The welcome lighting function turns on the
low beam headlight for smooth approach-
ing to or exiting from the vehicle at night or
in a dark place.
The function is activated while all of the
following conditions are met.
. The light control switch is in the
“AUTO ”position
. It is dark enough to turn on the auto on/
off headlights
When approaching:
While the welcome lighting function is
activated, the low beam headlights will
automatically illuminate when unlocking
the doors (for Outback, including the rear
gate) by using the remote keyless entry
system.
The low beam headlights will remain
illuminated for 30 seconds
*1and then turn
off. However, if any of the following
operations is done, the low beam head-
lights will turn off.
. The doors are locked.
. The light control switch is turned to a
position other than “AUTO”.
. The ignition switch is turned to the “ON”
position. When exiting:
While the welcome lighting function is
activated, the low beam headlights will
remain illuminated even when either of the
following operation is done.
.
Thepush-buttonignitionswitchis
turned to the “OFF”status (models with
“ keyless access with push-button start
system ”)
. The key is pulled out from the ignition
switch (models without “keyless access
with push-button start system ”)
The low beam headlights will turn off
under any of the following conditions.
. 3 minutes have passed since the low
beam headlights were illuminated by the
welcome lighting function.
. 30 seconds have passed since the
door is opened and closed.
*1
. The light control switch is turned to a
position other than “AUTO”.
. The locking procedure is performed
twice. When performing the unlocking
procedure after performing the locking
procedure, perform the locking procedure
twice again.
*1: The setting for the period of time in which
the low beam headlights remain on by the
welcome lighting function can be changed by a
SUBARU dealer. Contact your SUBARU dealer for details. Also, you can change the setting by
operating the multi information display. For
details, refer to
“Welcome Lighting ”F3-46.
For models with the genuine SUBARU naviga-
tion system, you can change the setting by
using the navigation system. For details, refer to
the Owner ’s Manual supplement for the naviga-
tion system.
3-48
Page 206 of 610

Malfunction of the high beam assist
function:
High beam assist warning indicator (yel-
low)
When the high beam assist function
malfunctions, the high beam assist warn-
ing indicator on the combination meter will
appear. In this case, have your vehicle
inspected by your SUBARU dealer.
Temporary stop of high beam assist
function:
If the high beam assist function stops
temporarily due to poor visibility or abnor-
mal temperature, the message appears
on the combination meter. When the
condition is canceled, the system will be
restored.
NOTE
Even when the operation conditions of
the high beam assist function are met,
there may be a case in which the high
beam assist indicator does not illumi-
nate and an abnormal condition warn-
ing is given. In this case, turn the
ignition switch to the“LOCK ”/“ OFF ”
position and then the “ON ”position
again. Check if the high beam assist
indicator illuminates. If the indicator
does not illuminate, have the vehicle
inspected at a SUBARU dealer.
! How to temporarily lower the
sensitivity of the high beam
assist function
The sensitivity of the high beam assist
function can be lowered by using the
following operations.
1. Turn the ignition switch to the “ON”
position.
1) Automatic dimming on/off button
2. Press and hold the automatic dimming
on/off button for 15 to 20 seconds.
When the sensitivity of the high beam
assist function is lowered, the LED in-
dicator on the automatic dimming on/off
button will flash.
NOTE
. The sensitivity of the high beam
assist function cannot be lowered
while driving.
. You can resume the sensitivity of
the high beam assist function by using
either of the following operations.
–Turn the ignition switch to the
“ LOCK ”/“ OFF ”position and then
start the engine.
Instruments and controls/Light control switch
–CONTINUED –3-51
Page 210 of 610

&One-touch lane changer
To flash the turn signal and turn signal
indicator light three times, push the turn
signal lever up or down slightly and
immediately release it.
The operational/non-operational setting of
the one-touch lane changer ’s can be
changed by a SUBARU dealer. Contact
the nearest SUBARU dealer for details.
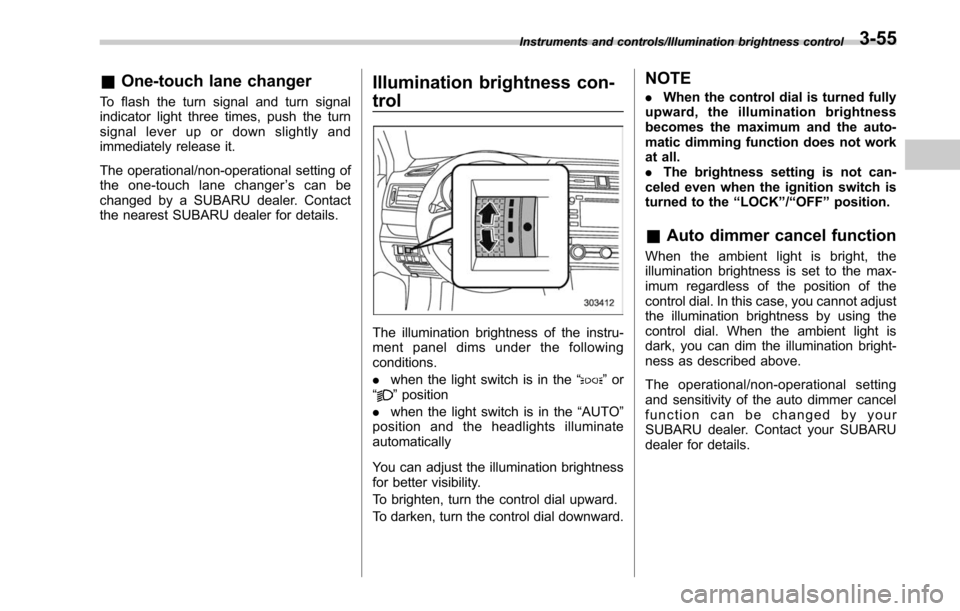
Illumination brightness con-
trol
The illumination brightness of the instru-
ment panel dims under the following
conditions.
. when the light switch is in the “
”or
“” position
. when the light switch is in the “AUTO”
position and the headlights illuminate
automatically
You can adjust the illumination brightness
for better visibility.
To brighten, turn the control dial upward.
To darken, turn the control dial downward.
NOTE
. When the control dial is turned fully
upward, the illumination brightness
becomes the maximum and the auto-
matic dimming function does not work
at all.
. The brightness setting is not can-
celed even when the ignition switch is
turned to the “LOCK ”/“ OFF ”position.
& Auto dimmer cancel function
When the ambient light is bright, the
illumination brightness is set to the max-
imum regardless of the position of the
control dial. In this case, you cannot adjust
the illumination brightness by using the
control dial. When the ambient light is
dark, you can dim the illumination bright-
ness as described above.
The operational/non-operational setting
and sensitivity of the auto dimmer cancel
function can be changed by your
SUBARU dealer. Contact your SUBARU
dealer for details.
Instruments and controls/Illumination brightness control3-55