2017 SUBARU LEGACY run flat
[x] Cancel search: run flatPage 474 of 610
If you park your vehicle in an emergency......... 9-2
Temporary spare tire ........................................... 9-2
Maintenance tools ............................................... 9-3
Legacy................................................................ 9-4
Outback .............................................................. 9-5
Flat tires ............................................................... 9-5Changing a flat tire .............................................. 9-5
Storing a flat tire ................................................. 9-8
Tire pressure monitoring system (TPMS) (if equipped) ......................................................... 9-10
Jump starting ..................................................... 9-11How to jump start ............................................... 9-11
Engine overheating ............................................ 9-13
If steam is coming from the engine
compartment .................................................... 9-13
If no steam is coming from the engine compartment .................................................... 9-13
Towing................................................................. 9-13Towing hook and tie-down hooks/holes .. ............ 9-14
Using a flat-bed truck ......................................... 9-16 Towing with all wheels on the ground
................. 9-17
Electronic parking brake–if the electronic
parking brake cannot be released ................. 9-17
Access key –if access key does not
operate properly ............................................. 9-18
Locking and unlocking ....................................... 9-18
Switching power status ...................................... 9-18
Starting engine .................................................. 9-19
Trunk lid (Legacy) –if the trunk lid cannot
be opened ....................................................... 9-19
Rear gate (Outback) –if the rear gate
cannot be opened ........................................... 9-20
Power rear gate - if power rear gate does not operate properly ....................................... 9-21
When the power rear gate is deactivated ............ 9-21
When the rear gate cannot be opened ................ 9-22
When the rear gate cannot be closed ................. 9-22
If your vehicle is involved in an accident ........ 9-22
In case of emergency
9
Page 479 of 610
In case of emergency/Flat tires
.Always turn off the engine before
raising the flat tire off the ground
using the jack. Never swing or
push the vehicle supported with
the jack. The jack can come out
of the jacking point due to a jolt
and this can result in a serious
accident.
1. Park on a hard, level surface, when-
ever possible, then stop the engine.
2. Apply the parking brake and shift the
shift lever in reverse (MT models) or the
select lever in the “P”(Park) position (CVT
models).
3. Turn on the hazard warning flasher
and unload all occupants and luggage
from the vehicle.
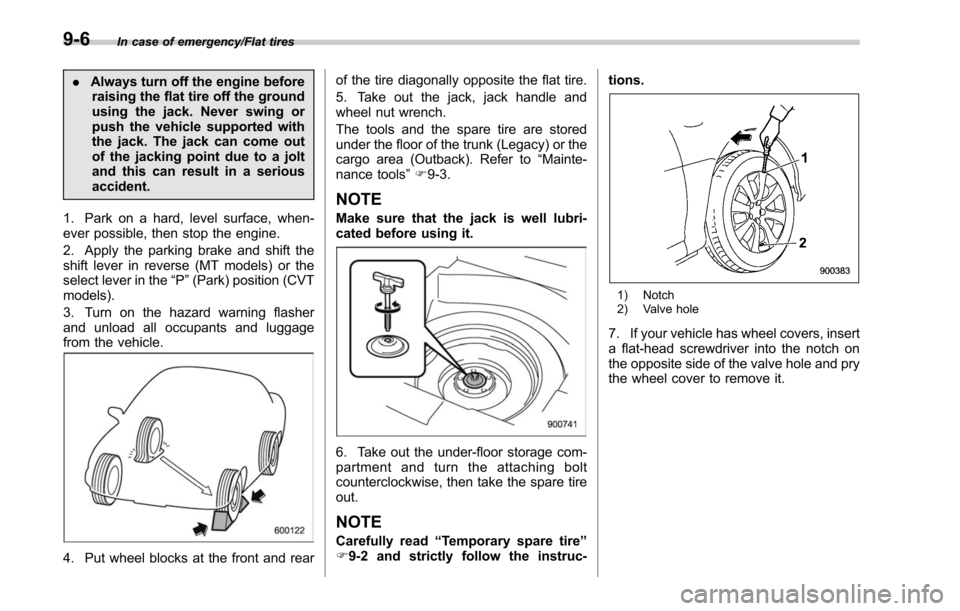
4. Put wheel blocks at the front and rear of the tire diagonally opposite the flat tire.
5. Take out the jack, jack handle and
wheel nut wrench.
The tools and the spare tire are stored
under the floor of the trunk (Legacy) or the
cargo area (Outback). Refer to
“Mainte-
nance tools ”F 9-3.
NOTE
Make sure that the jack is well lubri-
cated before using it.
6. Take out the under-floor storage com-
partment and turn the attaching bolt
counterclockwise, then take the spare tire
out.
NOTE
Carefully read “Temporary spare tire ”
F 9-2 and strictly follow the instruc- tions.
1) Notch
2) Valve hole
7. If your vehicle has wheel covers, insert
a flat-head screwdriver into the notch on
the opposite side of the valve hole and pry
the wheel cover to remove it.
9-6
Page 483 of 610

In case of emergency/Flat tires
6. Fasten the tire fixing band to secure
the tire bag.
&Tire pressure monitoring
system (TPMS) (if equipped)
Low tire pressure warning light
The tire pressure monitoring system pro-
vides the driver with the warning message
indicated by sending a signal from a
sensor that is installed in each wheel
when tire pressure is severely low.
The tire pressure monitoring system will
activate only when the vehicle is driven.
Also, this system may not react immedi-
ately to a sudden drop in tire pressure (for
example, a blow-out caused running over
a sharp object).
WARNING
. If the low tire pressure warning
light illuminates while driving,
never brake suddenly. Instead,
perform the following procedure.
Otherwise an accident involving
serious vehicle damage and ser-
ious personal injury could occur.
(1) Keep driving straight ahead while gradually reducing
speed.
(2) Slowly pull off the road to a safe place.
(3) Check the pressure for all four tires and adjust the pressure
to the COLD tire pressure
shown on the vehicle placard
on the door pillar on the
driver ’s side.
If this light still illuminates while driving after adjusting the tire
pressure, a tire may have signifi-
cant damage and a fast leak that
causes the tire to lose air rapidly.
If you have a flat tire, replace it
with a spare tire as soon as
possible.
. When a spare tire is mounted or a
wheel rim is replaced without the
original pressure sensor/trans- mitter being transferred, the low
tire pressure warning light will
illuminate steadily after blinking
for approximately one minute.
This indicates the TPMS is un-
able to monitor all four road
wheels. Contact your SUBARU
dealer as soon as possible for
tire and sensor replacement and/
or system resetting.
. When a tire is repaired with liquid
sealant, the tire pressure warning
valve and transmitter may not
operate properly. If a liquid sea-
lant is used, contact your nearest
SUBARU dealer or other qualified
service shop as soon as possi-
ble. Make sure to replace the tire
pressure warning valve and
transmitter when replacing the
tire. You may reuse the wheel if
there is no damage to it and if the
sealant residue is properly
cleaned off.
If the light illuminates steadily
after blinking for approximately
one minute, promptly contact a
SUBARU dealer to have the sys-
tem inspected.
9-10
Page 490 of 610
the shift lever into the“1st”position.
2. Apply the parking brake firmly.
3. Secure the vehicle onto the carrier
properly with safety chains. Each safety
chain should be equally tightened and
care must be taken not to pull the chains
so tightly that the suspension bottoms out.
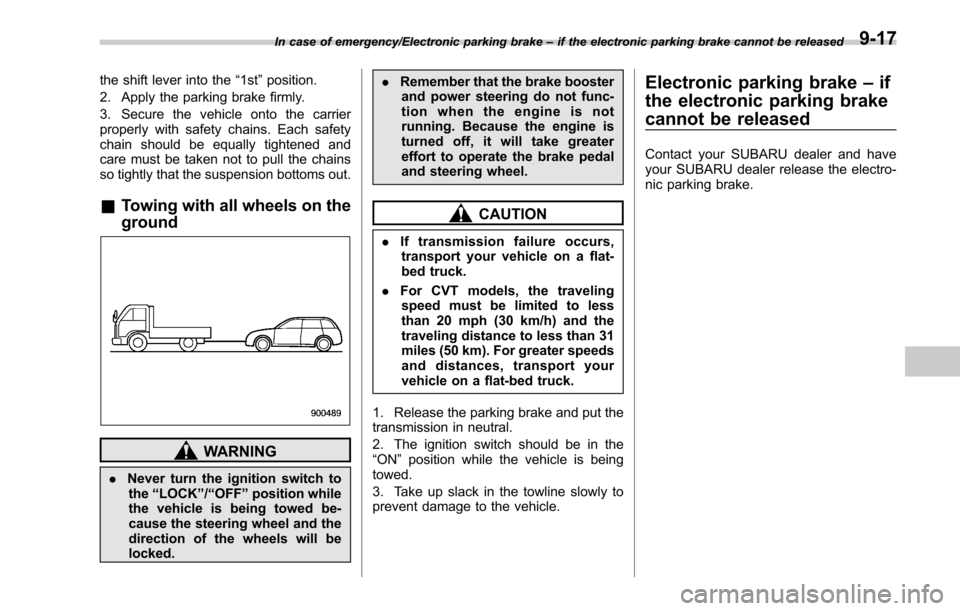
& Towing with all wheels on the
ground
WARNING
. Never turn the ignition switch to
the “LOCK ”/“ OFF ”position while
the vehicle is being towed be-
cause the steering wheel and the
direction of the wheels will be
locked. .
Remember that the brake booster
and power steering do not func-
tion when the engine is not
running. Because the engine is
turned off, it will take greater
effort to operate the brake pedal
and steering wheel.
CAUTION
. If transmission failure occurs,
transport your vehicle on a flat-
bed truck.
. For CVT models, the traveling
speed must be limited to less
than 20 mph (30 km/h) and the
traveling distance to less than 31
miles (50 km). For greater speeds
and distances, transport your
vehicle on a flat-bed truck.
1. Release the parking brake and put the
transmission in neutral.
2. The ignition switch should be in the
“ON ”position while the vehicle is being
towed.
3. Take up slack in the towline slowly to
prevent damage to the vehicle.
Electronic parking brake –if
the electronic parking brake
cannot be released
Contact your SUBARU dealer and have
your SUBARU dealer release the electro-
nic parking brake.
In case of emergency/Electronic parking brake –if the electronic parking brake cannot be released9-17
Page 493 of 610
In case of emergency/Rear gate (Outback)–if the rear gate cannot be opened
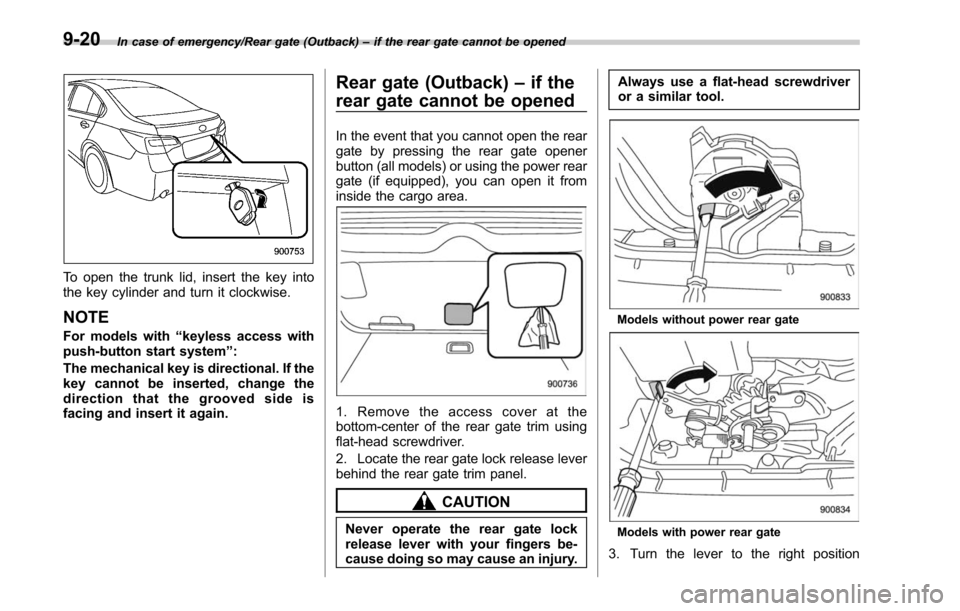
To open the trunk lid, insert the key into
the key cylinder and turn it clockwise.
NOTE
For models with “keyless access with
push-button start system ”:
The mechanical key is directional. If the
key cannot be inserted, change the
direction that the grooved side is
facing and insert it again.
Rear gate (Outback) –if the
rear gate cannot be opened
In the event that you cannot open the rear
gate by pressing the rear gate opener
button (all models) or using the power rear
gate (if equipped), you can open it from
inside the cargo area.
1. Remove the access cover at the
bottom-center of the rear gate trim using
flat-head screwdriver.
2. Locate the rear gate lock release lever
behind the rear gate trim panel.
CAUTION
Never operate the rear gate lock
release lever with your fingers be-
cause doing so may cause an injury. Always use a flat-head screwdriver
or a similar tool.
Models without power rear gate
Models with power rear gate
3. Turn the lever to the right position
9-20
Page 528 of 610

Tires and wheels
&Types of tires
You should be familiar with type of tires
present on your vehicle.
! All season tires
The factory-installed tires on your new
vehicle are all season tires.
All season tires are designed to provide
an adequate measure of traction, handling
and braking performance in year-round
driving including snowy and icy road
conditions. However all season tires do
not offer as much traction performance as
winter (snow) tires in heavy or loose snow
or on icy roads.
All season tires are identified by “ALL
SEASON ”and/or “M+S”(Mud & Snow) on
the tire sidewall.
! Summer tires
Summer tires are high-speed capability
tires best suited for highway driving under
dry conditions.
Summer tires are inadequate for driving
on slippery roads such as on snow-
covered or icy roads.
If you drive your vehicle on snow-covered
or icy roads, we strongly recommend the
use of winter (snow) tires.
When installing winter tires, be sure to replace all four tires.
!
Winter (snow) tires
Winter tires are best suited for driving on
snow-covered and icy roads. However
winter tires do not perform as well as
summer tires and all season tires on roads
other than snow-covered and icy roads.
& Tire pressure monitoring
system (TPMS) (if equipped)
The tire pressure monitoring system pro-
vides the driver with a warning message
by sending a signal from a sensor that is
installed in each wheel when tire pressure
is severely low. The tire pressure monitor-
ing system will activate only when the
vehicle is driven. Also, this system may
not react immediately to a sudden drop in
tire pressure (for example, a blow-out
caused by running over a sharp object).
If you adjust the tire pressures in a warm
garage and will then drive the vehicle in
cold outside air, the resulting drop in tire
pressures may cause the low tire pressure
warning light to illuminate. To avoid this
problem when adjusting the tire pressures
in a warm garage, inflate the tires to
pressures higher than those shown on the
tire placard. Specifically, inflate them by an
extra 1 psi (6.9 kPa, 0.07 kgf/cm
2) for
every difference of 10 8F (5.6 8C) between the temperature in the garage and the
temperature outside. By way of example,
the following table shows the required tire
pressures that correspond to various out-
side temperatures when the temperature
in the garage is 60
8F (15.6 8C).
Example:
Tire size: 225/55R17 97V, 225/50R18 95H
Standard tire pressures:
Front: 33 psi (230 kPa, 2.3 kgf/cm
2)
Rear: 32 psi (220 kPa, 2.2 kgf/cm2)
Garage temperature: 60 8F (15.6 8C)
Outside
temperature Adjusted pressure
[psi (kPa, kgf/cm2)]
Front Rear
30 8F( −18C) 36 (250, 2.5) 35 (240, 2.4)
10 8F( −12 8C) 38 (265, 2.65) 37 (255, 2.55)
−10 8F( −23 8C) 40 (280, 2.8) 39 (270, 2.7)
Example:
Tire size: 225/65R17 102H, 225/60R18
100H
Standard tire pressures:
Front: 35 psi (240 kPa, 2.4 kgf/cm
2)
Rear: 33 psi (230 kPa, 2.3 kgf/cm2)
Garage temperature: 60 8F (15.6 8C)
Maintenance and service/Tires and wheels
–CONTINUED –11-25
Page 549 of 610
Maintenance and service/Replacing bulbs
&Backup light
! Legacy
NOTE
It may be difficult to replace the bulbs.
We recommend that you have the bulbs
replaced by your SUBARU dealer if
necessary.
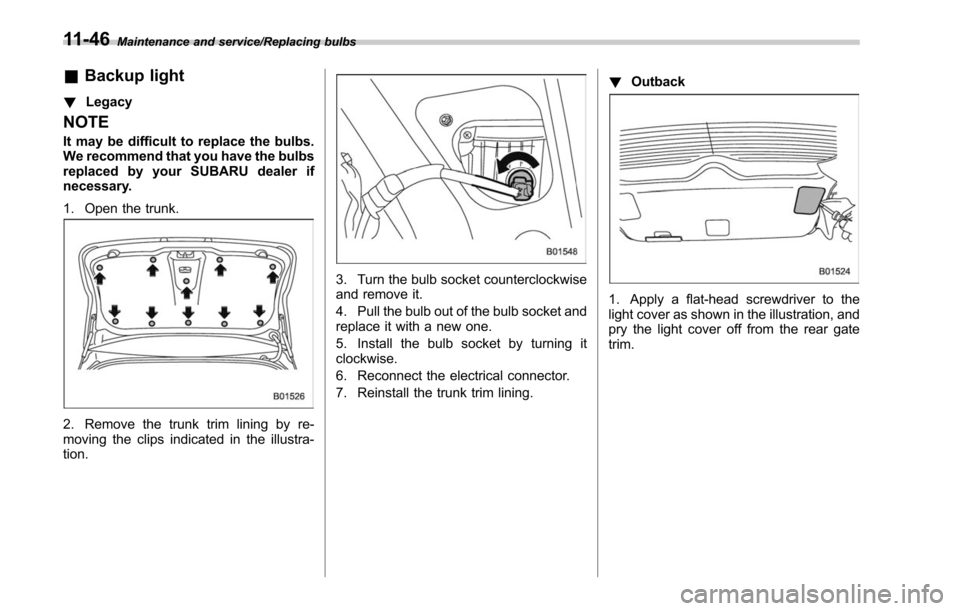
1. Open the trunk.
2. Remove the trunk trim lining by re-
moving the clips indicated in the illustra-
tion.
3. Turn the bulb socket counterclockwise
and remove it.
4. Pull the bulb out of the bulb socket and
replace it with a new one.
5. Install the bulb socket by turning it
clockwise.
6. Reconnect the electrical connector.
7. Reinstall the trunk trim lining. !
Outback
1. Apply a flat-head screwdriver to the
light cover as shown in the illustration, and
pry the light cover off from the rear gate
trim.
11-46
Page 552 of 610
&Door step light
CAUTION
Replacing the bulb could cause a
short circuit. Have the bulb replaced
by your SUBARU dealer.
&Cargo area light (Outback)
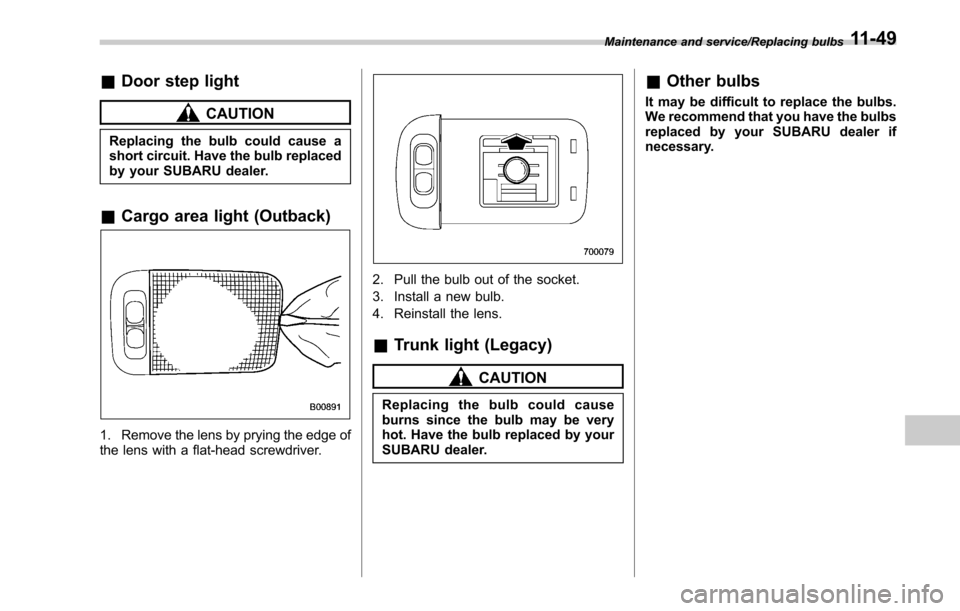
1. Remove the lens by prying the edge of
the lens with a flat-head screwdriver.
2. Pull the bulb out of the socket.
3. Install a new bulb.
4. Reinstall the lens.
&Trunk light (Legacy)
CAUTION
Replacing the bulb could cause
burns since the bulb may be very
hot. Have the bulb replaced by your
SUBARU dealer.
&Other bulbs
It may be difficult to replace the bulbs.
We recommend that you have the bulbs
replaced by your SUBARU dealer if
necessary.
Maintenance and service/Replacing bulbs11-49