2017 SUBARU LEGACY Gauge
[x] Cancel search: GaugePage 165 of 610

Instruments and controls/Meters and gauges
&Double trip meter
This meter displays the two trip meters
when the ignition switch is in the “ON”
position.
The trip meter shows the distance that the
vehicle has been driven since you last set
it to zero.
Trip reset switch
If you press the trip reset switch when the
ignition switch is in the “LOCK”/“OFF ”or
“ACC ”position, the odometer/trip meter
will light up. It is possible to switch
between the A trip meter and B trip meter
indications while the odometer/trip meter
is lit up. If you do not press the trip reset
switch within 10 seconds of illumination of
the odometer/trip meter, the odometer/trip
meter will turn off.
Also, if you open and close the driver ’s
door within 10 seconds of illumination of
the odometer/trip meter, the odometer/trip
meter will turn off.
The display can be switched as shown in
the following illustration by pressing the
trip reset switch.
To set the trip meter to zero, select the A
trip or B trip meter by pressing the trip
reset switch and keep the switch pressed
for more than 2 seconds.
CAUTION
To ensure safety, do not attempt to
change the function of the indicator
during driving, as an accident could
result.
NOTE
If the connection between the combina-
tion meter and battery is broken for any
reason such as vehicle maintenance or
fuse replacement, the data recorded on
the trip meter will be lost.
& Tachometer
The tachometer shows the engine speed
in thousands of revolutions per minute.
CAUTION
Do not operate the engine with the
pointer of the tachometer in the red
zone. In this range, fuel injection will
be cut by the engine control module
3-10
Page 166 of 610

to protect the engine from overrev-
ving. The engine will resume run-
ning normally after the engine speed
is reduced below the red zone.
NOTE
To protect the engine while the select
lever is in the“P ” or “N ” position (for
CVT models) or the shift lever is in the
neutral position (for MT models), the
engine is controlled so that the engine
speed may not become too high even if
the accelerator pedal is pressed hard.
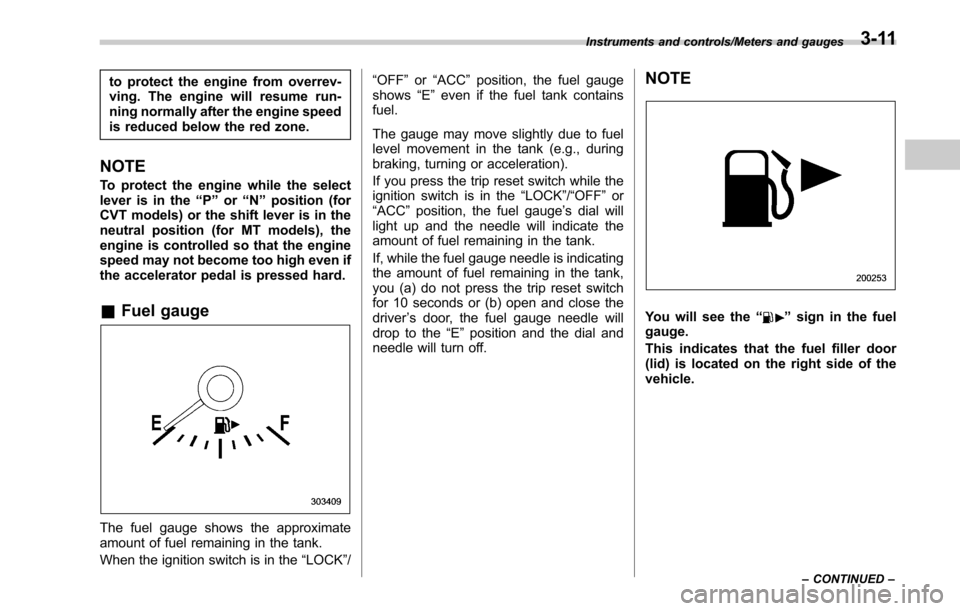
& Fuel gauge
The fuel gauge shows the approximate
amount of fuel remaining in the tank.
When the ignition switch is in the “LOCK”/ “OFF
”or “ACC ”position, the fuel gauge
shows “E”even if the fuel tank contains
fuel.
The gauge may move slightly due to fuel
level movement in the tank (e.g., during
braking, turning or acceleration).
If you press the trip reset switch while the
ignition switch is in the “LOCK”/“OFF ”or
“ACC ”position, the fuel gauge ’s dial will
light up and the needle will indicate the
amount of fuel remaining in the tank.
If, while the fuel gauge needle is indicating
the amount of fuel remaining in the tank,
you (a) do not press the trip reset switch
for 10 seconds or (b) open and close the
driver ’s door, the fuel gauge needle will
drop to the “E”position and the dial and
needle will turn off.
NOTE
You will see the “”sign in the fuel
gauge.
This indicates that the fuel filler door
(lid) is located on the right side of the
vehicle.
Instruments and controls/Meters and gauges
–CONTINUED –3-11
Page 167 of 610

Instruments and controls/Meters and gauges
&Temperature gauge
1) Normal operating range
The temperature gauge shows engine
coolant temperature when the ignition
switch is in the “ON”position.
The coolant temperature will vary in
accordance with the outside temperature
and driving conditions.
We recommend that you drive moderately
until the pointer of the temperature gauge
reaches near the middle of the range.
Engine operation is optimum with the
engine coolant at this temperature range
and high revving operation when the
engine is not warmed up enough should
be avoided.
CAUTION
If the pointer exceeds the normal
operating range, safely stop the
vehicle as soon as possible.
Refer to “Engine overheating ”F9-
13.
& ECO gauge
1) U.S. spec. models
2) Except U.S. spec. models
The ECO gauge shows the difference
between the average rate of fuel con-
sumption since the trip meter was last
reset and the current rate of fuel con-
sumption.
The ECO gauge indicates the current fuel efficiency as shown in the following chart.
Displayed unit
Needle position
“ +” side “-” side
MPG Better Poorer
l/100km Poorer Better
NOTE
.
The ECO gauge shows only an
approximate indication.
. After resetting the trip meter, the
average rate of fuel consumption is not
shown until driving 0.6 mile (1 km).
Until that time, the ECO gauge does not
operate.
3-12
Page 174 of 610

checking tire pressure. The tire
pressure should be checked peri-
odically (at least monthly) using a
tire gauge. After any change to tire
pressure(s), the tire pressure mon-
itoring system will not re-check tire
inflation pressures until the vehicle
is first driven more than 20 mph (32
km/h). After adjusting the tire pres-
sures, increase the vehicle speed to
at least 20 mph (32 km/h) to start the
TPMS re-checking of the tire infla-
tion pressures. If the tire pressures
are now above the severe low
pressure threshold, the low tire
pressure warning light should turn
off a few minutes later. Therefore, be
sure to install the specified size for
the front and rear tires.
&ABS warning light
CAUTION
.If any of the following conditions
occur, we recommend that you
have the ABS repaired at the first
available opportunity by your
SUBARU dealer.
– The warning light does not
illuminate when the ignition switch is turned to the
“ON ”
position.
– The warning light illuminates
when the ignition switch is
turned to the “ON ”position,
but it does not turn off even
after starting the vehicle.
– The warning light illuminates
during driving.
. When the warning light is on (and
brake system warning light is
off), the ABS function shuts
down; however, the conventional
brake system continues to oper-
ate normally.
The ABS warning light illuminates to-
gether with the brake system warning light
if the EBD system malfunctions. For
further details of the EBD system mal-
function warning, refer to “Brake system
warning light ”F 3-19.
NOTE
If the warning light behavior is as
described in the following conditions,
the ABS may be considered normal.
. The warning light illuminates right
after the engine is started but turns off
immediately, remaining off.
. The warning light remains illumi-
nated after the engine has been started, but it turns off while driving.
.
The warning light illuminates during
driving, but it turns off immediately and
remains off.
When driving with an insufficient battery
voltage such as when the engine is jump
started, the ABS warning light may illumi-
nate. This is due to the low battery voltage
and does not indicate a malfunction.
When the battery becomes fully charged,
the light will turn off.
&Brake system
warning light
WARNING
. Driving with the brake system
warning light on is dangerous.
This indicates your brake system
may not be working properly. If
the light remains illuminated,
have the brakes inspected by a
SUBARU dealer immediately.
. If at all in doubt about whether
the brakes are operating prop-
erly, do not drive the vehicle.
Have your vehicle towed to the
nearest SUBARU dealer for re-
pair.
. If the brake system warning light
illuminates, the electronic park-
Instruments and controls/Warning and indicator lights
–CONTINUED –3-19
Page 191 of 610

Instruments and controls/Multi information display
Multi information display
WARNING
Always pay adequate attention to
safe driving when operating the
multi information display while the
vehicle is in motion. When operation
of the multi information display
interferes with your ability to con-
centrate on driving, stop the vehicle
before performing operations on the
screen. Also, do not concentrate on
the display while driving. Doing so
may cause you to look away from
the road and could result in an
accident.
Various information will be shown on the
multi information display. Also, a warning
message will appear on the display if a
malfunction, etc. is detected. In addition,
several settings for the displayed content
can be performed.
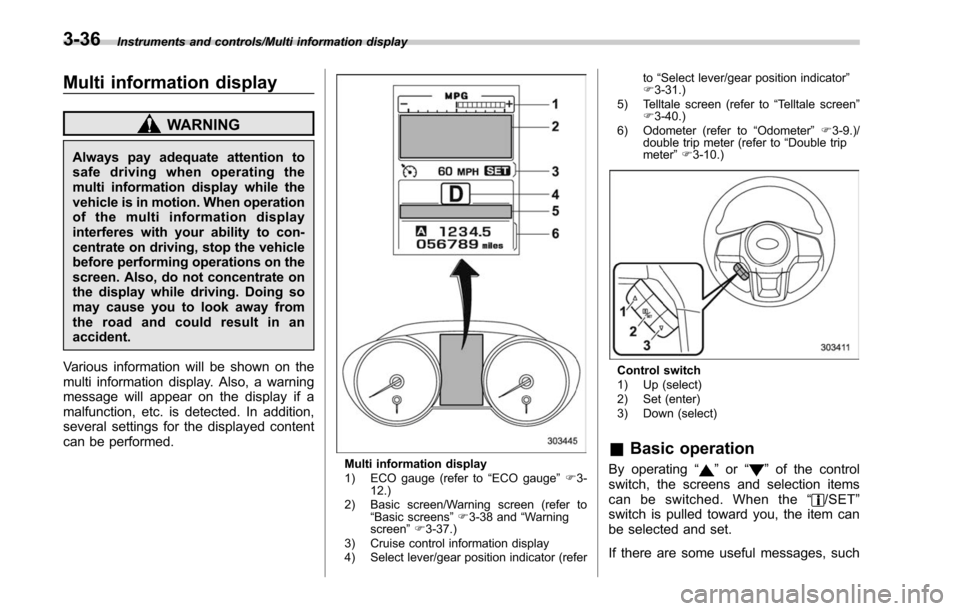
Multi information display
1) ECO gauge (refer to “ECO gauge ”F 3-
12.)
2) Basic screen/Warning screen (refer to “Basic screens ”F 3-38 and “Warning
screen ”F 3-37.)
3) Cruise control information display
4) Select lever/gear position indicator (refer to
“Select lever/gear position indicator ”
F 3-31.)
5) Telltale screen (refer to “Telltale screen ”
F 3-40.)
6) Odometer (refer to “Odometer ”F 3-9.)/
double trip meter (refer to “Double trip
meter” F3-10.)
Control switch
1) Up (select)
2) Set (enter)
3) Down (select)
& Basic operation
By operating “”or “”of the control
switch, the screens and selection items
can be switched. When the “
/SET”
switch is pulled toward you, the item can
be selected and set.
If there are some useful messages, such
3-36
Page 197 of 610

Instruments and controls/Multi information display
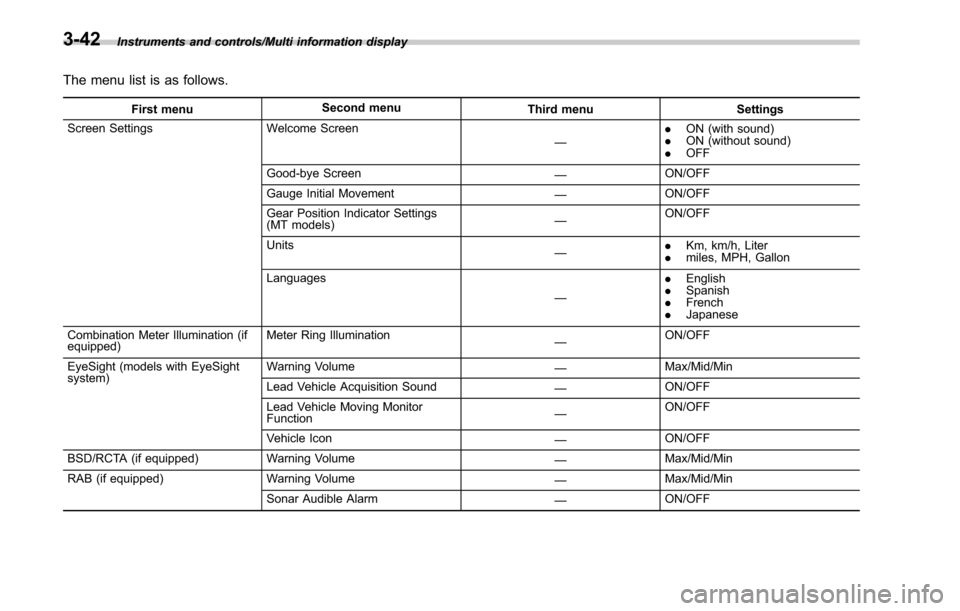
The menu list is as follows.
First menuSecond menu
Third menu Settings
Screen Settings Welcome Screen
—.
ON (with sound)
. ON (without sound)
. OFF
Good-bye Screen —ON/OFF
Gauge Initial Movement —ON/OFF
Gear Position Indicator Settings
(MT models) —ON/OFF
Units —.
Km, km/h, Liter
. miles, MPH, Gallon
Languages —.
English
. Spanish
. French
. Japanese
Combination Meter Illumination (if
equipped) Meter Ring Illumination
—ON/OFF
EyeSight (models with EyeSight
system) Warning Volume
—Max/Mid/Min
Lead Vehicle Acquisition Sound —ON/OFF
Lead Vehicle Moving Monitor
Function —ON/OFF
Vehicle Icon —ON/OFF
BSD/RCTA (if equipped) Warning Volume
—Max/Mid/Min
RAB (if equipped) Warning Volume
—Max/Mid/Min
Sonar Audible Alarm —ON/OFF
3-42
Page 199 of 610

Instruments and controls/Multi information display
!Screen Settings
After entering the “Screen Settings”menu,
select one of the following menus.
!Welcome Screen
The welcome screen can be activated or
deactivated. Select “On (with Sound)”to
activate the screen and sound. Select “On
(without Sound) ”to activate the screen
and deactivate the sound. Select “Off”to
deactivate the screen.
!Good-bye Screen
The Good-bye screen can be activated or
deactivated. Select “On”to activate the
screen. Select “Off ”to deactivate the
screen.
!Gauge Initial Movement
The movement of the meter needles and
gauge needles that occurs when the
ignition switch is turned to the “ON ”
position can be activated or deactivated.
Select “On”to activate. Select “Off”to
deactivate.
!Gear Position Indicator Settings
(MT models)
The gear position indicator light can be
activated or deactivated. Select “On”to
activate. Select “Off”to deactivate. !
Units
You can select the displayed units of the
distance, vehicle speed and volume.
Operate the “
”or “”switch on the
steering wheel to display the preferred
units. Then pull the “
/SET”switch to
select the displayed units.
!Languages
Operate the “
”or “”switch on the
steering wheel to display the preferred
language. Then pull the “
/SET”switch to
select the displayed language.
! Combination Meter Illumination (if
equipped)
After entering the “Combination Meter
Illumination ”menu, select the following
menu.
!Meter Ring Illumination
The illumination of the combination meter
rings can be activated or deactivated.
Select “On ”to activate the illumination.
Select “Off”to deactivate the illumination.
! EyeSight (models with EyeSight
system)
NOTE
For models with the EyeSight system,
refer to the Owner ’s Manual supple-
ment for the EyeSight system. After entering the
“EyeSight ”menu, select
one of the following menus.
!Warning Volume
The volume of the warning buzzer that
sounds when the EyeSight system is in
use can be set in 3 stages (“Max ”,“Mid ”
and “Min”).
! Lead Vehicle Acquisition Sound
When adaptive cruise control is used, the
buzzer that sounds under any of the
following conditions can be activated or
deactivated.
. A vehicle is detected in front
. Detection is not possible
Select “On”to activate the buzzer. Select
“Off ”to deactivate the buzzer.
! Lead Vehicle Moving Monitor
Function
When the lead vehicle moving monitor
function is operated, the buzzer that
sounds if a vehicle in front has started
can be activated or deactivated. Select
“On ”to activate the buzzer. Select “Off”to
deactivate the buzzer.
!Vehicle Icon
The vehicle icon indication can be acti-
vated or deactivated. Select “On ”to
activate. Select “Off”to deactivate.
3-44
Page 377 of 610

Starting and operating/Fuel
ping mechanism may not func-
tion, causing fuel to overflow the
tank and creating a fire hazard.
. Stop refueling when the auto-
matic stop mechanism on the
fuel nozzle activates. If you con-
tinue to add fuel, temperature
changes or other conditions
may cause fuel to overflow from
the tank and create a fire hazard.
6. Stop filling the tank after the fuel filler
pump automatically stops. Do not add any
more fuel.
7. Put the cap back on, turn it clockwise
until you hear a clicking noise. Be certain
not to catch the tether under the cap while
tightening.
CAUTION
Make sure that the cap is tightened
until it clicks to prevent fuel spillage
in the event of an accident.
8. Close the fuel filler lid completely.
CAUTION
If you spill any fuel on the painted
surface, rinse it off immediately.
Otherwise, the painted surface could be damaged.
NOTE
.
You will see the “”sign in the fuel
gauge. This indicates that the fuel filler
door (lid) is located on the right side of
the vehicle.
. If the fuel filler cap is not tightened
until it clicks or if the tether is caught
under the cap, the CHECK ENGINE
warning light/malfun ction indicator
light may illuminate. Refer to “CHECK
ENGINE warning light/Malfunction in-
dicator light ”F 3-16.
CAUTION
. Never add any cleaning agents to
the fuel tank. The addition of a
cleaning agent may cause da-
mage to the fuel system.
. After refueling, turn the cap to the
right until it clicks to ensure that
it is fully tightened. If the cap is
not securely tightened, fuel may
leak out while the vehicle is being
driven or fuel spillage could
occur in the event of an accident,
creating a fire hazard.
. Do not let fuel spill on the exterior
surfaces of the vehicle. Because
fuel may damage the paint, be
sure to wipe off any spilled fuel
quickly. Paint damage caused by
spilled fuel is not covered under
the SUBARU Limited Warranty.
. Always use a genuine SUBARU
fuel filler cap. If you use the
wrong cap, it may not fit, and
your fuel tank and emission con-
trol system may be damaged. It
could also lead to fuel spillage
and a fire.
. Immediately put fuel in the tank
whenever the low fuel warning
light illuminates. Engine misfires
7-6