2017 SUBARU FORESTER engine
[x] Cancel search: enginePage 270 of 634
Heated Steering Wheel sys-
tem (if equipped)
The Heated Steering Wheel system is a
function that warms the surface tempera-
ture of the steering wheel at the constant
temperature.
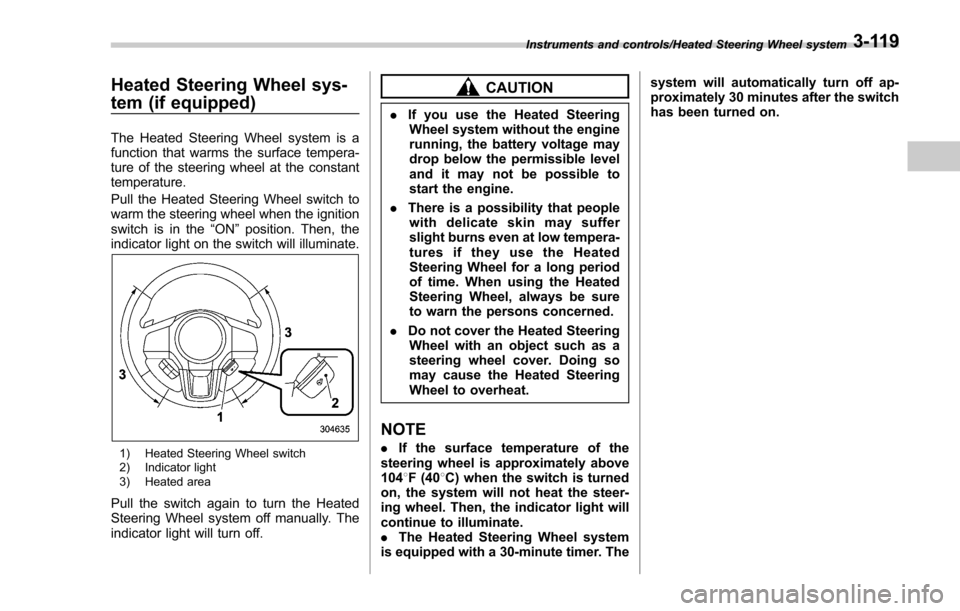
Pull the Heated Steering Wheel switch to
warm the steering wheel when the ignition
switch is in the“ON”position. Then, the
indicator light on the switch will illuminate.
1) Heated Steering Wheel switch
2) Indicator light
3) Heated area
Pull the switch again to turn the Heated
Steering Wheel system off manually. The
indicator light will turn off.
CAUTION
. If you use the Heated Steering
Wheel system without the engine
running, the battery voltage may
drop below the permissible level
and it may not be possible to
start the engine.
. There is a possibility that people
with delicate skin may suffer
slight burns even at low tempera-
turesiftheyusetheHeated
Steering Wheel for a long period
of time. When using the Heated
Steering Wheel, always be sure
to warn the persons concerned.
. Do not cover the Heated Steering
Wheel with an object such as a
steering wheel cover. Doing so
may cause the Heated Steering
Wheel to overheat.
NOTE
. If the surface temperature of the
steering wheel is approximately above
104 8F (40 8C) when the switch is turned
on, the system will not heat the steer-
ing wheel. Then, the indicator light will
continue to illuminate.
. The Heated Steering Wheel system
is equipped with a 30-minute timer. The system will automatically turn off ap-
proximately 30 minutes after the switch
has been turned on.
Instruments and controls/Heated Steering Wheel system3-119
Page 272 of 634

Ventilator control................................................. 4-2Center and side ventilators .................................. 4-2
Climate control panel.......................................... 4-3Type A ................................................................ 4-3
Type B ................................................................ 4-4
Type C ................................................................ 4-5
Type D ................................................................ 4-6
Automatic climate control operation (type
B, C and D) ....................................................... 4-7
Type B ................................................................ 4-7
Type C and D ...................................................... 4-7
Sensors .............................................................. 4-8
Manual climate control operation ...................... 4-8Airflow mode selection........................................ 4-8
Temperature control ............................................ 4-9
Fan speed control .............................................. 4-10
Air conditioner control ....................................... 4-10
Air inlet selection ............................................... 4-10
Defrosting........................................................... 4-11Type A and B..................................................... 4-11
Type C............................................................... 4-11
Type D............................................................... 4-11
Operating tips for heater and air
conditioner ...................................................... 4-12
Cleaning ventilation grille ................................... 4-12
Efficient cooling after parking in direct sunlight ........................................................... 4-12
Lubrication oil circulation in the refrigerant circuit .............................................................. 4-12
Checking air conditioning system before summer season ............................................................ 4-12
Cooling and dehumidifying in high humidity and low temperature weather conditions ................. 4-12
Air conditioner compressor shut-off when engine is heavily loaded .............................................. 4-12
Refrigerant for your climate control system ... ..... 4-12
Air filtration system........................................... 4-13Replacing an air filter ......................................... 4-13
Climate control
4
Page 278 of 634
Automatic climate control
operation (type B, C and D)
When this mode is selected, the fan
speed, airflow distribution, air-inlet control,
and air conditioner compressor operation
are automatically controlled. To activate
this mode, perform the following.
NOTE
.Operate the automatic climate con-
trol system when the engine is running.
. Even when cooling is not necessary,
setting the temperature much lower
than the current outlet air temperature
turns on the air conditioner compres-
sor automatically and the “A/C ”indi-
cator light on the control panel illumi-
nates.
& Type B
1. Turn the airflow mode selection dial
and fan speed control dial to the “AUTO”
position.
2. Set the preferred temperature using
the temperature control dial.
NOTE
. Each function can be individually
set to the AUTO mode independently of
the other functions. Any function set to the AUTO mode is controlled automa-
tically. Any function not set to the
AUTO mode can be manually adjusted
as desired.
.
The controllable temperature range
may vary depending on the regional
specifications of the vehicle.
3. To turn off the climate control system,
turn the fan speed control dial to the “OFF”
position. Then the air inlet selection will be
set as follows.
. when the AUTO mode is selected: OFF
(outside air)
. when the AUTO mode is not selected:
the mode that was selected when turning
off the climate system will be selected.
& Type C and D
1. Depress the “AUTO ”button. The
indicator light “FULL AUTO ”on the display
illuminates.
2. Set the preferred temperature using
the temperature control dial.
NOTE
. The controllable temperature range
may vary depending on the regional
specifications of the vehicle.
. During FULL AUTO mode operation,
a small amount of air may flow from the
foot outlets when ventilation mode is displayed.
.
If you operate any of the buttons on
the control panel other than the “OFF ”
button, rear window defogger button
and temperature control dial(s) during
FULL AUTO mode operation, the
“ FULL ”indicator light on the control
panel will turn off and the “AUTO ”
indicator light will remain illuminated.
You can then manually control the
system as desired using the button
you operated. To change the system
back to the FULL AUTO mode, press
the “AUTO ”button.
3. To turn off the climate control system,
press the “OFF ”button. Then the air inlet
selection will be set to OFF (outside air).
Climate control/Automatic climate control operation (type B, C and D)
–CONTINUED –4-7
Page 281 of 634
Climate control/Manual climate control operation
!“DUAL ”mode (type D)
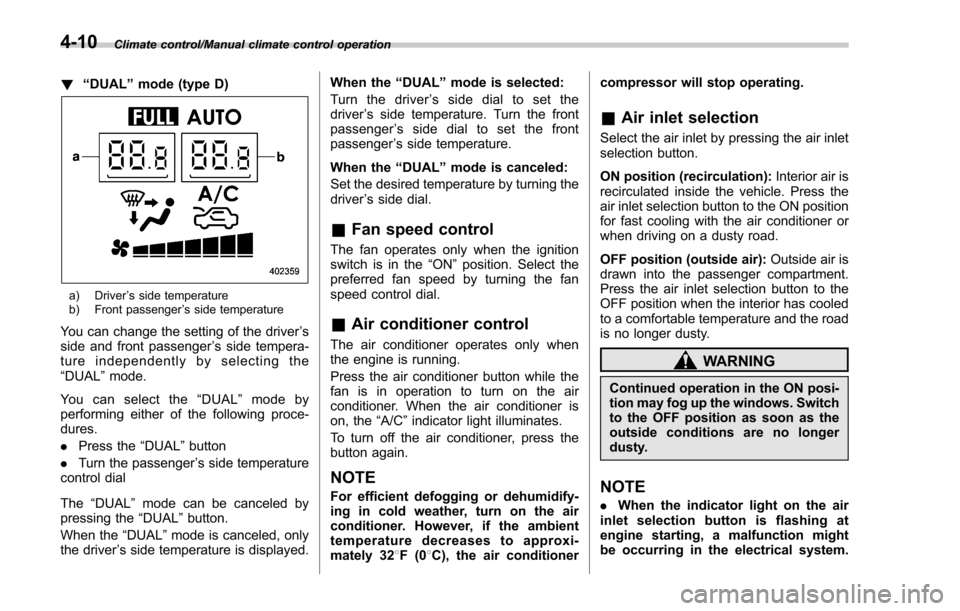
a) Driver ’s side temperature
b) Front passenger ’s side temperature
You can change the setting of the driver ’s
side and front passenger ’s side tempera-
ture independently by selecting the
“DUAL ”mode.
You can select the “DUAL ”mode by
performing either of the following proce-
dures.
. Press the “DUAL”button
. Turn the passenger ’s side temperature
control dial
The “DUAL ”mode can be canceled by
pressing the “DUAL”button.
When the “DUAL”mode is canceled, only
the driver ’s side temperature is displayed. When the
“DUAL ”mode is selected:
Turn the driver ’s side dial to set the
driver ’s side temperature. Turn the front
passenger ’s side dial to set the front
passenger ’s side temperature.
When the “DUAL ”mode is canceled:
Set the desired temperature by turning the
driver ’s side dial.
& Fan speed control
The fan operates only when the ignition
switch is in the “ON”position. Select the
preferred fan speed by turning the fan
speed control dial.
& Air conditioner control
The air conditioner operates only when
the engine is running.
Press the air conditioner button while the
fan is in operation to turn on the air
conditioner. When the air conditioner is
on, the “A/C ”indicator light illuminates.
To turn off the air conditioner, press the
button again.
NOTE
For efficient defogging or dehumidify-
ing in cold weather, turn on the air
conditioner. However, if the ambient
temperature decreases to approxi-
mately 32 8F(0 8C), the air conditioner compressor will stop operating.
&
Air inlet selection
Select the air inlet by pressing the air inlet
selection button.
ON position (recirculation): Interior air is
recirculated inside the vehicle. Press the
air inlet selection button to the ON position
for fast cooling with the air conditioner or
when driving on a dusty road.
OFF position (outside air): Outside air is
drawn into the passenger compartment.
Press the air inlet selection button to the
OFF position when the interior has cooled
to a comfortable temperature and the road
is no longer dusty.
WARNING
Continued operation in the ON posi-
tion may fog up the windows. Switch
to the OFF position as soon as the
outside conditions are no longer
dusty.
NOTE
. When the indicator light on the air
inlet selection button is flashing at
engine starting, a malfunction might
be occurring in the electrical system.
4-10
Page 283 of 634

Climate control/Operating tips for heater and air conditioner
Operating tips for heater and
air conditioner
&Cleaning ventilation grille
1) Front ventilation inlet grille
Always keep the front ventilation inlet grille
free of snow, leaves, or other obstructions
to ensure efficient heating and defrosting.
Since the condenser is located in front of
the radiator, this area should be kept clean
because cooling performance is impaired
by any accumulation of insects and leaves
on the condenser.
&Efficient cooling after parking
in direct sunlight
After parking in direct sunlight, drive with
the windows open for a few minutes to allow outside air to circulate into the
heated interior. This results in quicker
cooling by the air conditioner. Keep the
windows closed during the operation of
the air conditioner for maximum cooling
efficiency.
&
Lubrication oil circulation in
the refrigerant circuit
Operate the air conditioner compressor at
a low engine speed (at idle or low driving
speeds) a few minutes each month during
the off-season to circulate its oil.
&Checking air conditioning
system before summer sea-
son
Check the air conditioner unit for refriger-
ant leaks, hose conditions, and proper
operation each spring. Have the air con-
ditioning system checked by your
SUBARU dealer.
&Cooling and dehumidifying in
high humidity and low tem-
perature weather conditions
Under certain weather conditions (high
relative humidity, low temperatures, etc.) a
small amount of water vapor emission
from the air outlets may be noticed. This
condition is normal and does not indicate any problem with the air conditioning
system.
&
Air conditioner compressor
shut-off when engine is
heavily loaded
To improve acceleration and gas mileage,
the air conditioner compressor is designed
to temporarily shut off during air condi-
tioner operation whenever the accelerator
is fully depressed such as during rapid
acceleration or when driving up a steep
incline.
&Refrigerant for your climate
control system
1) Air conditioner label
Your air conditioner uses ozone friendly
4-12
Page 289 of 634
Audio/Antenna
Antenna
&Roof antenna
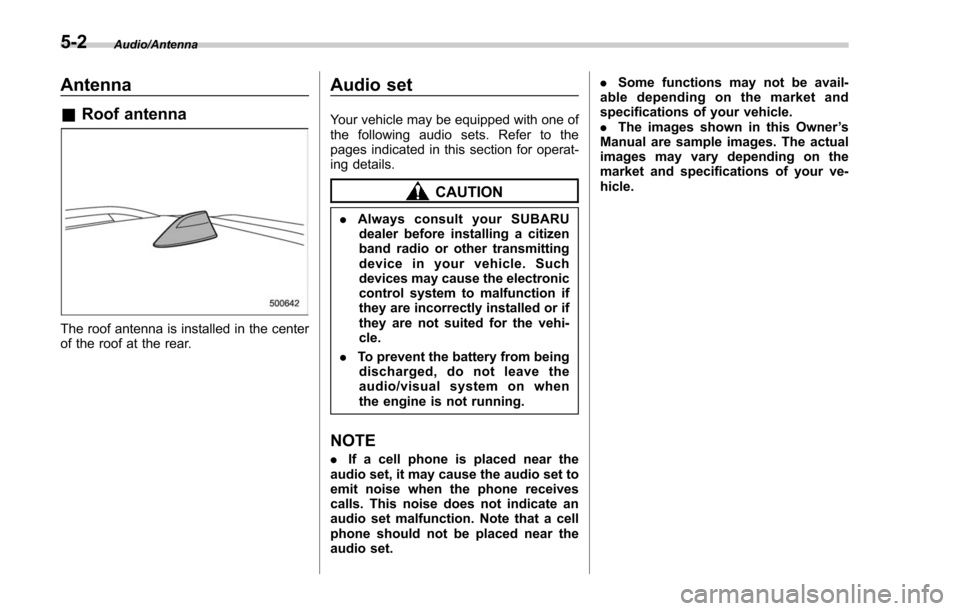
The roof antenna is installed in the center
of the roof at the rear.
Audio set
Your vehicle may be equipped with one of
the following audio sets. Refer to the
pages indicated in this section for operat-
ing details.
CAUTION
. Always consult your SUBARU
dealer before installing a citizen
band radio or other transmitting
device in your vehicle. Such
devices may cause the electronic
control system to malfunction if
they are incorrectly installed or if
they are not suited for the vehi-
cle.
. To prevent the battery from being
discharged, do not leave the
audio/visual system on when
the engine is not running.
NOTE
. If a cell phone is placed near the
audio set, it may cause the audio set to
emit noise when the phone receives
calls. This noise does not indicate an
audio set malfunction. Note that a cell
phone should not be placed near the
audio set. .
Some functions may not be avail-
able depending on the market and
specifications of your vehicle.
. The images shown in this Owner ’s
Manual are sample images. The actual
images may vary depending on the
market and specifications of your ve-
hicle.
5-2
Page 301 of 634
Audio/Audio set
&Basic information before use
WARNING
When the vehicle is stopped with the
engine running, always apply the
parking brake for safety. Failure to
do so may result in loss of control of
your vehicle and cause an accident
or serious injury.
CAUTION
. To prevent damaging the screen,
touch the screen keys with your
finger lightly.
. Wipe off fingerprints using a
glass cleaning cloth. Do not use
chemical cleaners to clean the
screen, as they may damage the
touch screen. !
Touch screen gestures
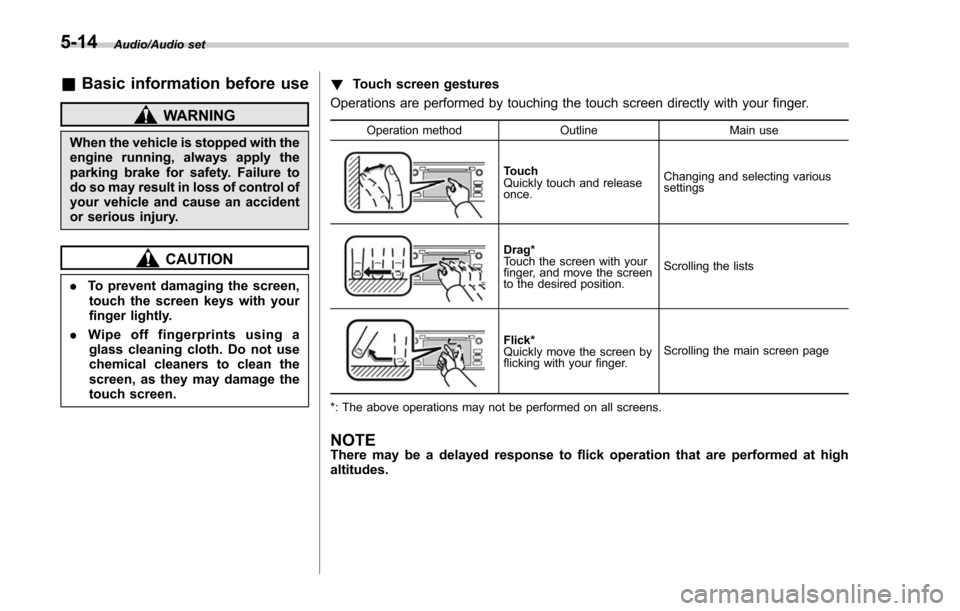
Operations are performed by touching the touch screen directly with your finger.
Operation method OutlineMain use
Touch
Quickly touch and release
once.Changing and selecting various
settings
Drag*
Touch the screen with your
finger, and move the screen
to the desired position.
Scrolling the lists
Flick*
Quickly move the screen by
flicking with your finger.
Scrolling the main screen page
*: The above operations may not be performed on all screens.
NOTEThere may be a delayed response to flick operation that are performed at high
altitudes.
5-14
Page 304 of 634
only the first two connected devices
will be recognized.
&Basic operation
This section describes some of the basic
features of the audio/visual system. Some
information may not pertain to your sys-
tem.
Your audio/visual system works when the
ignition switch is turned to the “ACC”or
“ON ”position.
CAUTION
To prevent the battery from being
discharged, do not leave the audio/
visual system on longer than neces-
sary when the engine is not running.
NOTE
Some functions can also be operated
by using the voice command system.
For details, refer to “Voice command
system ”F 5-80. !
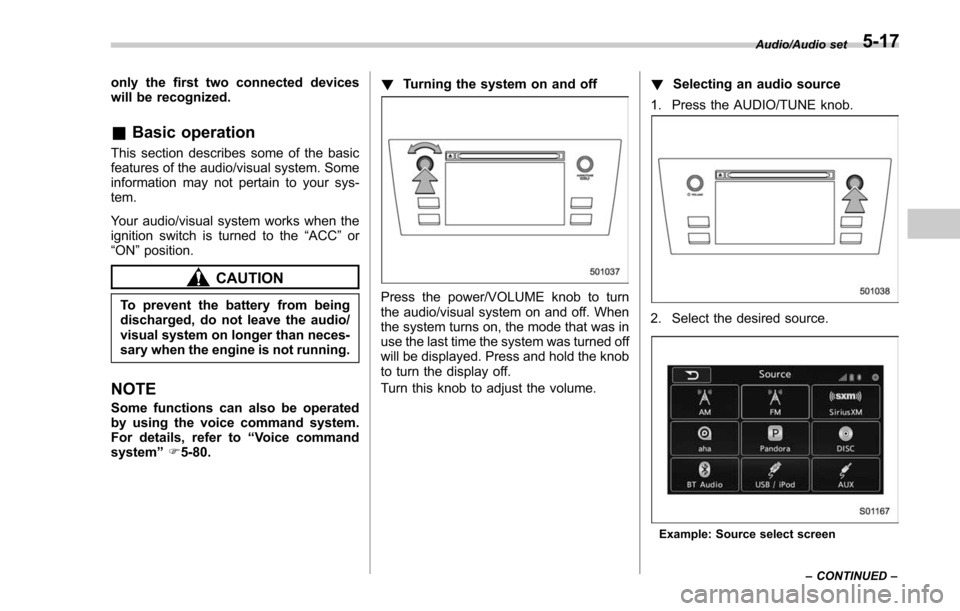
Turning the system on and off
Press the power/VOLUME knob to turn
the audio/visual system on and off. When
the system turns on, the mode that was in
use the last time the system was turned off
will be displayed. Press and hold the knob
to turn the display off.
Turn this knob to adjust the volume. !
Selecting an audio source
1. Press the AUDIO/TUNE knob.
2. Select the desired source.
Example: Source select screen Audio/Audio set
–CONTINUED –
5-17